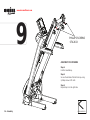
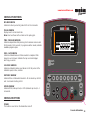
Ironman Fitness ACCLAIM IM-T7 Owner's manual
- Category
- Treadmills
- Type
- Owner's manual

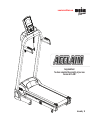
Model Name : ACCLAIM
Serial Number :__________
Serial Number can be found at
the above specified location.
100374
09/11 Rev 4.0
Owner’s Manual
Customer Service
(800) 750-4766
Manufactured By:
Ironman Fitness
4009 Distribution Drive
Suite 250
Garland, TX 75041
Read all precautions and instruc-
tions in this manual before using
this equipment.
CAUTION
Ironman ACCLAIM
ENVY

www.ironmanfitness.com
2 Table of Contents
Table of Contents
Assembly
Console Information
Workout Information
Troubleshooting
Parts Information
Warranty
2
4
18
27
31
37
43
TABLE OF CONTENTS
Ironman series
M
ODEL: ACCLAIM
QUESTIONS?
CALL
800-750-4766
Monday - Friday
8:30 am -5:30 pm Central Time
THANK YOU for making this unit a part of your exercise
program. Ironman Fitness assures the very best in value,
appearance, durability and biomechanics.
This manual will guide you through the assembly pro-
cess. If at any time you are having trouble with the
assembly or use of this product, then please contact us
at our Ironman Fitness Help line. We have trained ser-
vice technicians on site to take care of you, our valued
customer.
DISCLAIMER:
Ironman Fitness is not responsible for the misuse of any
of its products or for any injury sustained while using any
Ironman Fitness product. The consumer uses any or all
of Ironman Fitness Products at their own risk.
REGISTRATION CARD
To avoid unnecessary delays in warranty parts and to insure that a permanent record
of your purchase is on file with our company, be sure to send in the warranty registra-
tion card or register on-line at www.ironmanfitness.com within 10 days of purchase.
Thank you for purchasing the Ironman Fitness ACCLAIM! The quality product you
have chosen was designed to meet your needs for cardiovascular exercise. Before
you start, please read the Owner’s Manual and become familiar with the operation of
your new unit. Remember to take time to perform stretching exercises, provided in
this manual, to help avoid injury. If you are taking medication, consult your physician
to see what effect the medication will have on your exercise heart rate. If you have
heart problems, you are not active, and/or are over the age of 35 years, do not use
the pre-set programs or start an exercise program without rst contacting and receiv-
ing approval from your physician. To avoid the risk of electrical shock, always keep the
console dry. Do not spill liquids on the console.
Thank You for making this unit a part of your exercise program. Ironman Fitness
assures the very best in value, appearance, durability and biomechanics.
This manual will guide you through the assembly process. If at any time you are hav-
ing trouble with the assembly or use of this product, then please contact us at our
Ironman Fitness Help line. We have trained service technicians on site to take care of
you, our valued customer.
THANK YOU

www.ironmanfitness.com
3Safety Information
WARNING!
Before using this treadmill or starting any exercise program, consult your physician. This is especially important for persons
over the age of 35 and or persons with pre-existing health problems. The manufacturer or distributor assumes no responsibility
for personal injury or property damage sustained by or through the use of this product. To reduce the risk of electrical shock,
burns, fire, or other possible injuries to the user, it is important to review this manual and the following precautions before operation.
SAFETY PRECAUTIONS AND TIPS:
1. Always secure Safety Key firmly to waistband.
2.
It is the owner’s responsibility to ensure that all users of this treadmill have read the Owner’s Manual and are familiar with
warnings and safety precautions.
3. This treadmill has a user maximum capacity of 300 pounds.
4. The treadmill should only be used on a level surface and is intended for indoor use only. The treadmill should not be placed in a
garage, patio, or near water and should never be used while you are wet. Keys recommends a treadmill mat be placed under the
treadmill to protect floor or carpet and for easier cleaning.
5. Follow safety information in regard to plugging in your treadmill. Keep the power cord away from the incline wheels and do not run
the power cord underneath your treadmill. Do not operate the treadmill with a damaged or frayed power cord.
6. Wear comfortable, good-quality walking or running shoes and appropriate clothing. Do not use the treadmill with bare feet, sandals,
socks or stockings.
7. Always straddle the belt and allow it to start moving before stepping onto the belt.
8. Hold on to handrail when adjusting speed or other controls.
9. Always examine your treadmill before using to ensure all parts are in working order.
10. Allow the belt to fully stop before dismounting.
11. Pets should never be allowed near or on the treadmill.
12. Close supervision is necessary when this appliance is used by or near children, invalids or disabled persons.
13. Never operate the treadmill where oxygen is being administered, or where aerosol products are being used.
14. Never insert any object or body parts into any opening.
15. For safety and to prevent damage to your treadmill, no more than one person should use the treadmill at a time.
16. Always unplug the treadmill before cleaning and/or servicing. Service to your treadmill should only be performed by an authorized
service representative, unless authorized and/or instructed by the manufacturer
17. Failure to follow these instructions will void the treadmill warranty.
18. Never leave the treadmill unattended when plugged in. Unplug from outlet when not in use and before service or maintenance.
19. Always unplug this appliance immediately after using and before cleaning. To disconnect, turn all controls to the off position, then
remove plug from outlet.

4
www.ironmanfitness.com
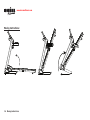
Assembly

www.ironmanfitness.com
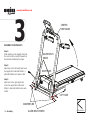
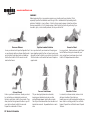
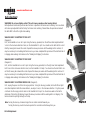
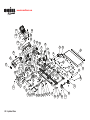
5Parts Identifier
Prior to assembly, remove components from the box and verify that all the listed parts
were supplied.
REAR WHEEL
LATCH SET
POWER CORD
ADJUST SUPPORT
BOTTLE HOLDER
END CAP
WALKING BELT
FRONT WHEEL
UPRIGHT
HANDLE BAR
REED SWITCH / SAFETY KEY
CONSOLE
END CAP LEFT
END CAP RIGHT
RIGHT FENDER OUTSIDE
RIGHT FENDER INSIDE
LEFT FENDER OUTSIDE
LEFT FENDER INSIDE
BOTTLE HOLDER
SAFETY KEY
ALLEN BOLTS M8X50
ALLEN BOLTS M8X15
PHILLIPS SCREWS M6X15
WASHERS Ø6
ALLEN WRENCH
PHILLIPS SCREWS M4X12
PHILLIPS SCREWS ST4.2X13
WASHERS Ø8

www.ironmanfitness.com
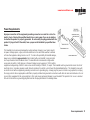
Important Information6 Assembly
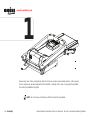
1
Unpack all parts and place them in a clear area. Be sure to remove all packing material.
Remove top cover of box, and break the sides of the box to create a level assembly surface. After opening
the box, remove any packing material from the treadmill. Carefully cut the strap surrounding the treadmill,
only while the treadmill is laying flat.
NOTE: Do not remove unit from box until it has been fully assembled.

www.ironmanfitness.com
Important Information 7
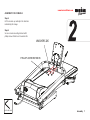
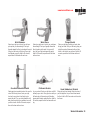
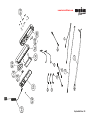
Assembly
WASHERS Ø6
PHILLIPS SCREWS M6X15
ALLEN WRENCH
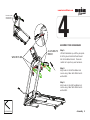
ASSEMBLY FOR CONSOLE
Step 1:
Lift the console up carefully in the direction
indicated by this image.
Step 2:
Secure console mounting bracket with 3
phillips screws M6x15 and 3 washers Ø6.

Important Information
www.ironmanfitness.com
8
Assembly
3
ALLEN BOLTS M8X50
ALLEN BOLTS
M8X15
WASHERS Ø8
CENTER
CROSSBAR
LEFT SIDE
RIGHT SIDE
ALLEN WRENCH
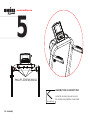
ASSEMBLY FOR UPRIGHTS
Step 1:
While standing on the treadmill, hold onto
the center cross bar and lift it upwards in
the direction indicated by the image.
Step 2:
Align holes on the left upright and secure
the upright with 2 allen bolts M8x15, 2
allen bolts M8x50 and 4 washers Ø8.
Step 3:
Align holes on the right upright and
secure the upright with 2 allen bolts
M8x15, 2 allen bolts M8x50 and 4 wash-
ers Ø8.

www.ironmanfitness.com
Important Information 9
Assembly
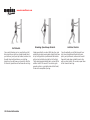
4
Please be careful
not to pinch the
wire harnesses
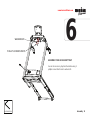
ASSEMBLY FOR HANDLEBARS
Step 1:
Lift both handlebars up until they are paral-
lel to the ground and slide them forward
into the handlebar bracket. Please be
careful not to pinch any wire harnesses.
Step 2:
Align holes on the left handlebar and
secure using 4 allen bolts M8x15 and 4
washers Ø8.
Step 3:
Align holes on the right handlebar and
secure using 4 allen bolts M8x15 and 4
washers Ø8.
ALLEN BOLTS
M8X15
WASHERS Ø8
ALLEN WRENCH

Important Information
www.ironmanfitness.com
10
Assembly
5
PHILLIPS SCREWS M4X12
ALLEN WRENCH
ASSEMBLY FOR ACCESSORY TRAY
Locate the accessory tray and secure to
the crossbar using 4 phillips screws M4x12.

www.ironmanfitness.com
Important Information 11
6
Assembly
WASHERS Ø6
PHILLIPS SCREWS M6X15
PHILLIPS SCREWS M4X12
ASSEMBLY FOR ACCESSORY TRAY
Secure the accessory tray from the bottom using 2
phillips screws M6x15 and 2 washers Ø6
ALLEN WRENCH

www.ironmanfitness.com
12
7
Assembly
PHILLIPS SCREWS M4X12
LEFT INSIDE
FENDER
RIGHT OUTER
FENDER
RIGHT INSIDE
FENDER
LEFT OUTER
FENDER
ASSEMBLY FOR FENDERS
Step 1:
Slide left inside fender onto the unit.
Step 2:
Attach the left outside fender onto the left
inside fender, aligning them at the screw
holes.
Step 3:
Secure with 3 phillips screws M4x12.
Step 4:
Repeat steps 1-3 with right fender.
ALLEN WRENCH

www.ironmanfitness.com
13Assembly
8
PHILLIPS SCREWS M4X12
REAR VIEW
ASSEMBLY FOR FENDERS
Step 1:
Locate right end cap and secure to the unit
using phillips screw M4x12.
Step 2:
Repeat step 1 with left end cap.
ALLEN WRENCH

www.ironmanfitness.com
14 Assembly
9
PHILLIPS SCREWS
ST4.2X13
ASSEMBLY FOR FENDERS
Step 1:
Fold the treadmill up.
Step 2:
Secure the bottom of the left end cap using
2 phillips screws ST4.2x13.
Step 3:
Repeat step 2 on the right side.
ALLEN WRENCH

www.ironmanfitness.com
15Assembly
Congratulations!
You have completed the assembly of your new
Ironman ACCLAIM!

www.ironmanfitness.com
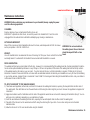
16 Moving Instructions
Moving Instructions:

www.ironmanfitness.com
17Power requirements
Power Requirements
Improper connection of the equipment grounding connector can result in a risk of an
electric shock. Check with a qualified electrician or service man if you are in doubt as
to whether the product is properly grounded. Do not modify the plug provided with the
product. If plug will not fit the outlet, have a proper outlet installed by a qualified elec-
trician.
This treadmill can be seriously damaged by sudden voltage changes in your home’s electri-
cal power. Voltage spikes, surges, and noise interference can result from weather conditions
or from other appliances being turned on or off. To reduce the possibility of treadmill damage,
always use a dedicated surge protector (not included) with your treadmill. Surge protectors
can be purchased at most hardware stores. The manufacturer recommends a single outlet
surge protector with UL 1449 rating as a Transient Voltage Surge Suppressor (TVSS) with UL
suppressed voltage rating of 400V or less and an electrical rating of 120VAC, 15 amps. This treadmill must be grounded to reduce the risk of
electrical shock. Grounding provides a path of least resistance for electric current should the treadmill malfunction. This treadmill comes with
an electrical cord with an equipment-grounding conductor and a grounding plug. Always plug the power cord into a surge protector, and plug
the surge protector into an appropriate outlet that is properly installed and grounded in accordance with all local codes and ordinances. Do not
connect other equipment to the surge protector or this could cause permanent damage to your treadmill. This product is for use on a nominal
120-volt circuit and has a grounding plug that looks like the plug illustrated in the drawing below.

Important Information18
www.ironmanfitness.com
Console Information

www.ironmanfitness.com
Important Information 19
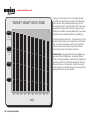
CONSOLE FUNCTIONS
INCLINE WINDOW
Indicates incline in percent of grade 0-12% in 0.5 increments.
PULSE WINDOW
Displays user’s current heart rate.
Note: User must have both on hands on the pulse grips.
TIME / PROGRAM WINDOW
Indicates elapsed time after pressing start in minutes and seconds
(0-99 minutes, 0-59 seconds). In program selection mode, indicates
available program option.
PACE / LAP WINDOW
Indicates estimated amount of time needed to complete 1 Mile
based on current speed. Indicates the lap count and displays
which lap you are on.
CALORIES WINDOW
Indicates estimated calories used based on 150 lb. person at the
indicated speed, incline, and time.
DISTANCE WINDOW
Indicates Miles or Kilometers traveled in .01 increments up to 9.99
and .1 increments starting at 10.0.
SPEED WINDOW
Indicates MPH (miles per hour) or KPH (kilometer per hour) in .1
increments.
CONSOLE BUTTONS
POWER
This button is used to turn the treadmill on and off.
Console Information
M P H
K M /H
D I S T A N C E
L A P P A C E
I N C L I N E
S P E E D
T I M E P R O G R A M
C A L OR I E S
P U L S E
M
K

Important Information
www.ironmanfitness.com
20
START/STOP
This button is used to start or stop the current program.
PAUSE
This button is used to stop your workout temporarily and continue from where you left off when you are ready.
WARNING: THE TREADMILL BELT WILL RESUME AT THE SPEED THE TREADMILL WAS MOVING AT BEFORE PAUSING.
ENTER
This button is used to confirm selection settings, such as time, distance, calories, and pulse.
PROGRAM UP AND DOWN
These buttons are used to cycle through to the desired program options.
INCLINE + and -
These buttons are used to adjust the incline value during the workout.
SPEED + and -
These buttons are used to adjust the speed of the treadmill during workout. These buttons are also used to adjust the values when setting up your
workout.
PROGRAM INSTRUCTIONS
QUICK START / MANUAL MODE (P1)
1. Plug into a surge protector outlet. Attach the Safety Key to the treadmill console.
2. Stand on the treadmill and straddle belt. Attach safety key clip to your clothes.
3. Press POWER button. There will be an eight (8) second delay after pressing the POWER button before data can be entered.
4. Press START/STOP button. Belt will begin to move after 4 seconds. Step on belt slowly after the belt starts moving. Speed or incline may be
adjusted by using the appropriate + (increase) or – (decrease) button.
5. To end your workout, press START/STOP button. Belt will gradually slow down to zero.
6. To pause your workout, press PAUSE.
7. To re-start after pausing: Press the PAUSE button.
PROGRAM MODE
Plug treadmill into a surge protector outlet. Attach the Safety Key on to the treadmill console.
1. Stand on the treadmill and straddle belt. Attach safety key clip to your clothes.
2. Press POWER button. There will be an eight (8) second delay before data can be entered.
Console Information
Page is loading ...
Page is loading ...
Page is loading ...
Page is loading ...
Page is loading ...
Page is loading ...
Page is loading ...
Page is loading ...
Page is loading ...
Page is loading ...
Page is loading ...
Page is loading ...
Page is loading ...
Page is loading ...
Page is loading ...
Page is loading ...
Page is loading ...
Page is loading ...
Page is loading ...
Page is loading ...
Page is loading ...
Page is loading ...
Page is loading ...
Page is loading ...
-
 1
1
-
 2
2
-
 3
3
-
 4
4
-
 5
5
-
 6
6
-
 7
7
-
 8
8
-
 9
9
-
 10
10
-
 11
11
-
 12
12
-
 13
13
-
 14
14
-
 15
15
-
 16
16
-
 17
17
-
 18
18
-
 19
19
-
 20
20
-
 21
21
-
 22
22
-
 23
23
-
 24
24
-
 25
25
-
 26
26
-
 27
27
-
 28
28
-
 29
29
-
 30
30
-
 31
31
-
 32
32
-
 33
33
-
 34
34
-
 35
35
-
 36
36
-
 37
37
-
 38
38
-
 39
39
-
 40
40
-
 41
41
-
 42
42
-
 43
43
-
 44
44


Ironman Fitness ACCLAIM IM-T7 Owner's manual
- Category
- Treadmills
- Type
- Owner's manual
Ask a question and I''ll find the answer in the document
Finding information in a document is now easier with AI
Related papers
-
Ironman Fitness Ironman series User manual
-
Ironman Fitness Treadmill HT901 User manual
-
-
-
-
-
-
-
-
Other documents
-
Alliance Laundry Systems 815 User manual
-
Keys Fitness Alliance 850 User manual
-
-
-
Keys Fitness Health Trainer 800HR User manual
-
-
-
 Trulife Alliance Fitness Treadmills Alliance 855 Owner's manual
-
-
