Page is loading ...

MICROWAVE
OVENS
ens, Compactors, Room Au Conditioners, Dehumidlflers, Automallc Washers, Clothes Dryers, Freezers. Refrigerator-Freezers, Ice Makers. Dishwashers,

This booklet covers operating instructions for the microwave oven
ONLY. Please refer to the range “Use and Care Guide” for conven-
tional gas range operating instructions.
Your responsibilities..
l
Proper installation and safe use of your microwave range are your personal
responsibilities. Read this “Use and Care Guide” carefully for important use and
safety information.
Instaffation
You must be sure your range is.. .
l
installed and leveled on a floor that page 20 of the range “Use and Care
will hold the weight:
Guide” or the “Installation Instructions”);
l
installed in a weTI-ventilated area pro-
tected from the weather;
l
properly connected to the correct gas
l
properly connected to the correct
supply (see “Installation Instructions”).
electric supply and grounding (see
Proper use
You must be sure your range is. . .
l
used only for jobs expected of ranges
designed for home use;
l
used only by people who can operate
it properly;
l
properly maintained.
during or after conventional cooking. Don’t be concerned. The fan
turns on automatically to help protect the microwave oven from
TABLE OF CONTENTS
Registration . . . . . . . . . . . . . . . . . . . . . . . . . . . . . . . . . . . . . . . . . . . . . . . . . . . . .
2
Safety Precautions . . . . . . . . . . . . . . . . . . . . . . . . . . . . . . . . . . . . . . . . . . . . . . . .
2
Installation . . . . . . . . . . . . . . . . . . . . . . . . . . . . . . . . . . . . . . . . . . . . . . . . . . . . . .
3
Electrical Grounding Requirements . . . . . . . . . . . . . . . . . . . . . . . . . . . . . . . . . .
3
How to Use Your Microwave Oven . . . . . . . . . . . . . . . . . . . . . . . . . . . . . . . . . .
4
Illustration of the Oven . . . . . . . . . . . . . . . . . . . . . . . . . . . . . . . . . . . . 4 & 5
General Information. , . . . . . . . . . . . . . . . . . , . . . . . . . . . . . . . . . . . . . . . . .
4
Time-Of-Day Clock . . . . . . . . . . . . . . . . . . . . . . . . . . . . . . . . . . . . . . . . . . . .
6
MinuteTimer . . . . . . . . . . . . . . . . . . . . . . . . . . . . . . . . . . . . . . . . . . . . . . . .
7
To Stop or Interrupt an Operation . . . . . . . . . . . . . . . . . . . . . . . . . . . . . . .
6
Full Power Cooking............................................ 6
Variable Power Cooking. . . . . . . . . . . . . . . . . . . . . . . . . . . . . . . . . . , . . . . .
9
ToChangeorEraseanOperation................................
12
Automatic Defrosting . . . . . . . . . . . . . . . . . . . . . . . . . . . . . . . , . . . , . . . . . . 14
Variable Power Defrosting. . . . . . . . . . . . . . . . . . . . . . . . . . . . . . . . . . . . . .
14
To Recall an Operation . . . . . . . . . . . . . . . . . . . . . . . . . . . . , . . . . . . . . . . .
16
ProgrammedOvenCooking . . . . . . . . . . . . . . . . . . . . . . . . . . . . . . . . . . . . .
16
Temperature Probe . . . . . . . . . . . . . . . . . . . . . . . . . . . . . . . . . . . . . . . . . . 19
DelayStartCooking . . . . . . . . . . . . . . . . . . . . . . . . . . . . . . . . . . . . . . . . . . . 23
Care and Cleaning of Your Microwave Oven . . . . . . . . . . . . . . , . . . . . . . . , . . 24
How to Change the Oven Light Bulb . . . . . . . . . . . . . . . . . . . . . . . . , . . . . . . . . . 24
Servicing Your Microwave Oven . . . , . . . . , . . . . . . , . . . . . . , . . . . . . . . . . . . . 24

Registration
tested to meet ail safety standards
Federal law requires that the micro-
and regulations set by the federal
wave oven manufacturer keep a per-
government. It has been tested and is
manent record of the owner and ioca-
listed by the Underwriters Labora-
tion of this microwave oven. To com-
tories, Inc. As with any appliance in
ply with the law, please fill out the
your home, safe operation is based on
CONSUMER REGISTRATION
proper use and care of the appliance.
CARD packaged in the oven.
WHIRLPOOL MICROWAVE OVEN
Check the model and serial numbers
on the card to see that they match the
numbers on the rating plate. Rating
plate is located on the left hand, ver-
tical side of the burner box, beneath
the main top. If the numbers are not
the same, cross out the numbers on
the card and write in the numbers as
they appear on the rating plate.
Return the CONSUMER PRODUCT
OWNERSHIP REGISTRATION
CARD to:
Whirlpool Corporation
Microwave Oven Registration Dept.
2000 U.S. 33 North
Benton Harbor, Michigan 49022
tf you move or are
not
the original
owner of this range, you must, by
law, renew the registration. Send the
following inFormation to the address
given above:
1. Your name and address.
3. The model and serial number 01
your range.
Saf tey Precautions
Your new range has been built aud
Precautions To Avoid Possible
Exposure To Excessive
Microwave Energy
(a] Do not attempt to operate
this oven with the door open since
open-door operation can result in
harmful exposure to microwave
energy. It is important not to de-
feat or tamper
with the safety
interlocks.
(b) Do not place any object be-
tween the oven front face and the
door or allow soil or cleaner resi-
due to accumulate on sealing sur-
faces.
(c) Do not operate the oven if it
is damaged. It is particularly im-
portant that the oven door close
properly and that there is no dam-
age to the: (1) door [bent), (2) hinges
and latches [broken or loosened),
(3) door seals and sealing surfaces.
(d) The oven should not be ad-
justed or repaired by anyone ex-
cept properly qualified service
personnel.
Additional safety considerations in-
clude:
Do not operate the oven when empty.
Tbe removable glass shelf MUST
ALWAYS BE IN PLACE WHENEVER
the oven is in use.
Do not lean on the oven door. The door
is designed to close tightly and seal
properly for safe operation. Leaning
on the door may warp or break the
hinges.
Do not operate the oven if it has been
dropped. Call your authorized dealer
for inspection and repair.
To avoid exposure to dangerous high
voltage, DO NOT REMOVE THE
OUTERCASE,DOORORCONTROL
PANEL.
Installation
Before you use your new microwave
Eye Level range, check the range for
possible shipping damage. If damage
has occurred, immediately report it
to your authorized dealer. Do not
attempt to operate the range.
For Lower Range Section: Refer to
installation instructions in the Use
and Care Booklet for gas ranges.
CAUTION: To prevent permanent
damage to range parts, range MUST
be installed according to the lnstai-
iation Instructions. Refer to the in-
structions for correct clearances.
OPERATION OF ANY SURFACE
UNIT WITHOUT A UTENSIL IN
PLACE WILL CAUSE PERMANENT
DAMAGE TO RANGE PARTS.
The Eye Level range requires free
movement of air for proper opera-
tion. Air movement keeps the magne-
tron tube cool, removes moisture
from the range during a cooking ope-
ration and prolongs the life of the
range. Vents for the Eye Level range
are located across the top of the
range. They shoui be kept clean and
unobstructed at ail times.
The Eye Level range is equipped with
a special, concealed fan that auto-
matically turns on when the temper-
ature of range parts begin to rise.
The fan will stay on until the range
cools. even after the conventional
oven or surface units have been
turned off. Do not be concerned if
you should hear a fan noise during,
and sometimes after, some conven-
tional cooking operations.
Electrical Grounding
Requirements
FOR COUNTERTOP MICROWAVE
OVENS AND EYE LEVEL GAS RANGES
ONLY
CAUTION: To insure continued pro-
tection against electrical shock, con-
nect the range into properly ground-
ed outlet only.
IMPORTANT
This range MUST BE PROPERLY
GROUNDED to insure satisfactory
operation of the solid state control.
Refer to the nameplate for the proper
voltage and ampere rating.
This oven is equipped with a three-
prong (grounding) plug. Where a two-
prong outlet is encountered, it is the
personal responsibility and obligation
of the owner to contact a qualified
electrician and have it replaced with
a properly grounded threeprong outlet
in accordance with the National Elec-
trical Code.
Where local codes permit, a tem-
porary connection may be made to a
properly grounded tweprong outlet by
3
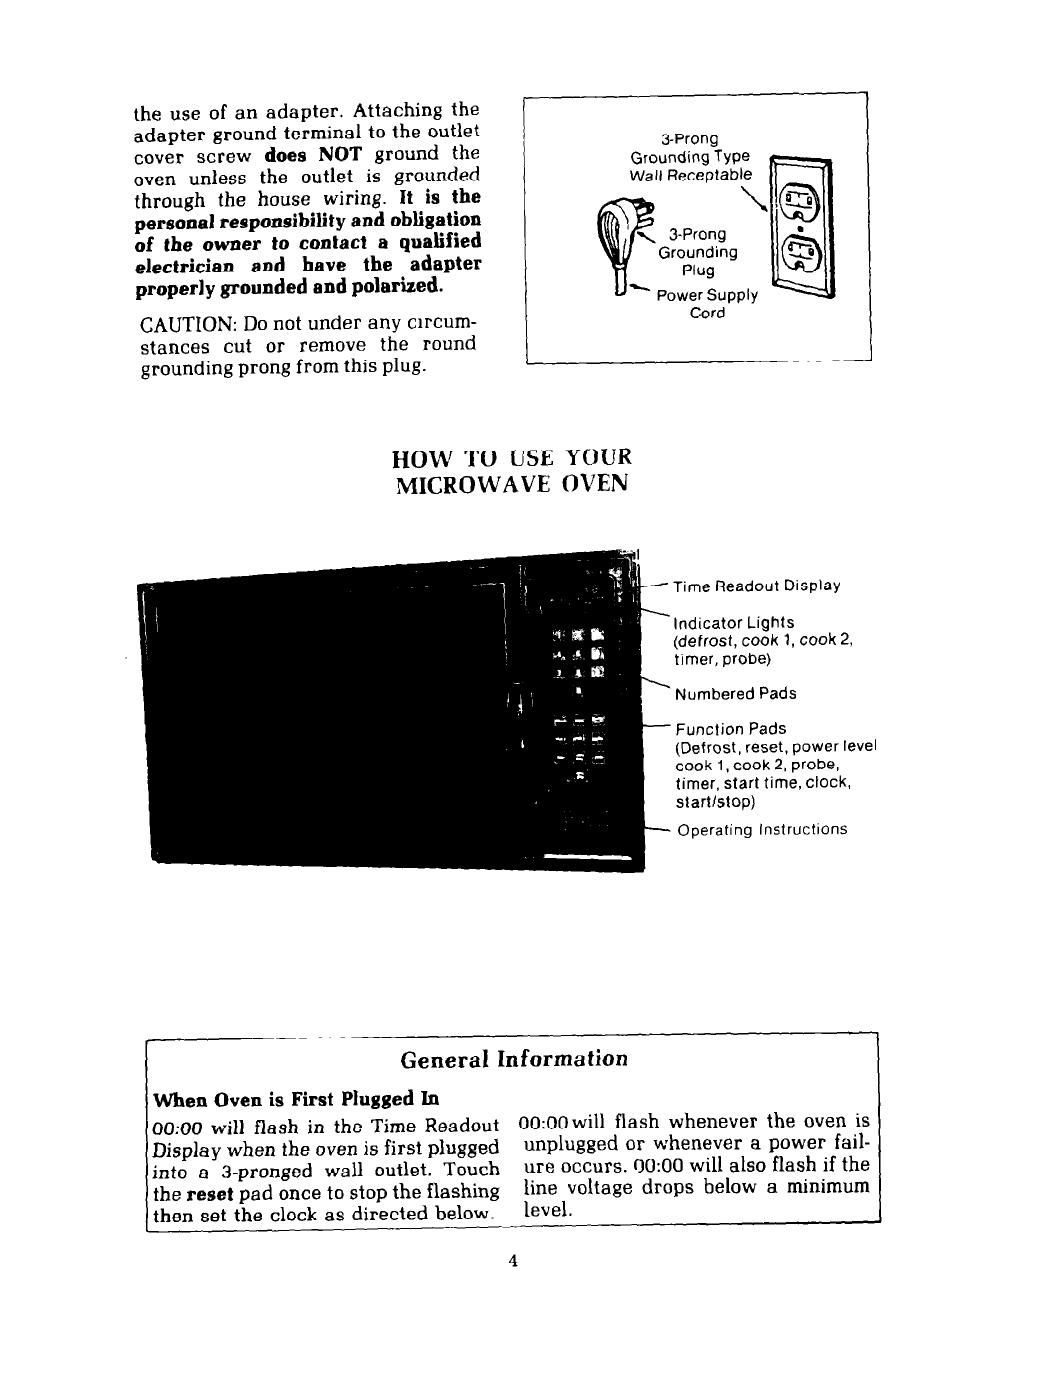
the use of an adapter. Attaching the
adapter ground terminal to the outlet
cover screw
does NOT
ground the
oven unless the outlet is grounded
through the house wiring.
It is the
personal responsibility and obligation
of the owner to contact a qualified
electrician and bave the adapter
properly grounded and polarized.
3-Prong
CAUTION: Do not under any circum-
stances cut or remove the round
grounding prong from this plug.
Cord
HOW TO USE YOUR
MICROWAVE
OVEN
- Time Readout Display
.
Indicator Lights
(defrost, cook 1, cook 2,
timer, probe)
\
Numbered Pads
Function Pads
(Defrost, reset, power level
cook 1, cook 2, probe,
timer, start time, clock,
start/stop)
- Operating Instructions
General Information
When Oven is First Plugged Ln
0O:OO
will flash
in
the Time Readout
0O:OO
will flash whenever the oven is
Display when the oven is first plugged
unplugged or whenever a power fail-
into a &pronged wall outlet. Touch
ure occurs.
9O:OO
will also flash if the
the
reset
pad once to stop the flashing
line voltage drops below a minimum
then set the clock as directed below.
level.
4

Time Readout Display,
Displays the current time-
of-day except when oven
is in use. When oven is in
use, the readout will dis-
play defrost or cook time,
temperature of food
when using Probe or a
timing when using the
TIMER function.
Indicator Lights ’
/
Lights automatically turn
on when the correspond-
ing function pads are
touched. (Example: touch
the DEFROST pad and
the defrost indicator
light turns on.)
Numbered Pads -/
Touch the desired num-
bered pads to enter a
timing, temperature,
power level or lime-of-
day. The function pad
must be touched before
entering the numbers.
Operating lnstructlons --
Brief description on how
to set the oven for a
simple defrost, cook,
probe or liming operation.
1. Enter Function-
Touch one of function
pads (defrost, cook 1,
cook 2, probe, timer).
2. Enter Time-Touch the
desired numbered
pads to enter the
timing or temperature.
3. Enter Power Level (O-9)
a) touch POWER
LEVEL pad.
b) enter power level by
touching ONE of Ihe
numbered pads.
4. Enter Start-the opera.
tion will begin.
I ’
/
defrost I cook2 I probe
/ cook l
timer
Elm
Cl
0
I
uuu
nnn
I
probe
r-l
clock
I‘\
operating instructions
I enter function
2 enter time
3enter power IevelIo-91
Function Pads
Defrost- Oven auto-
matically cycles on and
off to gently thaw frozen
foods. (See page 14.)
R-t-Cancels or erases
an entry. Time-of-day will
appear in display. Oven
must be off to cancel an
entry. (See page 12.)
Power Level-Select a
Variable power setting
(O-9) for a cook or defrost
operation. (See page 9.)
Cook 1 and Cook ~--TO
set oven to cook at one
power level touch either
COOK 1 or COOK 2 pad.
If cooking at two power
levels use both pads. (Ex-
ample: Set COOK 1 for
HIGH and COOK 2 at
setting #3.) This is called
2 phase cooking or pro-
grammed cooking (See
page 16.)
Probe-Used with Tem-
perature Probe. Cooking
-with temperature rather
than time. (See page 19.)
Timer-Use this function
to time microwave stand-
ing times or conventional
cooking. Oven will not
turn on. Door must be
closed. (See page 7.)
Start Time- Delays the
time you wish cooking to
begin. (See page 23.)
Clock-Sets time-of-day
clock. When oven is in
use, touch CLOCK pad
and time will reappear in
the display for 3 seconds.
(See page 6.)
Start/Stop-Turns oven
on and off. Door must be
securely closed before
oven will turn on. The
oven will automatically
turn off at the end of an
operation or when the
door is opened.
3 4enter hart -~ -. JI
5

Touch Pads
Just as many of today’s telephones of-
fer “touch-tone” dialing, your new
microwave oven offers touch-tone
programming. When any of the pads
are touched in proper sequence, a
sound can be heard indicating that
the entry has been accepted. If no
sound is heard, the oven has not ac-
cepted the entry.
Oven Light
The oven light automatically turns on
when the door is opened and off when
the door is
properly
closed. If the door
is not securely closed, the oven light
will remain on.
The oven light will also stay on during
a defrost,
cook
or hold operation. The
light will not turn on when the Minute
Timer feature is in use.
__-.
BEFORE YOU BEGIN
COOKING
Before you begin cooking, we sug-
gest you take a few minutes now
to become familiar with all the
special features found on your
new oven. By learning how each
feature operates you will find that
you will save time and avoid frus-
tration later. So sit down next to
your oven and review the next
few pages. Practice setting each
feature as you read the operating
instructions. You will be surpris-
ed to see how easy this oven is to
operate.
Why not treat yourself to a hot
beverage as you study. Heat
water for tea or coffee in the oven
as you practice setting the oven.
We do not recommend operating
the oven when the oven is empty.
Always
have a container of water
in the oven as you practice.
Time-of-Day
Clock
When the oven is first plugged in,
0O:OO will flash in the Time Readout
Display until the
reset
pad is touched.
To set the Clock:
1. Touch clock pad.
0
reset
0
timer
, .
start
LJ
time
I
start
stoo
I
2. Enter time-of-day by touching the
correct nT.abered pads.
For example, if it is 1~30 (a.m. or
p.m.] touch the following numbered
pads in sequence - 1, 3, 0.
1:30 will appear in the Time Read-
out Display.
defrost I cook2 I probe
cook I
timer
6
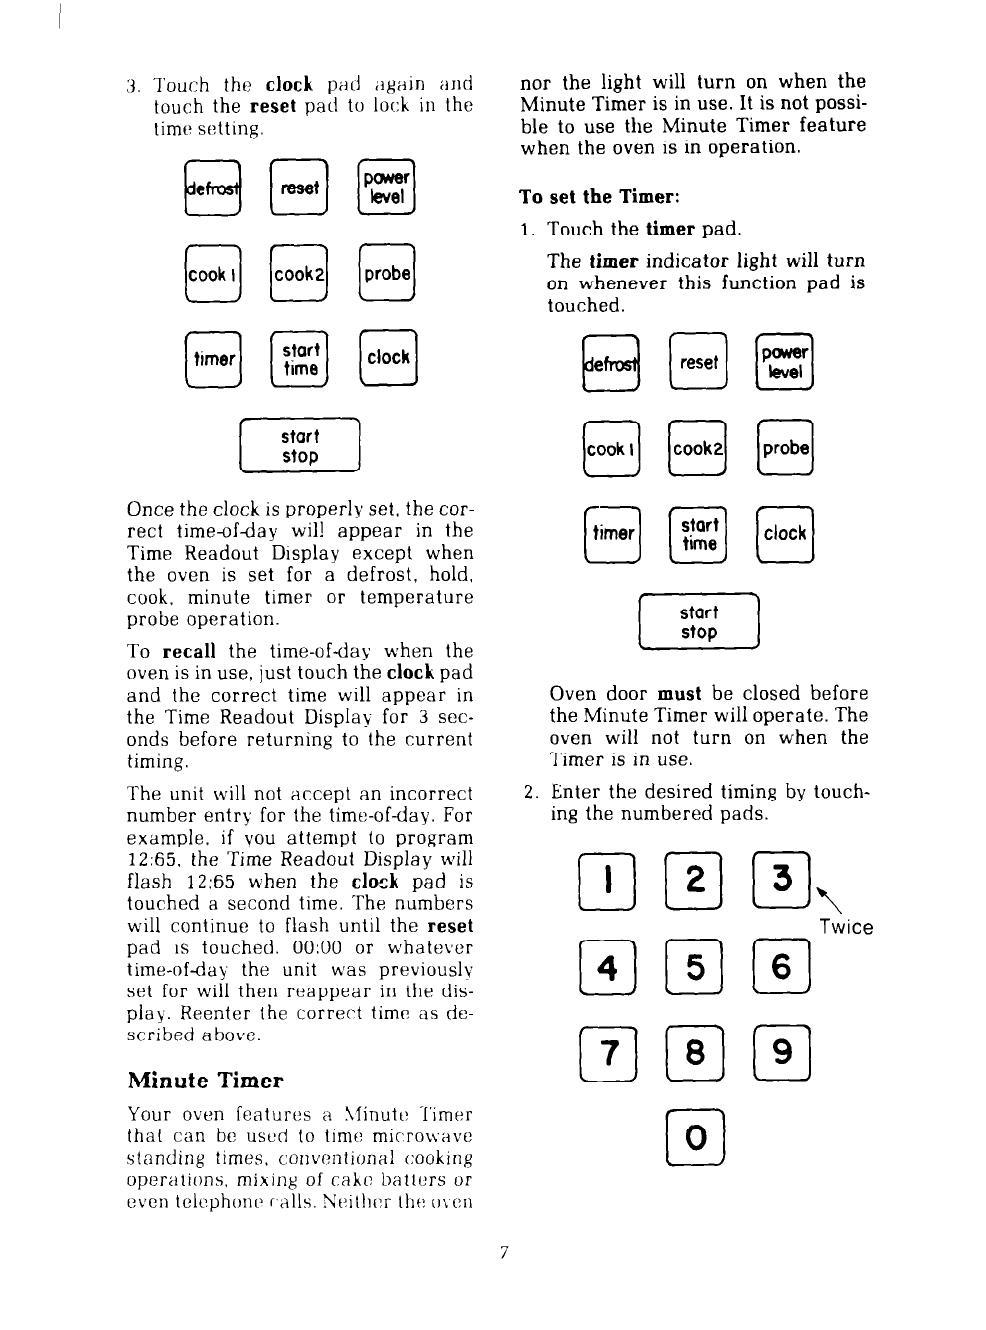
3. Touch the
clock PiId ;*g:iin ;111d
touch
the reset pad to lock in the
lime sntting.
(ig [-q
pq
Once the clock is properly set, the cor-
rect timeufday wil! appear in the
Time Readout Display except when
the oven is set for a defrost, hold,
cook, minute timer or temperature
probe operation.
To recall
the time-of-day when the
oven is in use, just touch the
clock
pad
and the correct time will appear in
the Time Readout Display- for
3 sec-
onds before returning to the current
timing.
The unit will not accept an incorrect
number entry for the time-of-day. For
example, if you attempt to program
12:65.
the Time Readout Display will
flash
12:65
when the
clock
pad
is
touched a second time. The numbers
will continue to flash until the
reset
pad 1s touched.
0O:OO
or whatever
time-of-day the unit was previously
set for will then reappear in the dis-
play.
Reenter the correct time! as de-
scribed above.
Minute Timer
Your oven features a Iiinutt: Timer
that can be usud to time micro\vavc
standing times, conventional cooking
operalions. mixing of cakr: batters or
even tclcphonr> r,alls. Ncithcr the: OL(:II
nor the light will turn on when the
Minute Timer is in use. It is not possi-
ble to use the Minute Timer feature
when the oven is in operation.
To set the Timer:
1.
2.
Touch the
timer
pad.
The
timer
indicator light will turn
on whenever this function pad is
touched.
B
e
0
reset
0
pEi
0
timer
start
0
time
0
clock
(- z$ ]
Oven door
must
be closed before
the Minute Timer will operate. The
oven will not turn on when the
Timer is in use.
Enter the desired timing by touch-
ing the numbered pads.
ccl El El,
Twice
BBrn

For example, if you wish to set a
3% minute timing operation touch
the following numbered pads in se-
quence - 3, 3, 0.
3:30 will appear in the Time Read-
out Display.
3. Touch the
start/stop
pad and the
timing begins.
When the
start/stop
pad is touched
a click sound may be heard.
The display will stop counting if
the door is opened. To restart
Timer, close door and touch
start/
stop
pad.
At the end of the timing operation an
electronic beep will sound for 3
seconds and the correct time-of-day
will reappear in the Time Readout
Display.
To Stop or Interrupt an
Operation
‘To stop an operation either touch
the
start/stop
pad or open the
oven door. The oven will automat-
ically turn off and the magnetron
tube will instantly stop producing
microwaves whenever the door is
opened or the
start/stop
pad is
touched. To resume the operation,
close the door and touch the
start/
stop
pad.
If food is removed from the oven
before time lapses on the Time
Readout Display, touch the
reset
pad once lo clear the display of
the timing. The correct time-of-
day will reappear in the display.
--
Full Power Cooking
Setting the oven to cook at full power
is a very simple 3-step operation. Just
enter the function
[cook l),
next enter
the cooking time and finally touch the
start/stop
pad.
The removable glass shelf
must
always be in place whenever the oven
is in use.
If desired, place a cup of water for in-
stant tea or coffee in the oven on the
glass shelf.
To set the oven for Full Power Cook-
ing:
1.
Touch the
cook 1
pad.
0O:OO will appear in the Time
Readout Display.
The Cook 1 indicator light will turn
on whenever this function pad is
touched.
[-Xi-]
2. Enter the desired cooking time by
touching the numbered pads.
For example, if you wish to heat
water for 1% minutes (1 minute
30
seconds) touch the following num-
bered pads in sequence - 1. 3.
0.
8
0
4
cl
5
Cl
6
EEI
0
0
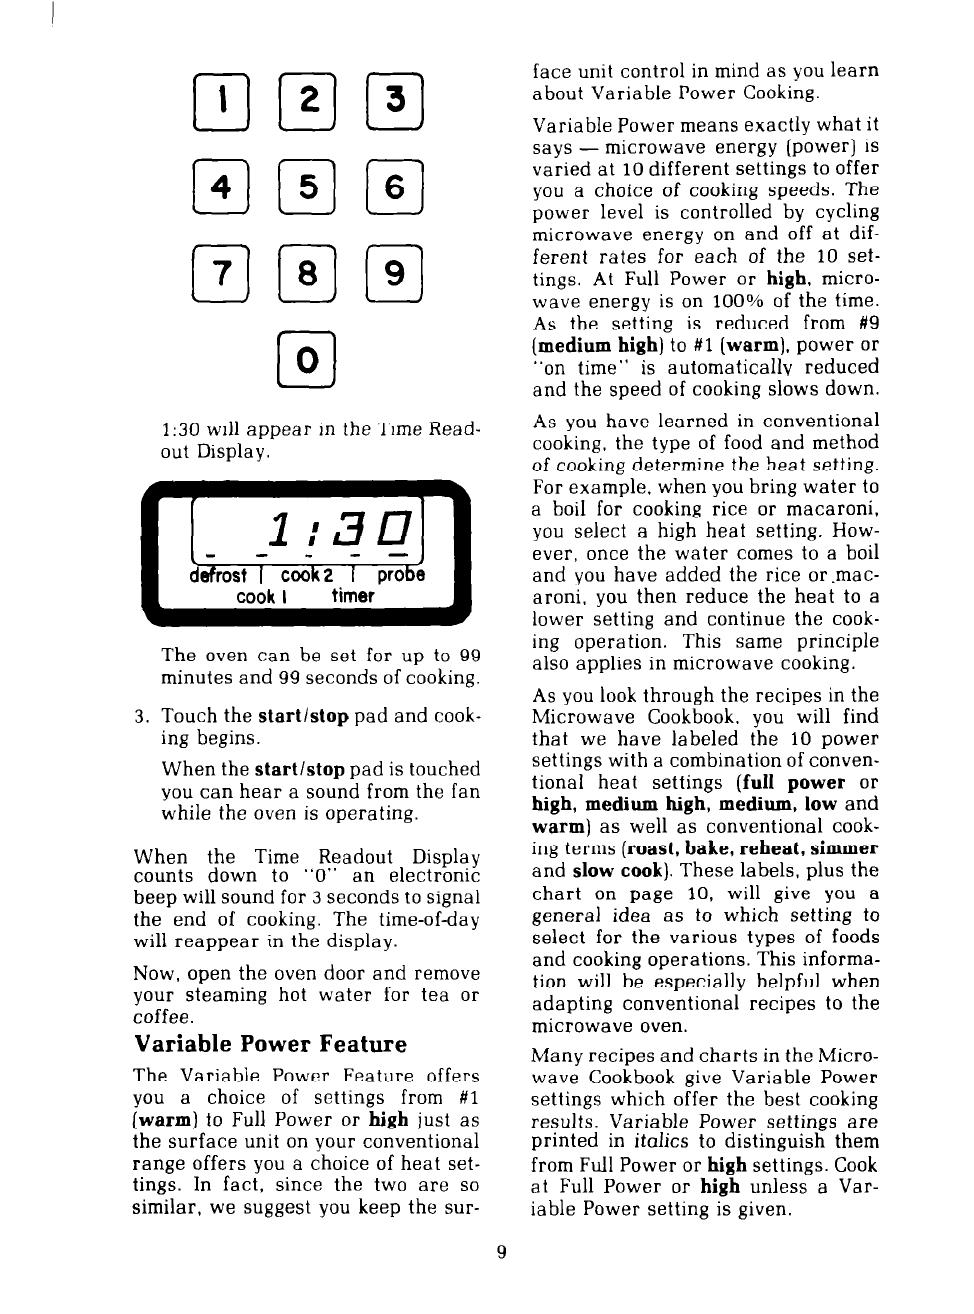
1:30
will appear in the Time Read-
out Display.
The oven can be set for up to 99
minutes and 99 seconds oi cooking.
3. Touch the
start/stop
pad and cook-
ing begins.
When the
start/stop
pad is touched
you can hear a sound from the fan
while the oven is operating.
When the Time Readout Display
counts down to “0” an electronic
beep will sound for 3 seconds to signal
the end of cooking. The time-ofday
will reappear in the display.
Now, open the oven door and remove
your steaming hot water for tea or
coffee.
Variable Power Feature
The Variabie Power Feature offers
you a choice of settings from
#l
(warm)
to Full Power or
high
just as
the surface unit on your conventional
range offers you a choice of heat set-
tings. In fact, since the two are so
similar, we suggest you keep the sur-
face unit control in mind as you learn
about Variable Power Cooking.
Variable Power means exactly what it
says -
microwave energy (power) is
varied at
10
different settings to offer
you a choice of cooking speeds. The
power level is controlled by cycling
microwave energy on and off at dif-
ferent rates for each of the 10 set-
tings. At Full Power or
high,
micro-
wave energy is on
100%
of the time.
As the setting is reduced from #9
(medium high)
to
#l
(warm),
power or
“on time”
is automatically reduced
and the speed of cooking slows down.
As you have learned in conventional
cooking, the type of food and method
of cooking determine the heat setting.
For example, when you bring water to
a boil for cooking rice or macaroni,
you select a high heat setting. How-
ever, once the water comes to a boil
and you have added the rice or.mac-
aroni. you then reduce the heat to a
lower setting and continue the cook-
ing operation. This same principle
also applies in microwave cooking.
As you look through the recipes in the
Microwave Cookbook. you will find
that we have labeled the
10
power
settings with a combination of conven-
tional heat settings
(full power
or
high, medium high, medium,
low and
warm)
as well as conventional cook-
ing terms
(roast, bake, reheat, simmer
and
slow cook).
These labels, plus the
chart on page
10,
will give you a
general idea as to which setting to
select for the various types of foods
and cooking operations. This informa-
tion will be especially helpful when
adapting conventional recipes to the
microwave oven.
Many recipes and charts in the Micro-
wave Cookbook give Variable Power
settings which offer the best cooking
results. Variable Power settings are
printed in italics to distinguish them
from Full Power or
high
settings. Cook
at Full Power or
high
unless a Var-
iable Power setting is given.
9
-
I
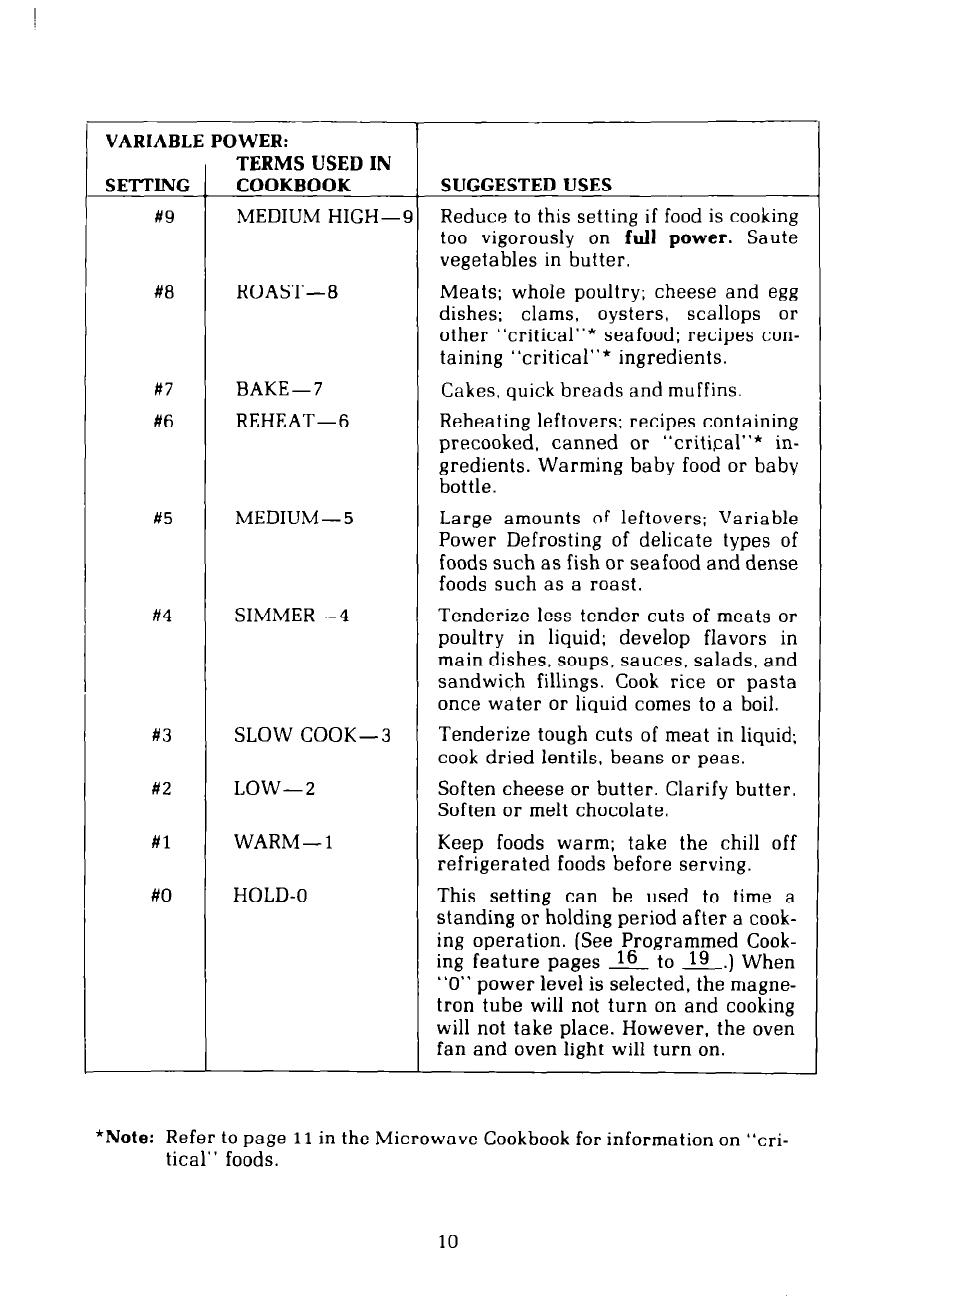
VARIABLE POWER:
SETTING
#9
#8
i#7
#6
#5
#4
#3
#2
#l
#O
TERMS USED IN
COOKBOOK
MEDIUM HIGH-9
ROAST-8
BAKE-7
REHEAT-6
MEDIUM- 5
SIMMER-4
SLOW COOK-3
LOW-2
WARM-1
HOLD-o
SUGGESTED USES
Reduce to this setting if food is cooking
too vigorously on full
power.
Saute
vegetables in butter.
Meats; whole poultry; cheese and egg
dishes; clams, oysters, scallops or
other “critical”* seafood; recipes con-
taining “critical”* ingredients.
Cakes, quick breads and muffins.
Reheating leftovers; recipes containing
precooked, canned or “critical”* in-
gredients. Warming baby food or baby
bottle.
Large amounts of leftovers; Variable
Power Defrosting of delicate types of
foods such as fish or seafood and dense
foods such as a roast.
Tenderize less tender cuts of meats or
poultry in liquid; develop flavors in
main dishes, soups, sauces, salads, and
sandwich fillings. Cook rice or pasta
once water or liquid comes to a boil.
Tenderize tough cuts of meat in liquid;
cook dried lentils, beans or peas.
Soften cheese or butter. Clarify butter.
Soften or melt chocolate.
Keep foods warm; take the chill off
refrigerated foods before serving.
This setting can be used to time a
standing or holding period after a cook-
ing operation. (See Programmed Cook-
ing feature pages 16 to 19.) When
“0” power level is selected, the magne-
tron tube will not turn on and cooking
will not take place. However, the oven
fan and oven light will turn on.
*Note: Refer to page 11 in the Microwave Cookbook for information on “cri-
tical” foods.
10
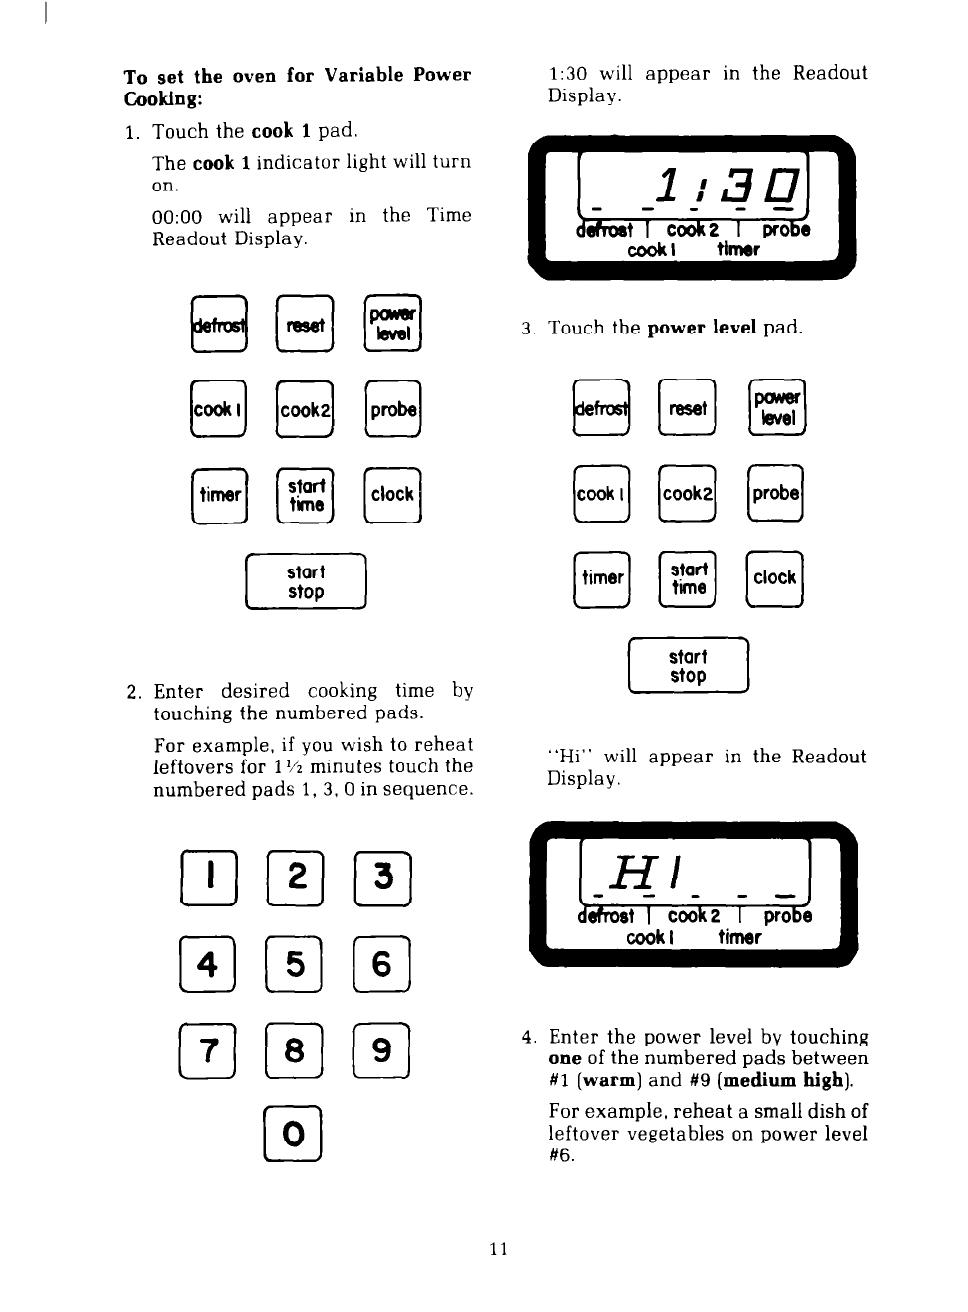
To set the oven for Variable Power
cooking:
1. Touch the
cook
1 pad.
The
cook
1 indicator light will turn
on.
0O:OO will appear in the Time
Readout Display.
2. Enter desired cooking time by
touching the numbered pads.
For example, if you wish to reheat
leftovers for 1% minutes touch the
numbered pads 1,3,0 in sequence.
1:30 will appear in the Readout
Display.
kc& I cook2 I
r!I tlmar
3. Touch the
power level
pad.
“Hi” will appear in the Readout
Display.
4. Enter the power level by touching
one of the numbered pads between
#l
(warm)
and
U9 (medium high).
For example, reheat a small dish of
leftover vegetables on power level
176.
11
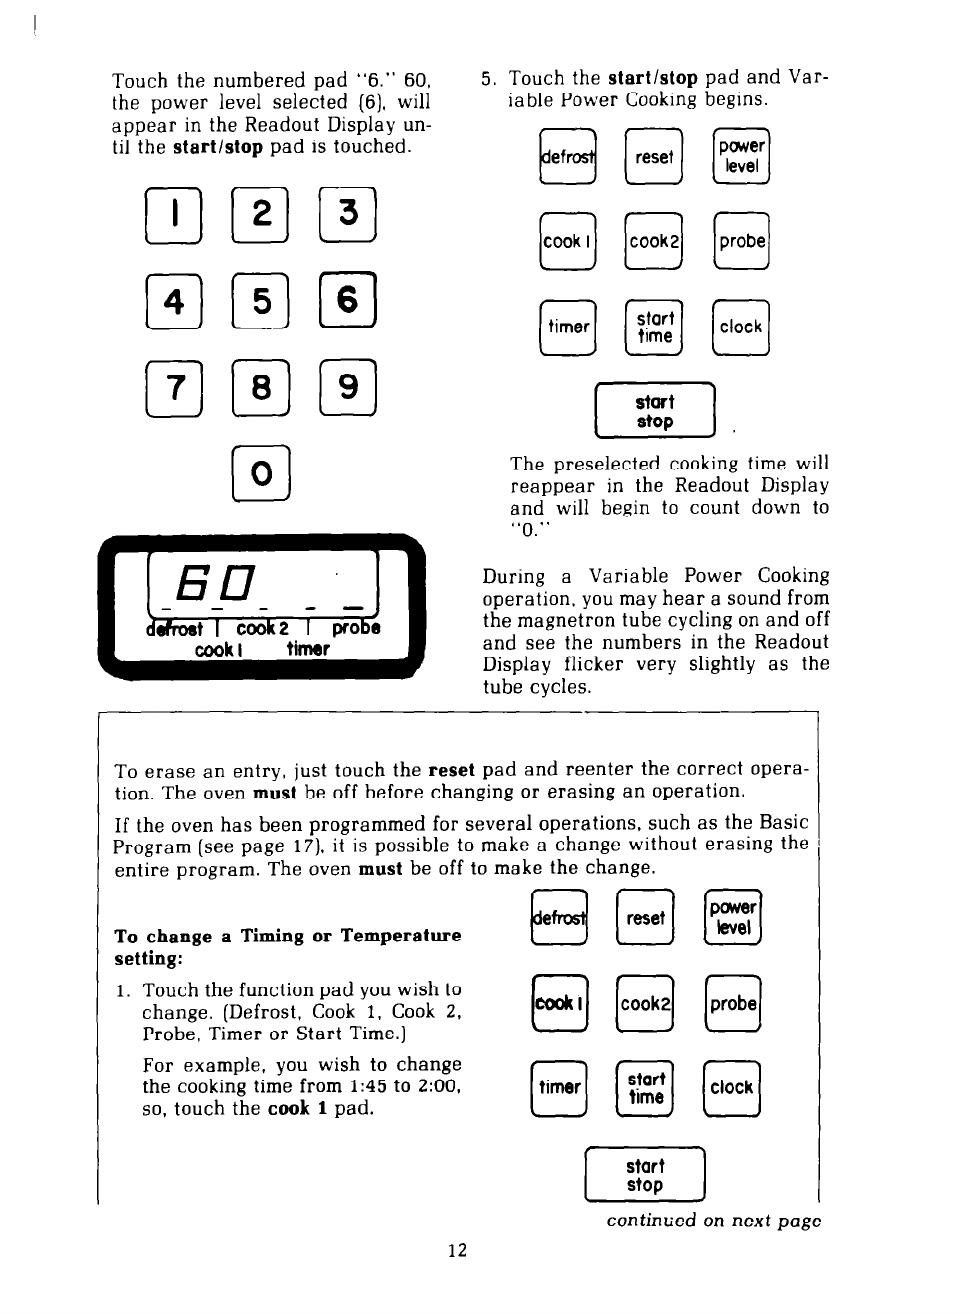
Touch the numbered pad “6.” 60.
the power level selected (6), will
appear in the Readout Display un-
til the
start/stop
pad is touched.
Cl
I
0
2
0
3
0
4
0
5
0
6
0
0
5. Touch the
start/stop
pad and Var-
iable Power Cooking begins.
[-?i--]
The preselected cooking time will
reappear in the Readout Display
and will begin to count down to
“0.”
During a Variable Power Cooking
operation, you may hear a sound from
the magnetron tube cycling on and off
and see the numbers in the Readout
Display flicker very slightly as the
tube cycles.
To erase an entry, just touch the
reset
pad and reenter the correct opera-
tion. The oven
must
be off before changing or erasing an operation.
If the oven has been programmed for several operations, such as the Basic
Program (see page 17). it is possible to make a change without erasing the
entire program. The oven
must
be off to make the change.
To change a Timing or Temperature
setting:
1. Touch the function pad you wish to
change. (Defrost, Cook 1. Cook 2,
Probe, Timer or Start Time.)
For example, you wish to change
the cooking time from 1:45 to 2:00,
so, touch the
cook 1
pad.
f-ii-1
continued on next page
12

2. Enter the new timing or tempera-
ture setting by touching the
desired numbered pads.
Touch the numbered pads 2,0,0 in
sequence.
2:00 will appear in the Readout
Display.
3. Now, touch the start/stop pad.
The Readout Display will begin
counting down at the new timing of
2:oo.
To
change a Power Level setting:
1. Touch the function pad you wish to change.
2 Touch the power level pad.
3. Enter the new power level by touching one of the numbered pads.
4. Touch the start/stop pad.
To change from a Variable Power setting
(#O
to
U9)
up to Full Power or high,
touch the reset pad to erase the entire program and begin again.
13
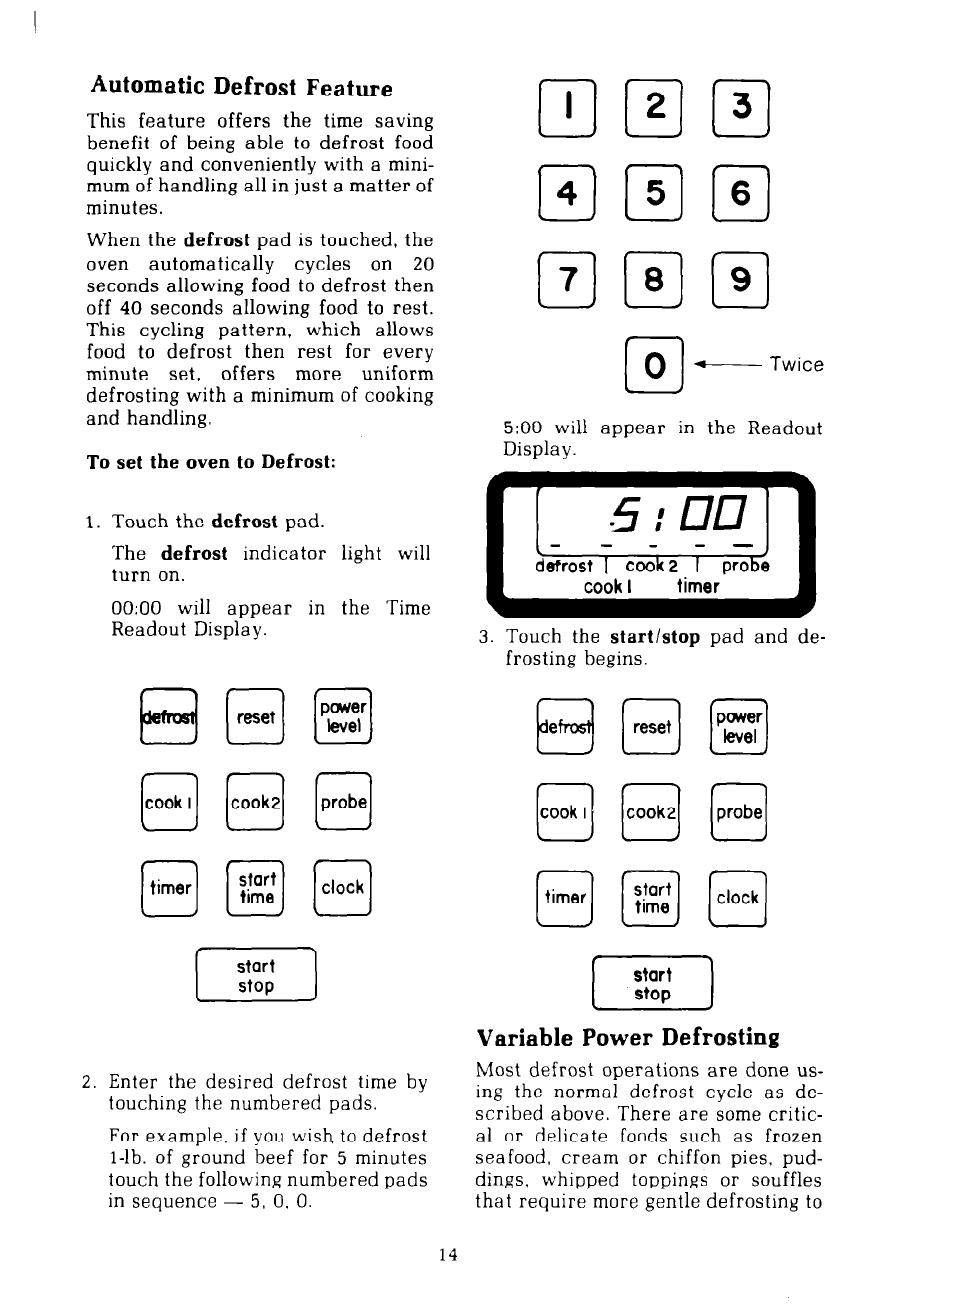
Automatic
Defrost Feature
This feature offers the time saving
benefit of being able to defrost food
quickly and conveniently with a mini-
mum of handling all in just a matter of
minutes.
EIEIEI
When the
defrost
pad is touched, the
oven automatically cycles on 20
seconds allowing food to defrost then
off
40
seconds allowing food to rest.
mmm
This cycling pattern, which allows
food to defrost then rest for every
minute set,
offers more uniform
0
0
+--- Twice
defrosting with a minimum of cooking
and hand‘iing.
5:00 will appear in the Readout
To set the oven to Defrost:
1. Touch the
defrost
pad.
Display.
The
defrost
indicator light will
- - - --
turn on.
defrost I cook2 I
probe
0O:OO will appear in the Time
Readout Display.
3. Touch the
start/stop
pad and de-
frosting begins. -
Variable Power Defrosting
2. Enter the desired defrost time by
touching the numbered pads.
For example, if you wish to defrost
l-lb. of ground beef for 5 minutes
touch the following numbered pads
in sequence - 5, 0. 0.
Most defrost operations are done us-
ing the normal defrost cycle as de-
scribed above. There are some critic-
al or delicate foods such as frozen
seafood, cream or chiffon pies, pud-
dings, whipped toppings or souffles
that require more gentle defrosting to
14
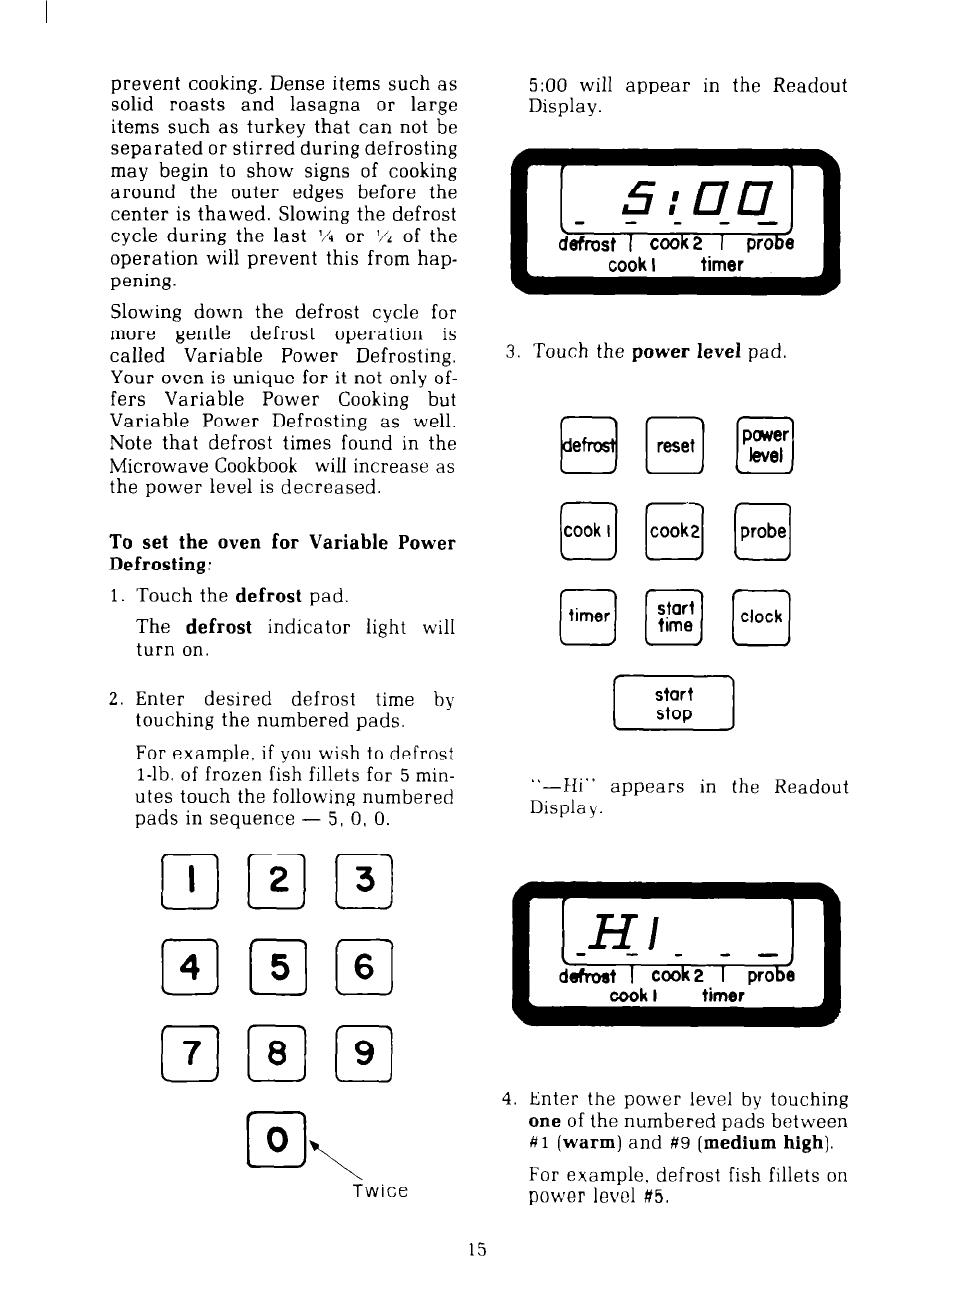
prevent cooking. Dense items such as
solid roasts and lasagna or large
items such as turkey that can not be
separated or stirred during defrosting
may begin to show signs of cooking
around the outer edges before the
center is thawed. Slowing the defrost
cycle during the last l/4 or % of the
operation will prevent this from hap-
pening.
Slowing down the defrost cycle for
more gentle defrost operation is
called Variable Power Defrosting.
Your oven is unique for it not only of-
fers Variable Power Cooking but
Variable Power Defrosting as well.
Note that defrost times found in the
Microwave Cookbook will increase as
the power level is decreased.
To set the oven for Variable Power
Defrosting:
1.
Touch the
defrost
pad
The
defrost
indicator light will
turn on.
5:00 will appear in the Readout
Display.
3. Touch the
power level
pad.
2. Enter desired defrost time by
touching the numbered pads.
For example, if you wish to defrost
l-lb. of frozen fish fillets for 5 min-
utes touch the following numbered
pads in sequence - 5, 0, 0.
“--Hi” appears in the Readout
Display.
0
I
0
4
0
7
EEI
Elm
Elm
0
0
\
iwice
4. Enter the power level by touching
one
of the numbered pads between
#l
(warm)
and #9
(medium high).
For example, defrost fish fillets on
power
level #5.
15
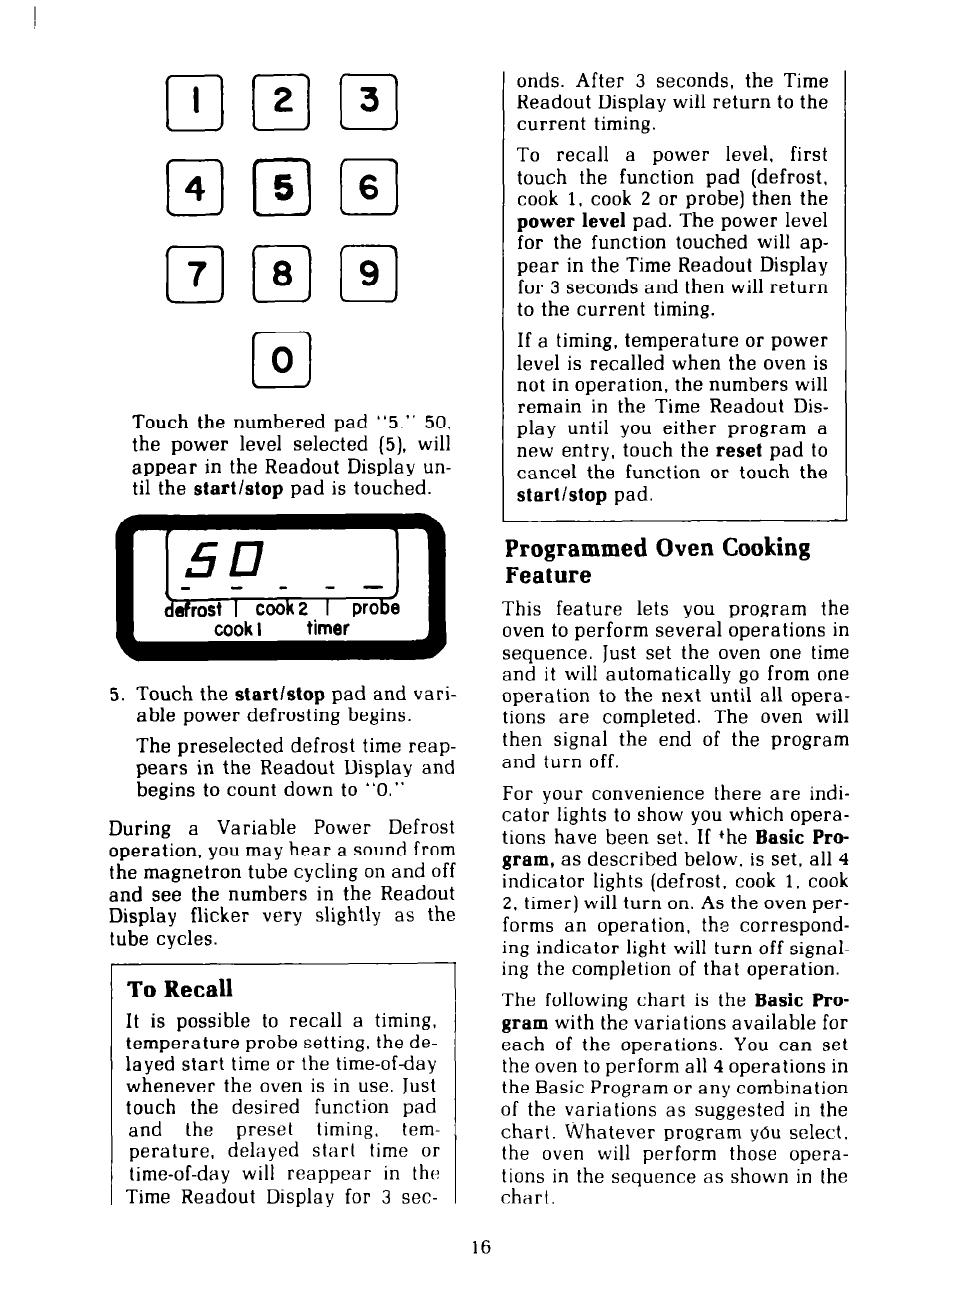
Cl
0
Touch the numbered pad “5.” 50,
the power level selected (5), will
appear in the Readout Display un-
til the
start/stop
pad is touched.
5. Touch the
start/stop
pad and vari-
able power defrosting begins.
The preselected defrost time reap-
pears in the Readout Display and
begins to count down to “0.”
During a Variable Power Defrost
operation, you may hear a sound from
the magnetron tube cycling on and off
and see the numbers in the Readout
Display flicker very slightly as the
tube cycles.
To Recall
It is possible to recall a timing,
temperature probe setting, the de-
layed start time or the time-of-day
whenever the oven is in use. Just
touch the desired function pad
and the preset timing, tem-
perature, delayed start time or
time-of-day will reappear in the
Time Readout Display for 3 sec-
onds. After 3 seconds, the Time
Readout Display will return to the
current timing.
To
recall a power level, first
touch the function pad (defrost,
cook
1,
cook 2 or probe] then the
power level
pad. The power level
for the function touched will ap-
pear in the Time Readout Display
for 3 seconds and then will return
to the current timing.
If a timing, temperature or power
level is recalled when the oven is
not in operation, the numbers will
remain in the Time Readout Dis-
play until you either program a
new entry, touch the
reset
pad to
cancel the function or touch the
start/stop
pad.
Programmed Oven Cooking
Feature
This feature lets you program the
oven to perform several operations in
sequence. Just set the oven one time
and it will automatically go from one
operation to the next until all opera-
tions are completed. The oven will
then signal the end of the program
and turn off.
For your convenience there are indi-
cator lights to show you which opera-
tions have been set. If +he
Basic Pro-
gram,
as described below. is set, all 4
indicator lights (defrost, cook 1. cook
2, timer) will turn on. As the oven per-
forms an operation, the correspond-
ing indicator light will turn off signal-
ing the completion of that operation.
The following chart is the
Basic Pro-
gram
with the variations available for
each of the operations. You can set
the oven to perform all 4 operations in
the Basic Program or any combination
of the variations as suggested in the
chart. Whatever program you select.
the oven will perform those opera-
tions in the sequence as shown in the
chart.
16

Basic Program
How
To Set The Oven
Possible
Variations
Operation #I:
1.
Touch
defrost
pad.
1. Defrost using normal defrost
Defrost 2.
Enter desired defrost time.
cycle.
3. For Variable Power Defrost-
2. Defrost using Variable Power
a] Touch
power
level pad.
Defrost.
b) Enter power level.
Operation t/2: I. Touch
cook 1
pad.
I. Cook at Full Power.
Cook
1 2.
Enter desired cooking time.
2. Cook at Variable Power.
3. For Variable Power Cooking- 3. Select “0” power level
and
a) Touch
power level
pad.
time a standing or rest period
b) Enter power level.
after the defrost operation.
Then, cook food using the
cook
2 operation.
If a Variable Power setting of
“0” is selected, the magnetron
tube will not turn on. However,
the fan and oven light will
turn on.
Operation #3: 1. Touch
cook
2 pad.
1. Cook at Full Power.
Cook
2 2. Enter desired cooking time.
2. Cook at Variable Power.
3. For Variable Power Cooking- 3. Select “1” power level and
a) Touch
power
level pad.
keep food warm until you are
b) Enter power level.
ready to serve. Food is more
palatable if kept warm no long-
er than 1 hour.
Operation
#4. I.
Touch
timer
pad.
I. Use to time standing or rest
Timer
2. Enter desired timing.
period after a cook or defrost
3. Now
touch
start/stop
pad
operation.
and the Programmed Cooking
Operation begins.
The oven and oven light will
turn off and cooking will not
take place when the Timer is
in
use.
Cook 1 and Cook 2 Program
One of the major conventional cooking
techniques suggests using a high heat
setting to bring liquids to a boil or
begin a cooking operation then reduce
to a lower setting to continue cooking
at a gentle simmer. This same tech-
nique applies in microwave cooking
as well. You can set the oven to cook
soups, stews, pot roasts, sauces and
many main dishes or vegetables at full
power then automatically reduce to a
variable power setting to gently sim-
mer food to desired doneness. Just use
the cook 1 - cook 2 program.
17
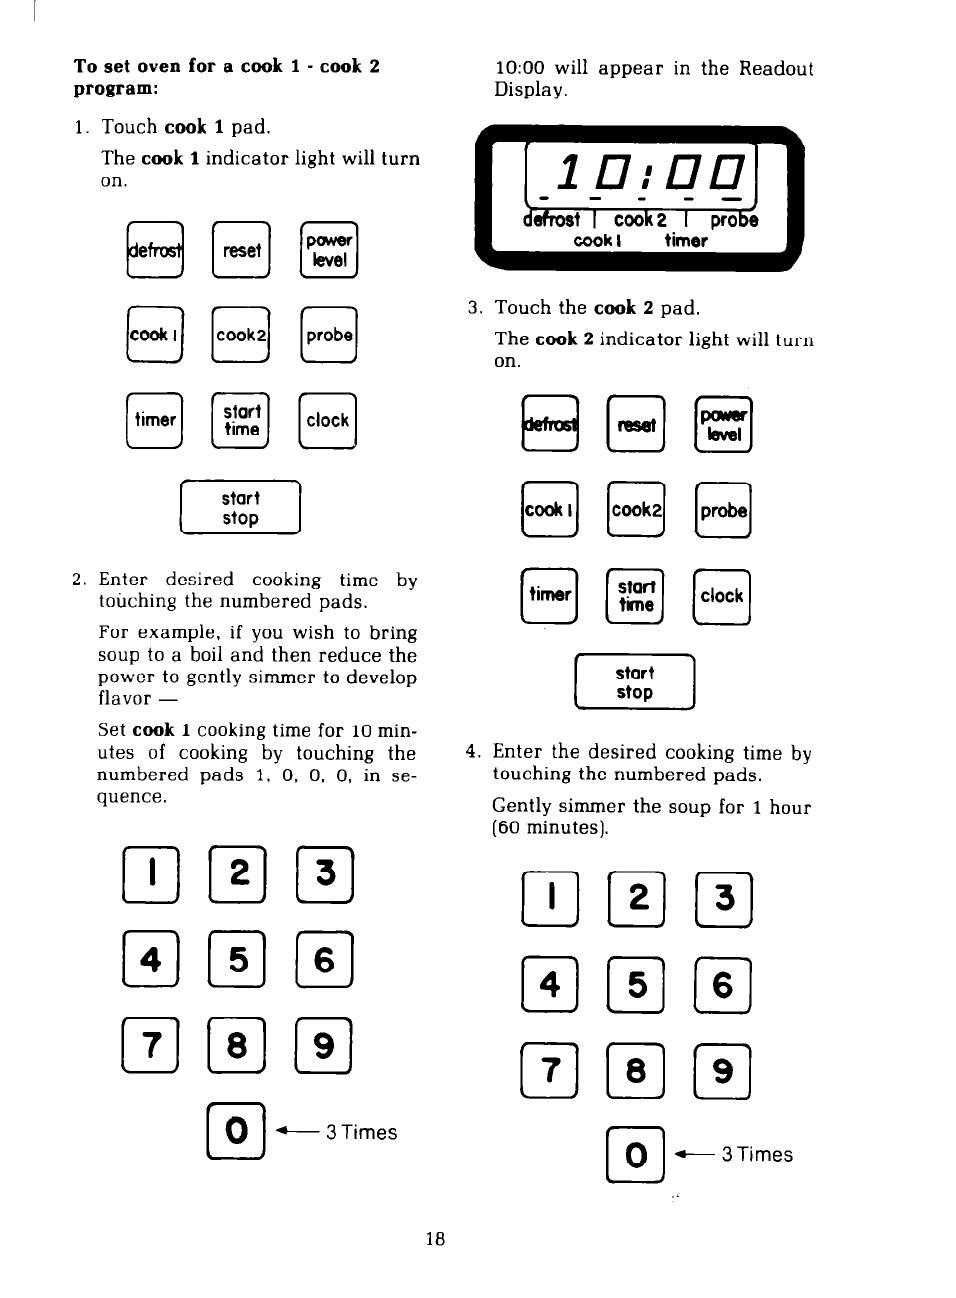
To
set oven for a cook 1 - cook 2
program:
1. Touch
cook 1
pad.
The
cook 1
indicator light will turn
on.
2. Enter desired cooking time by
touching the numbered pads.
For example, if you wish to bring
soup to a boil and then reduce the
power to gently simmer to develop
flavor -
Set
cook 1
cooking time for
10
min-
utes of cooking by touching the
numbered pads 1, 0. 0, 0, in se-
quence.
cl
0
+- 3 Times
10:00 will appear in the Readout
Display.
3. Touch the
cook
2 pad.
The
cook
2 indicator light will turn
on.
[T]
4. Enter the desired cooking time by
touching the numbered pads.
Gently simmer the soup for 1 hour
(60 minutes).
cl
0
- 3 Times
18
/