JVC XL-PG39BK User manual
- Category
- Car media receivers
- Type
- User manual
This manual is also suitable for

165
O
PE
N
Use numbers in parentheses when asking for replacement parts.
Stereo headphones .......................................................................................................................... 1 pc.
Car adaptor (CA-R456J or CA-R457J) (XL-PV390SL) .............................................................. 1 pc.
Car audio cassette adaptor (CA-RC6) (XL-PV390SL) .............................................................. 1 pc.
Supplied Accessories
Check the packing carton for these accessories.
Concerning Compact Discs
VICTOR COMPANY OF JAPAN, LIMITED
Precautions
Before using this unit, be sure to read the applicable items of the
operating instructions and these safety-suggestions carefully.
Afterwards keep them handy for future reference. Take special
care to follow the warnings indicated on the unit itself as well as
in the operating instructions.
Safety
1. Care of AC adaptor (not included) - The cord of the AC adap-
tor should be routed so that they are not likely to be walked on
or pinched by items placed upon or against them. Never take
hold of the AC adaptor if your hand is wet, and always grasp
the plug when connecting or disconnecting it.
2. Disconnect when not in use - When not in use, be sure to
disconnect the AC adaptor (not included) from the AC power
outlet.
3. Batteries - If the unit is not used for a long period of time or is
used only from an AC power source, remove all the batteries to
prevent potential damage due to battery leakage. Do not mix
(old and new ) batteries or different types of batteries.
Installation
■ Environment
1.Condensation - Moisture may form on the lens in the follow-
ing conditions…
• immediately after a heater has been turned on.
• in a steamy or very humid room.
• when the unit is suddenly moved from a cold environment
to a warm one. If moisture forms inside this unit, it may not
operate properly. To correct this problem wait about one
hour for the moisture to evaporate.
■ Placement
1.Foreign Material - Care should be taken so that objects do not
fall into and liquids are not spilled into the unit. Do not subject
this unit to excessive smoke, dust, mechanical vibration, or
shock.
2.Magnetism - The unit should be situated away from equip-
ment or devices that generate strong magnetic fields.
3. Stacking - Do not place any objects on top of the unit.
Maintenance
(See page 5 for details.)
Clean the cabinet, panel and controls with a soft cloth lightly
moistened with mild detergent solution.
Do not use any type of abrasive pad, scouring powder or solvent
such as alcohol or benzine.
Service
1.Damage Requiring Service - The unit should be serviced by
qualified service personnel when:
(a) The AC adaptor is damaged; or
(b) Objects have fallen or liquid has been spilled into the unit; or
(c) The unit has been exposed to rain; or
(d) The unit does not appear to operate normally or exhibits a
marked change in performance; or
(e) The unit has been dropped, or the enclosure damaged.
THE FOLLOWING NOTICES ARE APPLIED ONLY FOR U.S.A.:
CAUTION!
THIS PRODUCT UTILIZES A LASER.
USE OF CONTROLS OR ADJUSTMENTS OR PERFORMANCE
OF PROCEDURES OTHER THAN THOSE SPECIFIED HEREIN
MAY RESULT IN HAZARDOUS RADIATION EXPOSURE.
DO NOT OPEN COVERS AND DO NOT REPAIR YOURSELF.
REFER SERVICING TO QUALIFIED PERSONNEL.
CAUTION!
This equipment has been tested and found to comply with
the limits for a Class B digital device, pursuant to Part 15 of
the FCC Rules.
These limits are designed to provide reasonable protection
against harmful interference in a residential installation.
This equipment generates, uses and can radiate radio fre-
quency energy and, if not installed and used in accordance
with the instructions, may cause harmful interference to ra-
dio communications. However, there is no guarantee that
interference will not occur in a particular installation. If this
equipment does cause harmful interference to radio or tele-
vision reception, which can be determined by turning the
equipment off and on, the user is encouraged to try to cor-
rect the interference by one of the following measures:
• Reorient or relocate the receiving antenna.
• Increase the separation between the equipment and re-
ceiver.
• Connect the equipment into an outlet on a circuit different
from that to which the receiver is connected.
• Consult the dealer or an experienced radio/TV technician
for help.
Any unauthorized changes or modifications to this equip-
ment would void the user’s authority to operate this device.
POWERED BY NICKEL-CADMIUM BATTERY.
MUST BE RECYCLED OR DISPOSED OF PROPERLY.
ATTENTION:
The product that you have purchased is powered by a re-
chargeable battery. The battery is recyclable. At the end of
it’s useful life, under various state and local laws, it may be
illegal to dispose of this battery into the municipal waste
stream.
Check with your local solid waste officials for details in
your area for recycling options or proper disposal.
RBRC
RBRC
Ni-Cd
0103SKMCREORI
©2003 VICTOR COMPANY OF JAPAN, LIMITED
EN
PORTABLE CD PLAYER
XL-PG39BK/XL-PG39RD/
XL-PV3
9
0SL
INSTRUCTIONS
Thank you for purchasing this JVC product. Please read these instructions carefully before starting
operation to be sure to obtain optimum performance and a longer service life from the unit.
Only compact discs bearing this mark can be used with this unit.
However, continued use of irregular shape CDs (heart-shape, octagonal, etc.) can damage
the unit.
If moisture has formed on a disc
When moisture has formed because the
disc was brought suddenly into a warm
room from a cold environment, wipe off
the moisture using a soft dry cloth.
When storing discs
Avoid locations which are
• Exposed to direct sunlight.
• Susceptible to high levels of humidity or
dust.
• Directly exposed to heat from a heating
appliance.
• On top of a car dashboard or near the
rear window.
Handling precautions
• On the label side (the side with writing)
Do not write anything using a pencil,
ball-point pen, etc. Do not use adhesive
paper or labels.
• On the disc (shiny) side
Handle this side carefully to keep it free
from fingerprints or scratches. Do not
use record cleaners, solvents, etc.
• Do not attach labels or stickers to CDs.
Do not use CDs with exposed adhesive
from tape or left over peeled off stickers.
• Do not use scratch-proof protectors or
covers other than those specified for use
with this unit.
If the disk surface is dirty
Wipe it with a damp cloth and then wipe dry.
Wipe from the center toward the outer edge.
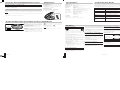
How to hold a disc
How to store the disc in
its case
How to remove a disc from its case
Label side up
Play surface (shiny surface)
LVT0978-008A [J]
For Customer Use:
Enter below the Model No. and Serial
No. which are located either on the rear,
bottom or side of the player. Retain this
information for future reference.
Model No.
Serial No.
WARNING:
TO REDUCE THE RISK OF FIRE OR ELECTRIC SHOCK, DO
NOT EXPOSE THIS APPLIANCE TO RAIN OR MOISTURE.
Special rechargeable
batteries
Ordinary dry cell
batteries/rechargeable
batteries
Check this
• Are the batteries charged?
• Is the AC adaptor (not included) securely connected?
• Is the HOLD switch set to HOLD position?
Is the disc properly secured in place?
• Is the disc properly secured in place?
• Is there moisture condensation on the lens?
(Wait for about an hour and then try again.)
• Is the headphone plug inserted all the way?
• Is the plug dirty? (Wipe away dirt on the plug.)
Are you using the unit body too near a TV or tuner? (If the
TV or tuner is connected to a simple indoor antenna,
connect it to an outdoor antenna.)
• Is the disc damaged?
• Is the disc playable on this player?
• Has the disc been inserted upside down?
Problem
Does not turn on.
Cannot close cover.
Cannot play discs.
Cannot hear music—too
noisy.
TV picture is distorted.
Radio reception is noisy.
“diSC” or “Er”is displayed
when a disc is in the
player.
Portable CD player
Type : Compact disc player
Signal detection system : Non-contact optical pickup (semiconductor laser)
Pickup system : 3 beam laser
Number of channels: : 2 channels (stereo)
Frequency response : 20 Hz to 20 000 Hz
Wow & flutter : Unmeasurable
Output : Headphones (3.5 mm dia. stereo × 1)
9 mW/ch at 10 % THD/16 Ω matching impedance (16 Ω to 1 kΩ)
Duration of battery : Approx. 3 hours when using two rechargeable batteries
(with Anti-Shock (BN-R1211J) charged for 10 hours,
Protection EX OFF) Approx. 20 hours when using two alkaline batteries
(LR6)
Power requirements : DC 3 V (“AA” size battery × 2)
DC 2.4 V (rechargeable battery × 2)
DC IN 4.5 V
Dimensions (W × H × D) : 134 mm × 30 mm × 144 mm (5-
5
/
16
”× 1-
3
/
16
”× 5-
11
/
16
”)
(Excluding buttons and controls)
Mass : 237 g (0.53 lbs)
(without batteries)
AC adaptor
Input power source : AC 120 V, 60 Hz
Output voltage : DC 4.5 V, 600 mA
*
Design and specifications are subject to change without notice.
Specifications
Troubleshooting Guide
Before requesting service for this unit, check the chart below for a possible cause of the problem
you are experiencing. Some simple checks or a minor adjustment on your part may eliminate the
problem and restore proper operation.
If you are in doubt about some of the check points, or if the remedies indicated in the chart do not
solve the problem, refer to the directory of Authorized Service Centers (enclosed with this unit) to
locate a convenient service center, or consult your dealer for instructions.
Cautions
E
L
E
C
T
R
O
N
I
C
I
N
D
U
S
T
R
I
E
S
•
A
S
S
O
C
I
A
T
I
O
N
•
EST. 1924
Maintaining the unit
Wipe the unit with a soft cloth. Remove stubborn dirt using a
cloth which has been dipped in water or soapy water and wrung
out, and then wipe dry.
• If you intend to use a chemically treated cleaning cloth, read
its directions first.
• Do not use alcohol or paint thinners.
Maintaining the lens
Open the lid and clean the lens as shown in the figure.
Use a cotton swab to gently wipe off any finger-prints.
Recommended product: Lens cleaner kit
Using the Unit with Optional Accessories Maintenance
Air blower for
camera lens
Lens
Lens
Accidental Operation Prevention Function (Hold Mode)
This function causes the unit to ignore short, accidental button
presses.
The accidental operation prevention function
prevents the following:
• Powering on the unit accidentally (which can cause the batter-
ies to go dead).
• Play being cut off unexpectedly in the middle of a track.
To use the accidental operation prevention
function
• To prevent the unit from powering up accidentally, set the
HOLD switch to the ON position.
• To prevent the unit from unexpected operation during play,
set the HOLD switch to the ON position after you starts play-
ing the disc.
“ ”
When the unit is in the hold mode according to the HOLD
switch setting in the main unit, “ ” lights up if the 6 is
pressed.
To release the function
Move the HOLD switch back to OFF position.
Note:
If the HOLD switch on the unit is set to the ON position, you
cannot turn on the unit.
Using the unit with a car audio system
XL-PV390SL comes with the car adaptor and car audio cassette adaptor.
• Car adaptor (CA-R456J or CA-R457J)
• Car audio cassette adaptor (CA-RC6)
To connect to a car audio system:
Connect the car audio cassette adaptor to the unit’s headphones jack. (When doing this, keep the unit’s
VOLUME control at a medium setting.)
Depending on the automobile used, noise may occur, and in that case, it is recommended that a KS-U32 noise filter (optional) be
used.
Note:
It may not be possible to use the unit with some types of car stereo owing to restrictions imposed by the construction of the car audio
cassette adaptor.
For further details, refer to the instructions of the part concerned.
Listening precautions
Do not play your headphones or earphones at a high volume.
Hearing experts advise against continuous extended play.
If you experience a ringing in your ears, reduce volume or discon-
tinue use.
Do not use while operating a motorized vehicle. It may create a
traffic hazard and is illegal in many areas.
You should use extreme caution or temporarily discontinue use
in potentially hazardous situations.
Even if your headphones or earphones are an open-air type de-
signed to let you hear outside sounds, don’t turn up the volume
so high that you can’t hear what’s around you.
Sound can be deceiving. Over time your hearing “comfort level”
adapts to higher volumes of sound. So what sounds “normal” can
actually be loud and harmful to your hearing.
Guard against this by setting your equipment at a safe level BE-
FORE your hearing adapts.
To establish a safe level:
• Start your volume control at a low setting.
• Slowly increase the sound until you can hear it comfortably and
clearly, and without distortion.
Once you have established a comfortable sound level:
• Set the dial and leave it there.
Rechargeable batteries
• Only the BN-R1211J battery can be recharged.
• If the power delivered by the batteries lasts for a very short
time after recharging, it means that the batteries’ service life is
over. Do not use them any more.
• Recharging already charged batteries will shorten their service
life.
• When recharging batteries for the first time or when they have
not been used for a long period of time, the play time may be
shorter than usual. In a case like this, repeatedly recharge and
discharge the batteries. This will restore them to their regular
state.
• Do not allow any metal objects to touch the terminals of re-
chargeable batteries since this may cause short-circuiting
which is dangerous.
• Do not peel off the plastic covering on the rechargeable batter-
ies. Short-circuiting may occur which is dangerous.
Dry cell batteries / rechargeable
batteries
To prevent damage to the batteries and electrolyte leakage, heed
the following points.
• Align the , and . polarities properly when inserting the bat-
teries.
• Do not mix different types or makers of batteries or old and
new batteries.
• Remove the batteries if you do not plan to use the unit for a
long period of time.
• Do not throw batteries into a fire, and do not short-circuit, dis-
assemble or subject them to excessive heat.
• Do not attempt to recharge dry cell batteries.
Carrying dry cell batteries /
rechargeable batteries around
When putting dry cell or rechargeable batteries in a pocket or
bag, ensure that no other metal objects such as a necklace are
placed together with them. Contact with metal may cause short-
circuiting which, in turn, may cause a fire.
When purchasing rechargeable
batteries
As a safety precaution, the portable CD players made by JVC
have a construction designed to make it impossible to recharge or-
dinary batteries.
To use rechargeable batteries, be absolutely sure to purchase the
rechargeable Ni-Cd batteries designed especially for this unit.
Special rechargeable Ni-Cd batteries:
BN-R1211J (set of 2)
For details, check with your dealer.
When purchasing AC adaptor
To use AC adaptor, be absolutely sure to purchase the AC adap-
tor designed especially for this unit.
AC adaptor: AA-R4513
For details, check with your dealer.
When driving a car
In the interest of traffic safety, do not operate the unit while driv-
ing.
CD-R and CD-RW discs recorded with the audio
CD format can be played back, though some may
not be played back because of the disc characteris-
tics or recording condition.
1. CLASS 1 LASER PRODUCT
2. DANGER: Invisible laser radiation when open and in-
terlock failed or defeated. Avoid direct exposure to
beam.
3. CAUTION: Do not open the top cover. There are no
user serviceable parts inside the unit; leave all servic-
ing to qualitied service personnel.
XL-PG39BK_J.p65 12/18/02, 6:48 PM1

2
4
3
Power Supply Preparations
When using rechargeable batteries
(not included)
Be sure to recharge the rechargeable batteries BN-R1211J (not in-
cluded) before using them.
For information about these, see “When purchasing rechargeable
batteries” on page 6.
Recharging procedure
1 Insert the special rechargeable batteries
into the unit.
Caution:
Do not open the battery lid too wide. It can break if you forcibly
open it beyond approximately 90°.
2 Connect the AC adaptor (not included).
See “When purchasing AC adaptor” on page 6.
*Recharging will be completed after 10 hours.
3 When recharging is complete, unplug the
AC adaptor from the power outlet and the
DC IN jack.
Button
Operation
To pause play
To stop play
To turn off the
unit
Fast forward/
reverse
Basic Play
Display/reference
Skip function
During play, press.
Search function
Keep depressed during play.
Follow steps 1–6.
In steps 1, firmly connect the plug into the jack.
• Play stops automatically when all the tracks have been played.
• When the unit is connected to a car audio system, set the volume level on the car audio system to minimum position before playing
the disc. Then, gradually increase the volume level.
For your reference:
“ ”
This indication appears for about 30 seconds if the 3/8 button is
pressed when no disc is loaded in the unit or if the disc is not
properly seated. Then, the unit is automatically shut off.
“– –”
This indication appears to let you know the status of the unit.
• Preparation period before playing the track
Flashes for several seconds after you have press the 3/8 button
to play the disc.
(Flashes until the rotational speed of disc becomes constant or
until the contents of disc is read.)
“ ”
• Opened lid
Stays lit for 30 seconds when the lid is opened.
Note:
Never insert foreign objects into the unit body.
Removing discs
Turn off the unit and, after the disc has stopped rotating, remove
the disc as shown below:
OP
EN
Auto power off function
If the unit is left in stop mode for 30 seconds, the unit powers
itself off automatically to prevent the batteries from running
down.
A
• To skip back to the previous track, quickly press the
4 button twice.
• During program play, the button is used to fast for-
ward or back through the programmed sequence of
tracks.
• During random play, the skip button cannot be used to
skip back to tracks that were played previously in the
random sequence.
During play, press.
During play, press.
In stop mode, press.
Press again to resume play.
Reverse
Forward
Off mode
Sequential Play
This function has been developed to achieve excellent performance
against sound interruption caused by vibrations. You will be able
to enjoy listening to music during jogging (not vigorous jogging).
This function is achieved by utilizing the high-performance
servo circuit and audio data that has been stored in the memory
ahead of time (up to 45 seconds worth).
Normally, the “ANTI SHOCK” indicator lights up on the display
and the Anti-Shock Protection EX is in effect.
Anti-Shock Protection EX
Other Play Methods
When the disc is played, as the audio data gradually stored in
the memory, the “ANTI SHOCK” indicator changes as follows:
To cancel the Anti-Shock Protection EX
Press the A.S.P. button in stop mode or during playback.
The “ANTI SHOCK” indicator goes out on the display.
To activate the Anti-Shock Protection EX again
Press the A.S.P. button again.
Battery indicator
When using the AC adaptor
(not included)
See “When purchasing AC adaptor” on page 6.
Connect the AC adaptor.
Refer to “Using rechargeable batteries” for connection instruc-
tions.
Note:
The unit is in the standby condition when the AC adaptor is con-
nected. The primary circuit is always “live” as long as the AC
adaptor is connected to an electrical outlet.
Using the car adaptor
XL-PV390SL comes with a car adaptor. For XL-PG39BK/XL-
PG39RD, obtain the optional car adaptor as required.
• Car adaptor (CA-R456J or CA-R457J)
The car adaptor can be used to recharge the unit’s batteries while
in a car.
DC IN jack
(DC IN 4.5 V )
AC adaptor
(not included)
(AA-R4513)
Location of Controls
When using dry-cell batteries
(not included)
Insert two “AA” (LR6) alkaline batteries.
The procedure for inserting and removing dry-cell
batteries is identical to that for rechargeable bat-
teries.
Notes:
Be sure to disconnect the AC adaptor (not included) beforehand,
if it is used.
Battery indicator
This indicator flashes on and off when the batteries are almost out
of power. Power is cut off completely a short while later.
Rechargeable batteries: Recharge batteries.
Dry-cell batteries: Replace batteries with new ones.
Notes:
• The length of time the unit can continue further operation after
the battery indicator starts flashing differs depending on the
type of batteries used.
• The battery indicator may not flash if rechargeable batteries,
other than those designated by JVC, are used.
Tip:
Turning off the Anti-Shock Protection EX will save the battery
power more or less. For details, see “Anti-shock Protection EX”
on page 4.
If the unit malfunctions or freezes during use,
disconnect the power source (the AC adaptor
and batteries) once. Then, re-connect the power
source and continue operation.
Notes:
• To operate the unit on batteries, the AC adaptor must be dis-
connected from the DC IN jack.
• It takes approximately 10 hours to recharge the rechargeable
batteries.
• Rechargeable batteries have a service life of approximately
300 charge-discharge cycles. If the operating time on one full
charge becomes noticeably shorter than it used to be, the batteries
have reached the end of their service life and should be replaced.
• Recharging takes place only when the unit is powered off. (It is
not possible to recharge the batteries while playing a CD.)
• The AC adaptor and rechargeable batteries may become warm
while recharging is in progress. This is normal and is not a mal-
function.
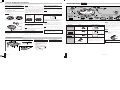
Portable CD player A
A Display
B Play / pause button (3/8)
C Skip / search buttons (4, ¢)
D Stop / power off button (7)
E PROGRAM button
F A.S.P. (Anti-shock protection EX)
button
G MODE button
H Lid open switch (OPEN 3)
I DC in jack (DC IN 4.5 V
)
J Headphones volume control
(VOLUME
)
K HOLD switch
L Hyper-bass sound switch (HBS)
M Headphones jack (
)
Skip play
You can play any track after locating it with the 4 or ¢ buttons.
Preparation: Put the unit in stop mode. (See page 3.)
1 Select the track you want to play.
2
For your reference:
You can also skip the track during playback, with the 4 or
¢ button.
Random play
You can play all tracks in a random order. After playing all
tracks, the unit stops.
1 Play the disc.
2 Press MODE until “RANDOM” flashes.
MODE
Release
Press MODE until “RANDOM” goes out, or press the 7 button to
stop the disc.
For your reference:
• You can also select random play in stop mode. In stop mode,
press MODE until “RANDOM” lights up. Then, press 6 to
start random play.
• During program play (“PROG” appears on the display). ran-
dom play is not selectable.
Program play
You can program up to 20 tracks in any desired order including
the same tracks.
1 During playback or in stop mode, press PRO-
GRAM.
PROGRAM
2 Select the desired track.
3 Press PROGRAM.
The track is registered, and “00” and the next program se-
quence number appear.
PROGRAM
4 Repeat steps 2 and 3 to select other
tracks.
When you program exceeding 20 tracks, the program se-
quence number returns to “01” and will overwrite the previ-
ous setting.
5 Press the 3/8 button.
The tracks are played in the programmed order, and then
the unit stops.
• To confirm the programmed tracks
In stop mode, press PROGRAM repeatedly. The programmed
track number will successively appear together with the pro-
gram sequence number. At this time, you can change the pro-
gram, if required.
If the programmed tracks are less than 20, track number “00”
appears for the youngest programmable sequence number, en-
abling further programming.
• To delete the entire programmed sequence
Turn off the unit, or set the track number to 00 for the first pro-
gram sequencer number, “01”.
Program sequence
number
Track number to be programmed
00: Not programmed yet.
e.g. Track number 3
Repeat function
You can repeatedly play one track or all tracks.
1 During playback or in stop mode, press MODE
until the repeat indicator lights up.
MODE
2 When you select repeat function in stop
mode, press 6.
Cancelling
Press MODE until the repeat indicator goes out and the unit re-
turns to normal play mode.
For your reference:
Repeat function is also effective for program play.
Intro play
You can successively play the first 10 seconds of every track
from the first track.
Intro play stops after playing the last track.
1 During playback, press MODE until “INTRO”
flashes.
MODE
2 Press the 3/8 button.
The “INTRO” play will start from the first track.
Cancelling
Press MODE until “INTRO” goes out and the unit returns to nor-
mal play mode.
To normally play the track being played
Press the 3/8 button.
For your reference:
• You can also enter intro play in stop mode.
• You can also use intro play for program play.
Hyper-Bass Sound effect
You can enjoy powerful bass sound.
To get the hyper-bass sound effect
Set HBS switch to “1”.
Set HBS switch to “2” to get more effect.
OFF 21
HBS
To cancel the effect
Set HBS switch to “OFF”.
Notes:
• During Anti-Shock Protection EX operation, the disc rotates at
a higher rate than usual in order to collect extra audio data.
This may cause the batteries to run out faster and could result
in a slight increase in disc rotation noise.
• The Anti-Shock Protection EX function can be switched ON
and OFF during playback. However, this may cause a slight
interruption in the sound because the disc’s rotational speed
changes.
If the battery lid
compartment
comes loose
Slide the lid back into
place horizontally.
Removing batteries
Push up on the battery in
the direction indicated by
the arrow. Then lift it out.
Refer to the specifications (page 6) for information on operating times when using rechargeable batteries or dry-cell batteries.
B
[Fully stored]
Total number of tracks
Total playing time.
Right side panel of the
unit
ANTI SHOCK
indicator
AC power outlet
Stop mode
Stereo headphones
XL-PG39BK_J.p65 12/18/02, 6:49 PM2
-
 1
1
-
 2
2


JVC XL-PG39BK User manual
- Category
- Car media receivers
- Type
- User manual
- This manual is also suitable for
Ask a question and I''ll find the answer in the document
Finding information in a document is now easier with AI
Related papers
Other documents
-
Audiovox CE144A Operating instructions
-
-
Curtis CD156UK User manual
-
-
Insignia IS-PA040719 User manual
-
-
-
Memorex MD6115 User manual
-
Panasonic SLXP600 Operating instructions
-