Page is loading ...

UC Wireless System User Guide
27B8614 (AA)
2001, Shure Incorporated
Printed in U.S.A.
UC WIRELESS SYSTEM
User Guide

– 1 –
TABLE OF CONTENTS
QUICK SETUP GUIDE FOR THE SHURE UC WIRELESS SYSTEM 2. . . . . . . . . . . . . . . . . . . . . . . . . . . . . . . . . .
UC4 Receiver Setup 2. . . . . . . . . . . . . . . . . . . . . . . . . . . . . . . . . . . . . . . . . . . . . . . . . . . . . . . . . . . . . . . . . . . . . . . . .
UC1/UC2 Transmitter Setup 2. . . . . . . . . . . . . . . . . . . . . . . . . . . . . . . . . . . . . . . . . . . . . . . . . . . . . . . . . . . . . . . . . .
System Operation 2. . . . . . . . . . . . . . . . . . . . . . . . . . . . . . . . . . . . . . . . . . . . . . . . . . . . . . . . . . . . . . . . . . . . . . . . . . .
SYSTEM DESCRIPTION 3. . . . . . . . . . . . . . . . . . . . . . . . . . . . . . . . . . . . . . . . . . . . . . . . . . . . . . . . . . . . . . . . . . . . . . . . .
SYSTEM FEATURES 3. . . . . . . . . . . . . . . . . . . . . . . . . . . . . . . . . . . . . . . . . . . . . . . . . . . . . . . . . . . . . . . . . . . . . . . . . . . .
UC1 TRANSMITTER FEATURES AND CONTROLS 4. . . . . . . . . . . . . . . . . . . . . . . . . . . . . . . . . . . . . . . . . . . . . . . .
UC2 TRANSMITTER FEATURES AND CONTROLS 5. . . . . . . . . . . . . . . . . . . . . . . . . . . . . . . . . . . . . . . . . . . . . . . .
UC4 RECEIVER CONTROLS AND CONNECTORS 6. . . . . . . . . . . . . . . . . . . . . . . . . . . . . . . . . . . . . . . . . . . . . . . .
RECEIVER CABLE CONNECTIONS 7. . . . . . . . . . . . . . . . . . . . . . . . . . . . . . . . . . . . . . . . . . . . . . . . . . . . . . . . . . . . .
TRANSMITTER SETUP 7. . . . . . . . . . . . . . . . . . . . . . . . . . . . . . . . . . . . . . . . . . . . . . . . . . . . . . . . . . . . . . . . . . . . . . . . .
Checking the Transmitter Battery 7. . . . . . . . . . . . . . . . . . . . . . . . . . . . . . . . . . . . . . . . . . . . . . . . . . . . . . . . . . . . . .
Changing the UC1 Transmitter Battery 8. . . . . . . . . . . . . . . . . . . . . . . . . . . . . . . . . . . . . . . . . . . . . . . . . . . . . . . . .
Changing the UC2 Transmitter Battery 8. . . . . . . . . . . . . . . . . . . . . . . . . . . . . . . . . . . . . . . . . . . . . . . . . . . . . . . . .
OPERATING THE UC1 BODY–PACK SYSTEM 9. . . . . . . . . . . . . . . . . . . . . . . . . . . . . . . . . . . . . . . . . . . . . . . . . . . .
OPERATING THE UC2 HAND-HELD SYSTEM 10. . . . . . . . . . . . . . . . . . . . . . . . . . . . . . . . . . . . . . . . . . . . . . . . . . . .
CHANGING THE TRANSMITTER SETTINGS 10. . . . . . . . . . . . . . . . . . . . . . . . . . . . . . . . . . . . . . . . . . . . . . . . . . . . .
Adjusting the Transmitter Gain Level 10. . . . . . . . . . . . . . . . . . . . . . . . . . . . . . . . . . . . . . . . . . . . . . . . . . . . . . . . . . .
Changing the Transmitter Group/Channel Settings 11. . . . . . . . . . . . . . . . . . . . . . . . . . . . . . . . . . . . . . . . . . . . . . . .
Activating the UC1 Transmitter Attenuator Switch 11. . . . . . . . . . . . . . . . . . . . . . . . . . . . . . . . . . . . . . . . . . . . . . . . .
CHANGING THE RECEIVER SETTINGS 12. . . . . . . . . . . . . . . . . . . . . . . . . . . . . . . . . . . . . . . . . . . . . . . . . . . . . . . . .
Changing the Receiver Group Setting 12. . . . . . . . . . . . . . . . . . . . . . . . . . . . . . . . . . . . . . . . . . . . . . . . . . . . . . . . .
Changing the Receiver Channel Setting 12. . . . . . . . . . . . . . . . . . . . . . . . . . . . . . . . . . . . . . . . . . . . . . . . . . . . . . .
Adjusting the Receiver Squelch Setting 12. . . . . . . . . . . . . . . . . . . . . . . . . . . . . . . . . . . . . . . . . . . . . . . . . . . . . . . .
Adjusting the Receiver Equalizer Setting 13. . . . . . . . . . . . . . . . . . . . . . . . . . . . . . . . . . . . . . . . . . . . . . . . . . . . . . .
Adjusting the Low–Cut Filter (High Pass) Setting 13. . . . . . . . . . . . . . . . . . . . . . . . . . . . . . . . . . . . . . . . . . . . . . . .
Adjusting for High–Frequency Shelving 13. . . . . . . . . . . . . . . . . . . . . . . . . . . . . . . . . . . . . . . . . . . . . . . . . . . . . . . .
RECEIVER MOUNTING 14. . . . . . . . . . . . . . . . . . . . . . . . . . . . . . . . . . . . . . . . . . . . . . . . . . . . . . . . . . . . . . . . . . . . . . . .
Table Mounting 14. . . . . . . . . . . . . . . . . . . . . . . . . . . . . . . . . . . . . . . . . . . . . . . . . . . . . . . . . . . . . . . . . . . . . . . . . . . . .
Rack Mounting a Single Receiver 14. . . . . . . . . . . . . . . . . . . . . . . . . . . . . . . . . . . . . . . . . . . . . . . . . . . . . . . . . . . . .
Rack Mounting Two Receivers Side by Side 15. . . . . . . . . . . . . . . . . . . . . . . . . . . . . . . . . . . . . . . . . . . . . . . . . . . .
RECEIVER ANTENNA INSTALLATION 16. . . . . . . . . . . . . . . . . . . . . . . . . . . . . . . . . . . . . . . . . . . . . . . . . . . . . . . . . . .
Rear Mounted Antenna Installation 16. . . . . . . . . . . . . . . . . . . . . . . . . . . . . . . . . . . . . . . . . . . . . . . . . . . . . . . . . . . .
Front Mounted Antenna Installation 16. . . . . . . . . . . . . . . . . . . . . . . . . . . . . . . . . . . . . . . . . . . . . . . . . . . . . . . . . . .
Remote Antenna Installation 17. . . . . . . . . . . . . . . . . . . . . . . . . . . . . . . . . . . . . . . . . . . . . . . . . . . . . . . . . . . . . . . . .
LOGIC CONNECTION SPECIFICATIONS 18. . . . . . . . . . . . . . . . . . . . . . . . . . . . . . . . . . . . . . . . . . . . . . . . . . . . . . . .
TIPS FOR ACHIEVING OPTIMUM PERFORMANCE 19. . . . . . . . . . . . . . . . . . . . . . . . . . . . . . . . . . . . . . . . . . . . . . .
TROUBLESHOOTING 19. . . . . . . . . . . . . . . . . . . . . . . . . . . . . . . . . . . . . . . . . . . . . . . . . . . . . . . . . . . . . . . . . . . . . . . . . .
SPECIFICATIONS 20. . . . . . . . . . . . . . . . . . . . . . . . . . . . . . . . . . . . . . . . . . . . . . . . . . . . . . . . . . . . . . . . . . . . . . . . . . . . .
LICENSING INFORMATION 20. . . . . . . . . . . . . . . . . . . . . . . . . . . . . . . . . . . . . . . . . . . . . . . . . . . . . . . . . . . . . . . . . . . . .
NOTE: Operation of this device is subject to the following two conditions:
(1) this device may not cause interference, and
(2) this device must accept interference, including interference that may cause undesired operation of the device.

ENGLISH
ENGLISH
– 2 –
QUICK SETUP GUIDE FOR THE SHURE UC WIRELESS SYSTEM
UC4 Receiver Setup
1. Plug the dc power supply into the power connector on the back of the receiver. Connect the other end of the power
supply into an electrical outlet.
2. Attach the two antennas to the ANTENNA IN BNC connectors.
3. Connect audio cable(s) from the UC4 audio output(s) into the audio input(s) of the mixer and/or amplifier.
4. If you are using a handheld microphone system or lavalier microphone system, move the receiver MIC/LINE switch
to the MIC position. If you are using an instrument system, move the MIC/LINE switch to the LINE position. Make
sure the receiver settings match the input settings on the mixer.
5. Turn the receiver on.
Note: If you encounter RF interference, change the Group and Channel setting using the supplied screwdriver. Re-
fer to the supplement for additional frequency information.
6. Set the OUTPUT LEVEL CONTROL to maximum (fully clockwise).
UC1/UC2 Transmitter Setup
1. Open the battery cover and insert a fresh 9V alkaline battery.
2. Make sure the transmitter Group and Channel settings match those of the receiver. If they do not, use a screwdriver
to rotate the Group and Channel switches clockwise to increase the setting or counterclockwise to decrease the
setting.
3. If you are using a UC1 transmitter with a lavalier microphone, make sure the Attenuator switch is set to the 0 dB
position. If you are using a UC1 transmitter with an instrument adapter cable, set the Attenuator switch to the –20
dB position.
4. Close the battery cover.
System Operation
1. Turn the transmitter on and speak into the microphone or play your instrument. The RF and audio LEDs on the
receiver should illuminate, indicating that it is receiving the transmitter signal.
2. Adjust the transmitter gain until the yellow LEDs on the receiver light up as you speak into the microphone or play
your instrument. The red LEDs should light up when you speak or play your instrument loudly.
Note: For indoor use only.

– 3 –
UC1
UC2
UC4
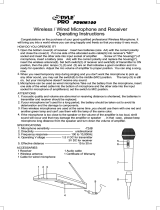
UC WIRELESS SYSTEM COMPONENTS
FIGURE 1
SYSTEM DESCRIPTION
The Shure UC Wireless System is a frequency–agile, diversity wireless system operating in the UHF band. Both
the receiver and the transmitter are microprocessor controlled by Phase Locked Loop (PLL) circuitry for a clear, steady
signal. The receiver is half–rack sized and can be mounted in a standard 19 inch (482 mm) audio equipment rack.
Each Shure UC Wireless System includes the following components:
UC1 Body-Pack Transmitter with your choice of lavalier microphone, headworn microphone, instrument microphone
or cable,
or
UC2 Hand-Held Microphone-Transmitter with your choice of interchangeable microphone heads, including:
• SM58 cardioid dynamic microphone
• BETA 58A
supercardioid premium dynamic microphone
• SM87 supercardioid condenser microphone
• BETA 87 supercardioid premium condenser microphone
and a
UC4 Diversity Receiver with power supply, antennas, and rack-mounting hardware.
Accessories include a Remote Audio Mute Switch for body pack transmitters, an Antenna Distribution System, a Passive
Antenna Splitter/Combiner, and Front/Remote Antenna Mounting Hardware. All accessories are available separately.
SYSTEM FEATURES
• UHF Band Operation. The Shure UC System operates within the UHF frequency band, which is less con-
gested than the VHF band. Typically, UHF systems encounter less interference than VHF systems.
• Frequency Agility. The UC transmitter and receiver frequencies can be changed to avoid RF interference. This
ensures interference–free operation, even in the most congested RF environments.
• 1/2 Rack Receiver Design. The UC4 receiver interfaces with the HR (half–rack) format to save rack space.
The UC4 receiver is supplied with hardware for single and dual rack mounting.
• MARCAD Diversity. Exclusive Shure MARCAD (MAximum Ratio Combining Audio Diversity) circuitry monitors
signals from both receiver sections and combines them into a single output signal. MARCAD provides superior
reception and exceptional freedom from dropouts.
• Built–in Equalizer (On Receiver). Lets you tailor frequency response to match other devices in the system.
• Tone Key Squelch Circuitry. Prevents unwanted noise from entering the system, including the “pop” noise that
occurs when the transmitter is turned on or off.
• Noise Squelch Circuitry. Analyzes signal quality rather than signal strength, virtually eliminating the possibility
of annoying noise bursts.
• Dual RF Meters (On Receiver). Indicate received signal strength at each antenna, making it easier to identify
“dead spots” in the performing area.
• Audio Meter (On Receiver). Lets you monitor received audio level and helps you optimize the transmitter gain
setting.
• Logic In/Out Terminal (On Receiver). Provides logic interface with external devices.
• Preconfigured Group/Channel and Frequency Setup. Ensures frequency compatibility and simplifies instal-
lation of multiple UC systems. A “Group” is a preconfigured set of frequencies or channels that do not interfere
with one another.
• Optional Remote Mute feature on body–pack. Lets you externally mute body pack transmitter during perfor-
mance.

ENGLISH
ENGLISH
– 4 –
1
234
6
7
8
9
10
11
12
5
1
234
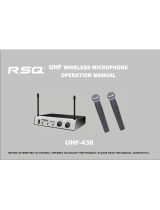
UC1 BODY PACK TRANSMITTER FEATURES AND CONTROLS
FIGURE 2
UC1 TRANSMITTER FEATURES AND CONTROLS
1. Antenna. A flexible 1/4 wave whip antenna is permanently attached to the top of the UC1 Body–Pack transmitter.
2. Power/Battery Fuel Gauge. When the Power switch is in the ON position, one of the three LEDs will glow, indicat-
ing that the transmitter is on. The LED color indicates the amount of battery life remaining. Refer to the “Checking
the Transmitter Battery” paragraph.
3. ON/OFF Switch. Turns transmitter power on and off.
4. Input Connector (LEMO connector optional). This Switchcraft TA4F “Tini Q–G” connector provides connection with
a variety of lavalier, instrument and headset microphones and cables. LEMO connectors are available as an option.
5. Remote Mute Switch Input Connector. When used with the optional Shure UA101 Remote Mute Switch, this
3.5 mm connector lets you remotely mute the body pack during a performance.
6. Group Setting Control (Red Switch). Rotating this switch clockwise advances the Group setting. Rotating it coun-
terclockwise decreases the Group setting. Use the supplied screwdriver (Xcelite R3322 or equivalent) to make ad-
justments.
7. Channel Setting Control (Green Switch). Rotating this switch clockwise advances the Channel setting. Rotating
it counterclockwise decreases the Channel setting. Use the supplied screwdriver (Xcelite R3322 or equivalent) to
make adjustments.
8. Input Attenuation Control. This two position switch lets you select either 0 dB or –20 dB attenuation, depending
on the input source and application. Use the 0 dB position for normal applications including voice, and low output
instruments. Use the 20 dB pad position for high output instruments such as electric guitars with active electronics.
9. Audio Gain Control. Changes the audio level to accommodate various sound sources (e.g. singing, speaking,
or musical instrument). Use the supplied screwdriver (Xcelite R3322 or equivalent) to make adjustments. Refer to
the “Adjusting the Transmitter Gain Level” paragraph.
10.Battery Compartment. Holds one 9V battery.
11. Battery Compartment Cover. Hinged cover on front surface opens to expose the battery and Group/Channel,
Gain, and Attenuation controls.
12.Battery Cover Release Tabs. Squeeze these two tabs together to release the battery cover.
13.Belt Clip (not shown). Allows the transmitter to be worn on a belt, waistband, or guitar strap. The belt clip can be
rotated 180°.

– 5 –
1
5
3
7
4
8
6
2
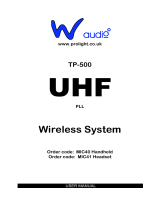
UC2 HAND–HELD TRANSMITTER FEATURES AND CONTROLS
FIGURE 3
UC2 TRANSMITTER FEATURES AND CONTROLS
1. Grille. Protects the microphone cartridge and helps reduce breath sounds and wind noise. The grilles for the vari-
ous microphone heads differ in appearance.
2. Power Indicator/Battery Fuel Gauge. When the UC2 is turned on, one of three LEDs will glow, indicating that
power is on and the amount of battery life remaining. Refer to the “Checking Transmitter Battery” paragraph for
more information on battery life.
3. Power Switch. Turns the transmitter on and off.
4. Audio Gain Control. Changes the audio level to accommodate various sound sources (e.g. singing or speaking).
Use the supplied screwdriver (Xcelite R3322 or equivalent) to make adjustments. Refer to the “Adjusting the Trans-
mitter Gain Level” paragraph.
5. Group Setting Control (Red Switch). Rotating this switch clockwise advances the Group setting. Rotating it coun-
terclockwise decreases the Group setting. Use the supplied screwdriver (Xcelite R3322 or equivalent) to change
the setting.
6. Channel Setting Control (Green Switch). Rotating this switch clockwise advances the Channel setting. Rotating
it counterclockwise decreases the Channel setting. Use the supplied screwdriver (Xcelite R3322 or equivalent) to
make adjustments.
7. 9 V Battery. Provides power to the transmitter and microphone.
8. Battery Cover. Unscrews to expose battery and Group, Channel, Gain, and Attenuation controls.

ENGLISH
ENGLISH
– 6 –
A B
1
2
345678
9
10 11
12
13 14 15 16 17 17
UC4 RECEIVER CONTROLS AND INDICATORS
FIGURE 4
UC4 RECEIVER CONTROLS AND CONNECTORS
1. A/B Diversity Signal Indicators. Indicate presence of received RF signal and diversity status.
2. Squelch Control. Sets the point at which the receiver “mutes” when the transmitter signal becomes noisy, weak,
or fails. This control is factory-set at the 12 o’clock position.
3. RF Level Indicators. Indicate RF signal strength. The more LEDs that glow, the stronger the received signal. If none
of these LEDs glow, no signal is being received.
4. Audio Level Indicators. Indicate transmitted audio signal strength. Green indicates normal operation. Amber
indicates approaching overload condition. Red indicates excessive audio levels.
5. Low Transmitter Battery Level Warning Indicator. This LED glows when the transmitter battery level is low. Refer
to the “Checking Transmitter Batteries” section.
6. Group Setting Control. Rotate this switch clockwise to advance the Group setting, or rotate it counterclockwise
to decrease the setting. Use the supplied screwdriver to make adjustments.
7. Group/Channel Display. Indicates the current Group and Channel settings.
8. Channel Setting Control. Rotate this switch clockwise to advance the Channel setting, or rotate it counterclock-
wise to decrease the setting. Use the supplied screwdriver to make adjustments.
9. Low Frequency Cut and High Frequency Shelving Equalization Controls. Adjustable low–frequency roll off
(high pass) reduces undesirable low–frequency signals. The level boost or cut in the mid to high–frequency region
compensates for off–axis lavalier microphones and adjusts the sibilance of vocal microphones.
10.Audio Output Control. Adjusts the receiver output level to match the required input levels of a mixer or amplifier.
Normally, this control is set fully clockwise.
11. Power On/Off Switch. Turns the receiver on and off.
12.Power Connector. Accepts power from the supplied AC adapter, or from any filtered 15–18 Vdc (600 mA minimum)
supply. It also accepts the dc power cord from a Shure UA845 Antenna Distribution System.
13.Low Z (balanced) Output Connector. XLR connector provides balanced low–impedance mic level or line level
output.
14.Mic/Line Slide Switch. Controls output of balanced XLR connector. It can be set for microphone (–14 dBu) or line–
level (+16 dBu).
15.High Z (unbalanced) Output Connector. This 1/4 inch phone jack provides unbalanced high impedance auxiliary
level output.
16.TTL Logic Output Terminal. This “Phoenix Style” connector lets you control external devices based on the status
of the UC System.
17.Antenna Input Connectors. BNC–type connectors provide connection to the supplied antennas or to the coaxial
cable used with a distribution amplifier.

– 7 –
RECEIVER CABLE CONNECTIONS
1. Connect the receiver output to the mixer or amplifier input, using a standard audio cable with a female 3–pin XLR
connector or 1/4” phone plug. Refer to Figure 5.
2. Connect the AC power adapter to the POWER jack on the rear panel of the receiver.
3. Plug the AC adapter into an AC power source.
Power Supply Model Power Type
PS40 90–120 VAC, 60 Hz
PS40E 230 VAC, 50/60 Hz
PS40UK 230 VAC, 50/60 Hz
PS40J 100 VAC, 50/60 Hz
AC POWER
SOURCE
AUDIO MIXER
AMPLIFIER
LOUDSPEAKER
LOUDSPEAKER
DC POWER
SUPPLY
TYPICAL UC4 RECEIVER CABLING CONFIGURATION
FIGURE 5
NOTE: If a receiver is rack mounted, RF performance can be improved by remotely locating the antennas. Diversity
performance can be improved by placing one or both antennas at a remote location and separating them by at least
1.5 meters (60 in.). Use UA825 or UA850 Extension Cable kits or other low–loss cable (RG8 or equivalent) with
remote antennas. Do not use the supplied 1/4 wave antennas at remote locations. Use only UA820A 1/2 wave an-
tennas for remote installation.
TRANSMITTER SETUP
Checking the Transmitter Battery
Turn the transmitter ON/OFF switch to the ON position and verify that one of the LEDs glow. The amount of battery
life remaining is indicated by which LED is lit, as shown in the following table:
Transmitter LED Color Receiver LED Color Remaining Transmitter Operating Time
Green –– 2 to 8 hours
Amber –– 45 minutes to 2 hours
Red Red 45 minutes or less
*Estimated operating time assumes the use of a fresh 9V alkaline battery.
NOTE: If extended performance time is required, use an Ultralife 9V lithium battery, which can last more than twice
as long as an alkaline battery. A rechargeable 8.4V nicad battery will cause the indicators to change more quickly
than if a 9V alkaline battery is used. Carbon-zinc and zinc-chloride batteries will not provide adequate power and are
not recommended. Actual times depend on the type and brand of battery used.

ENGLISH
ENGLISH
– 8 –
Changing the UC1 Transmitter Battery
1. Make sure the transmitter power ON/OFF switch is in the OFF position.
2. Open the transmitter battery compartment by squeezing the two tabs on either side of the transmitter. Then flip the
battery cover down. Refer to Figure 6.
3. Lift up on the edge of the battery remove it.
4. Insert a new 9V battery in the compartment. Maintain proper battery polarity (”+/–”).
CHANGING THE UC1 TRANSMITTER BATTERY
FIGURE 6
Changing the UC2 Transmitter Battery
1. Make sure the transmitter power ON/OFF switch is in the OFF position.
2. Unscrew the battery cover.
3. Pull down on the old battery and remove it. Refer to Figure 7.
4. Install a fresh 9V alkaline battery. Make sure the battery terminals match the terminals in the transmitter. Screw the
battery cover back into place.
CHANGING THE UC2 TRANSMITTER BATTERY
FIGURE 7

– 9 –
OPERATING THE UC1 BODY–PACK SYSTEM
1. Clip the UC1 body–pack transmitter to your belt, waistband, or guitar strap.
2. Connect the lavalier microphone, headset microphone, WM98 microphone, or instrument adapter cable to the UC1
transmitter, as shown in Figure 8.
MICROPHONE CABLE OR
INSTRUMENT ADAPTER CABLE
CONNECTING A MICROPHONE OR INSTRUMENT ADAPTER CABLE TO THE UC1 TRANSMITTER
FIGURE 8
3. If you are using a lavalier microphone, clip it to your tie, lapel, or other garment. For best results, the microphone
should be 15 to 20 cm (6 to 8 in.) below your chin.
4. If you are using an instrument adapter cable, plug it into the instrument.
5. If you are using a WM98 condenser mic, install it onto the Shure A98KCS Horn Mount assembly attached to the
bell of your horn. Refer to Figure 9.
6. Slide the transmitter ON/OFF switch to the ON position. One of the three transmitter LEDs will glow. If none of the
LEDs glow, change the battery.
7. Turn the receiver on by pushing the ON button. The receiver LED display and RF LEDs will glow.
8. Make sure the transmitter and receiver are tuned to the same Group and Channel. If necessary, change the settings
on either the transmitter or receiver.
9. Begin speaking or playing your instrument. Rotate the OUTPUT LEVEL knob on the receiver as necessary to
achieve desired receiver output levels. (This does not affect the audio LED status.)
NOTE: If the red PEAK LEDs on the receiver do not flicker during the loudest sounds, or if they are always on, the
transmitter gain may need to be increased or decreased. Refer to the “Adjusting the Transmitter Audio Gain Level”
paragraph. If the system still does not operate properly, consult the “Troubleshooting” table included in this manual.
10. When the performance or presentation is over, slide the transmitter ON/OFF switch to the OFF position to conserve
battery power.
LAVALIER
MIC
WA302 INSTRUMENT
ADAPTER CABLE
WM98 MIC
& A98KCS
HORN MOUNT
WH10
HEADSET
OPERATING THE BODY–PACK SYSTEM
FIGURE 9

ENGLISH
ENGLISH
– 10 –
OPERATING THE UC2 HAND-HELD SYSTEM
1. Slide the transmitter power ON/OFF switch to the ON position. One of the three transmitter LEDs will glow. If none
of the LEDs glow, change the battery.
2. Turn the receiver on by pushing the ON button. The receiver LED display and RF LEDs will glow.
3. Make sure the transmitter and receiver are tuned to the same Group and Channel. If necessary, change the settings
on either the transmitter or receiver.
4. Begin speaking or singing into the microphone. Rotate the OUTPUT LEVEL knob on the receiver as necessary to
achieve the desired receiver output level. (This does not affect the audio LED status.) See Figure 10.
NOTE: If the red PEAK LEDs on the receiver do not flicker during the loudest sounds, or if they are always on, the
transmitter gain may need to be increased or decreased. Refer to the “Adjusting the Transmitter Audio Gain Level”
paragraph. If the system still does not operate properly, consult the “Troubleshooting” table.
5. When the performance or presentation is over, slide the transmitter ON/OFF switch to the OFF position to conserve
battery power.
OPERATING THE HANDHELD SYSTEM
FIGURE 10
CHANGING THE TRANSMITTER SETTINGS
Adjusting the Transmitter Gain Level
The transmitter audio gain level has been factory preset to provide satisfactory output in most applications. Howev-
er, for loud singers or high–output musical instruments, the preset level may be too high, as indicated by constant glow
of the red audio LED on the receiver. Soft spoken talkers or singers may find that the factory setting is too low, as indi-
cated by the failure of the amber audio level LED on the receiver to glow at all.
To adjust audio gain, open the battery compartment and locate the transmitter audio gain control. Use the supplied
screwdriver to make adjustments. See Figure 11.
For high sound pressure level applications, such as loud singing or playing, decrease audio gain level by rotating
the gain control counterclockwise (while the microphone is in use) until the red audio level LEDs on the receiver flickers
during the loudest sounds.
For low sound pressure level applications, such as soft singing or playing, increase audio gain level by rotating the
gain control clockwise until the red audio level LEDs on the receiver flickers during the loudest sounds.
NOTE: For guitar applications, the minimum setting (full counterclockwise) is recommended. If you are using the Shure
WH10TQG headset, rotate the gain control to the fully clockwise position. Then, if necessary, rotate it back slightly.
INCREASE GAIN
DECREASE GAIN
INCREASE GAIN
DECREASE GAIN
ADJUSTING THE TRANSMITTER GAIN LEVEL
FIGURE 11

– 11 –
Changing the Transmitter Group/Channel Settings
1. Turn the transmitter off and open the battery compartment to expose the GROUP and CHANNEL switches. Refer
to Figure12 below.
2. Using the supplied screwdriver, rotate the GROUP switch until the desired setting is reached. Then rotate the
CHANNEL switch until the the desired setting is reached.
IMPORTANT: Transmitter GROUP and CHANNEL settings must match receiver GROUP and CHANNEL settings.
CHLGRP
CHLGRP
CHANGING THE TRANSMITTER GROUP/CHANNEL SETTINGS
FIGURE 12
Activating the UC1 Attenuator Switch
When using the UC1 transmitter with high output devices such as electric guitar or brass instruments, set the Attenu-
ator switch to the –20 dB position. This will provide additional headroom and prevent unwanted clipping and distortion.
See Figure 13 below.
ATTENUATOR
SWITCH
0
–20
ACTIVATING THE UC1 TRANSMITTER ATTENUATION SWITCH
FIGURE 13

ENGLISH
ENGLISH
– 12 –
CHANGING RECEIVER SETTINGS
The receiver display identifies the operating frequency by Group and Channel. The character on the left represents
the Group setting and the character on the right represents the Channel setting. Groups are preconfigured sets of
frequencies or channels that work well together. A complete list of compatible Groups and Channels is included in
the separate UC Wireless Frequency Compatibility Guide.
Changing the Receiver Group Setting
To advance the receiver Group setting, rotate the Group switch clockwise, using the supplied screwdriver. Rotate
the switch counterclockwise to decrease the setting. The display will indicate the change. See Figure 14.
NOTE: A dash mark (––) indicates an unavailable Group.
CHANGING THE UC4 RECEIVER GROUP SETTING
FIGURE 14
Changing the Receiver Channel Setting
Using the supplied screwdriver, rotate the Channel switch clockwise to increase the setting. Rotate it counterclock-
wise to decrease the setting. The display will indicate the change. See Figure 15.
NOTE: A dash mark (––) indicates an unavailable Channel.
CHANGING THE UC4 RECEIVER CHANNEL SETTING
FIGURE 15
Adjusting the Receiver Squelch Setting
The receiver squelch control is factory preset at the 12 o’clock position for optimum performance. Normally, no fur-
ther adjustment is required. However, it is possible to adjust the squelch control to improve either signal quality or in-
crease system range.
To raise the squelch threshold, rotate the control clockwise. This causes the receiver to demand a higher quality
signal (less noise before muting), but it reduces operating range. See Figure 16.
To lower the squelch threshold, rotate the control counterclockwise. This allows a lower quality signal through (more
noise before muting), but it extends the operating range. See Figure 16.
ADJUSTING THE UC4 RECEIVER SQUELCH SETTING
FIGURE 16

– 13 –
Adjusting the Equalizer Setting
The UC4 receiver incorporates a two band equalizer to help adjust the sound of the wireless system to match that
of other wired and wireless products in an installation. See Figure 17.
ADJUSTING THE UC4 RECEIVER EQUALIZER SETTING
FIGURE 17
Adjusting the Low–Cut Filter (High Pass)
The low–cut (or high–pass) filter allows all frequencies above its cutoff point to pass from filter input to filter output
without attenuation, while frequencies below its cutoff point are attenuated. See Figure 18. The cutoff point is defined
as the frequency at which the signal has dropped 3 dB relative to the flat bandpass region. Below the cutoff point, the
filter exhibits increasingly more attenuation as the frequency level drops. The rate at which this attenuation occurs
is expressed in decibels per octave (dB/oct). The UC4 Receiver has a one–pole, low–cut filter of 6 dB per octave.
Low–cut filters are used to attenuate the audio signal when low frequency noise or excessive proximity effect is pres-
ent. For example, the low–frequency vibration caused by wind, footsteps, and vehicular traffic can be transmitted
through microphone stands to the microphone, and from there to the sound system. These low frequencies, typically
ranging from 5 to 80 Hz, are generally not desirable.
-10
-8
-6
-4
-2
0
+2
20 100 1,000 5,000
FREQUENCY (Hz)
FULL CW
50% ROTA-
TION
FULL CCW
AMPLITUDE (dBV)
ADJUSTING THE LOW CUT FILTER
FIGURE 18
Adjusting for High–Frequency Shelving
The fixed frequency equalizer produces a 6 dB boost or cut at 5 kHz and above. See Figure 19. High–frequency
shelving is extremely useful for boosting flat frequency response, softening sibilant vocal microphones, or enhancing
the sound of off–axis lavalier microphones. See Figure 19.
200
-10
-8
-6
-4
-2
0
+2
+4
+6
+8
+10
1,000 10,000
20,000
FREQUENCY (Hz)
FULL CW
FULL
CCW
50%
ROTATION
AMPLITUDE (dBV)
ADJUSTING FOR HIGH FREQUENCY SHELVING
FIGURE 19

ENGLISH
ENGLISH
– 14 –
RECEIVER MOUNTING
Table Mounting
To mount a receiver on a table or other horizontal surface, attach the four adhesive bumpers to the bottom corners
of the receiver and place the receiver on the mounting surface. See Figure 20.
RUBBER FEET
R
TABLE MOUNTING THE UC4 RECEIVER
FIGURE 20
Rack Mounting a Single Receiver
To mount a single receiver in an audio equipment rack, select the single rack mounting kit supplied with the system
and proceed as follows:
1. Remove the two screws from each side of the receiver. See Figure 21.
2. Position the large mounting bracket over the holes on one side of the receiver and secure them with the screws
removed in Step 1. One of the brackets will be longer than the other.
UC4 RECEIVER
(TOP VIEW)
BRACKET
BRACKET
FRONT
UC4 RECEIVER
(TOP VIEW)
EQUIPMENT RACK
ANTENNA
HOLE PLUG
ANTENNA
HOLE PLUG
FRONT
RACK MOUNTING A SINGLE UC4 RECEIVER
FIGURE 21
NOTE: If you are not front mounting the antennas with a UA600 Front Mount Conversion Kit, insert the plastic plugs
into the bracket holes.
3. Secure the receiver to a 19-inch audio equipment rack, using the four supplied screws.

– 15 –
Rack Mounting Two Receivers Side by Side
To mount two receivers side by side in an equipment rack, select the double rack–mounting kit supplied with the
system and proceed as follows:
1. Remove the two screws on the outer side of each receiver.
2. Position the small mounting brackets over the holes on the outer side of each receiver, and secure them with the
screws removed in Step 1.
3. Remove the screws on the inner side of each receiver.
4. Place two link bars over the holes and secure them with the screws removed in Step 3. For the receiver on the left
(Receiver 1 in Figure 22), the link bar should be positioned so that its threaded hole is toward the front of the receiver.
For the receiver on the right (Receiver 2 in Figure 22), the link bar should be positioned so that its threaded hole is
toward the rear of the receiver. See Figure 22.
5. Place the two receivers next to each other so that the threaded holes in the link bars line up, one on top of the other.
6. Fasten the receivers together by inserting a small screw from the top into the threaded hole at the front of the link
bar. Then insert the other screw from the bottom into the threaded hole at the rear of the link bar.
7. Secure the receivers to a standard audio equipment rack, using four supplied screws.
EQUIPMENT RACK
SUPPLIED RACK MOUNT
SCREWS
BRACKET
BRACKET
UC4 RECEIVER 2
(TOP VIEW)
LINK BARS
LINK BARS
FRONT
UC4 RECEIVER 1
(TOP VIEW)
FRONT
RACK MOUNTING TWO UC4 RECEIVERS
FIGURE 22
NOTE: Shure recommends using the optional UA220 Passive Antenna Splitter/Combiner to front mount antennas
when two receivers are installed side by side.

ENGLISH
ENGLISH
– 16 –
RECEIVER ANTENNA INSTALLATION
Rear Mounted Antenna Installation
Attach the supplied UHF antennas to the BNC connectors on the receiver back panel, as shown in Figure 23. For
best performance, point the antenna tips away from each other at a 90° angle (45° from vertical axis).
NOTE: For improved RF performance (3 dB additional gain), optional UA820A 1/2 wave antennas may be used.
REAR MOUNTED ANTENNA INSTALLATION
FIGURE 23
Front Mounted Antenna Installation
NOTE: The UA600 Front Mount Antenna kit is sold separately.
1. Insert the two bulkhead adapters through the larger holes on each side of the front panel, and secure them from
each side, using the supplied attaching hardware. See Figure 24.
UC4 RECEIVER
(TOP VIEW)
BULKHEAD
ADAPTER
BULKHEAD
ADAPTER
FRONT MOUNTED ANTENNA INSTALLATION
FIGURE 24
2. Connect antenna cables to the receiver and the bulkhead adapters, as shown in Figure 25.
UC4 RECEIVER
(TOP VIEW)
ANTENNA
CABLE
ANTENNA
CABLE
NOTE: Two cable clamps are included
with the supplied hardware kit. The
clamps allows the antenna cables to be
secured to the sides of the receiver.
FRONT MOUNTED ANTENNA CABLE CONNECTIONS
FIGURE 25
NOTE: Shure recommends connecting the bulkhead adapter and antenna cables before mounting the receiver in a
rack. Once the receiver is in the rack, it is more difficult to install the bulkhead adapters and antenna cables.

– 17 –
3. Attach the supplied UHF antennas to the BNC connectors on the front panel as shown in Figure 26. For best perfor-
mance, orient the antennas with tips pointing away from each other at a 45° angle from vertical.
ATTACHING FRONT MOUNT ANTENNAS TO BNC CONNECTORS
FIGURE 26
Remote Antenna Installation
NOTE: The UA500 Remote Mount Antenna kit is sold separately.
1. Insert the two bulkhead adapters through the larger holes on each side of the front panel, and secure them from
each side, using the supplied attaching hardware. See Figure 27.
2. Connect antenna cables to the receiver and the bulkhead adapters.
3. Attach Shure UA825 or UA850 low–loss antenna cable (RG–8 or equivalent) to the bulkhead adapters.
4. Connect Shure UA820A 1/2 wave antennas to the end of the antenna cables (adapter required).
5. Mount the antennas using the Shure UA500 mounting brackets. For best RF performance, do not use the supplied
1/4 wave antennas when remoting antennas. Use UA820A 1/2 wave antennas.
NOTE: For improved performance, use the optional UA830A Line Amplifier with UA845 Distribution Amplifier.
RECEIVER
(TOP VIEW)
INSTALLING REMOTE ANTENNAS
FIGURE 27

ENGLISH
ENGLISH
– 18 –
LOGIC CONNECTION SPECIFICATIONS
The logic capability of the UC4 receiver provides two functions: transmitter status indication (which can be used to
signal and control other events) and transmitter low battery indication. The various logic functions and their applica-
tions are presented in the following table. Refer to Figure 28 below for pin mapping.
Pin No. Function Transmitter Status Logic Level Typical Applications Connections
1 Signals or controls
other events.
On
Off
Low (0V)
High (+5 V)
100 mA of
current
sinking
provided.
• Drives a remote LED.
• Provides remote indica-
tion of transmitter status
when used with a Room
Control System (i.e.,
Crestron or AMX)
• Activates external equip-
ment (equalizer, signal
processor, loudspeakers,
etc.) when used with a
Room Control System.
• Transmitter status control
muting/unmuting of an in-
put channel on automatic
mixer. Used with auto-
matic mixers, such as
Shure Model SCM810
Tie the transmitter status
pin to podium mic mute in-
put terminal on the automat-
ic mixer
Tie receiver logic ground to
mixer logic ground.
2 Logic Ground* –– –– –– Make all logic ground con-
nections to this pin, includ-
ing the power supply
ground of external logic cir-
cuitry. To avoid switching
noise, do not connect logic
ground to audio, chassis, or
rack grounds.
3 Remote indication of
transmitter battery
status.
Good Battery (1–8 hours of
battery life remaining)
Low Battery (1 hour of less
of battery life remaining)
Low (0 V)
High (+5 V)
• Drives a remote LED to
light when battery is low.
• Indicates low transmitter
battery status on remote
control panel when used
with a Room Control
System.
*Logic ground is distinct from UC4 audio ground.
LOGIC GROUND
MUTE
LOGICGATE 1
MUTE 1
GATE 3
MUTE 3
GATE 5
MUTE 5
GATE 7
MUTE 7
GATE 2
MUTE 2
GATE 4
MUTE 4
GATE 6
MUTE 6
GATE 8
MUTE 8
GROUND
SCM810 MIXER DB 25 LOGIC CONNECTOR
UC4 LOGIC CONNECTOR
OVERRIDE 5 OVERRIDE 7OVERRIDE 1 OVERRIDE 3
OVERRIDE 2 OVERRIDE 4 OVERRIDE 6 OVERRIDE 8
PIN 1: TRANSMITTER STATUS OUT
PIN 2: LOGIC GROUND
PIN 3: TRANSMITTER LOW BATTERY
TYPICAL UC4 CONNECTIONS TO SCM810 MIXER LOGIC CONNECTOR
FIGURE 28
NOTE: For more information on logic functions, please contact the Shure Applications Department.

– 19 –
TIPS FOR ACHIEVING OPTIMUM PERFORMANCE
• Maintain a line of sight between the transmitter and receiver antennas.
• Avoid placing transmitter and receiver where metal or other dense materials may be present.
• Avoid placing the receiver near computers or other RF generating equipment.
• Avoid placing the receiver in the bottom of an equipment rack unless the antennas are remotely located.
• Use the proper receiver antennas.
• Point the receiver antenna tips away from each other at a 45° angle from vertical, and keep them away from
large metal objects.
• Do not obstruct the receiver antennas.
• Use the proper cable when remotely locating receiver antennas. For best performance, use Shure UA825 or
UA850 low loss coaxial antenna cable, or 50 Ω low loss cable such as RG8.
• Use Shure UA820 1/2 Wave Antenna and UA830 Active Remote Antenna Kits, along with Shure UA845 Anten-
na Distribution System for remote antenna placement.
• Mount diversity antennas at least 1/4 wave apart. This can be achieved by remote placement of one or both 1/2
wave antennas using Shure UA825 or UA850 low loss coaxial cable and a Shure UA830 Active Remote Anten-
na Kit in conjunction with a Shure Antenna Distribution System. For multiple system installations, use the Shure
UA845 Antenna/Power Distribution System.
TROUBLESHOOTING
Some common problems and their solutions are identified in the table below. If you are unable to solve a problem,
contact your dealer or the Shure Service Department at 1-800-516-2525 (7:30 am to 4:00 pm, Central Standard Time). In
Europe, call 49-7131-72140; other international users call Shure in the U.S.A. at 847-866-2200.
Problem Solution
No sound; receiver RF LED(s) and
AUDIO LEDs not glowing.
Make sure transmitter and receiver are turned on.
Check transmitter Power/Battery Fuel Gauge. Replace battery if necessary.
Make sure transmitter and receiver frequency Group/Channel settings are identical.
Check receiver squelch setting.
Check receiver antenna connection(s).
Make sure at least one antenna is in the line of sight of the transmitter. If necessary, reduce
the distance between transmitter and receiver.
No receiver sound; RF and AUDIO
level meter LEDs glowing.
Turn up the receiver audio output Level control.
Check for proper connection between receiver and microphone mixer.
Talk into the microphone and observe the receiver audio level LEDs. If they glow, the prob-
lem is elsewhere in the sound system.
Received signal is noisy or con-
tains extraneous sounds with
transmitter on.
Check transmitter Power/Battery Fuel Gauge and replace battery if power is low.
Remove local sources of RF interference, such as lighting equipment.
If using a guitar or other instrument, make sure it is connected to the UC1 with a Shure
WA302 adapter cable.
Two transmitters may be operating on the same frequency. Locate and turn one off or change
frequency.
Signal may be too weak. Reposition antennas closer to the transmitter.
Adjust receiver squelch control.
Noise from receiver with transmit-
ter off.
Adjust receiver squelch control.
Remove local sources of RF interference, such as lighting equipment.
Try using another frequency.
Reposition the receiver or antennas.
Turn the receiver off when not in use.
Momentary loss of sound as trans-
mitter is moved around performing
area.
Reposition receiver and perform another “walkthrough” test and observe the RF level or
Diversity signal indicators. If audio dropouts persist, mark these “dead spots” in the perform-
ing area and avoid them during the performance.
Decrease squelch control setting, even though noise in “dead spots” may increase slightly.
Move antennas to a remote location.
/