Page is loading ...


iD-Link DWR-512 User Manual
D-Link reserves the right to revise this publication and to make changes in the content hereof without obligation to
notify any person or organization of such revisions or changes.
Trademarks
D-Link and the D-Link logo are trademarks or registered trademarks of D-Link Corporation or its subsidiaries in
the United States or other countries. All other company or product names mentioned herein are trademarks or
registered trademarks of their respective companies.
Copyright © 2011 by D-Link Corporation, Inc.
All rights reserved. This publication may not be reproduced, in whole or in part, without prior expressed written
permission from D-Link Corporation, Inc.
Preface

iiD-Link DWR-512 User Manual
FCC Regulations
This device complies with part 15 of the FCC Rules. Operation is subject to the following two conditions: (1) This device may not cause
harmful interference, and (2) this device must accept any interference received, including interference that may cause undesired operation.
This device has been tested and found to comply with the limits for a Class B digital device, pursuant to Part 15 of the FCC Rules. These
limits are designed to provide reasonable protection against harmful interference in a residential installation. This equipment generates,
uses and can radiated radio frequency energy and, if not installed and used in accordance with the instructions, may cause harmful
interference to radio communications. However, there is no guarantee that interference will not occur in a particular installation If this
equipment does cause harmful interference to radio or television reception, which can be determined by turning the equipment off and on,
the user is encouraged to try to correct the interference by one or more of the following measures:
• Reorient or relocate the receiving antenna.
• Increase the separation between the equipment and receiver.
• Connect the equipment into an outlet on a circuit different from that to which the receiver is connected.
• Consult the dealer or an experienced radio/TV technician for help.
Changes or modications not expressly approved by the party responsible for compliance could void the user‘s authority to operate the
equipment.
The antenna(s) used for this transmitter must not be co-located or operating in conjunction with any other antenna or transmitter.
This device complies with FCC radiation exposure limits set forth for an uncontrolled environment. In order to avoid the possibility of
exceeding the FCC radio frequency exposure limits, human proximity to the antenna shall not be less than 20cm (8 inches) during normal
operation.

iiiD-Link DWR-512 User Manual
Table of Contents
Preface...........................................................................i
Trademarks .............................................................. i
FCC Regulations ..................................................... ii
Product Overview ........................................................ 1
Package Contents ...................................................1
System Requirements ............................................. 1
Introduction ..............................................................2
Hardware Overview .................................................3
Rear Panel ......................................................... 3
Front Panel ........................................................4
LEDs ..................................................................5
Installation ....................................................................6
Connect to Your Network ........................................6
Connect a Telephone ..............................................7
Wireless Installation Considerations ........................ 8
Conguration ............................................................... 9
Web-based Conguration Utility ..............................9
Setup .....................................................................10
Internet .............................................................10
Internet Connection Setup Wizard ............... 10
Manual Internet Connection Setup ............... 13
Internet Connection ...................................... 13
Static IP ........................................................14
Dynamic IP (DHCP) ..................................... 15
PPPoE .......................................................... 16
PPTP ............................................................17
L2TP ............................................................. 18
3G ................................................................19
Wireless Settings .............................................21
Wireless Connection Setup Wizard .............. 21
Manual Wireless Connection Setup ............. 23
Wireless Settings .........................................24
Wireless Security Mode ............................... 25
Wi-Fi Protected Setup ...................................... 28
Network Settings .............................................. 30
Router Settings ............................................ 30
DHCP Server Settings .................................31
Message Service ............................................. 32
SMS Inbox .................................................... 32
Create Message ........................................... 33
Advanced ...............................................................34
Virtual Server ................................................... 34
Application Rules ............................................. 36
QoS Engine ..................................................... 37
MAC Address Filter .......................................... 38
URL Filter ......................................................... 39
Outbound Filter ................................................ 40
Inbound Filter ................................................... 41
SNMP .............................................................. 42
Routing ............................................................ 43
Table of Contents

ivD-Link DWR-512 User Manual
Table of Contents
Advanced Wireless .......................................... 44
Advanced Network ........................................... 45
Tools ...................................................................... 46
Admin ............................................................... 46
Time ................................................................. 47
Syslog .............................................................. 48
E-mail Settings ................................................. 49
System ............................................................. 50
Firmware .......................................................... 51
Dynamic DNS .................................................. 52
System Check .................................................. 53
Schedules ........................................................ 54
Status .................................................................... 55
Device Info ....................................................... 55
Log ................................................................... 56
Statistics .......................................................... 57
Wireless ........................................................... 58
Support ..................................................................59
Connecting to a Wireless Network .......................... 60
Using Windows 7 ..................................................60
Conguring Wireless Security .......................... 62
Using Windows Vista™ ......................................... 65
Conguring Wireless Security .......................... 66
Using Windows
®
XP ............................................... 68
Congure WEP ................................................ 69
Congure WPA-PSK ........................................ 71
Troubleshooting ........................................................ 73
Wireless Basics ......................................................... 75
What is Wireless? ..................................................76
Tips ........................................................................78
Wireless Modes .....................................................79
Networking Basics .................................................... 80
Check your IP address .......................................... 80
Statically Assign an IP address ............................. 81
Technical Specications........................................... 82

1D-Link DWR-512 User Manual
Section 1 - Product Overview
• D-Link DWR-512 3.75G mobile communication device
• Power Adapter
• Manual and Warranty on CD
• 3G Antenna
Note: Using a power supply with a different voltage rating than the one included with the DWR-512 will cause damage and void the
warranty for this product.
System Requirements
• A compatible (U)SIM card with service.*
• Computers with Windows
®
, Macintosh
®
, or Linux-based operating system with an installed Ethernet adapter
• Internet Explorer 6 or Netscape Navigator™ Version 6.0 and above (for conguration)
*Subject to services and service terms available from your carrier.
Product Overview
Package Contents

2D-Link DWR-512 User Manual
Section 1 - Product Overview
Introduction
The D-Link 3.75G mobile communication device allows users to access worldwide mobile broadband networks.
Once connected, users can transfer data, stream media, send SMS messages, and make mobile phone calls.
Simply insert your UMTS/HSUPA SIM card, and share your 3G Internet connection through a secure 802.11n
wireless network or using any of the four 10/100 Ethernet ports.
While accessing your 3G Internet connection, you will still have the ability to answer incoming mobile calls and
respond to SMS messages. An RJ-11 jack allows you to attach a standard analog phone for high-quality mobile
calls over a GSM network. Enjoy the comfort and convenience of your favorite ofce phone anywhere you go.
Keep your wireless network safe with WPA/WPA2 wireless encryption. The DWR-512 utilizes dual-active rewalls
(SPI and NAT) to prevent potential attacks across the Internet, and includes MAC address ltering to control access
to your network.
The 3.75G Mobile communication device can be installed quickly and easily almost anywhere. This router is great
for situations where an impromptu wireless network must be set up, or wherever conventional network access is
unavailable. The DWR-512 can even be installed in buses, trains, or boats, allowing passengers to check e-mail or
chat online while commuting.

3D-Link DWR-512 User Manual
Section 1 - Product Overview
Hardware Overview
Rear Panel
Port Function
LAN Ports
(RJ-45)
Connects to a network device such as a desktop or notebook
computer through an Ethernet cable.
WAN (RJ-45) Connects to a DSL/Cable modem or router through an
Ethernet cable.
SIM Accepts a standard (U)SIM card for 3G connectivity.
Power Connects to the included power adapter.
Power Switch Turns the device on or off.
Phone (RJ-11) Connects to a telephone through a standard RJ-11 telephone
cable.
LAN Ports
Power ConnectorWAN Port
SIM Card Slot Power Switch
Phone Jack

4D-Link DWR-512 User Manual
Section 1 - Product Overview
Hardware Overview
Front Panel
Status 2G 3G SMS WLAN
WAN LAN1 LAN2 LAN3 LAN4
Signal Strength Reset Button WPS Button
Button Name Function
Reset Press this button with an unfolded paperclip to
reset the device.
WPS Press this button to initiate a new WPS connection.

5D-Link DWR-512 User Manual
Section 1 - Product Overview
LED Name Function
Status Blinking Green: Device is working
WAN Solid Green: Ethernet connection has been established
Blinking Green: Data is being transferred
LAN 1-4 Solid Green: Ethernet connection has been established
Blinking Green: Data is being transferred
Signal
Strength
Blinking Red: No SIM card / signal or unveried PIN code
Solid Red: Signal strength is at level one (weak)
Solid Amber: Signal strength is at level two or three (medium)
Solid Green: Signal strength is at level four or ve (strong)
WPS Slow Blinking Green: WPS is functioning normally
Fast Blinking Green: WPS is functioning in PBC mode
2G Solid Green: EDGE or GPRS connection has been established
Blinking Green: Data is being transferred via 2G/2G
3G Solid Green: UMTS/HSDPA/HSUPA connection is established
Blinking: Data is being transferred via 2G
SMS Solid Green: SMS storage is full
Blinking Green: There is an unread SMS message
WLAN Solid Green: WLAN is active and available
Blinking Green: Data is being transferred over the WLAN
Hardware Overview
LEDs

6D-Link DWR-512 User Manual
Section 2 - Installation
Connect to Your Network
Installation
This section will guide you through the installation process. Placement of the router is very important. Do not place the router in an enclosed
area such as a closet, cabinet, or in an attic or garage.
1. Ensure that your DWR-512 3.75G mobile communication device is disconnected and powered off.
2. Insert a standard (U)SIM card into the SIM card slot on the back of the router as indicated by the SIM card logo next to the slot. The
gold contacts should face downwards.
Caution: Always unplug/power down the router before installing or removing the SIM card. Never insert or remove the SIM card while
the router is in use.
3. Insert your Internet/WAN network cable into the WAN port on the back of the router.
Note: The 3G connection can also be used as a backup WAN. Once a backup is congured, the router will automatically use 3G for the
Internet connection if the Ethernet WAN is not available.
4. Insert the Ethernet cable into the LAN Port 1 on the back panel of the DWR-512 3.75G mobile communication device and an available
Ethernet port on the network adapter in the computer you will use to congure the router.
Note: The DWR-512 3.75G mobile communication device LAN Ports are Auto-MDI/MDIX, so both patch and crossover Ethernet cables
can be used.
5. Connect the power adapter to the socket on the back panel of your DWR-512 3.75G mobile communication device. Plug the other end
of the power adapter into a wall outlet or power strip and turn the device on.
a. The Status LED will light up to indicate that power has been supplied to the router.
b. The LEDs on the front panel will ash on and off as the DWR-512 3.75G mobile communication device performs initialization and
Internet connection processes.
c. After a few moments, if a connection has been established, the following LEDs will turn solid green: Power, Status, WAN, WLAN,
and any LAN Port LEDs that are connected computers or other devices.

7D-Link DWR-512 User Manual
Section 2 - Installation
Connect a Telephone
The RJ-11 jack on the back of the router allows you to connect a standard analog
telephone for voice calls.
Simply plug the phone cable into the RJ-11 jack.
You can then use your handset to dial out as you typically would with a standard landline
phone.
Your attached phone will also ring for any incoming voice calls.
Note: Calls made will be charged at a rate determined by your mobile service provider.

8D-Link DWR-512 User Manual
Section 2 - Installation
Wireless Installation Considerations
The DWR-512 can be accessed using a wireless connection from virtually anywhere within the operating range of your wireless network.
Keep in mind that the quantity, thickness, and location of walls, ceilings, or other objects that the wireless signals must pass through may
limit the range of the wireless signal. Ranges vary depending on the types of materials and background RF (radio frequency) noise in your
home or ofce. The key to maximizing the wireless range is to follow these basic guidelines:
1. Minimize the number of walls and ceilings between the D-Link router and other network devices. Each wall or ceiling can reduce your
adapter’s range from 3 to 90 feet (1 to 30 meters).
2. Be aware of the direct line between network devices. A wall that is 1.5 feet thick (0.5 meters), at a 45-degree angle appears to be
almost 3 feet (1 meter) thick. At a 2-degree angle it looks over 42 feet (14 meters) thick. Position devices so that the signal will travel
straight through a wall or ceiling (instead of at an angle) for better reception.
3. Try to position access points, wireless routers, and computers so that the signal passes through open doorways and drywall. Materials
such as glass, metal, brick, insulation, concrete, and water can affect wireless performance. Large objects such as sh tanks, mirrors,
le cabinets, metal doors, and aluminum studs may also have a negative effect on range.
4. If you are using 2.4 GHz cordless phones, make sure that the 2.4 GHz phone base is as far away from your wireless device as possible.
The base transmits a signal even if the phone is not in use. In some cases, cordless phones, X-10 wireless devices, and electronic
equipment such as ceiling fans, uorescent lights, and home security systems may dramatically degrade wireless connectivity.

9D-Link DWR-512 User Manual
Section 3 - Conguration
Conguration
This section will show you how to congure your new D-Link mobile router using the web-based conguration utility.
Web-based Conguration Utility
To access the conguration utility, open a web-browser such as Internet Explorer and
enter the IP address of the router (192.168.0.1 by default).
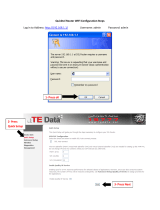
To log in to the conguration utility, enter admin as the username, and then enter the
password. By default, the password is blank.
If you get a Page Cannot be Displayed error, please refer to the Troubleshooting
section for assistance.
The conguration utility will open to the STATUS > DEVICE INFO page. You can view
different conguration pages by clicking on the categories at the top of the screen
(SETUP/ADVANCED/TOOLS/STATUS/SUPPORT), and then selecting a conguration
page from the bar on the left side.
The following pages will describe each section in detail, starting with the SETUP pages.

10D-Link DWR-512 User Manual
Section 3 - Conguration
Setup
This wizard will guide you through a step-by-step process to congure your D-Link router
to connect to the Internet.
Click Next to continue.
Note: While using the wizard, you can click Prev to go back to the previous page or
you can click Cancel to close the wizard.
Internet Connection Setup Wizard
The SETUP pages allow you to congure your Internet and wireless settings, as well
as manage your SMS inbox. To view the Setup conguration pages, click on SETUP at
the top of the screen.
The Internet page allows you to congure how your router connects to the Internet. There
are two ways to set up your Internet connection.
You can click on the Internet Connection Setup Wizard button to start a wizard that
will guide you through setting up your Internet settings.
If you want to manually congure your settings, click Manual Internet Connection Setup
and skip to “Manual Internet Connection Setup” on page 13.
Internet

11D-Link DWR-512 User Manual
Section 3 - Conguration
Create a new password and then click Next to continue.
Select the Internet connection type you use. The connection types are explained on the
following page. If you are unsure which connection type you should use, contact your
Internet Service Provider (ISP).
Click Prev to go back to the previous page or click Cancel to close the wizard.
Note: The DWR-512 has a WAN Failover feature that allows the router to switch to a
3G connection if the WAN connection is down or unavailable. To congure this
feature, please refer to “Internet Connection” on page 13.
Select your time zone from the drop-down box and then click Next to continue.

12D-Link DWR-512 User Manual
Section 3 - Conguration
Choose this if your Internet connection automatically provides you with an IP Address.
Most cable modems use this type of connection. See “Dynamic IP (DHCP)” on
page 15 for information about how to congure this type of connection.
Choose this option if your Internet connection requires a username and password
to connect. Most DSL modems use this style of connection. See “PPPoE” on
page 16 for information about how to congure this type of connection.
Choose this option if your Internet connection requires Point-to-Point Tunneling Protocol (PPTP).
See “PPTP” on page 17 for information about how to congure this type of connection.
Choose this option if your Internet connection requires Layer 2 Tunneling Protocol (L2TP).
See “L2TP” on page 18 for information about how to congure this type of connection.
Choose this connection if you have installed a SIM card into the DWR-512. See “3G”
on page 19 for information about how to congure this type of connection.
Choose this option if your Internet Setup Provider provided you with IP Address information that has to be
manually congured. See “Static IP” on page 14 for information about how to congure this type of connection.
DHCP Connection
(Dynamic IP Address):
Username / Password
Connection (PPPoE):
Username / Password
Connection (PPTP):
Username / Password
Connection (L2TP):
3G Connection:
Static IP Address
Connection:
The subsequent conguration pages will differ depending on the selection you make on this page.
After entering the requested information,click Next to continue.
This completes the Internet Connection Setup Wizard. Click Connect to save your
changes and reboot the router.

13D-Link DWR-512 User Manual
Section 3 - Conguration
Manual Internet Connection Setup
To set up your Internet connection manually, click Manual Internet Connection Setup.
Several different Internet Connection types can be selected depending upon the specications of your Internet Service Provider (ISP). You
can also set up the Auto-Backup feature, which allows you to use a 3G connection for your Internet connection if your main connection fails.
Internet Connection
Select the Internet Connection type specied
by your Internet Service Provider (ISP). The
corresponding settings will be displayed below.
Please see the following pages for details on how
to congure these different connection types.
If the Internet Host you are using for the Auto-Backup
feature requires you to enter a Host Name, enter it
here. In most cases, you may leave this blank.
When this box is checked, the router will
switch over to a 3G connection if the Internet
Host (specied below) is unreachable.
Enter an IP address for the router to use to check
if it is connected to the Internet. If Auto-Backup is
enabled and the IP address cannot be reached,
the router will switch over to a 3G connection.
My Internet Connection
is:
Host Name:
Auto-Backup:
Internet Host:

14D-Link DWR-512 User Manual
Section 3 - Conguration
Enter the IP address assigned to your network connection.
Enter the subnet mask.
Enter the default gateway.
Enter the primary DNS server.
Enter the secondary DNS server.
You may need to change the Maximum Transmission Unit
(MTU) for optimal performance. The default value is 1500.
The default MAC Address is set to the Internet port’s
physical interface MAC address on the Broadband
Router. It is not recommended that you change the
default MAC address unless required by your ISP.
You can use the Clone Your PC’s MAC Address
button to replace the Internet port’s MAC address
with the MAC address of your Ethernet card.
IP Address:
Subnet Mask:
Default Gateway:
Primary DNS Server:
Secondary DNS
Server:
MTU:
MAC Address:
Choose this Internet connection if your ISP assigns you a static IP address. After modifying any settings, click Save Settings to save your
changes.
Static IP

15D-Link DWR-512 User Manual
Section 3 - Conguration
Dynamic IP (DHCP)
This section will help you to obtain IP Address information automatically from your ISP. Use this option if your ISP didn’t provide you with
IP Address information and/or a username and password. After modifying any settings, click Save Settings to save your changes.
(Optional) Required by some ISPs.
(Optional) Fill in with IP address of primary DNS server.
(Optional) Fill in with IP address of secondary DNS server.
You may need to change the Maximum Transmission Unit
(MTU) for optimal performance. The default value is 1500.
The default MAC Address is set to the Internet port’s
physical interface MAC address on the Broadband
Router. It is not recommended that you change
the default MAC address unless required by your
ISP. You can use the Clone Your PC’s MAC
Address button to replace the Internet port’s MAC
address with the MAC address of your PC.
This feature enables this product to renew the WAN IP
address automatically when the lease time has expired.
Host Name:
Primary DNS Server:
Secondary DNS
Server:
MTU (Maximum
Transmission Unit):
MAC Address:
Auto-reconnect:
/