Page is loading ...

1
INSTRUCTION MANUAL
OMRON
Digital Automatic Blood Pressure Monitor
Model
HEM-907
HID
E
P
-
SE
T
1
00
AUT
O
1
40
1
80
220
260
280
MOD
E
A
VG.
M
AN
U
.
CHE
CK
SI
N
G
LE
O
N
/
OF
F
A
V
G
.
/
1
s
t
/
2
n
d
/
3
r
d
D
E
F
L
A
T
I
O
N
STA
RT
STO
P
mmHg
SYS
mmHg
DIA
BPM
PU
L
SE
A
RT
.
INDEX
M
A
X
Thank you very much for purchasing the
OMRON Digital Automatic Blood Pressure
Monitor.
Requests from OMRON to the
operators and the persons
responsible for maintenance
Please read thoroughly the “Notes on Safety”
of this Instruction Manual before using this unit
so that you can use it safely and correctly after
suf cient understanding.
After reading this Instruction Manual, please
keep it near the unit all the times for future
reference.
= Read the instruction manual carefully
Table of Contents
Intended use ................................................. 2
Exemptions ................................................... 3
Names and Functions of the Parts ............... 4
Notes on Safety ............................................ 8
Components of the Product ....................... 12
Options ....................................................... 12
How to Apply the Arm Cuff ......................... 13
How to Use the Power Source
(AC Adapter)........................................... 14
How to Measure Blood Pressure ............... 15
SINGLE Mode ........................................ 16
AVG. Mode ............................................. 17
MANU. Mode .......................................... 18
CHECK Mode ......................................... 19
Installation and Replacement of
Battery Pack ........................................... 20
How to Clean the Unit after Use................. 21
List of Error Codes ..................................... 22
Troublesho oting .......................................... 23
Speci cations ............................................. 24
IM-HEM-907-E7-03-01/2012
5329412-4C

2
Intended Use
Medical Purpose This is a medical device that measures the brachial blood
pressure in a non-invasive manner.
Intended User Legally certi ed: such as doctor, nurse and medical expert.
Patient Population It is used on adult patients only.
Environment The instrument is used in physicians’ of ces, hospitals, clinics
and other medical facilities.
Measurement Parameter Non-invasive Blood Pressure
Pulse rate
Precautions for use Warnings and cautions described in the instruction manual
should be observed.

3
Exemptions
OMRON will not bear any responsibilities on the following matters.
When a problem or damage occurs caused by the maintenance and/or repair con-
ducted by a person other than OMRON or the dealer speci ed by OMRON
The problem or damage of OMRON product caused by the product of other manu-
facturer not delivered by OMRON
The problem and damage caused by the maintenance and/or repair using the repair
parts not speci ed by OMRON
The problem and damage caused by the results not observing the Notes on Safety
or the operational method mentioned in this Instruction Manual
Under the circumstances not within the operating conditions of this unit including the
power source or the setting environment mentioned in this Instruction Manual
The problem and damage caused by the result(s) of remodeling or improper repair
of this product
The problem and damage caused by act of god such as re, earthquake, ood, or
lightening
1.
2.
3.
4.
5.
6.
7.
The contents of this Instruction Manual may be changed without prior notice.
We have thoroughly reviewed the contents of this Instruction Manual.
However, if an inadequate description or error is found, please let us know.
It is prohibited to copy a part of or the entire Instruction Manual without getting
OMRON’s permission. Unless this Instruction Manual is used by an individual (com-
pany), it cannot be used without getting OMRON’s permission from the standpoint
of the Copyright Law.
1.
2.
3.

4
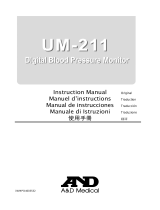
Names and Functions of the Parts
HIDE
P
-
SET
100
AUTO
140 180
220
260
280
MODE
AVG.
MANU.
CHECK
SINGLE
ON/OFF
A
V
G
.
/
1
s
t
/
2
n
d
/
3
r
d
D
E
F
L
A
T
I
O
N
START
STOP
mmHg
SYS
mmHg
DIA
BPM
PULSE
AC
DC8V
1. LCD display
2. HIDE (non-display) Button
3. DC jack
4. P-SET (pressure
setting) Volume
5. MODE Selector
10. STOP Button
9. Arm Cuff
Connector
8. DEFLATION
(de ation
control) Button
7. STA RT But ton
6. ON/OFF
(power) Button
Main unit

5
Battery level
Displays for the usable level.
Displays
for the low level.
Displays
for the unusable level.
Names and Functions of the Parts
Display
HIDE
BPM
mmHg
PULSE
SYS
mmHg
DIA
AC
Systolic blood
pressure
Diastolic blood
pressure
Contents when the AVG.
Mode is selected
AVG. : Mean value
1st : First measurement
2nd : Second measurement
3rd : Third measurement
Pulse rate
Ready to Measure
Pulse level / Number of
irregular pulse waves
Number of irregular pulse waves:
The pulse wave having a difference
of more than ±25% from the average
interval of pulse waves is determined
as irregular. Number of irregular pulse
waves are displayed up to three times.
Example of display
No. of arrhythmias
123
Charging
Displays when the battery
pack is being charged.
External power source
Displays AC when the unit is con-
nected to the AC adapter.

6
Names and Functions of the Parts
Explanation of Functions
(1) Pressure setting function
P
-
SET
In ation can be set by AUTO (automatic setting) or the target value.
AUTO (automatic setting): In the SINGLE (single measurement), AVG. (average), and MANU. (auscultation) Modes, the
monitor estimates the systolic blood pressure value during in ation and automatically in ates to the proper value.
Target value setting: The monitor in ates to the target value.Pressure value is set to 30 to 40 mmHg above the expected
systolic pressure.
(2) Non-display function
HIDE
A function not to display the results of measured blood pressures.
However, the pressure values during the measurement are displayed.
This function can be used when SINGLE (single measurement) or AVG.
(average) Mode is selected.
(3) Manual de ation control function
A function to accelerate the de ation speed by pushing a DEFLATION Button
during de ation.
This function can be used when MANU. (auscultation) Mode is selected.
ON/OFF
A
V
G
.
/
1
s
t
/
2
n
d
/
3
r
d
D
E
F
L
A
T
I
O
N
START
STOP
HIDE
P
-
SET
100
AUTO
140 180
220
260
280
MODE
AVG.
MANU.
CHECK
SINGLE
ON/OFF
A
V
G
.
/
1
s
t
/
2
n
d
/
3
r
d
D
E
F
L
A
T
I
O
N
START
STOP
HIDE
P
-
SET
100
AUTO
140 180
220
260
280
MODE
AVG.
MANU.
CHECK
SINGLE

7
Names and Functions of the Parts
(4) Setting mode change function
You can set the number of times to measure, the waiting time until the start of measurement, and the interval between
measurements.
Items to set Set value
F1 Number of measurements 2 times, 3 times
F2 Waiting time until the start of measurement 0 sec, 3 min, 5 min, 10 min.
F3 Measurement interval time 5 sec, 30 sec, 1 min, 2 min, 3 min.
Procedure to change the set values
When the power is off, press the ON/OFF Button for more than three
seconds while holding the START Button and change the mode to the
Setting Change Mode.
Press the START Button to select the item from F1 to F3.
Press the DEFLATION Button to change the set values.
List of Functions for each Mode
Measurement
Mode
Function
Single measure-
ment (SINGLE)
Average
(AVG.)
Auscultation
(MANU.)
Check
(CHECK)
Pressure setting
function
Non-display
function
Manual de ation
control function
Setting mode
change function
1)
2)
3)
ON/OFF
A
V
G
.
/
1
s
t
/
2
n
d
/
3
r
d
D
E
F
L
A
T
I
O
N
START
STOP
HIDE
P
-
SET
100
AUTO
140 180
220
260
280
MODE
AVG.
MANU.
CHECK
SINGLE

8
Notes on Safety
The warning signs and the sample icons shown here are listed for you to use the product safely and correctly as well as
to prevent the risk and the damage to you and others from happening.
The icons and meanings are as follow.
Warning sign Contents
Warning
Indicates matters in which death or sever bodily damage may arise as a result of incorrect
handling.
Caution
Indicates matters in which bodily harm or material damage* may arise as a result of incorrect
handling.
* Material damage refers to a wide range of damage involving your house, household goods, domestic animals, and pets.
Examples of signs
The icon indicates caution (including warning and danger). Matters involving actual caution are
indicated by text or pictures in or near
. The left icon refers to “caution for ignition”.
The icon indicates prohibitions (what you cannot do). Matters involving actual prohibitions are indi-
cated by text or pictures in or near
. The left icon refers to “prohibition to disassemble”.
The icon indicates something that is compulsory (always follow). Matters involving actual compul-
sory actions are indicated by text or pictures in or near
. The left icon refers to “pulling the power
source plug”.
Warning
If any abnormal matter occurs during the measurement such as in ation does not stop, remove the arm
cuff or pull out the air tube from the main unit.
You may suffer peripheral neuropathy.
•
Do not wrap the arm cuff over the arm to which intravenous injection or transfusion is being conducted.
Intravenous injection or transfusion is impossible.
•
Do not use the unit in the place where in ammable gas, such as highly in ammable anesthetic, may be
generated or in a high pressure oxygen room or an oxygen tent.
It may cause ignition and explosion.
•
Do not touch the AC adapter with wet hands.
You may suffer electric shock.
•
•
•

9
Notes on Safety
Caution
When you are not going to use the unit for a long period of time, be sure to remove the AC adapter
from the electric outlet.
You may suffer electric shock, or electric leak or re may arise because of deteriorated insulation.
Be sure to remove the AC adapter from the electric outlet when installing, removing, or cleaning the
part.
You may suffer electric shock or injure yourself.
Pull the AC adapter from the electric outlet when cleaning the unit.
You may suffer electric shock.
•
•
•
In the following case, con rm the measurement with the stethoscope.
(1) When an irregular pulse wave is displayed
· An error may be displayed when an external vibration is applied or the patient moves his/her body.
(2) When an error is generated or the measured value is doubtful
· An error may be displayed when an external vibration is applied or the patient moves his/her body.
· An error may be generated in the measured value or the blood pressure may not be able to measure for the
patient having peripheral circulatory disturbance or extreme hypotension.
· An error may be generated in the measured value or the blood pressure may not be able to measure for the
patient having short variation of blood pressure such as arrhythmia.
After cleaning the unit, dry it well, then insert the AC adapter to the electric outlet.
You may suffer electric shock.
Insert the AC adapter to the electric outlet as far as it goes.
Wipe off the dust on the AC adapter.
You may suffer electric shock, or there may be short circuit or re ignition.
If you nd any trouble with this unit, immediately stop using it, turn off the power, pull out the AC
adapter from the electric outlet, then contact the repair department.
You may suffer electric shock, or there may be short circuit or re ignition.
•
•
•
Do not disassemble or remodel the unit.
You may suffer electric shock, or there may be short circuit or re ignition.
•
Do not use the unit to the patient using a pump oxygenator.
The unit can not measure correctly. The unit cannot measure when it cannot detect any beat.
Do not use the AC adapter and the battery pack not speci ed for this unit.
It may cause re or electric shock.
Do not use a portable phone near the unit.
The unit may malfunction.
Do not install the parts and/or instrument not speci ed for this unit.
It may cause damage to the unit.
Do not use the damaged power cord or AC adapter, or loose electric outlet.
You may suffer electric shock, or there may be short circuit or re ignition.
Do not damage the power cord of the AC adapter by placing heavy thing on it or pinching it, or modify,
forcibly bend, pull, twist, or bundle it.
You may suffer electric shock or there may be electric leak and re because of deteriorated insulation.
•
•
•
•
•
•

10
Notes on Safety
Caution
Be sure to use the power supply of 230 VAC.
It may cause re or electric shock.
Do not share an electric outlet with other unit or electric appliance.
It may cause re or electric leak.
Do not pull the power cord when pulling out the AC adapter from the electric outlet.
The power cord will be disconnected or shorted and may cause re or electric shock.
•
•
•
Do not install or store the unit where it may be sprayed with water or medication.
You may suffer electric shock.
•
Requests from OMRON
Do not place or put anything on the unit.
Do not apply strong shock to or drop the unit.
When you move the unit, be sure to turn off the power and remove the connected AC adapter.
When using this unit concurrently with other unit, be sure to read the Instruction Manual of the other unit to be used
concurrently and understand the warnings and cautions before use.
Be sure to con rm that all cords and tubes are connected correctly and completely before use.
Inspect the Buttons and so on to con rm that the unit operates normally before use.
When using a battery pack, be sure to con rm that the voltage is suf cient before use. If you are not going to use the
unit for a long period of time, remove the battery pack.
Do not in ate the arm cuff without being wrapped over the arm.
Do not use a damaged arm cuff.
Do not use the unit in a vehicle.
Be sure to monitor all the time that the unit and the patient are not abnormal.
Please keep the unit out of the reach of patient.
Clean and store the unit and accessories after each use.
Do not clean the unit with gasoline, thinner, or high concentration alcohol.
Do not disinfect the unit by autoclave or gas sterilization (EOG, formaldehyde, or high concentration ozone.)
Do not store the unit in the following places.
· Under the direct sunshine
· Dusty or salty environment
· Places which slope, vibrate, and/or are prone to shocks
· Storage of chemicals or where gas may be generated
· Under high temperature and high humidity
•
•
•
•
•
•
•
•
•
•
•
•
•
•
•
•

11
Notes on Safety
Maintenance
Be sure to inspect the unit on regular basis. Check accuracy on a 1 year interval.
If the unit has not been used for a while, be sure to con rm that the unit operates normally and safely before use
Durability
The durability of this unit is ve years. (Arm cuff is a consumable.)
Measures to take at the time of trouble or accident
If a device error (Er9) occurs, take the following procedure promptly.
Remove the arm cuff from the patient’s arm.
Turn off the power and pull the AC adapter from the electric outlet. If an optional battery pack is used, remove it also.
Display “Trouble” on the unit so that it cannot be used.
Contact the dealer where you purchased the unit or the nearest OMRON dealer
1.
2.
1.
2.
3.
4.

12
Components of the Product
Main unit Accessories
HIDE
P
-
S
E
T
10
0
A
U
TO
14
0
1
80
2
2
0
260
280
MODE
AVG
.
MA
N
U
.
C
HE
C
K
S
IN
G
L
E
ON/OFF
A
V
G
.
/
1
s
t
/
2
n
d
/
3
r
d
D
E
F
L
A
T
I
O
N
START
STOP
Medium size arm cuff (with built-in air bag)
Model: HEM-9CMC
Art.no.: 4928640-0
Applicable arm circumference: 22 to 32 cm
R
A
N
G
E
M
I
N
M
A
X
I
NDE
X
A
R
T.
22
~
3
2
c
m
(
9"
~
1
3
"
)
R
EF
H
E
M
-
CR
19
Instruction Manual
(with guarantee card)
Air tube (1 m)
Art.no.: 4928647-8
AC adapter
(80230H907S)
Model: HEM-9ADAP
Art.no.: 1098200-0
Battery pack
(48H907N-E)
Model: HEM-9BAT
Art.no.: 1098391-0
Options
Large size arm cuff
Model: HEM-9CLC
Art.no.: 4928654-0
Applicable arm
circumference:
32 to 42 cm
I
N
D
E
X
AR
T
.
R
A
N
G
E
M
I
N
M
A
X
32
~
4
2
c
m
(
1
3
"
~
1
7"
)
RE
F
HE
M
-
C
L
19
Medium size arm cuff
Model: HEM-9CMC
Art.no.: 4928640-0
Applicable arm
circumference:
22 to 32 cm
R
A
NG
E
M
IN
M
A
X
I
N
DE
X
AR
T
.
2
2
~
3
2
cm
(
9
"
~
1
3
"
)
RE
F
H
E
M
-
C
R19
Small size adult arm cuff
Model: HEM-9CSC
Art.no.: 4928639-7
Applicable arm
circumference:
17 to 22 cm
AR
T
.
RA
NGE
M
IN
MA
X
I
ND
E
X
R
E
F
HEM
-
C
S
19
17
~
22
cm
(
7"
~
9"
)
Air tube (1.3 m)
Model: HEM-9T1.3
Art.no.: 4928648-6
Stand exclusive
for this unit
Model: HEM-9ST
Art.no.: 4928649-4
Wall-hanging kit
Model: HEM-9WM
Art.no.: 4928650-8
Pole-mounting kit
Model: HEM-9PM
Art.no.: 4928651-6

13
Select the arm cuff according to the arm circumference of the patient.
Arm circumference Name of the arm cuff
17 - 22 cm
22 - 32 cm
32 - 42 cm
Small size adult arm cuff (option)
Adult arm cuff
Large size adult arm cuff (option)
Be sure to use the arm cuff suitable for the size of the patient’s arm.
If an arm cuff not suitable for the size of the arm is used, blood pressure
may not be measured correctly.
Securely connect the air tube.
If you connect the attached 1m air tube, the air tube can be used with the
entire length of 1.2 m.
Prepare the patient to be ready to wrap the arm cuff.
Wrap the arm cuff over the right upper arm’s skin as a rule.
If the arm cuff is wrapped over a thick cloth or by rolling up the jacket or shirt, blood pressure may not be measured
correctly.
Place the right hand of
the patient with the palm
of hand facing upward.
4.
Place the arm cuff over the patient’s
arm by matching the mark indicating
the artery position
to the brachial artery.
5.
R
AN
GE
MI
N
M
A
X
IN
D
EX
ART
.
22
~
3
2
c
m
(
9"
~
13"
)
R
E
F
HE
M
-
CR
19
ART.
Wrap the arm cuff snugly using both hands and securely fasten it with the Velcro tape. At this time, the lower
edge of the arm cuff must be placed 1 to 2 cm above the inner side of elbow joint.
If the arm cuff is not wrapped snugly, patient may feel numbness on his/her arm, or blood pressure may not be
measured correctly.
The arm cuff wrapped diagonally along the shape of the arm does not affect the measurement value.
MIN
A
RT.
R
AN
G
E
MIN
I
N
DEX
AR
T
.
2
2
~
3
2
cm
(
9
"
~
1
3
"
)
R
E
F
H
EM
-
CR1
9
R
A
NGE
1-2 cm
1.
•
•
2.
•
3.
•
•
6.
•
•
How to Apply the Arm Cuff
RA
N
G
E
M
I
N
MAX
I
N
D
E
X
AR
T
.
22
~
3
2
cm
(
9
"
~
1
3
"
)
R
E
F
HE
M
-
C
R
1
9
I
N
D
E
X
A
R
T.
RA
NG
E
MIN
M
A
X
3
2
~
4
2
c
m
(
1
3
"
~
17
"
)
R
E
F
HE
M
-
CL
1
9
A
RT.
RA
N
G
E
M
IN
M
A
X
I
ND
EX
R
E
F
H
E
M
-
C
S
1
9
1
7
~
2
2
cm
(
7
"
~
9
"
)
Warning
Do not apply the arm cuff during the intravenous
injection or transfusion.
Intravenous injection or transfusion is impossible.•
Requests from OMRON
Do not use the unit to the patient using a pump oxy-
genator.
Do not in ate the unit without applying the arm cuff.
Do not use the damaged cuff.
•
•
•
Cuff side Air tube
side
ART.

14
How to Apply the Arm Cuff
(cont.)
R
A
N
G
E
ART
.
RA
N
G
E
A
R
T.
INDEX
22
~
32cm
(
9"
~
13"
)
R
EF
HEM
-
CR
19
Adjust the level of the arm cuff to the level of the heart.
Keep the level of the arm cuff at the same level as the heart during the measure-
ment.
How to use the Power Source
(AC adapter exclusive for this unit)
7.
•
Warning
Do not use the unit in the place where in amma-
ble gas, such as highly in ammable anesthetic,
may be generated, or in the high pressure
oxygen room or the oxygen tent.
It may cause ignition and explosion.
•
Do not touch the AC adapter with wet hands.
You may suffer electric shock.
•
Caution
Be sure to use the power supply of 230 VAC.
It may cause re or electric shock.
•
Do not install or store the unit where it may be
sprayed with water or medication.
You may suffer electric shock.
•
Requests from OMRON
If this unit is used concurrently with other unit, be sure
to read the Instruction Manual of the other unit to be
used concurrently and understand the warnings and
cautions before use.
Inspect the Buttons to con rm that the unit operates
normally before use.
•
•
Connect the AC adapter to the DC jack of the main unit
[1] and the electric outlet [2].
D
C
8
V
[1]
[2]
When using an optional battery pack, the AC adapter
functions as the charger also.
•

15
How to Measure Blood Pressure
Warning
If any abnormal matter occurs during the mea-
surement such as the in ation does not stop,
remove the arm cuff or pull the air tube from the
main unit.
You may suffer peripheral neuropathy.
Requests from OMRON
Be sure that the patient should not touch the unit.
Be sure to monitor all the time that the unit and the
patient are not abnormal.
Do not use the unit in a vehicle.
Caution
In the following case, con rm the measurement
with the stethoscope.
(1) When an irregular pulse wave is displayed
· An error may be displayed when an external vibra-
tion is applied or the patient moves his/her body.
(2) When an error is generated or the measured value
is doubtful
· An error may be displayed when an external vibra-
tion is applied or the patient moves his/her body.
· An error may be generated in the measured valueor
the blood pressure may not be able to measure for
the patient having peripheral circulatory disturbance
or extreme hypotension.
· An error may be generated in the measured valueor
the blood pressure may not be able to measure for
the patient having short variation of blood pressure
such as arrhythmia.
Do not use a portable phone near the unit.
The unit may malfunction.
List of Measurement Modes
To measure
only once
To measure three
times
(or two times)
consecutively
To measure
by using a
stethoscope
To con rm the
accuracy of
pressure display
SINGLE Mode
AVG. Mode
MANU. Mode
CHECK Mode
Refer to Page
16.
Refer to Page
17.
Refer to Page
18.
Refer to Page
19.

16
How to Measure Blood Pressure
(in SINGLE Mode)
Wrap the arm cuff over the
patient’s arm.
1.
Set the MODE Selector to
“SINGLE”.
3.
ON/OFF
A
V
G
.
/
1
s
t
/
2
n
d
/
3
r
d
D
E
F
L
A
T
I
O
N
START
STOP
HIDE
P
-
SET
100
AUTO
140 180
220
260
280
MODE
AVG.
MANU.
CHECK
SINGLE
Push the START Button to start
the measurement.
If the in ation is determined
insuf cient, the unit may start
in ation again automatically.
If you want to stop measure-
ment, push the STOP Button.
The unit de ates fast.
5.
•
•
ON/OFF
A
V
G
.
/
1
s
t
/
2
n
d
/
3
r
d
D
E
F
L
A
T
I
O
N
START
STOP
HIDE
P
-
SET
100
AUTO
140 180
220
260
280
MODE
AVG.
MANU.
CHECK
SINGLE
Push the ON/OFF (power)
Button to turn off the power.
7.
ON/OFF
A
V
G
.
/
1
s
t
/
2
n
d
/
3
r
d
D
E
F
L
A
T
I
O
N
START
STOP
HIDE
P
-
SET
100
AUTO
140 180
220
260
280
MODE
AVG.
MANU.
CHECK
SINGLE
Push the ON/OFF (power)
Button to turn on the power.
2.
ON/OFF
A
V
G
.
/
1
s
t
/
2
n
d
/
3
r
d
D
E
F
L
A
T
I
O
N
START
STOP
HIDE
P
-
SET
100
AUTO
140 180
220
260
280
MODE
AVG .
MANU.
CHECK
SINGLE
Set the P-SET (pressure set-
ting) Volume to “AUTO” or the
target in ation value.
When setting the P-SET to
“AUTO”, turn the Volume
counterclockwise as far as it
goes until you can hear the
click sound.
When the systolic pressure is
expected to exceed 220 mmHg,
proper in ation may not be pos-
sible in “AUTO” setting.
Set the target in ation value to
30 to 40 mmHg higher than the
expected systolic pressure.
4.
•
•
ON/OFF
A
V
G
.
/
1
s
t
/
2
n
d
/
3
r
d
D
E
F
L
A
T
I
O
N
START
STOP
HIDE
P
-
SET
100
AUTO
140 180
220
260
280
MODE
AVG.
MANU.
CHECK
SINGLE
Measured results are dis-
played.
6.
HIDE
BPM
mmHg
PULSE
SYS
mmHg
DIA

17
Wrap the arm cuff over the
patient’s arm.
1.
Set the MODE Selector to
“AVG.”.
3.
ON/OFF
A
V
G
.
/
1
s
t
/
2
n
d
/
3
r
d
D
E
F
L
A
T
I
O
N
START
STOP
HIDE
P
-
SET
100
AUTO
140 180
220
260
280
MODE
AVG.
MANU.
CHECK
SINGLE
Push the START Button to start
the measurement.
Set the unit to the start time of
the rst measurement, then the
unit starts measurement auto-
matically.
After displaying the results of
rst measurement, the unit will
measure blood pressure in the
set number of times automati-
cally by taking an interval.
For the setting of the number of
measurements, the waiting time
before start of measurement,
and the interval time, refer to
Page 7.
5.
•
•
•
ON/OFF
A
V
G
.
/
1
s
t
/
2
n
d
/
3
r
d
D
E
F
L
A
T
I
O
N
START
STOP
HIDE
P
-
SET
100
AUTO
140 180
220
260
280
MODE
AVG.
MANU.
CHECK
SINGLE
Push the ON/OFF (power)
Button to turn off the power.
7.
ON/OFF
A
V
G
.
/
1
s
t
/
2
n
d
/
3
r
d
D
E
F
L
A
T
I
O
N
START
STOP
HIDE
P
-
SET
100
AUTO
140 180
220
260
280
MODE
AVG.
MANU.
CHECK
SINGLE
Push the ON/OFF (power)
Button to turn on the power.
2.
ON/OFF
A
V
G
.
/
1
s
t
/
2
n
d
/
3
r
d
D
E
F
L
A
T
I
O
N
START
STOP
HIDE
P
-
SET
100
AUTO
140 180
220
260
280
MODE
AVG .
MANU.
CHECK
SINGLE
Set the P-SET (pressure set-
ting) Volume to “AUTO” or the
target in ation value.
When setting the P-SET to
“AUTO”, turn the Volume coun-
terclockwise as far as it goes
until you can hear the click
sound.
When the systolic pressure is
expected to exceed 220 mmHg,
proper in ation may not be pos-
sible in “AUTO” setting.
Set the target in ation value to
30 to 40 mmHg higher than the
expected systolic pressure.
4.
•
•
ON/OFF
A
V
G
.
/
1
s
t
/
2
n
d
/
3
r
d
D
E
F
L
A
T
I
O
N
START
STOP
HIDE
P
-
SET
100
AUTO
140 180
220
260
280
MODE
AVG.
MANU.
CHECK
SINGLE
Measured results are
displayed.
After the measurement is
completed, average values are
displayed.
Each time a DEFLATION
(de ation control) Button is
pushed, the measurement
results for each time are
displayed.
6.
•
•
HIDE
BPM
mmHg
PULSE
SYS
mmHg
DIA
How to Measure Blood Pressure
(in AVG. Mode)
To stop the measurement during the measurement:
Push the STOP Button.
To start the stopped measurement again:
Push the START Button.

18
How to Measure Blood Pressure
(in MANU. Mode)
Wrap the arm cuff over the
patient’s arm.
1.
Push the ON/OFF (power)
Button to turn on the power.
3.
ON/OFF
A
V
G
.
/
1
s
t
/
2
n
d
/
3
r
d
D
E
F
L
A
T
I
O
N
START
STOP
HIDE
P
-
SET
100
AUTO
140 180
220
260
280
MODE
AVG.
MANU.
CHECK
SINGLE
Set the P-SET (pressure set-
ting) Volume to “AUTO” or the
target in ation value.
When setting the P-SET to
“AUTO”, turn the Volume coun-
terclockwise as far as it goes un-
til you can hear the click sound.
When the systolic pressure is
expected to exceed 220 mmHg,
proper in ation may not be pos-
sible in “AUTO” setting.
Set the target in ation value to
30 to 40 mmHg higher than the
expected systolic pressure.
5.
•
•
ON/OFF
A
V
G
.
/
1
s
t
/
2
n
d
/
3
r
d
D
E
F
L
A
T
I
O
N
START
STOP
HIDE
P
-
SET
100
AUTO
140 180
220
260
280
MODE
AVG.
MANU.
CHECK
SINGLE
Push the ON/OFF (power)
Button to turn off the power.
7.
ON/OFF
A
V
G
.
/
1
s
t
/
2
n
d
/
3
r
d
D
E
F
L
A
T
I
O
N
START
STOP
HIDE
P
-
SET
100
AUTO
140 180
220
260
280
MODE
AVG.
MANU.
CHECK
SINGLE
Place the stethoscope on the
patient’s arm.
2.
ON/OFF
A
V
G
.
/
1
s
t
/
2
n
d
/
3
r
d
D
E
F
L
A
T
I
O
N
START
STOP
HIDE
P
-
SET
100
AUTO
140 180
220
260
280
MODE
AVG.
MANU.
CHECK
SINGLE
Set the MODE Selector to
“MANU.”.
4.
ON/OFF
A
V
G
.
/
1
s
t
/
2
n
d
/
3
r
d
D
E
F
L
A
T
I
O
N
START
STOP
HIDE
P
-
SET
100
AUTO
140 180
220
260
280
MODE
AVG.
MANU.
CHECK
SINGLE
Push the START Button to
start the measurement.
In the “AUTO” setting, the unit
stops in ation at the pres-
sure considered to be 30 to
40 mmHg above the expected
systolic pressure, then start
de ation.
The unit can be re-in ated
only while the START Button is
pushed.
The pressure display is syn-
chronized with the pulse rate
and renewed.
Each time the DEFLATION
(de ation control) Button is
pushed, the unit de ates by
5~10 mmHg.
When you press the STOP But-
ton, the unit de ates fast and
ends the operation.
6.
•
•
•
•
•
ON/OFF
A
V
G
.
/
1
s
t
/
2
n
d
/
3
r
d
D
E
F
L
A
T
I
O
N
START
STOP
HIDE
P
-
SET
100
AUTO
140 180
220
260
280
MODE
AVG .
MANU.
CHECK
SINGLE

19
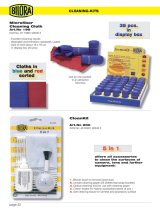
How to Measure Blood Pressure (in CHECK Mode)
Display of pressure can be con rmed by the CHECK Mode (yearly procedure).
What you need to prepare
(1) Well-adjusted reference pressure monitor (including rubber ball),
(2) T-shaped tube,
(3) Two rubber tubes, and (4) something in the cylindrical shape to wrap the arm cuff such as the tea container (sturdy one
that will not break or deform with pressure)
* Measurement error may occur even with the mercury blood pressure monitor because of insuf cient amount of mercury
in the mercury, dirty glass tube, or clogged glass tube cap.
How to use the blood pressure monitor
Connect the mercury blood
pressure monitor, rubber
ball, and this unit with the
T-shaped tube as shown in
the Figure.
Push the ON/OFF (power)
Button to turn on the
power.
Set the MODE Selector to
“CHECK”.
Tightly wrap the arm cuff
over a sturdy cylindrical
object.
Close the air release valve
of rubber ball and in ate
the monitor to a certain
value (pressure to be
checked).
Compare the value displayed on this monitor and that on the mercury.
Open the air release valve of rubber ball to de ate.
CHECK result
(1) In the measuring rule, the test tolerance of blood pressure monitor (accuracy of pressure when shipped from the
factory) should not exceed 3 mmHg.
(2) If the CHECK result is +/- 3 mmHg or above, contact the dealer where you purchased this unit or the nearest OMRON
dealer.
1.
2.
3.
4.
5.
6.
7.
H
IDE
P
-
SET
100
AUT
O
140 180
220
260
280
MOD
E
AVG
.
M
A
NU
.
CHEC
K
SING
LE
O
N
/O
F
F
A
V
G
.
/
1
s
t
/
2
n
d
/
3
r
d
D
E
F
L
A
T
I
O
N
S
T
ART
STOP
mmH
g
S
Y
S
mmHg
DIA
B
PM
P
ULS
E
AC

20
Installation and Replacement of Battery Pack
Remove the battery cover on the back of the
main unit.
Installation: To install the battery pack, connect
the battery pack connector to the connector in the
battery cover.
Replacement: Remove the battery pack from the
connector and replace with a new one.
Install the battery cover and fasten it with
screws.
Battery life
You can use the unit for approximately three hundred measurements.
If a
mark appears frequently even after the battery is charged, replace the battery.
Approximate battery life is two years.
Charging time
After inserting the AC adapter, the battery will start to charge automatically in approximately ve seconds.
While the battery is being charged, a
mark turns on.
The battery can be charged in approximately twelve hours.
Battery low
Even after a mark starts to ash, you can use the battery for twenty to thirty measurements. However it is
better to charge the battery as soon as possible.
If a
mark is displayed, the battery is low. Please charge the battery.
1.
2.
3.
•
•
•
•
•
•
•
•
Warning
Do not disassemble or modify the battery pack.
Do not throw the battery pack into re or heat it.
Do not charge the battery pack by using equip-
ment other than this unit.
If the uid in the battery pack gets into your
eye, wash the eye with suf cient water without
rubbing the eye. Then immediately consult the
doctor for treatment.
You may suffer injury, or battery uid may leak,
or battery may heat, ignite re, or explode.
•
Caution
Do not short the polarities of battery using metal
object such as the wire.
If the uid in the battery is stained on your skin
or cloth, immediately wash off the uid with
water.
You may suffer injury, or battery uid may leak,
or battery may heat, ignite re, or explode.
•
/