Nautilus SELECTTECH 552 User manual
- Type
- User manual

Be Strong.
™
P/N: 000-6069 Rev C (06/2007)
Owner’s Manual
SelectTech
®
552 Dumbbells

2
preface
Congratulations on the your purchase of the Nautilus
®
SelectTech
®
Dumbbell set. This innovative
dumbbell is a versatile training tool that will help you reach your fitness goal. This product has
been carefully engineered and manufactured to provide a wide array of weight options starting at
5 lbs (2.27 kg) and going all the way up to 52.5 lbs. (23.9kg) In order to utilize this product to its
fullest extent, it is critical that you read and fully understand this owner’s manual prior to using
the SelectTech
®
dumbbell.

3
Nautilus
®
SelectTech
®
Owner’s Manual
table of contents
IMPORTANT SAFETY INSTRUCTIONS ................. 4
PRODUCT SPECIFICATIONS
.......................................... 5
SELECTTECH
®
OPERATION ................................... 6
GETTING TO KNOW YOUR NAUTILUS®
SELECTTECH
®
DUMBBELLS ...................................... 6
UNDERSTANDING AND TESTING LOCKING
MECHANISM FUNCTION
........................................... 7
FUNCTION .................................................................... 7
PURPOSE ...................................................................... 7
TESTING PROPER LOCKING MECHANISM
FUNCTION .................................................................... 7
OFFSET WEIGHT SELECTION
.................................... 8
EXAMPLE OF OFFSET WEIGHT SELECTION
........... 8
WEIGHT SETTING CHARTS
....................................... 9
MAINTENANCE ........................................................... 10
DUMBBELL STAND
..................................................... 10
TROUBLESHOOTING GUIDE
...................................... 11
SELECTTECH
®
6 WEEK CHALLENGE .................... 12
SELECTTECH
®
MENU PLAN .................................. 34
LEG EXERCISES ..................................................... 16
WIDE SQUATS
............................................................. 16
CALF RAISES
............................................................... 16
STATIONARY LUNGE
S ................................................ 17
STIFF-LEG DEAD LIF
T ................................................. 17
REVERSE LUNGE
......................................................... 18
CHEST EXERCISES ................................................ 19
FLAT CHEST PRESS
.................................................... 19
INCLINE CHEST PRESS
.............................................. 19
FLAT CHEST FLY
........................................................... 20
INCLINE CHEST FLY
................................................... 20
DECLINE CHEST FLY
................................................... 21
ARM EXERCISES .................................................... 22
STANDING CURLS
...................................................... 22
CONCENTRATION CURLS
.......................................... 22
INCLINE BENCH CURLS
............................................. 23
SCOTT CURLS - STANDING
CONCENTRATION CURLS
......................................... 23
OVERHEAD TRICEPS EXTENSION ............................ 24
TRICEPS KICKBACK
.................................................... 24
LYING TRICEPS EXTENSION
..................................... 25
HAMMER CURLS
......................................................... 25
BACK EXERCISES .................................................. 26
SINGLE ARM ROW - ALTERNATING ROWS
........... 26
WIDE ROWS
................................................................. 26
DEAD LIFTS
.................................................................. 27
ABDOMINAL EXERCISES ...................................... 28
AB CRUNCH
................................................................. 28
REVERSE CRUNCH
...................................................... 28
LYING TRUNK ROTATION
........................................... 29
TWISTING SIDE CRUNCH
.......................................... 29
LYING LEG RAISE
........................................................ 30
SHOULDER EXERCISES ........................................ 31
STANDING SHOULDER PRESS
................................. 31
LATERAL RAISE
........................................................... 31
SEATED OVERHEAD PRESS
....................................... 32
FRONT RAISE
............................................................... 32
REAR DELT ROW
......................................................... 33
SHRUGS
........................................................................ 33
LIMITED WARRANTY ............................................. 36
IMPORTANT CONTACT NUMBERS ...................... 39

4
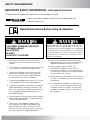
safety requirements
IMPORTANT SAFETY INFORMATION: SAVE THESE INSTRUCTIONS
The following definition applies to the word “Warning” found throughout this guide:
- Indicates a potentially hazardous situation which, if not avoided, could result
in death or serious injury.
W A R N I N G
A T T E N T I O N
D A N G E R
IMMEDIATE ACTION REQUIRED
C A U T I O N
Read All Instructions Before Using the Machine
1. Read and fully understand all instructions
contained in this manual prior to using the
product.
2. This product is intended for home use only and
is not suitable for commercial application.
3. Never allow children to use or play near this
equipment. Teenagers under the age of 18
must always have parental supervision and
instruction on the use of this product.
4. Inspect the dumbbells prior to each use. Do not
use a dumbbell with worn or damaged parts.
5. Confirm that the plates are installed in the correct
order and direction (see Figure B, page 5). If the
plates are not correctly installed, the Locking Tabs
may not properly engage and the plates may
unintentionally drop.
6. Never attempt to force the adjustment knob to
rotate when the dumbbell has been removed
from the dumbbell base.
7. Never allow the dumbbells to drop freely
to the ground. Damage to the product and
potential personal injury may occur. Please
see the warranty section for specific warranty
limitations related to dropped dumbbells.
8. Never allow dumbbells to forcefully bump
together during use. Damage to the product
and potential personal injury may occur.
9. Never attempt to disassemble your
SelectTech
®
Dumbbell handle, or base
assembly–the product is not designed to be
user serviced. Contact your Nautilus retailer or
Nautilus directly for service.
10. Before beginning your workout, make certain
that your surroundings are free from potential
interference.
11. The SelectTech
®
dumbbells are very heavy;
if you are not using the optional SelectTech
®
Dumbbell Stand we suggest you place the
dumbbell assembly directly on the floor for
best support.
W A R N I N G
A T T E N T I O N
D A N G E R
IMMEDIATE ACTION REQUIRED
C A U T I O N
This symbol appearing ThroughouT
This manual means
pay aTTenTion!
be alerT!
your safeTy is involved!
W A R N I N G
A T T E N T I O N
D A N G E R
IMMEDIATE ACTION REQUIRED
C A U T I O N
Before beginning any exercise program, consult your
physician or health care professional. Only he or she
can determine the exercise program that is appropriate
for your particular age and condition. If you experience
any lightheadedness, dizziness or shortness of breath
while exercising, stop the exercise and consult your
physician immediately.

5
Nautilus
®
SelectTech
®
Owner’s Manual
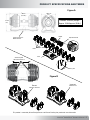
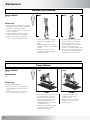
product specifications and terms
Dumbbell Assembly Weight =
Approx. 23.6 kilograms (58 lbs.)
40 cm
23 cm
20.5 cm
(15 3/4”)
(9”)
(8”)
40 cm
23 cm
20.5 cm
(15 3/4”)
(9”)
(8”)
Handle
Adjustment Knob
Plates
Base
Locking Tab
Correct
Tab Points Outward
Incorrect
Tab Reversed
All LockingTabs
Must Point Outward
Figure B
Serial # Located on
Bottom of Base
This product is covered by US and Foreign Patents and Patents Pending. See product for more information.
Figure A

6
selecttech
®
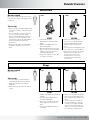
operation
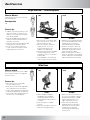
Figure 1
Figure 2
Weight will increment in the following 15 steps:
5 7.5 10 12.5 15 17.5 20 22.5 25 30 35 40 45 50 52.5
Getting to know your Nautilus
®
SelectTech
®
Dumbbells
The Nautilus
®
SelectTech
®
ND 552 dumbbells are shipped fully
assembled, one dumbbell to a box. After carefully removing the
dumbbell from its box, there are some initial steps that should be taken
to familiarize you with the function of the product and to assure that all
aspects of the dumbbell are performing according their specifications.
1. After removing the dumbbell from its protective packaging,
inspect the products and packaging material for any damages.
2. Push down slightly on the handle assembly to make sure it is
fully depressed into the base. Rotate each adjustment knob
several full rotations to make sure it is turning freely-do this
in both directions. Make sure there is a click at each weight
increment of the adjustment knob. This click will help you
locate the proper alignment to select a given weight increment.
3. You will notice that there are
weight increments from 5 to 52.5
lbs (2.27kg to 23.9kg) on both
adjustment knobs. To properly
select a given weight (20 lbs [9kg]
for example) , both adjustment
knobs should be rotated until 20
is aligned with the arrow located
on the outward edge of the
Nautilus
®
nameplate (Fig.1).
4. After confirming the proper rotational function of the adjustment
knob, turn each adjustment so that the number 5 is aligned with
the arrow in the Nautilus
®
nameplate.
5. With both adjustment
knobs set to 5, pull
the handle straight up
from the dumbbell.
This will remove just
the handle from the
base, leaving all of the
weight plates standing
in the base (Fig. 2).
The handle without
plates represents the starting weight of 5 lbs (2.27 kg).
6. You may increase the selected weight by rotating each
adjustment knob clockwise.
7. The dumbbell handle and weight plates are symmetrical. This
means that one may insert the handle with either end facing
the user provided that you have selected the same weight
number on both ends of the dumbbell.
8. When either returning or removing the dumbbell to or from the
base, do so in a vertical motion, perpendicular to the base. Try
not to tilt the dumbbell or move it laterally (parallel to the base)
until it is fully clear of the unselected weight plates.
(2.27kg) (3.4kg) (4.5kg) (5.7kg) (6.8kg) (8kg) (9kg)
(10.2kg) (11.4kg)
(13.6kg) (15.9kg)
(18.2kg) (20.5kg)
(22.7kg)
(23.9kg)

7
Nautilus
®
SelectTech
®
Owner’s Manual
selecttech
®
locking mechanism
Understanding and testing the locking
mechanism function
The Nautilus
®
SelectTech
®
Dumbbell features a patent pending locking
mechanism designed to assure proper and complete selection of the
weight plates as well as to ensure weight plate retention during the
workout. It is important that you fully understand the function of this
mechanism and periodically test it to ensure it is properly functioning.
Function
The locking mechanism provides two key functions:
1. The mechanism will only allow the adjustment knobs to be
rotated when the dumbbell handle is completely inserted and
engaging the dumbbell base.
2. The mechanism is designed to lock the dumbbell handle to
the base if either adjustment knob is not fully engaging the
selected weight plates.
Purpose
The locking mechanism serves two important purposes:
1. The mechanism will prevent deselecting (dropping) weight
plates from the dumbbell when it is NOT in the dumbbell base.
2. The mechanism will prevent partial selection of the weight
plates in which the plates are not fully supported and the
locking pin is not fully engaged.
Given the importance of this locking mechanism, it is critical that you
understand how it operates and how to periodically test it to make sure
it is functioning correctly.
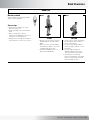
Testing proper locking mechanism function
1. With the dumbbell handle set in the
dumbbell base, turn both adjustment
knobs to the number 5. You will know
you have fully and correctly selected
the number when you feel the
adjustment knob settle into a notch
(known as a detent). You will also
hear a slight, but audible, clicking
noise that corresponds with the
detent locations for each number.
2. You should be able to withdraw the handle from the base
leaving all the weight plates behind.
3. With the handle removed from the base, grab one adjustment
knob with your other hand and gently attempt to turn the knob,
the knob should not rotate. A locking pin in the mechanism
will have engaged the rotational assembly when the unit was
withdrawn from the base. Perform this test with all adjustment
knobs.
4. After confirming the proper function of the locking mechanism
as described above, return and fully insert the dumbbell handle
back into the base assembly.
5. With the handle back in the base,
turn the adjustment knob on one side
to a position that is in-between the
5 and 7.5 number. This represents an
incomplete weight selection where
the adjustment knob has not fully
selected a weight and the knob is
in-between the selection detents
(clicks).
6. With the selection knob in this improper position, gently
attempt to lift up on the handle to remove it from the base. You
should find that the handle is locked to the base and cannot be
removed with light pressure as it can normally.
7. Return the improperly selected adjustment knob to a full and
proper weight selection and assure that the dumbbell handle
can once again be removed.
8. Repeat this test for all adjustment knobs.
9. Assure the entire dumbbell handle assembly is properly
tightened. Do this by setting the adjustment knobs to five
pounds and removing the handle assembly from the base.
Grab both adjustment knobs and very slightly push and pull the
knobs toward and away from the handle grip. The knobs should
not exhibit free play and all of the selection discs should feel
tightly connected.
10. You have now tested the function of the locking mechanism.
We suggest you repeat this test periodically (once a month) to
confirm the proper function of the locking mechanism.
W A R N I N G
A T T E N T I O N
D A N G E R
IMMEDIATE ACTION REQUIRED
C A U T I O N
Do not use a great deal of force in an attempt to turn
the locked adjustment knob. Excessive force may
damage the locking mechanism.

8
weight selection
Side 1 Side 2 Total dumbbell weight
Weight settings selected
20 lbs (9 kg) 30 lbs (13.6 kg) 25 lbs (11.4 kg)
Weight Difference 10 lbs (4.5 kg)
Weight Distribution 10 lbs (4.5 kg) 15 lbs (6.8 kg) 25 lbs (11.4 kg)
Weight offset + 5 lbs (2.27 kg)
W A R N I N G
A T T E N T I O N
D A N G E R
IMMEDIATE ACTION REQUIRED
C A U T I O N
Do not intentionally engage the locking mechanism
and attempt to lift the entire dumbbell via the grip.
The dumbbell should only be lifted by using the lift
handles molded into the base assembly.
W A R N I N G
A T T E N T I O N
D A N G E R
IMMEDIATE ACTION REQUIRED
C A U T I O N
If the dumbbell locking mechanism fails to perform
in accordance with the test procedure above,
do the following things:
1. Discontinue use of the product immediately until
proper service can be provided.
2. Contact your Nautilus® retailer or contact Nautilus,
Inc. directly by phone at 1-800-628-8458 for service.
Offset weight selection
As indicated above, proper selection for a given weight is
accomplished by selecting that weight number on both ends of the
dumbbell. For example: to select 20 lbs (9 kg), one must dial both
adjustment knobs on the dumbbell to the number 20. By selecting
the same number on both sides of the dumbbell, you will replicate
a common dumbbell, this is to say, a balanced dumbbell with equal
weight on both sides. While this is the most common form of weight
selection and will be used in the vast majority of workouts, the
Nautilus
®
SelectTech
®
Dumbbell offers a useful and unique workout
alternative known as offset weight selection. Offset weight selection
involves using a different weight setting on one side of the dumbbell
relative to the other. Doing so can be a powerful muscle development
tool during certain workouts, such as the biceps curl. The SelectTech
®
Dumbbell functions exactly the same way whether you have selected
balanced or offset weights. The only exception is that when you are
using offset weights, you must return the dumbbell to the base in the
same orientation that you removed it. When you have offset weight
selection the combination of weight plates selected will not be the
same on both sides of the dumbbell. You must therefore make certain
to return the dumbbell to the base in the same orientation in which
it was removed, in order for the weight plates to settle back into the
corresponding vacant slots in the dumbbell base.
Example of offset weight selection workout
Performed traditionally, dumbbell curls strengthen the biceps, but do
little for the forearm muscles that assist in supination and pronation
of the wrist. Supination and pronation are terms describing a rotating
motion of the wrist. For example, turning a doorknob and turning your
key in your car’s ignition are examples of supination and pronation.
Turning a doorknob clockwise would be the supination direction, while
counter-clockwise would be the pronation direction. Whether you are
training for a specific sport, or just training to become stronger and
improve activities of daily living, training your forearm muscles that
are involved in supination and pronation can be beneficial.
These dumbbells allow you to train differently than
traditional dumbbells. By using different weight settings on either
side of the dumbbells, you can use those supination/pronation
muscles during your curls. Using more weight on the thumb side of
the dumbbell will improve pronation strength, while more weight on
the little finger side will improve supination strength. Not only will
you be strengthening your biceps, but also you can become stronger in
activities involving rotation of the wrist!
The following example of a Biceps Curl using offset weight is a good
demonstration of the superior muscle development
provided by the SelectTech
®
Dumbbell.
The dumbbell weight has been set to 20 lbs (9 kg) on one side and 30
lbs (13.6 kg) on the other. The total weight of the dumbbell is therefore
25 lbs (11.4 kg). This 25 lb (11.4 kg) dumbbell has the weight distributed
such that there are 10 lbs (4.5 kg) on one side and 15 lbs (6.8 kg) on the
other for a total of 25 lbs (11.4 kg).
With the dumbbell weight configured as defined above, the user should
grip the dumbbell with 20 lbs (9 kg) on the thumb side of the hand and
the 30 lbs (13.6 kg) on the little finger side of the hand.

9
Nautilus
®
SelectTech
®
Owner’s Manual
Start the biceps curl with a neutral wrist and forearm position (palm
facing leg). As the curl progresses from the start to finish position, the
wrist should be rotated progressively outward (palm up). During this
curl the user will be lifting the weight of the dumbbell (25 lbs [11.4
kg]) with the biceps but also lifting the offset weight of 5 lbs (2.27 kg)
with wrist rotation (supination). Unlike a conventional dumbbell that
is balanced end to end, this offset weight will require more muscle
activation and therefore develop the forearm and wrist.
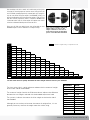
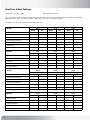
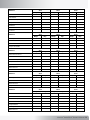
Below you will find some helpful charts that will provide the total
dumbbell weight for various combinations of weight settings.
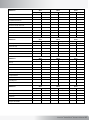
The chart to the right is a quick reference to determine the amount of weight
offset to one side of the dumbbell.
The amount of weight listed in the Difference column indicates the difference
between the two weights selected with the dumbbell adjustment knob.
The symbol + indicates the amount of offset weight on the heavier side of
the dumbbell.
Although you can continue to increase the amount of weight offset, it is not
generally necessary to offset the weight more than 20 lbs (9 kg).
Difference Offset
2.5 lbs + 1.25 lbs
5 lbs + 2.5 lbs
7.5 lbs + 3.75 lbs
10 lbs + 5 lbs
12.5 lbs + 6.25 lbs
15 lbs + 7.5 lbs
17.5 + 8.75 lbs
20 lbs + 10 lbs
22.5 lbs + 11.25 lbs
25 lbs + 12.5 lbs
30 lbs + 15 lbs
35 lbs + 17.5 lbs
40 lbs + 20 lbs
This is just one example of the offset
weight settings you may use. The
weight combinations and totals are
quite extensive given the adjustment
options of the SelectTech
®
Dumbbell.
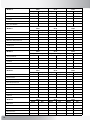
5 Indicates weight setting on adjustment knob
7.5 6.25
10 7.5 8.75
12.5 8.75 10 11.25
15 10 11.25 12.5 13.75
17.5 11.25 12.5 13.75 15 16.25
20 12.5 13.75 15 16.25 17.5 18.75
22.5 13.75 15 16.25 17.5 18.75 20 21.25
25 15 16.25 17.5 18.75 20 21.25 22.5 23.75
30 17.5 18.75 20 21.25 22.5 23.75 25 26.25 27.5
35 20 21.25 22.5 23.75 25 26.25 27.5 28.75 30 32.5
40 22.5 23.75 25 26.25 27.5 28.75 30 31.25 32.5 35 37.5
45 25 26.25 27.5 28.75 30 31.25 32.5 33.75 35 37.5 40 42.5
50 27.5 28.75 30 31.25 32.5 33.75 35 36.25 37.5 40 42.5 45 47.5
52.5 28.75 30 31.25 32.5 33.75 35 36.25 37.5 38.75 41.25 43.75 46.25 48.75 51.25
5 7.5 10 12.5 15 17.5 20 22.5 25 30 35 40 45 50 52.5
Use the matrix above to quickly determine the offset weight selection total for your dumbbell.

10
maintenance
Optional exercise bench and mat are available separately.
Check out the selection of products available from Nautilus, Inc. at www.nautilus.com
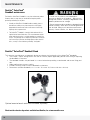
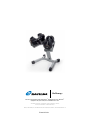
Nautilus
®
SelectTech
®
Dumbbell Stand
This attractive stand features an ergonomic design to enhance the functionality of the SelectTech
®
dumbbells.
• The V-shape “step-in” design allows the user to maintain proper upper body position while lifting or replacing
the dumbbells in the base.
• The dumbbell handles are positioned in a natural orientation providing a comfortable and secure lifting posi-
tion.
• Wide stabilizer base assures stability.
• Includes fastening straps to secure dumbbells to the base.
• Dimensions (without dumbbells): 21.3" L x 26.1" W x 24.8" H (54.2cm x 66.4cm x 63.1cm)
W A R N I N G
A T T E N T I O N
D A N G E R
IMMEDIATE ACTION REQUIRED
C A U T I O N
1. Do not use any solvents, harsh detergents,
chemicals or bleach on this product − doing so may
damage the materials, resulting in degradation of the
products performance or strength.
2. Do not attempt to disassemble the dumbbell handle
or base assembly. These items are not designed to be
user serviced. Doing so will void the manufacturers
warranty. Contact Nautilus, Inc. directly for service.
Nautilus
®
SelectTech
®
Dumbbell maintenance:
The Nautilus
®
SelectTech
®
Dumbbell is a very low maintenance product.
However, there are steps that you should take to keep the product
performing and looking its very best.
1. Should your SelectTech
®
Dumbbell handle assembly, plates or
base become soiled you may clean them with a cloth lightly
dampened with warm water and a small amount of mild soap.
Wipe dry with a separate cloth.
2. The SelectTech
®
Dumbbell is internally lubricated and will not
require further internal lubrication. The contact between weight
plates and selection discs is not lubricated but has naturally low
friction. This generally will not require any lubrication. Should you
feel it necessary to lubricate the weight plates and/or selection
discs, use only a silicon lubricant, preferably “food grade”.

11
Nautilus
®
SelectTech
®
Owner’s Manual
troubleshooting
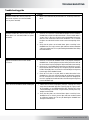
Troubleshooting guide
Problem Solution
Dumbbell handle does not fully insert into
base when no plates are selected (handle
has no plates attached).
1. Make certain that both adjustment knobs are set directly to the num
-
ber 5.
Dumbbell handle does not fully insert into base
when plates are selected (handle has plates
attached).
1. Check to see if you have selected different weights on each side of the
dumbbell (for example one adjustment knob is set to 2 and the other is
set to 3). If this is the case, you must replace the dumbbell in the base
with the same orientation in which was withdrawn. This is to allow
the plates to settle back into the correct and vacant openings in the
base.
2. Verify that the plates not selected (those plates remaining in the
dumbbell base) are in their correct spots and have not been moved to
a different support slot. This may be blocking the dumbbell from fitting
back into the base.
Adjustment knob will not turn while handle
is in base.
1. Check to assure that the dumbbell handle is fully depressed into the
dumbbell base. If not fully depressed, the locking mechanism will not
be released and may be keeping the adjustment knobs from rotating.
2. Check to see if any weight plates have been put into the base assem
-
bly backwards with the “Locking Tab” facing the grip of the dumbbell
handle. All weight plates must have the selection tongue facing away
from the grip of the dumbbell handle.
3. Check to see if there is any dirt, debris or other obstruction in the
dumbbell base. You may need to remove the weight plates from the
base to accomplish this check. Remember to put each weight plate
back in its appropriate location with the selection tongue facing away
from the dumbbell grip.
Plates are not secured to the handle and drop out.
1. Confirm that all of the weight plates have the “Locking Tab” facing
away from the dumbbell grip (See Figure B, page 5). If one or more
of the weights are inserted backwards with “Locking Tab” facing
inward toward grip, the handle can get blocked, and the plates may
wedge into the handle.
2. Verify that the plates not selected (those plates remaining in the
dumbbell base) are in their correct spots and have not been moved
to a different support slot. This may be blocking the dumbbell from
fitting back into the base.

12
Workout 1 Set #1 Set #2 Set #3
Weight Reps Weight Reps Weight Reps
Flat Chest Press
Overhead Press
Lying Triceps Extension
Overhead Triceps Extension
Single Arm Row
Standing Curl
Concentration Curls
Workout 2 Set #1 Set #2 Set #3
Weight Reps Weight Reps Weight Reps
Stationary Lunge
Stiff-Leg Dead Lift
Calf Raise
Ab Crunch
Lying Trunk Rotation
Workout 3 Set #1 Set #2 Set #3
Weight Reps Weight Reps Weight Reps
Flat Chest Press Alternating
Overhead Press Alternating
Lying Triceps Extension
Overhead Triceps Extension
Single Arm Row
Standing Curl Alternating
Concentration Curls
Workout 4 Set #1 Set #2 Set #3
Weight Reps Weight Reps Weight Reps
Stationary Lunge
Stiff-Leg Dead Lift
Calf Raise Unilateral
Reverse Crunch
Lying Trunk Rotation
SelectTech
®
6 Week Challenge
FREQUENCY: 3-Days a Week TIME: About 30 minutes
For a successful workout, focus on generating the muscular contraction required to create the motion of the weight
(demonstrated in your “The Secrets of the 4-Step Rep” DVD) not just lifting the weight.
# of Reps: 8-12 (30 to 40 second intervals between sets)

13
Nautilus
®
SelectTech
®
Owner’s Manual
Workout 5 Set #1 Set #2 Set #3
Weight Reps Weight Reps Weight Reps
30d Incline Chest Press
Lateral Raise
Overhead Triceps Extension
Triceps Kickback
Wide Row
60d Incline Curl
Scott Curl
Workout 6 Set #1 Set #2 Set #3
Weight Reps Weight Reps Weight Reps
Wide Squat
Calf Raise
Ab Crunch
Lying Trunk Rotation
Workout 7 Set #1 Set #2 Set #3
Weight Reps Weight Reps Weight Reps
30d Incline Chest Press
Lateral Raise
Overhead Triceps Extension
Triceps Kickback
Wide Row
60d Incline Curl
Scott Curl
Workout 8 Set #1 Set #2 Set #3
Weight Reps Weight Reps Weight Reps
Wide Squat
Calf Raise
Reverse Crunch
Lying Trunk Rotation
Workout 9 Set #1 Set #2 Set #3
Weight Reps Weight Reps Weight Reps
Flat Chest Press
60d Incline Press
Overhead Triceps Extension
60d Incline Triceps Extension
Single Arm Row
Standing Curl
60d Incline Curl

14
Workout 10 Set #1 Set #2 Set #3
Weight Reps Weight Reps Weight Reps
Stiff-Leg Dead Lift
Wide Squat
Calf Raise
Reverse Crunch
Lying Trunk Rotation
Workout 11 Set #1 Set #2 Set #3
Weight Reps Weight Reps Weight Reps
Flat Chest Press
60d Incline Press
Lying Triceps Extension
60d Incline Triceps Extension
Single Arm Row
Standing Curl
60d Incline Curl
Workout 12 Set #1 Set #2 Set #3
Weight Reps Weight Reps Weight Reps
Stiff-Leg Dead Lift
Wide Squat
Calf Raise
Reverse Crunch
Lying Trunk Rotation
Workout 13 Set #1 Set #2 Set #3
Weight Reps Weight Reps Weight Reps
Flat Fly
Flat Chest Press
Seated Overhead Press Bilateral
Lying Triceps Extension
Overhead Triceps Extension
Single Arm Row
Wide Row
Standing Curl
Scott Curl
Workout 14 Set #1 Set #2 Set #3
Weight Reps Weight Reps Weight Reps
Wide Squat
Reverse Lunge
Calf Raise
Reverse Crunch
Lying Trunk Rotation

15
Nautilus
®
SelectTech
®
Owner’s Manual
Workout 15 Set #1 Set #2 Set #3
Weight Reps Weight Reps Weight Reps
Flat Fly
Flat Chest Press
Seated Overhead Press
Lying Triceps Extension
Overhead Triceps Extension
Single Arm Row
Rear Delt Row
Standing Curl
Scott Curl
Workout 16 Set #1 Set #2 Set #3
Weight Reps Weight Reps Weight Reps
Wide Squat
Reverse Lunge
Calf Raise
Reverse Crunch
Lying Trunk Rotation
Workout 17 Set #1 Set #2 Set #3
Weight Reps Weight Reps Weight Reps
Flat Fly
Flat Chest Press
Lateral Raise
Lying Triceps Extension
Overhead Triceps Extension
Single Arm Row
Rear Delt Row
Standing Curl
Scott Curl
Workout 18 Set #1 Set #2 Set #3
Weight Reps Weight Reps Weight Reps
Stiff-Leg Dead Lift
Wide Squat
Calf Raise
Ab Crunch
Lying Trunk Rotation

16
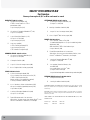
BREAKFAST: 300-335 calories
A. 1/2 New York style bagel (125)
2 TBSP of cream cheese or 1 TSP of
peanut butter (100)
1 cup of orange juice (110)
B. 1/2 serving of Champion Metabolol II
®
(130)
1 cup of 1% milk (200)
C. 1 cup of Honey Nut Cheerios
®
(115)
1/2 cup of 1% milk (100)
1 cup of orange juice (110)
D. 1 egg, any style (80)
1 slice of whole-grain bread (75)
1 cup of orange juice (110)
1 TSP of butter or margarine (35)
MORNING SNACK: 180-215 calories
A. 1/2 serving of Champion Met Max (115)
1/2 cup of 1% milk (100)
B. 1 Champion SnacBar (180)
C. 1 cup of 1% low-fat cottage cheese (180)
D. 6 oz. of Yoplait
®
99% fat free yogurt (180)
LUNCH: 350-380 calories
A. 2 slices of whole-grain bread (150)
1.5 oz. of turkey, ham, chicken or tuna fish (75)
1 TBSP of light mayonnaise (50)
(lettuce, tomato, onion and pickles optional)
1 serving of medium-sized fruit (100)
B. 3 oz. of boneless, skinless chicken breast (150)
3/4 cup of cooked rice (preferably brown) (150)
1 cup of broccoli (80)
C. 1 serving of Champion Metabolol II
®
(260)
1/2 cup of 1% milk (100)
D. Frozen Microwave meal of no more than
350 calories. You may choose from Healthy Choice
®
, Lean
Cuisine
®
or Michelina’s
®
Authentico, for example.
AFTERNOON SNACK: 180-215 calories
A. 1/2 serving of Champion Met Max (115)
1/2 cup of 1% milk (100)
B. 2 servings of medium-sized fruit (200)
C. 1 cup of 1% low- fat cottage cheese (180)
D. 6 oz. of Yoplait
®
99% fat free yogurt (180)
DINNER: 350-360 calories
A. 3 oz. of Chicken, Turkey or Fish (150)
1/2 medium baked potato or 1/2 cup of cooked rice (prefer-
ably brown) (100)
Side salad with 2 TBSP of low-fat dressing or
2 cups of broccoli (100)
B. Frozen Microwave dinners of no more than
350 calories. You may choose from Healthy Choice
®
, Lean
Cuisine
®
or Michelina’s
®
Authentico, for example.
C. 1 serving of Champion Metabolol II
®
(260)
1/2 cup of 1% milk (100)
D. 1 oz. spaghetti, American Beauty
®
, thin,
uncooked (105)
3 oz. ground turkey, Louis Rich
®
(140)
1/2 cup of tomato sauce (30)
1 cup of desired vegetables sautéed with ground turkey (80)
EVENING SNACK (optional): 100-180 calories
A. 1 Champion SnacBar (180)
B. 1 serving of medium-sized fruit (100)
CHAMPION CREATINE SUPPLEMENT: On weight-training days, please take one serving
before your workout and one serving after your workout. CREATINE CALORIES…280 on
workout days.
BEVERAGES: Please follow the hydration program for your water intake. You may also
have soft drinks, tea or coffee as long as it’s calorie and caffeine free. This would be in
addition to your water.
TOTAL CALORIES WILL DEPEND ON WHETHER YOU CHOOSE OPTION A, B, C OR D
DURING THE DAY
Workout days: LOW 1640 HIGH 1785
Off days: LOW 1360 HIGH 1505
SELECT TECH MENU PLAN
For Females
You may choose plan A, B, C or D for each meal or snack

17
Nautilus
®
SelectTech
®
Owner’s Manual
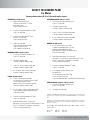
BREAKFAST: 455-490 calories
A. 1 New York style bagel (250)
2 TBSP of cream cheese or 1 TSP of
peanut butter (100)
1 cup of orange juice (110)
B. 1 serving of Champion Metabolol II
®
(260)
1 cup of 1% milk (200)
C. 2 cups of Honey Nut Cheerios
®
(230)
3/4 cup of 1% milk (150)
1 cup of orange juice (110)
D. 2 eggs, any style (160)
2 slices of whole-grain bread (150)
1 cup of orange juice (110)
1 TSP of butter or margarine (35)
MORNING SNACK: 280-315 calories
A. 1/2 serving of Champion Met Max (115)
1 cup of 1% milk (200)
B. 1 Champion SnacBar (180)
1 serving of medium-sized fruit (100)
C. 1 cup of 1% low-fat cottage cheese (180)
1 serving of medium-sized fruit (100)
D. 6 oz. of Yoplait
®
99% fat free yogurt (180)
1 serving of medium-sized fruit (100)
LUNCH: 425-460 calories
A. 2 slices of whole-grain bread (150)
3 oz. of turkey, ham, chicken or tuna fish (150)
1 TBSP of light mayonnaise (50)
(lettuce, tomato, onion and pickles optional)
1 serving of medium-sized fruit (100)
B. 3 oz. of boneless, skinless chicken breast (150)
1 cup of cooked rice (preferably brown) (200)
1 cup of broccoli (80)
C. 1 serving of Champion Metabolol II
®
(260)
1 cup of 1% milk (200)
D. Frozen Microwave meal of no more than
350 calories. You may choose from Healthy Choice
®
, Lean
Cuisine
®
or Michelina’s
®
Authentico, for example.
1 slice of whole-grain bread (75)
AFTERNOON SNACK: 280-315 calories
A. 1/2 serving of Champion Met Max (115)
1 cup of 1% milk (200)
B. 1 Champion SnacBar (180)
1 serving of medium-sized fruit (100)
C. 1 cup of 1% low- fat cottage cheese (180)
1 serving of medium-sized fruit (100)
D. 6 oz. of Yoplait
®
99% fat free yogurt (180)
1 serving of medium-sized fruit (100)
DINNER: 425-460 calories
A. 3 oz. of chicken, turkey or fish (150)
1 medium-sized baked potato or 1 cup of
cooked rice (preferably brown) (200)
Side salad with 2 TBSP of low-fat dressing or
2 cups of broccoli (100)
B. Frozen Microwave dinners of no more than
350 calories. You may choose from Healthy Choice
®
, Lean
Cuisine
®
or Michelina’s
®
Authentico, for example.
1 slice of whole-grain bread (75)
C. 1 serving of Champion Metabolol II
®
(260)
1 cup of 1% milk (200)
D. 2 oz. spaghetti, American Beauty
®
thin,
uncooked (210)
3 oz. ground turkey, Louis Rich
®
(140)
1/2 cup of tomato sauce (30)
1 cup of desired vegetables sautéed with ground turkey (80)
EVENING SNACK (optional): 180-315 calories
A. 1/2 serving of Champion Met Max (115)
1 cup of 1% milk (200)
B. 1 Champion SnacBar (180)
CREATINE SUPPLEMENT: On weight-training days, please take one serving before your
workout and one serving after your workout. CREATINE CALORIES…280 on workout
days.
BEVERAGES: Please follow the hydration program for your water intake. You may also
have soft drinks, tea or coffee as long as it’s calorie and caffeine free. This would be in
addition to your water.
TOTAL CALORIES WILL DEPEND ON WHETHER YOU CHOOSE OPTION A, B, C OR D
DURING THE DAY
Workout days: LOW 2145 HIGH 2320
Off days: LOW 1865 HIGH 2040
SELECT TECH MENU PLAN
For Males
You may choose plan A, B, C or D for each meal or snack

18
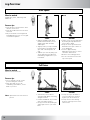
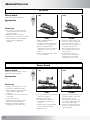
Leg Exercises
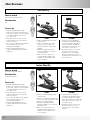
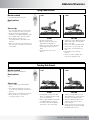
Wide Squats
START ACTION
START
• Grab the dumbbell with both
hands and stand with you feet
slightly wider than shoulder
width apart.
• Slightly rotate your hips outward,
feet and knees should be lined
up in that outward position as
well.
• Stabilize your torso by lifting your
chest, tightening your abs and
maintaining a slight arch in your
lower back.
• Under control, slowly squat down
by sticking the hips back as the
knees start to bend.
• Keep the chest up and the and
back flat as the hips continue to
move backward.
• Lower to approximately
90 degrees at the knees, unless
otherwise determined.
• Return to the starting position.
• Do not lockout the knees at the
top of the squat.
FINISH
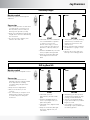
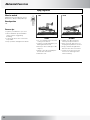
Calf Raises
START ACTION
START
• Stand with your feet about
shoulder width apart, feet facing
straight forward.
• Hold the dumbbells at your sides
with your palms facing in.
• Keep your chest lifted, abs tight
and a slight curve in your lower
back.
• Slowly rise up on the balls of
your feet, lifting your heels as
high as you can off the floor.
• Slowly return to the starting
position, keeping tension on the
calf muscles.
FINISH
Muscles worked
Quadriceps, glutes, hamstrings and
adductors
Success tips:
• Keep the knees pointed in the same
direction as the toes.
• Keep the head and neck in line with
the trunk.
• Pay close attention to all alignment
and stabilization issues on every part
of each and repetition.
Muscles worked
Gastrocnemius and soleus
Success tips
• Do not change your hip or knee
position during the exercise.
• Rise up as high as you can,
maintaining your balance, on the
balls of your feet.
Note: Optional accessories shown in
photos.

19
Nautilus
®
SelectTech
®
Owner’s Manual
Leg Exercises
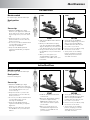
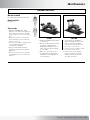
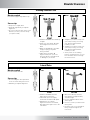
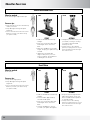
Stationary Lunges
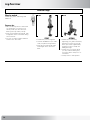
Stiff-leg Dead Lift
START ACTION
START
• Stand with your feet
approximately shoulder width
apart
• Hold the dumbbells down in
front of your thighs with your
palms facing back.
• Stand with a very slight bend at
the knees.
• Keep the chest lifted, abs tight
and a very slight arch in your
lower back.
• Maintaining your knee position,
slowly bend forward at the hips
moving your butt backward.
• Stop as your hamstings begin
to get taut and before your back
begins to round.
• Concentrate on tensing your
hamstrings to pull you back up to
the starting position.
FINISH
START ACTION
START
• Stand with one foot forward and
one foot backward in a position
so when you move to the
bottom of the lunge, you front
foot is under your knee and you
back knee is directly under you
hip.
• Hold the dumbbells at your sides
with your palms facing inward.
• Keep the chest lifted, abs tight
and a slight arch in the lower
back.
• Slowly lower your body bending
at both knees, simultaneously
keeping the front knee in line
with the toes.
• Move down and stop just before
the back knee is going to touch
the floor.
• Reverse the motion and come
back up to the starting position.
FINISH
Muscles worked
Quadriceps, glutes, hamstrings and
adductors
Success tips
• Place feet in a position so that when
you lunge down, your front foot is
directly under your knee and your
back leg lines up under your hip.
• Keep your head and chest lifted, with
a slight arch in the lower back during
the movement.
• Do only one side to fatigue, then
switch to the other side.
Muscles worked
Hamstrings, glutes and spinal erectors
Success tips
• Your torso should move from
standing vertical to leaning forward
at the hips without rounding
your spine during any part of the
movement.
• Keep the knees slightly bent.
• Only move as far as you can
correctly.
• It is critical that you keep the chest
lifted and do not allow your spine
to round at any time during the
movement.

20
Leg Exercises
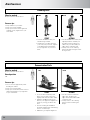
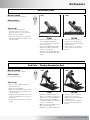
Reverse Lunge
START ACTION
START
• Stand with your feet together.
• Hold the dumbbells at your sides
with your palms facing inward.
• Keep the chest lifted, abs tight
and a slight arch in the lower
back.
• Initiate the movement by
tightening your glutes and slowly
pivoting your leg from your hip.
Move your entire leg backward,
keeping your knee steady at a
90 degree angle.
• Slowly move your leg as far as
you can, without allowing any
movement at the waist, knee or
lower back.
• Slowly return to start position.
FINISH
Muscles worked
Quadriceps, glutes, hamstrings and
adductors
Success tips
• Place feet in a position so that when
you lunge back, your front foot is
directly under your knee and your
back leg lines up under your hip.
• Keep your head and chest lifted, with
a slight arch in the lower back during
the movement.
• Do only one side to fatigue and then
switch to the other side.
Page is loading ...
Page is loading ...
Page is loading ...
Page is loading ...
Page is loading ...
Page is loading ...
Page is loading ...
Page is loading ...
Page is loading ...
Page is loading ...
Page is loading ...
Page is loading ...
Page is loading ...
Page is loading ...
Page is loading ...
Page is loading ...
Page is loading ...
Page is loading ...
Page is loading ...
Page is loading ...
-
 1
1
-
 2
2
-
 3
3
-
 4
4
-
 5
5
-
 6
6
-
 7
7
-
 8
8
-
 9
9
-
 10
10
-
 11
11
-
 12
12
-
 13
13
-
 14
14
-
 15
15
-
 16
16
-
 17
17
-
 18
18
-
 19
19
-
 20
20
-
 21
21
-
 22
22
-
 23
23
-
 24
24
-
 25
25
-
 26
26
-
 27
27
-
 28
28
-
 29
29
-
 30
30
-
 31
31
-
 32
32
-
 33
33
-
 34
34
-
 35
35
-
 36
36
-
 37
37
-
 38
38
-
 39
39
-
 40
40


Nautilus SELECTTECH 552 User manual
- Type
- User manual
Ask a question and I''ll find the answer in the document
Finding information in a document is now easier with AI
Related papers
Other documents
-
Keys Fitness Power System KPS-FI User manual
-
Bowflex BowFlex SelectTech 1090 Dumbbells Owner's manual
-
-
-
-
-
Bowflex SelectTech 552 Dumbbells Owner's manual
-
Bowflex BD1090 User manual
-
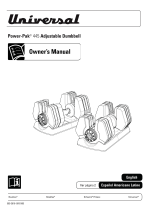 Universal POWER-PAK 445 Adjustable Dumbbell User manual
-
