Page is loading ...

4
10 R - 02 1397

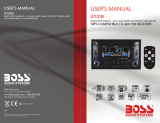
The following illustration shows a typical installation. If you have any questions or require information
regarding installation kits, consult your customer car audio dealer or a company suppling kits.
If you are not sure how to install this unit correctly, have it installed by a qualified technician.
EN - 1
1. INSTALLATION
4
Remove the unit
1. Press the Panel Release button.
2. Push the left side of the panel rightward
3. Pull the panel towards you to disengage it from the chassis.
To attach the front panel back to the unit chassis,
please insert the right side of the panel in
the chassis until it is correctly
engaged. Press the left side
of the panel until the mechanism
locks it into place.
18 2
mm
m
11
1m
Dashboard
Sleeve
Bend the appropriate
tabs to hold the sleeve
firmly in place.
Tr im
Plate
Panel
1
3
2
(Not supplied with this unit)
1
2

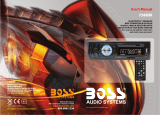
2. CONNECTING THE SYSTEM
EN - 2
CONNECTOR
ISO
FUSE
Front
RCA L
Rear
RCA L
SUBW
Front
RCA R
Rear
RCA R
ANTENNA
JACK
Subwoofer
Rear line out R
Rear line out L
Front line out R
Front line out L
RCA-TO-RCA CABLE
(not supplied)
Antenna
Socket
FUSE
1
2
3
4
5
6
7
8
4
5 7
8
A
B
ISO CONNECTOR WIRING CHART
YELLOW
WIRE COLOR
VIOLET/BLACK
GREY/BLACK
WHITE/BLACK
VIOLET
WHITE
GREY
B1
B5
B4
B3
B2
GREEN
GREEN/BLACK
B7
B8
B6
A5
A4
PIN
BLACK
A8
REDA7
BLUE
LEFT FRONT SPEAKER (-)
LEFT REAR SPEAKER (+)
LEFT REAR SPEAKER ( )
RIGHT REAR SPEAKER (+)
RIGHT FRONT SPEAKER (+)
LEFT FRONT SPEAKER (+)
RIGHT FRONT SPEAKER (-)
RIGHT REAR SPEAKER (-)
FUNCTION/LABEL
CONNECT TO SYSTEM CONTROL
TERMINAL OF THE POWER AMP OR
AUTO ANTENNA RELAYCONTROL
TERMINAL(max 150mA 12VDC)
BATTERY(+)
IGNITION(ACC)
GROUND
Figure 2

No.
Item
Decriptions
1
2
4
5
6
7
8
9
3
EN - 3
3. THE MAJOR FUNCTION OF THIS UNIT
1
10
13
2
7 4
3
15
6
11
5
8
9
12
14
Press to access into the Audio Menu mode to adjust the below
options: BASS(Bass Level) / TRE (Treble Level) / BAL(Balance)
/ FAD (Fader)
Press to detach the front panel.
Press to select different mode of playback
Press to access into the System Menu mode.
Press and hold to turn On or Off the iX-BASS booster function.
Press to turn the unit on, press and hold turn the unit off.
Press to Mute or restore the volume.
Rotate the encoder volume to increase and decrease
the volume.
Press to select the preset equalizer setting
EQ OFF ->POP ->USER ->TECHNO ->ROCK ->CLASSIC
->JAZZ ->VOCAL
Power
MUTE
MENU
AUDIO
Release
MODE
VOLUME KNOB
XBS
EQ
BAND
BROWSE
Under Radio mode, press to change between BAND FM1,FM2,FM3,
AM1(MW1) or AM2 (MW2).
Under Media playback mode, press to access into the music folder
/ file searching mode.

EN -4
3. THE MAJOR FUNCTION OF THIS UNIT
No.
Item
Decriptions
10
11
12
13
14
15
Number
Eject
PRESET
NUMERIC
BUTTONS
FILE UP
/DOWN
TUNE UP
/DOWN
INFO
Under Radio mode, turn these buttons to enter into the Auto Seek
mode, turn and hold these buttons to enter into the Manual Seek
mode.
Under Media playback mode, turn these buttons to skip a chapter /
track / scene / file.
FAST FORWARD
/BACKWARD
Under Media playback mode, turn and hold momentarily to fast forward
/backward.
TRANSFER
Under the Bluetooth Handfree mode, press to answer an incoming call.
Under the talking mode, press and hold to enter into call Tansfer back
to Mobile Phone.
Under Radio mode, press the Numeric buttons to recall the preset
stations. Press and hold the Numeric buttons to store the listening
station.
Under Media playback mode, short press the Numeric buttons to
perform the below operation
Button
5
61 2 3
4
Pause/Play
INT RPT
RDM
Folder Down Folder UP
Under Radio mode, press to view the Clock.
Under Media playback mode, press this button repeatedly to display
ID3 information: Track number and play time ->folder ->file ->title ->
artist ->album ->clock.
SUBW
Press and hold to turn On or Off the Subwoofer function.
Under the Bluetooth Handfree mode, press to enter reject an incoming
call.
Press to quick return previous menu or mode.
ESC
Press to eject the Disc.

4. ADJUST SYSTEM MENU SETTING
EN - 5
AUTO STORE
Reconnection/Disconnection
Under the Tuner mode, press the button to access into the Auto Store mode. The six strongest
stations of the selected band are saved in preset channel automatically:FM1,FM2,FM3(1-6),AM1,AM2.
This feature allows to Reconnect or Disconnect to the paired mobile phone or Bluetooth device manually.
To Reconnect or Disconnect the Bluetooth, press the MENU button, “CONNECT ” or “DISCONN ” is
displays on the LCD, then press to start activating the selection.
AF ON/OFF (Alternate Frequencies)
PTY (Program Type)
Once into the PTY mode, you can be press get into program type item, and rotate Encode Volume
Knob to selected category.
User can rotate Encoder Volume Knob to turn On or Off the AF (Alternate Frequencies) function. When AF
in On mode, the unit will be searches for another station with stronger signal, but with the same program
identification as the current station automatically.
SPEECH GROUP
NEWS, AFFAIRS, INFO
CULTURE, SCIENCE, VARIED
SPORT, EDUCATE, DRAMA
SOCIAL, RELIGION, PHONE IN
TRAVEL, LEISURE, DOCUMENT
WEATHER,FINANCE, CHILDREN
MUSIC GROUP
POP M , ROCK M
CLASSICS, OTHER M
JAZZ M, COUNTRY
EASY M, LIGHT M
NATION M, OLDIES M
FOLK M, A-TEST, ALARM
>
Press MENU to access into the System Menu. Press MENU repeatedly to select the item to be adjusted,
then roate Encoder Volume Knob to select a value / option.
>
LOCAL SEEK (Local/Distance Select)
This feature is used to designate the strength of the signals at which the radio will stop during automatic
tuning. "Distance" is the default, allowing the radio to stop at a broader range of signals. To set the unit to
select only strong local stations during automatic tuning, rotate the Encoder Volume Knob until
“LOC”appears in the display.
TA ON/OFF (Traffic Announcement)
User can rotate the Encoder Volume Knob to turn On or Off the TA(Traffic Announcement) function. Under
TA On mode, there is trafic announcement, the unit switches to the tuner mode(regardless of the current
mode) and begins to broadcast the announcement on traffic conditons. When the traffic announcement is
over, it return to the previous mode. When TA Off, the traffic announcement does not cut in.
CLOCK SET
CLOCK FORMAT
Program the current time by rotating the Encoder Volume Knob clockwise to adjust the minutes and
hours.
User can rotating the Encoder Volume Knob to to selected the clcok format 12H or 24H.
BEEP ON/OFF (Beep Tone)
The beep tone feature allows the selection of an audible beep tone to be heard each time a button is pressed on
the face of the radio. "Beep On" is the default display. Rotate Encoder Volume Konb to select the “Beep Off”
option.
RDS ON/OFF
User can rotate the Encoder Volume Knob to turn On or Off the RDS function.
This option allows the selection of the frequency spacing appropriate for your area. Rotate the Encoder
Volume Konb to select the USA, LATIN, EUROPE, RUSSIA, ASIA (Asia Pacific), MID-EAST(Middle East) or
JAPAN options.
AREA (Tuner Frequency Spacing)

EN - 6
5. ABOUT RDS
Press the MENU enter into the System Menu mode, press to confirm to search the select PTY type.
The RDS (Radio Data System) function operates only in areas with FM stations broadcasting RDS signals.
If you tune to an RDS station, an RDS icon and information about the presenter, station or program is
displayed.
Before tuning to RDS stations, you can select program type and let the unit search only for programs of
the selected category.
Select Program Type ( PTY )
SPEECH GROUP
NEWS, AFFAIRS, INFO
CULTURE, SCIENCE, VARIED
SPORT, EDUCATE, DRAMA
SOCIAL, RELIGION, PHONE IN
TRAVEL, LEISURE, DOCUMENT
WEATHER,FINANCE, CHILDREN
MUSIC GROUP
POP M , ROCK M
CLASSICS, OTHER M
JAZZ, COUNTRY
EASY M, LIGHT M
NATION M, OLDIES
FOLK M, TEST, ALARM
This unit support below RDS features:
If you do not want to miss traffic announcement during enjoying music, you can turn on the TA (Traffic
Announcement) function.
The RDS signal broadcast together with the clock time to the unit automatically.
Receive Traffic Announcement ( TA )
Clock Time ( CT )
When there is traffic announcement, the unit switches to the tuner mode (regardless of
the current mode) and begins to broadcast the announcement on traffic conditions.
When the traffic announcement is over, it returns to the previous mode.
Traffic announcement does not cut in.
TA On
TA Off
If the radio signal come from the current station is poor, you can turn on the AF (Alternate Frequency)
function to let the unit searches for another station with stronger signal but with the same program
identification as the current station automatically.
Select Alternate Frequencies ( AF)
Press the MENU enter into the System Menu mode, then rotate the Encoder Volume Knob to turn AF On or
Off, then press to confirm.

Ground
Left Track
Right Track
6. EXTERNAL CONNECTION AND MEDIA PLAYER
MP3 music files are audio compression format. This unit can play MP3 directly from files contained on a
USB Memory Stick, SD Card.
1. Open the cover marked USB icon on the front panel.
2. Insert the USB device into the USB socket. The unit starts
playing from the USB device automatically.
NOTE
Ensure that the USB device contains playable music.
Remove the USB Device
Insert the Memory Card
Insert the USB Device
Before remove the USB stick from the front panel. Always remember to switch off the unit's power then
remove out the USB Stick.
1. Press panel button to release the front panel.
2. Push the left side of the panel rightward. Pull the panel towards
you to disengage it from the chassis.
3. Insert the card into the card slot in the correct direction until a “
CLICK” sound is heard,
4. Close the front panel, then the unit starts playing from the card
automatically.
Press the unit in off. Press the card until you hear a click sound, the card is now disengaged. then remove
the card.
Remove Memory Card
Connect the external signal to AUX in jack located atthe front of
the panel, then press Mode button to select Aux mode. Press
Mode Button again to cancel Aux Mode and return to previous
mode.
You can reset the unit to its default setting.
The RESET button is located on the main unit (as shown on the diagram). To press it vertically with a
ballpoint pen or metal object will activate it.
The reset button is to be activated for the following reasons:
1. Initial installation of the unit when all wiring is completed.
2. All the function buttons do not operate.
3. Error symbol on the display.
USB DEVICE OPERATION
MEMORY CARD OPERATION
CONNECT THE AUX-IN
RESET THE UNIT
EN - 7
PRESS DOWN
RESET

7. iPod / iPhone OPERATION
This unit is equipped with iPod/iPhone Ready function which allow end user to have direct control of the
iPod/iPhone on the front panel control button and display iPod/iPhone song information on the unit's
LCD display. Please read below for more details operation.
Compatible iPod/iPhone
Connect iPod / iPhone
Apple iPod and iPhone models with a 30-pin dock connector:
• iPod nano (2nd generation)
• iPod nano (3rd generation, 4GB only)
• iPod nano (3rd generation, 8GB only)
• iPod nano (4th generation)
• iPod nano (5th generation)
• iPod classic (1st generation)
• iPod classic (2nd generation)
• iPod touch (1st generation)
• iPod touch (2nd generation)
• iPod touch (3rd generation)
• iPod video (30GB, 80GB only)
• iPhone
• iPhone 3G
• iPhone 3GS
• iPhone 4
Insert the iPod/iPhone USB cable
to the Front Panel USB socket, the
unit starts playing iPod/iPhone
automatically.
Press MENU on front panel repeatedly the [IPOD CONTROL] is displayed, then press to switch
between the two control modes:
• iPod control mode: Use the iPod/iPhone to operates music control.
• Panel control mode: Use the Panel buttons on unit to operates the music control.
iPod/iPhone control music playback mode
Search for a track on iPod/iPhone
NOTE
Please make sure the iPod/iPhone cable is connected correctly. And please only use
original iPod / iPhone cable( iPhone, iPod & cable not supplied with this unit.).
1. Press BAND/ to browse iPod/iPhone menu.
2. Roate Encoder Volume knob to select the Artist search mode, and press to confirm.
3. Roate Encoder Volume knob to select the Album, then press to confirm.
4. Roate Encoder Volume knob to select desired song in the current album, press to confirm.
Audiobook
In iPod/iPhone mode, you can set the audiobook playback speed on this car audio.
EN - 8
Press MENU on front panel repeatedly the [AUDIOBOOK SPEED] is displayed,press to enter into
the audiobook playback speed mode, then rotate Encoder Volume Knob to select setting:
NORMAL / FASTER / SLOWER
iPod/iPhone USB cable
(not supplied with this unit)

EN - 9
8. BLUETOOTH HANDS FREE & A2DP STREAMING OPERATION
Pairing a Bluetooth Device
You can make or receive phone calls with Bluetooth-enabled phones through the unit. You can also listen to
music from an A2DP Bluetooth-enabled device.
Before using the Bluetooth device, you need to pair the device to the unit. Pairing needs only to be done once.
1 Open your mobile phone and switch bluetooth on.
2 Search for other bluetooth device with your device.
1 Press MENU to enter into the system menu mode.
2 Once the [DISCONN ] is displayed, press to activate the manual Disconnect mode.
1 The phone should reconnect automatically every time you use the system.
4 Input the password “0000”
5 [CONNECTED] with mobile phone number will be displayed on the LCD display if pairing is successful,
and the paired device will connect to the car audio system automatically.
3 Select “TF2310” in the pairing list.
Disconnect the Bluetooth Device
Reconnect the Bluetooth Device
Making a Call
You can dial number using the mobile phone.
1 Use the Mobile Phone to dial and make an outgoing call.
2 Once you have completed dialing, [CALLING] is displayed.
2 If not, Press MENU to enter into the system menu mode. Once the [CONNECT ] is displayed, press
to manually Re-connect the phone.
>
>
1 Press on front panel, [REDAIL ] is displayed.
2 Press , unit will display [CALLING], and the unit starts dialing the previous number.
To redial a number
NOTE
To make an outgoing call on this unit, the Bluetooth connection between the unit and the phone must be active.
>
Receiving a Call
1 If there is an incoming call, the Caller ID is displayed. If the incoming.call has no Caller ID, [PHONE IN] is displayed.
2 Press to answer / accept the call.
3 When conversation ends, press to terminate the call.
Call Transfer
You can transfer audio from the car speakers to the phone during a call.
While talking, press and hold voice transfers from loudspeaker to mobile phone.
Bluetooth A2DP Audio Streaming
If the connected Bluetooth device supports Advanced Audio Distribution Profile (A2DP), you can listen to
the music stored on the device through the unit. If the device also supports Audio Video Remote Control
Profile (AVRCP) profile, you can use the control on the unit or its playback function (eg iPOD Music) to play
music stored on the device.
1 Press MODE button repeatedly to select [BT AUDIO].
2 Press to start play, press it again to pause.
3 To track up/down, turn the track up/down on front panel.

9. THE FUNCTIONS OF REMOTE CONTROL
No. Button
Item
Decriptions
1
2
MUTE
Press this button to turn the mute On / Off.
POWER
ON/OFF
When the unit is power on, press this button to
turn Off the unit. Once the unit power off, press
this button to turn On the unit.
1
5
AUDIO
AUDIO
MENU
Press this button to enter into the Audio
Menu mode.
SRC
SOURCE
Press this button to select different source
playback mode: TUNER,USB, SD, BT and
AUX IN.
4
5
6
TUNE UP
/DOWN
FILE UP
/DOWN
FAST FORWARD
/BACKWARD
Under the tuner mode, press this button to
enter into the Auto seek mode, press and
hold this button to enter into the Manual Seek
mode.
Under USB/SD media playback mode, press
and hold momentarily to fast forward /
backward.
Under USB/SD media playback mode, press
these buttons to skip to the next or previous
file / song.
2
6
4
3
3
Press this button to increase / decrease the
volume.
VOLUME
KNOB
EN - 10
MUTE

Before going through the check list, check wiring connection. If any of the problems persist after check
list has been made, consult your nearest service dealer.
No power or no sound
Noise in broadcasts
Cannot play disc
Car engine is not on. Turn the car engine on.
Signals are too weak. Select other stations with stronger signals.
Ensure tha the disc label is inserted with the printed side facing up.
Cable is not correctly connected. Check connections.
Check the connection of the car antenna.
Wipe the disc with fibre cleaning cloth from the centre to the edge in a straight line.
Fuse is burnt. Replace fuse.
Change broadcast from Stereo to mono.
This disc may be defective. Play another disc.
Ensure that the CD is a finalised CD/CD-R/CD-RW.
Ensure that the CD is not encoded with copyright protection techn-ologies.
Volume is in minimum. Adjust volume to a desired level.
If the above solutions cannot help, press the RESET button.
Ensure that the track played is of a compatible format.
The CD Skips tracks
Preset stations lost
Display show ERR-1
Display show ERR-3
Display show ERR-5
Ensure that the CD is not damaged or dirty.
Battery cable is not correctly connected. Connect the battery cable to the terminal that is always
live.
The disc, USB or SD device cannot be red in two minutes
USB/SD data error.
Communication error or component is damged.
Disc is upside down. Ensure the printed side is facing up.
Ensure that random mode is deactivated.
10. TROUBLE SHOOTING
EN - 11

11. PRODUCT INFORMATION
EN - 12
Frequency Range
Usable Sensitivity
Usable Sensitivity
Frequency Range
Radio
87.5 - 107.9MHz(American)
87.5 - 108MHz(Europe)
(100KHz per step in auto search and 50KHz per step
in manual search)
Better than 15dB at S/N 30dB
Better than 45dB
530 - 1710 KHz(American)
522 -1620KHz(Europe)
-FM
-AM(MW)
Power Supply
Suitable Speaker Impedance
Pre-AMP output
voltage
Aux-In level
Power output
Fuse
12 V DC (11-14 V), Negative Ground
15A
4 - 8
80W x 4 channels
300mV
Sampling frequency
32/44.1/48 Khz
16/22.05/24 KHz
8/11.025/12KHz
MPEG1
MPEG2
MPEG2.5
ID3
Disc written by Packet Write (UDF) is not supported.
CDROM Mode
1 / 2
ISO9660 Level
1 / 2 & Joliet(unicode)
999
255
Max File/DIR. Count
Max DIR. Depth
Tree sortingSorting Method
Max File/DIR. Name
64Byte
V1.0/1.1/2.0/2.3(Max 32Byte)
MP3 directory shown in this manual as “Directory”
MP3 file shown “Track”.
Maximum length of file name
31 characters.
Maximum length of directory
32 characters.
Supports CD, CDR and CDRW.
Supports Multi-Session recording.
NOTE
Product information is subject to change without prior notice.
Supported formats:
MPEG1/2/2.5/ Layer 2/3
WMA Version 7/8/9
22/32/44/48KHz
WMA
MP3/WMA
Sampling But rate
32~320Kbps & VBR
If at any time in the future you should need to dispose of this product please note
that Waste electrical products should not be disposed of with household waste.
Please recycle where facilities exist. Check with your Local Authority or retailer for
recycling advice.(Waste Electrical and Electronic Equipment Directive)
2.0 V (USB play mode; 1KHZ, 0dB,10
k load)
USB devices:
USB flash memory
USB 1.1, & 2.0 compatible

1
2
ES - 1

ES - 2

ES - 3

ES - 4

ES - 5

ES - 6

ES - 7
/