DaVinci Full Size Bed Conversion Rails Assembly Instructions
- Type
- Assembly Instructions

Full Size Bed Conversion Rails (5789) Assembly Instructions
Traverses de conversion (5789) Instructions d’assemblage
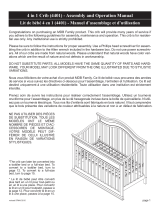
Congratulations on purchasing an MDB Family product. This product will provide many years of service
if you adhere to the following guidelines for assembly, maintenance, and operation. This product is
for residential use only. Any institutional use is strictly prohibited.
Please be sure to follow the instructions for proper assembly. Use a Phillips head screwdriver for assembling
the product in addition to the Allen wrench included in the hardware box. Do not use power screwdriv-
ers. All of our products are made from natural woods. Please understand that natural woods have color vari-
ations which are the result of nature and not defects in workmanship.
DO NOT SUBSTITUTE PARTS. ALL MODELS HAVE THE SAME QUANTITY OF PARTS AND HARD-
WARE. YOUR MODEL MAY LOOK DIFFERENT FROM THE ONE ILLUSTRATED DUE TO STYLISTIC VARI-
ATIONS.
Nous vous félicitons de votre achat d’un produit MDB Family. Ce produit vous procurera des années de
service si vous suivez les directives ci-dessous pour l’assemblage, l’entretien et l’utilisation. Ce produit
est destiné uniquement à une utilisation résidentielle. Toute utilisation dans une institution est stricte-
ment interdite.
Prenez soin de suivre les instructions pour réaliser correctement l’assemblage. Utilisez un tourne-
vis cruciforme pour l’assemblage, en plus de la clé hexagonale incluse dans la boîte de quincaillerie.
N’utilisez pas un tournevis électrique. Tous nos produits sont fabriqués en bois naturel. Il faut compren-
dre que le bois présente des variations de couleur attribuables à la nature et non à un défaut de fabrica-
tion.
NE PAS UTILISER DES PIÈCES DE SUBSTITUTION. TOUS LES MODÈLES ONT LE MÊME
NOMBRE DE PIÈCES ET D’ACCESSOIRES DE MONTAGE. VOTRE MODÈLE PEUT DIFFÉRER DE
CELUI ILLUSTRÉ EN RAISON DE VARIATIONS STYLISTIQUES.
page 1
revised 08JUL2015
H3. Left bracket
H3. Bride gauche
H4. Right bracket
H4. Bride droit
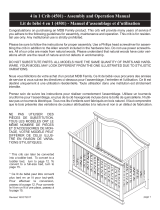
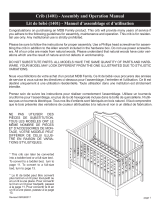
HARDWARE • ACCESSOIRES DE MONTAGE
H2. 3/4” Allen head bolt (4)
H2. Boulon Allen de 1,9 cm
(
3/4 po) (4)
H1.
3/4” Wood
Screw (10)
H1. Vis à bois de
1,9 cm (
3/4 po) (10)
A. Left Rail
A. Traverse de gauche
B. Right Rail
B. Traverse de droite
PARTS • PIÈCES

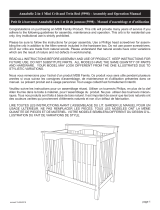
All barrel nuts are threaded and come pre-attached to the
bolts. Please ensure you have the correct number of
barrel nuts needed as indicated in the instruction manual
before assembly.
Tous les écrous cylindriques sont filetés et posés sur leur
vis. Assurez-vous d’avoir le nombre adéquat de ces
écrous, tel qu’indiqué dans le manuel d’instructions avant
l’assemblage.
Insert the barrel nuts all the way into the holes. Do not
insert at an angle to avoid damaging the threaded area.
Insérez les écrous cylindriques jusqu’au fond dans les
trous. Ne les insérez pas en angle afin d’éviter d’abîmer
la partie filetée.
BARREL NUT - ADDITIONAL INSTRUCTION
ÉCROU CYLINDRIQUE - INSTRUCTIONS SUPPLÉMENTAIRES
1
2
* The bolt may not be able to screw through the barrel
nuts smoothly. It is suggested to use a flat screwdriver
to stabilize and adjust the direction of the barrel nut.
* Il est parfois difficile de visser correctement la vis
dans l’écrou. Vous pouvez utiliser un tournevis plat
pour corriger l’orientation de l’écrou cylindrique et
l’immobiliser.
Flat Screwdriver
Tournevis plat
Please follow the rest of the instruction steps in the instruction manual to complete the assembly.
Veuillez suivre le reste des instructions du manuel pour terminer l’assemblage.
Please use an Allen wrench to screw the bolt with the
lock washer straight into the threaded nut until it is tight.
À l’aide d’un clef Allen, vissez la vis avec une rondelle
de blocage dans la partie filetée de l’écrou et serrez.
Allen wrench
Clef Allen
3
page 2
Tools Needed
(not included)
Outils requis
(non inclus)
Phillips
screwdriver
Tournevis
cruciforme
H6. Barrel nut (4)
H6. Écrou cylindrique (4)
H5. 3”
Allen Head Bolt (4)
H5.
Boulon Allen de
7,6 cm (3 po)
(4)
H7. Allen wrench
H7. Clef Allen

page 3
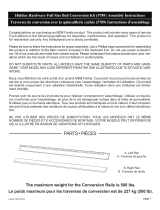
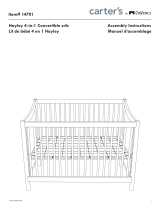
ASSEMBLY INSTRUCTIONS • INSTRUCTIONS D’ASSEMBLAGE
1
Remove crib sides and mattress support.
Enlever les panneaux et le support du matelas.
2
3
H2
H3
H2
H2
H4
H2
Foot Board
Pied de lit
H1
H1
H1
H1
H1
X2
A
B
Foot Board
Pied de lit
H4
H3
Page is loading ...
-
 1
1
-
 2
2
-
 3
3
-
 4
4


DaVinci Full Size Bed Conversion Rails Assembly Instructions
- Type
- Assembly Instructions
Ask a question and I''ll find the answer in the document
Finding information in a document is now easier with AI
in other languages
- français: DaVinci Full Size Bed Conversion Rails
Related papers

Other documents
-
 DaVinci Baby M4798 User manual
-
 DaVinci Baby M4401 User manual
-
 DaVinci Baby M4501 User manual
-
 DaVinci Baby M5998 User manual
-
 DaVinci Baby M4799 User manual
-
 DaVinci Baby M3199 User manual
-
 DaVinci Baby M1401 User manual
-
 DaVinci Baby F14701 User manual
-
 DaVinci Baby M5981 User manual
-
 DaVinci Baby F14901 User manual


