

Contents
Overview 1
Unpacking the Camera 3
RoboSHOT 12 HD-SDI Cameras 3
RoboSHOT 30 HD-SDI Cameras 4
A Quick Look at the Camera 5
Front of the camera 5
Back of the camera 6
Switch Settings 6
Video resolution 7
Camera settings 8
Installation 9
Before You Install the Camera 9
Don’t void your warranty! 9
Cabling notes 9
Installing the Camera Mount and the Camera 10
Connecting the Camera 11
In a Small Space 11
In a Larger Space 11
Powering up the camera 11
Configuring and Controlling the Camera 12
Vaddio IR Remote Commander 12
Quick Reference 12
Details 13
To store a preset using the IR Remote Commander: 13
Web Interface 14
Compatible Web Browsers 14
User Access 15
Administrative access 15
Web Interface Cheat Sheet 16
Web Tasks for All Users: Camera Control 17
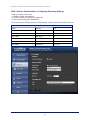
Web Tasks for Administrators: Configuring Network Settings 21
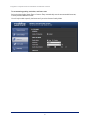
Web Tasks for Administrators: Adding Room Information to the Screen 22
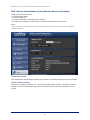
Web Tasks for Administrators: Managing Access and Passwords 23
Web Tasks for Administrators: Setting Camera Behaviors and Adjustments 24
Web Tasks for Administrators: Configuring Streaming Settings 26
Web Tasks for Administrators: System Reboots, Resets, and Updates 28
Web Tasks for Administrators: Viewing Diagnostic Logs 30
Web Tasks for Administrators: Contacting Vaddio Technical Support 31
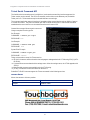
Telnet Serial Command API 32
camera home 32
i
Integrator's Complete Guide for RoboSHOT HD-SDI PTZ Cameras

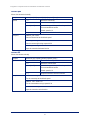
camera pan 33
camera tilt 33
camera zoom 34
camera focus 35
camera preset 36
camera ccu get 37
camera ccu set 38
camera ccu scene 39
camera standby 39
streaming settings 40
network ping 41
network settings get 41
system reboot 41
system factory-reset 42
history 43
version 43
help 44
exit 44
RS-232 Serial Communication 45
RS-232 Command List 45
RS-232 Inquiry Command List 53
Command Setting Values – Exposure Control 57
General Specifications 60
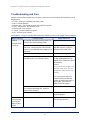
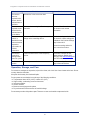
Troubleshooting and Care 63
Operation, Storage, and Care 64
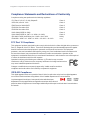
Compliance Statements and Declarations of Conformity 65
FCC Part 15 Compliance 65
ICES-003 Compliance 65
European Compliance 66
Warranty Information 67
Index 68
ii
Integrator's Complete Guide for RoboSHOT HD-SDI PTZ Cameras

1
Overview
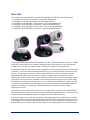
This manual covers the RoboSHOT 12 HD-SDI and RoboSHOT 30 HD-SDI robotic PTZ cameras:
nRoboSHOT 12 HD-SDI, North America – part number 999-9930-000
nRoboSHOT 12 HD-SDI, international – part number 999-9930-001
nRoboSHOT 30 HD-SDI (black), North America – part number 999-9933-000
nRoboSHOT 30 HD-SDI (black), international – part number 999-9933-001
nRoboSHOT 30 HD-SDI (white), North America – part number 999-9933-000W
nRoboSHOT 30 HD-SDI (white), international – part number 999-9933-001W
The enterprise-class, high-definition PTZ RoboSHOT HD-SDI conferencing cameras with HD-SDI, HDMI,
and H.264 IP streaming provide a substantial price/performance improvement over other SDI cameras
available today, with very high quality imaging, fine detail and exceptional color reproduction.
The RoboSHOT HD-SDI cameras have a PoE+ gigabit Ethernet port, providing both power and IP network
connectivity. The intuitive browser-based interface allows you to control the camera’s functions from your
browser – from anywhere in the world – while monitoring the RSTP, H.264 IP video stream using any
standards-based media viewer. This feature is perfect for enterprise remote management, network
operating centers and overall IT control. Telnet, IR Remote and RS-232 control are also available to satisfy
your system control requirements. Available H.264 streaming resolutions range from 352 x 288 to 1080p.
The RoboSHOT 12 features a 12X optical zoom with a 73° wide horizontal field of view – perfect for small
to medium sized conference rooms, training rooms or classrooms and provides incomparable support for
applications including, UC conferencing, videoconferencing, distance learning, lecture capture,
telepresence and more.
With 30X optical zoom power with an impressive 2.3° tele end and 65° wide field of view, the RoboSHOT
30 is ideal for medium to large venues such as houses of worship, large auditorium A/V systems, live event
theatres, IMAG for performances, large lecture theatres with lecture capture and more.
The Exmor® image sensor, multi-element glass lens and image signal processor (ISP) are the real magic
behind these cameras’ awesome video performance characteristics. The latest generation Exmor® 1/2.8”,
2.38 Megapixel, Full HD (native 1080p/60) high-speed, low noise CMOS image sensor combined with the
new ISP produces vivid, realistic color with extremely fast, razor-sharp automatic focus and iris routines.

The proprietary Tri-Synchronous MotionTM algorithm moves the RoboSHOT cameras on the pan, tilt and
zoom axes simultaneously, calculating the position and velocity of the movements between presets so
pan, tilt and zoom arrive at the preset subject simultaneously, allowing smooth and manageable on-air
camera movements. No more waiting for the pan/tilt motion to stop before starting the zoom.
Smooth, silent brushless DC direct-drive motors provide ultra-accurate and fast camera positioning and are
capable of the slowest of crawls – perfect for on-air use.
Control the camera the way you prefer:
nUse your browser to access the camera's web interface
nUse the IR remote
nConnect via a Telnet session
nConnect directly via RS-232 serial port.
The features, flexibility and value of RoboSHOT cameras are unparalleled in today’s PTZ camera market.
All this, and they’re made in the USA, at Vaddio HQ in Minnetonka, Minnesota.
2
Integrator's Complete Guide for RoboSHOT HD-SDI PTZ Cameras

Unpacking the Camera
Make sure you received all the items you expected. Here are the packing lists for the RoboSHOT HD-SDI
cameras.
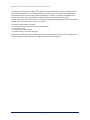
RoboSHOT 12 HD-SDI Cameras
RoboSHOT 12 HD-SDI (North America) – part number 999-9930-000
Includes:
nOne (1) RoboSHOT 12 HD-SDI Camera
nOne (1) Thin Profile Wall Mount with Mounting Hardware (535-2000-240)
nOne (1) IR Remote Commander (998-2100-000)
nOne (1) EZCamera Control Adapter (998-1001-232)
nOne (1) 12 VDC, 3.0 Amp Switching Power Supply
nOne (1) AC Cord Set for North America
nOne (1) Quick Setup Guide
RoboSHOT 12 HD-SDI (International) – part number 999-9930-001
Includes:
nOne (1) RoboSHOT 12 HD-SDI Camera
nOne (1) Thin Profile Wall Mount with Mounting Hardware (535-2000-240)
nOne (1) IR Remote Commander (998-2100-000)
nOne (1) EZCamera Control Adapter (998-1001-232)
nOne (1) 12 VDC, 3.0 Amp Switching Power Supply
nOne (1) Euro Power Cord
nOne (1) UK Power Cord
nOne (1) Quick Setup Guide
3
Integrator's Complete Guide for RoboSHOT HD-SDI PTZ Cameras

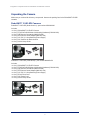
RoboSHOT 30 HD-SDI Cameras
RoboSHOT 30 HD-SDI (North America, black) – part number 999-9933-000
RoboSHOT 30 HD-SDI (North America, white) – part number 999-9933-000W
Includes:
nOne (1) RoboSHOT 30 HD-SDI Camera
nOne (1) Thin Profile Wall Mount with Mounting Hardware, black or white depending on camera color
(535-2000-240 or 535-2000-240W)
nOne (1) IR Remote Commander (998-2100-000)
nOne (1) EZCamera Control Adapter (998-1001-232)
nOne (1) 12 VDC, 3.0 Amp Switching Power Supply
nOne (1) AC Cord Set for North America
nOne (1) Quick Setup Guide
OR
RoboSHOT 30 HD-SDI (International, black) – part number 999-9933-001
RoboSHOT 30 HD-SDI (International, white) – part number 999-9933-001W
Includes:
nOne (1) RoboSHOT 30 HD-SDI Camera
nOne (1) Thin Profile Wall Mount with Mounting Hardware, black or white depending on camera color
(535-2000-240 or 535-2000-240W)
nOne (1) IR Remote Commander
nOne (1) EZCamera Control Adapter (998-1001-232)
nOne (1) 12 VDC, 3.0 Amp Switching Power Supply
nOne (1) Euro Power Cord
nOne (1) UK Power Cord
nOne (1) Quick Setup Guide
OR
Download all product documentation from support.vaddio.com.
4
Integrator's Complete Guide for RoboSHOT HD-SDI PTZ Cameras

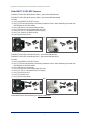
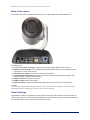
A Quick Look at the Camera
The RoboSHOT 12 and RoboSHOT 30 cameras are similar. The RoboSHOT 12 is the camera on the left in
the photo. Differences are noted below.
Front of the camera
nCamera and Zoom Lens: The RoboSHOT 12 and 30 models use different optical components.
oThe RoboSHOT 12 features a 12X optical zoom lens (12X in Super-Wide mode and 10X in normal
mode) that is built around an Exmor 1/2.8-Type, high-speed, low noise image sensor with a total of
2.38 Megapixels for exceptionally precise HD video image acquisition in a small to medium sized
conference room.
oThe RoboSHOT 30 has a powerful 30X optical zoom lens, best suited to a medium to large room. It
uses the same Exmor image sensor as the RoboSHOT 12.
nIR Sensors: Sensors in the front of the camera base receive signals from the IR Remote Commander.
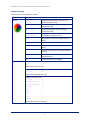
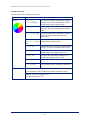
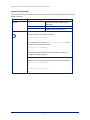
nStatus indicator: The multi-colored LED indicates the camera's current state.
oPurple – Boot-up and Standby modes.
oBlue – normal operation and is a power on, ready condition.
oBlinking blue – the camera has received a valid IR command.
oRed – Tally function; shows that the camera is on-air.
oBlinking red – fault condition.
oYellow – firmware update is in progress.
Caution
Do not remove power or reset the camera while the indicator is yellow, showing a firmware update in
progress. Interrupting a firmware update can make the camera unusable.
nCamera Base: Cast zinc alloy base for strength and stability, powder coated for toughness with fine
texture.
nLogo: Really Cool Logo Badge (RCLB) is located on the IR Window.
5
Integrator's Complete Guide for RoboSHOT HD-SDI PTZ Cameras

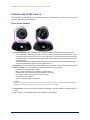
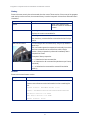
Back of the camera
Rear panel connections are identical for both models. This photograph shows the RoboSHOT 12.
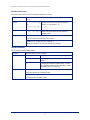
From left to right:
n12 VDC 3.0 A power connector: Connect only the power supply shipped with the camera.
nNetwork RJ-45 connector: PoE+ Gigabit Ethernet port allows the camera to be controlled using the
web interface or via a Telnet session.
nHD Video Select switch: Select the HD video output resolution.
nCamera Settings DIP switches: Settings for IR remote frequency, baud rate and image flip. See
"Switch Settings" belowfor more information.
nHD-SDI connector: HD-SDI video output.
nHDMI connector: HDMI video output.
nRS-232 connector: accepts modified VISCA protocol for camera control over a Cat-5e cable.
Caution:
Use the power supply shipped with the camera. Using a different power supply may create an unsafe
operating condition or damage the camera, and will void the warranty.
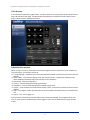
Switch Settings
The RoboSHOT HD-SDI cameras use a rotary switch to set the HD video resolution of the HD-SDI and
HDMI outputs, and a set of DIP switches that determine certain camera functions. A label on the bottom of
the camera provides a quick reference for setting the switches.
6
Integrator's Complete Guide for RoboSHOT HD-SDI PTZ Cameras

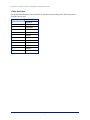
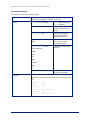
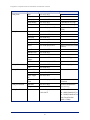
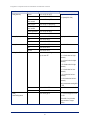
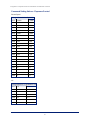
Video resolution
Set the desired available HD output resolution for the camera with the rotary switch. Switch positions 9
through D are not used.
Switch position Resolution
0 720p/59.94
1 1080i/59.94
2 1080p/59.94
3 720p/60
4 1080i/60
5 1080p/60
6 720p/50
7 1080i/50
8 1080p/50
9 - D Not used
E 1080p/30
F 1080p/25
7
Integrator's Complete Guide for RoboSHOT HD-SDI PTZ Cameras

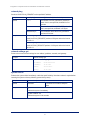
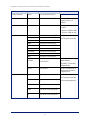
Camera settings
Use the DIP switch array to set other camera behaviors.
Note
When the camera is right side up, switches are in their default positions when they are up.
Camera identification:If a Vaddio remote control will be used with the camera: IR Frequency
Selection:The IR Remote Commander can control up to three cameras in the same room with different IR
frequencies. Use switches 1 and 2 to select the frequency to identify the camera as camera 1, 2, or 3;
then use the Camera Select buttons at the top of the remote to select the camera you want to control.
IR: Leave switch 3 in the default up position if the IR remote will be used.
Inverted operation: If mounting the camera upside-down, set switch 4 (IMAGE FLIP) ON.
Super Wide Mode (RoboSHOT 12 only): To set Super-wide mode for the RoboSHOT 12 HDMI, set
switch 5 ON. This gives a 12X, 73º horizontal angle of view. Normal mode produces a 67.2º horizontal
field of view (HFOV). Super-wide mode is not available on RoboSHOT 30 cameras.
RS-232 Serial Baud Rate:Set the baud rate for RS-232 communication using switch 6. Most
applications use 9600bps (switch 6 OFF). The 9600 bps setting works best with Cat-5e over distance. Use
the 38,400 bps setting for short control lines only.
Switch 7 is not currently used.
Switch 8 is not currently used.
8
Integrator's Complete Guide for RoboSHOT HD-SDI PTZ Cameras

Installation
This section covers siting the camera, installing the mount, and installing the camera.
Before You Install the Camera
All RoboSHOT cameras include a Thin Profile Wall Mount for…wall mounting the camera. There are
options for IN-Wall™ mounts and IN-Ceiling™ Half-Recessed as well. Contact us if you don’t have the
camera mount you need.
nChoose a camera mounting location that will optimize camera performance. Consider camera viewing
angles, lighting conditions, line-of-sight obstructions, and in-wall obstructions where the camera is to be
mounted.
nEnsure that the camera body can move freely and point away from the ceiling and lights. Cameras gen-
erally don’t like to be swamped with light and nobody sits on the ceiling anyway.
nFollow the installation instructions included with the camera mount.
Don’t void your warranty!
Caution
This product is for indoor use. Do not install it outdoors or in a humid environment without the appropriate
protective enclosure. Do not allow it to come into contact with any liquid.
Use only the power supply included with this product. Using a different one will void the warranty, and
could create unsafe operating conditions or damage the product.
Do not install or operate this product if it has been dropped, damaged, or exposed to liquids. If any of these
things happen, return it to Vaddio for safety and functional testing.
All information about this product is available for download at www.vaddio.com/support – no cost, no
registration required.
DomeVIEW enclosures are available to allow outdoor installation of RoboSHOT cameras. Learn more at
www.vaddio.com/products.
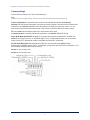
Cabling notes
For RS-232 cabling, use Cat-5 or Cat-5e/6 cable and standard RJ-45 connectors (568B termination) from
the camera’s RS-232 Port to the controller's RS-232 port. If the camera is connected to a third-party
control system (such as AMX or Crestron), a DE-9F (sometimes called DB-9F) adapter is supplied.
We recommend using high-quality connectors and a high-quality crimping tool.
Note
Do not use pass-through RJ-45 connectors. These can cause intermittent
connections and degraded signal quality, resulting in problems that may be hard to
diagnose. Use standard RJ-45 connectors and test all cables for proper pin-outs and
continuity before you connect them to Vaddio products.
9
Integrator's Complete Guide for RoboSHOT HD-SDI PTZ Cameras

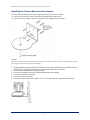
Installing the Camera Mount and the Camera
You can install the camera wall mount to a 2-gang wall box or directly to the drywall.
nIf you mount it to drywall, use the wall anchors provided with the wall mount.
nIf you mount it to a wall box, use the cover plate screws supplied with the wall box.
Caution
Before you start, be sure you can identify the network and RS-232 cables correctly. Connecting a cable to
the wrong port can result in equipment damage.
1. Route the cables through the hole in the back of the mount, and install the mount on the wall or attach it
to the wall box. Leave the screws loose enough to adjust the position of the mount.
2. Level the mount and tighten the mounting screws.
3. Check the level again to avoid any of those weird Batman camera angles.
4. Connect the cables to the camera.
5. Place the camera on the mount.
6. Attach the camera to the mount using the ¼”-20 x .375 mounting screw supplied with the camera.
v
10
Integrator's Complete Guide for RoboSHOT HD-SDI PTZ Cameras

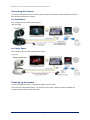
Connecting the Camera
Here are two examples of how the camera might be set up. This information is also available on the Quick-
Start Guide provided with the camera.
In a Small Space
This example uses the camera's power supply.
In a Larger Space
This example uses PoE and a mid-span power injector.
Powering up the camera
Connect the supplied 12 VDC, 3.0 Amp power supply to a power outlet.
The camera will wake up and initialize. This will take a few seconds. When an image is available, the
camera is ready to accept control information.
11
Integrator's Complete Guide for RoboSHOT HD-SDI PTZ Cameras

Configuring and Controlling the Camera
You can control the camera using the IR remote, web interface, Telnet session, or RS-232 command line –
but not at the same time. We recommend that you pick one and run with it.
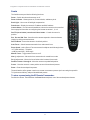
Vaddio IR Remote Commander
The remote provides basic camera control for end users.
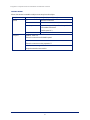
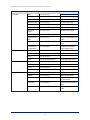
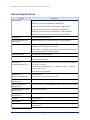
Quick Reference
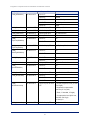
What do you need to do? Button(s)
Power on or standby Power (green button at top right)
Select the camera to control (if this
remote controls more than one)
Camera Select buttons 1 through 3 (second row on the
remote)
Discover the camera's IP address Data Screen button (top left)
Move the camera Arrow buttons and Home button (dark red)
Move the camera to a preset position Position Preset buttons 1 through 6 (bottom two rows)
Focus the camera Auto Focus button (near arrow buttons)
Manual Focus buttons Near and Far (below Zoom
Speed buttons)
Control zoom speed Zoom Speed buttons - Slow Tand W, Fast Tand Wfor
telephoto and wide-angle modes (light gray)
Adjust for excess light behind the
camera's subject
Back Light button (top center)
12
Integrator's Complete Guide for RoboSHOT HD-SDI PTZ Cameras

Details
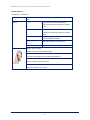
The Vaddio remote provides the following functions:
Power – Switch the selected camera on or off.
Power indicator – Shows power on, IR transmission, and battery level.
Back Light – Use or turn off backlight compensation.
Data Screen – Display the camera’s IP address and MAC address.
Camera Select – In multi-camera installations, selects the camera to be controlled.
See on page for information on configuring the camera as camera 1, 2, or 3.
Pan/Tilt (arrow button) controls and Home button – Control the camera’s
position.
Rev. Pan and Std. Pan– Control how the camera responds to the arrow buttons.
Helpful for ceiling-mounted cameras.
Pan/Tilt Reset – Return the camera to its default position.
Auto Focus – Switch between automatic focus and manual focus.
Zoom Speed – select Slow or Fast movements for telephoto and wide-angle shots.
nT(slow and fast) – Telephoto
nW(slow and fast) – Wide-angle
Manual Focus – Toggle manual focus on or off.
Near (-) adjustment – Moves the focus nearer when in manual focus mode.
Far (+) adjustment – Moves the focus farther when in manual focus mode.
Position Presets 1 through 6 – Move the camera to a predefined position.
Preset – Save the camera’s current position as one of the numbered presets.
Reset – Clear the saved position presets.
The web interface offers greater control over camera movements to presets (such as setting the speed for
Tri-Synchronous Motion), and provides additional presets.
To store a preset using the IR Remote Commander:
Position the camera. Then hold down the Preset button and press one of the numbered preset buttons.
13
Integrator's Complete Guide for RoboSHOT HD-SDI PTZ Cameras

Web Interface
RoboSHOT cameras provides a web interface to allow control of the attached camera via an Ethernet
network connection. The web interface provides more control over the camera for the user, along with
administrative tasks such as setting passwords, changing the IP address, viewing diagnostics, installing
firmware updates, and more!
The web interface allows administrative and user-level camera control.
nAdministrative access – The default username is admin and the password is password. The admin
has access to all pages of the web interface.
nUser access – The default username is user and the password is password. Only the camera control
page is available with user-level access.
If the LAN has a DHCP server, the camera will get its IP address, gateway and routing information
automatically and you will be able to browse to it.
In the absence of a DHCP server, the camera's default IP address is 169.254.1.1 and its subnet mask is
255.255.0.0. You can configure the camera’s static IP address either through the network or from a
computer connected directly to its Ethernet port. You may need a crossover cable.
Compatible Web Browsers
Supported web browsers:
nChrome® (latest version),
nFirefox® (latest version),
nInternet Explorer® (versions 8 through 11)
nSafari® (versions 6 and 7)
Other browsers may also work, but have not been used in testing the product.
14
Integrator's Complete Guide for RoboSHOT HD-SDI PTZ Cameras

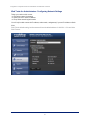
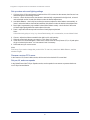
User Access
If the admin sets up automatic guest access, no login is needed – the system starts at the Camera Control
page, rather than the login page. The administrative login dialog is accessible from the Camera Control
page, to allow access to administrative tasks.
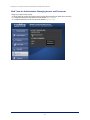
Administrative access
When you log in as Admin, all the admin menu buttons appear on the left side of the screen. In addition to
Camera Controls, you also have access to:
nCamera Settings – Additional control over camera behavior related to camera movement and color man-
agement.
nRoom Labels – Information to display on the web interface screens, including the conference room
name and phone number and the in-house number for AV assistance.
nNetworking – Ethernet configuration.
nSecurity – Set passwords and manage guest access.
nDiagnostics – View or download logs when troubleshooting issues.
nSystem – View firmware version and switch settings, reboot, restore factory defaults, and run firmware
updates.
nHelp – Tech support contact information and a link to the product information library on the Vaddio web-
site.
nLogout – Yes, it’s for logging out.
If you are on the Camera Control screen and no other screens are available, you’re logged in at the user
level, or guest access is enabled and you’re not logged on at all. Use the Admin button to open the login
screen.
15
Integrator's Complete Guide for RoboSHOT HD-SDI PTZ Cameras

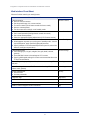
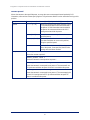
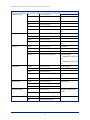
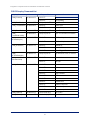
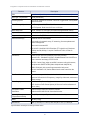
Web Interface Cheat Sheet
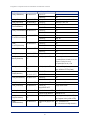
Where to find the controls you need right now.
What do you need? Go to this screen
Camera operation
nMove or zoom the camera
nSet the speed for pan, tilt, or zoom motions
nFocus the camera (Focus button reveals the focus control)
nMove to a camera preset
nPut the camera into or bring it out of standby mode
Camera Controls
Camera behavior
nSet inverted operation (Settings button reveals the control)
nSet or clear camera presets
nSelect the appropriate lighting adjustments (CCU Scenes section)
Camera Controls
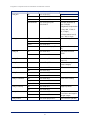
Camera behavior
nWhat happens on power-up or coming out of standby mode - move to
a specified preset, apply specified lighting adjustments
nSpecify whether to use automated adjustments (auto-iris, auto white
balance, backlight compensation)
Camera Settings
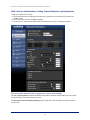
Camera adjustments
nColor settings (Iris, iris gain, red gain, blue gain, detail, chroma,
gamma)
nStore and label custom color settings as CCU scenes
nSpecify global speed settings for camera movements that do not use
Tri-Synchronous Motion
Camera Settings
IP streaming settings - quality, resolution, frame rate, streaming URL
and path
Streaming
Other IP settings - hostname, DHCP or static addressing, IP address,
subnet mask, gateway
Networking
Access management
nGuest access
nAccount passwords
Security
Diagnostic logs Diagnostics
Information about the camera location Room Labels
Helpdesk phone number for end users Room Labels
Vaddio Technical Support contact information Help
16
Integrator's Complete Guide for RoboSHOT HD-SDI PTZ Cameras

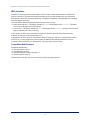
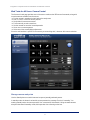
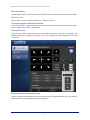
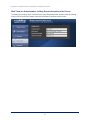
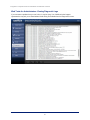
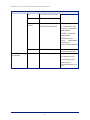
Web Tasks for All Users: Camera Control
The Camera Control page provides most of the same controls as the IR Remote Commander, along with
some that are not available from the remote:
nPut the camera in standby or bring it back to the ready state
nPan, tilt, zoom, or return to "home" position"
nSet speeds for camera movements
nFocus manually or select auto-focus
nSet the camera for normal or inverted operation
nSet or move to camera presets
nSelect one of the stored lighting adjustments
Since the web interface is specific to the camera you are working with, it does not offer camera selection.
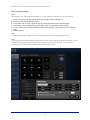
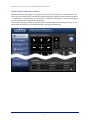
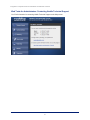
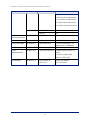
Manage camera ready state
Use the Standby button to switch between low-power (standby) and ready states.
In standby mode, the button is red and the screen presents the message “Device is in standby.” On
entering standby mode, the camera pans 90° from center and 30° downward. Ceiling-mounted cameras
also point downward in standby mode; this keeps dust from collecting on the lens.
17
Integrator's Complete Guide for RoboSHOT HD-SDI PTZ Cameras
Page is loading ...
Page is loading ...
Page is loading ...
Page is loading ...
Page is loading ...
Page is loading ...
Page is loading ...
Page is loading ...
Page is loading ...
Page is loading ...
Page is loading ...
Page is loading ...
Page is loading ...
Page is loading ...
Page is loading ...
Page is loading ...
Page is loading ...
Page is loading ...
Page is loading ...
Page is loading ...
Page is loading ...
Page is loading ...
Page is loading ...
Page is loading ...
Page is loading ...
Page is loading ...
Page is loading ...
Page is loading ...
Page is loading ...
Page is loading ...
Page is loading ...
Page is loading ...
Page is loading ...
Page is loading ...
Page is loading ...
Page is loading ...
Page is loading ...
Page is loading ...
Page is loading ...
Page is loading ...
Page is loading ...
Page is loading ...
Page is loading ...
Page is loading ...
Page is loading ...
Page is loading ...
Page is loading ...
Page is loading ...
Page is loading ...
Page is loading ...
Page is loading ...
Page is loading ...
Page is loading ...
-
 1
1
-
 2
2
-
 3
3
-
 4
4
-
 5
5
-
 6
6
-
 7
7
-
 8
8
-
 9
9
-
 10
10
-
 11
11
-
 12
12
-
 13
13
-
 14
14
-
 15
15
-
 16
16
-
 17
17
-
 18
18
-
 19
19
-
 20
20
-
 21
21
-
 22
22
-
 23
23
-
 24
24
-
 25
25
-
 26
26
-
 27
27
-
 28
28
-
 29
29
-
 30
30
-
 31
31
-
 32
32
-
 33
33
-
 34
34
-
 35
35
-
 36
36
-
 37
37
-
 38
38
-
 39
39
-
 40
40
-
 41
41
-
 42
42
-
 43
43
-
 44
44
-
 45
45
-
 46
46
-
 47
47
-
 48
48
-
 49
49
-
 50
50
-
 51
51
-
 52
52
-
 53
53
-
 54
54
-
 55
55
-
 56
56
-
 57
57
-
 58
58
-
 59
59
-
 60
60
-
 61
61
-
 62
62
-
 63
63
-
 64
64
-
 65
65
-
 66
66
-
 67
67
-
 68
68
-
 69
69
-
 70
70
-
 71
71
-
 72
72
-
 73
73


VADDIO RoboSHOT 12 HD-SDI User manual
- Type
- User manual
- This manual is also suitable for
Ask a question and I''ll find the answer in the document
Finding information in a document is now easier with AI
Related papers
-
VADDIO RoboSHOT 20 UHD Integrator's Complete Manual
-
-
-
VADDIO RoboSHOT HD-SDI Series Complete Manual
-
-
-
-
-
-