VEVOR EV-B06-US003A User manual

Type
User manual

The VEVOR EV-B06-US003A is a portable EV charger designed for convenient charging of electric vehicles. It features a compact and lightweight design, making it easy to carry and store. With its IP66 protection rating, the charger can withstand dust and water, ensuring safe operation in various weather conditions. The device offers adjustable charging current, allowing you to select the appropriate power output for your vehicle's needs. Additionally, it comes equipped with a digital display that provides real-time information on charging status, including voltage, current, and charging time.

The VEVOR EV-B06-US003A is a portable EV charger designed for convenient charging of electric vehicles. It features a compact and lightweight design, making it easy to carry and store. With its IP66 protection rating, the charger can withstand dust and water, ensuring safe operation in various weather conditions. The device offers adjustable charging current, allowing you to select the appropriate power output for your vehicle's needs. Additionally, it comes equipped with a digital display that provides real-time information on charging status, including voltage, current, and charging time.

Technical Support and E-Warranty Certificate www.vevor.com/support
AC EV CHARGER
USR MANUAL
MODEL:EV-B06-US003A/EV-B06-US003B/EV-B06-US007B
We continue to be committed to provide you tools with competitive price.
"Save Half", "Half Price" or any other similar expressions used by us only represents an
estimate of savings you might benefit from buying certain tools with us compared to the major
top brands and doses not necessarily mean to cover all categories of tools offered by us. You
are kindly reminded to verify carefully when you are placing an order with us if you are
actually saving half in comparison with the top major brands.
- 1 -
MODEL:EV-B06-US003A/EV-B06-US003B/EV-B06-US007B
EV-B06-US003A
EV-B06-US003B
EV-B06-US007B
Have product questions? Need technical support? Please feel free to
contact us:
CustomerService@vevor.com
NEED HELP? CONTACT US!
This is the original instruction, please read all manual instructions
carefully before operating. VEVOR reserves a clear interpretation of our
user manual. The appearance of the product shall be subject to the
product you received. Please forgive us that we won't inform you again if
there are any technology or software updates on our product.
AC EV CHARGER
- 2 -
Before the operation, please read the operation manual carefully to
know the equipment and the correct method of use. Please keep it for
future reference.
1. Before installation, please check the grid for single-phase 230 v ±10%
(50 Hz)". Otherwise unable to use it.
2. Detection of the charging device has the function of user network circuit
load capacity; When the electric grid circuit of the user cannot bear the
charging power of the charging device, the device will automatically reduce
the charging power and then charge the electric vehicle. This function can
solve the problem of frequent tripping caused by the user's grid voltage
instability, circuit aging and other problems; At the same time, it can reduce
the safety problems caused by the user's circuit problems. If the charging
power is reduced in use, it is a normal phenomenon.
3. This equipment has over-voltage, under-voltage protection; It also has
overload protection function. After the device automatically adjusts the
charging power, the device will automatically shut down the charging and
stop using if the user's grid voltage is still abnormal.
4. Install the equipment, the total input of the front-end must be installed
circuit breakers.
5.Do not use flammable,explosive, or combustible materials, chemicals,
combustible gas and other dangerous goods near the charging pile.
- 3 -
6. Keep dry and clean on the charging point. If there is any dirt, please use
a clean, dry cloth to wipe it. It is forbidden to touch the point pin.
7. Hybrid car, please recharge again after flame out. In the process of
charging, vehicle driving is prohibited.
8. Children do not get close to the process of charging so as not to cause
harm.
9.In case of rain, thunder, or weather, be a cautious charge, please.
10. It is strictly prohibited that the charging cable breaks, wear and tear,
charging cable nudity, charging pile has obviously been knocked down,
damaged, etc. If the charging post is used, please stay away from the
charging post immediately and contact the staff.
11. If there is a fire in the process of charging electric shock and other
abnormal situation occurs, immediately press the stop button to ensure
personal safety.
12. Please do not try to remove, maintain, or modify the charging
pile.Improper use may cause damage, leakage, and so on and so forth.
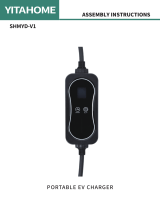
EV-B06-US series portable charger is designed for the pain points in the
portable charging industry. It is characterized by convenient installation,
use, and debugging, simple operation and maintenance, accurate
measurement, and complete protection functions. It has good compatibility,
and meets the charging requirements of national standard.
EV-B06-US series portable charger has a protection level of IP66, and has
good dustproof and waterproof functions, enabling safe indoor and outdoor
operation.
- 4 -
1. Product Parameters
Type no.
EV-B06-US003A
EV-B06-US003B
EV-B06-US007B
In put voltage
AC 120V or
AC 240V
AC 240V
AC 240V
Ou tput voltage
AC 120V or
AC 240V
AC 240V
AC 240V
Power output
3.8KW
7.7kw
Maximum
output current
16A
32A
Class of
protection
IP66
Protection
Function
Fire protection, over current, over voltage, under voltage, ground protection,
over temperature protection, self monitoring and recovery,
Indicator light
Standby - Green on; Charging - Yellow blinking; Alarm - red on
Liquid crystal
screen
3*LED light indicator
1.5-inch LCD
Mode of
charging
Plug and Play/APP charging
Charging
interface
SAE J1772
Input plug
NEME 6-20P
NEME 10-30P
NEME 14-50P
Material of
case
PC+ABS
Operating
temperature
-30~45°C
Relative
humidity
5% to 95% no condensation
Overall
dimensions
245*105*63mm(H*W*D)
Standard of
reference
CCS1 (combo/Type 1)
AC Level 1 and 2
charging
CCS1 (combo/Type 1) AC Level 2 charging
- 5 -
2. After the device is powered on, it enters the standby state. The device
standby interface is shown below:
2.1 After inserting the charging gun head into the vehicle charging port,
the charging interface is shown below:
2.2 Adjust the charging current: click the button to adjust the
charging gear:16A-13A-10A-8A-16A Cycle the current in this order.After
switching the usage current, plug in the gun head to charge.
- 6 -
2.3 Appointment charging: Click to increase the reservation time.You
can choose between 0 and 12H.After the appointment time, it will
automatically enter the charging state.All models included in this manual
can be charged by APP Appointment charging.
3. APP download and binding use
a. To download the smart APP, enter the following address in the mobile
browser:
https://developer.tuya.com/cn/docs/iot/tuya-smart-app-smart-life-app-adva
ntages?id=K989rqa49rluq
Click the website and follow the prompts to install.
b. Qr code download
Open the mobile browser or other social software, scan the QR code, and
- 7 -
follow the APP according to the prompts.
3.1 Binding and Using Devices
Open the installed APP, click Agree privacy Statement, you can register
with your mobile phone number, social software binding registration, and
log in to the APP after a successful registration.
Long press A on the charging panel, and APP START appears on the
display screen to enter the APP mode;
Press and hold on the charging panel again, and the display screen will
display Plug and Charge to enter the Plug and Play charging mode. Open
the Location, Bluetooth, and Wifi of the mobile phone. If the charging
device is in standby state, the APP will automatically search for the
charging device and the device name will be displayed.
- 8 -
c. Click Add to add the device, enter the WIFI pairing interface,
automatically identify the WIFI name of the phone.Click Next, and the
device will be automatically bound. After the binding is successful, a
message will be displayed indicating that the device has been successfully
added. Finally, click the icon of "Finish" and wait about 5 seconds for the
device to be bound.
d. You can also click "+" in the upper right corner of the APP to manually
add the device, select the category of "Energy saving" in the left column,
pull up the device type, find the device "Car charging pile (Bluetooth +
WIFI)", click to enter, and then click "Confirm indicator flashing" and "Fast
flashing" as prompted. Enter the WIFI password (WIFI password
connected to the mobile phone) and click Next to match the password, and
always set the bound device as prompted. After binding the device, charge
it according to the APP interface.
e. Device WIFI is reset
EV-B06-US
003A and
EV-B06-US
003B
Press both and buttons on the
lower panel simultaneously for 3 seconds
device display panel for 3 seconds After
waiting for the display screen to display WIFI
Reset, the device's WiFi will be reset.
Under the WiFi reset
interface, simultaneously
press the and
buttons on the device panel
for 2 seconds to return to the
device status interface.
EV-B06-EU
007B
Press both and buttons on the
lower panel simultaneously for 3 seconds
device display panel for 3 seconds After
waiting for the display screen to display WIFI
Reset, the device's WiFi will be reset.
Under the WiFi reset
interface, simultaneously
press the and
buttons on the device panel
for 2 seconds to return to the
device status interface.
- 9 -
Note: The APP can set charging
current, reserve charging time and
other functions; You can also query
the real-time charging status. APP
controls the charging function, which
is not limited by the charging mode of
the device.
4. Charging indicator LED indicator status table.
Device Status
Three-color indicator status (green light: standby, yellow light:
charging, red light: failure)
Standby mode
Green light steady on
The gun has been fired
Steady yellow light
The gun is charging
Yellow light flashing
Switch current gear status:
EV-B06-US003A
EV-B06-US003B
EV-B06-US007B
Press the current button and the yellow light will flash once (8A );
Press the current button and the yellow light will flash twice (10A);
Press the current button and the yellow light will flash 3 times (13A);
Press the current button and the yellow light will flash 4 times (16A);
CP fault
The red light is on
Overpressure and underpressure
The red light flashes once per second
The PE cable is not connected
The red light flashes once in two seconds
Over-Current
The red light flashes every four seconds
Electrical leakage of equipment
The green and red lights flash once every second
Equipment overtemperature
The green and red lights flash every two seconds
- 10 -
4.1 Fault display description(EV-B06-US007B)
4.2 Ground Fault: The ground wire is not connected or the ground wire
is poor.
4.3 CP Fault:The device detects that the CP voltage exceeds 6V ± 0.8 or
9V ± 0.8, reports a CP fault, recovers the voltage to within range, and
recovers the fault.
- 11 -
4.4 Overcurrent Fault: If the charging current of the device exceeds the
threshold and continues to exceed 5s, the device will disconnect charging
and report a fault, which cannot be automatically restored.
4.5 Undervoltage Fault: The rated input voltage is 240V, and a fault is
reported if the voltage value is lower than 192V±5V.
- 12 -
4.6 Overvoltage Fault: The rated input voltage is 240V, and a fault is
reported if the voltage value is higher than 288V±5V.
5. List of Parts
General purpose accessories
Product specification
Ac pile instruction manual
1 copy
Storage bag
Portable hard case travel bag
1 PCS
Adapter plug cable (equipped
with EV-B06-US003A)
Adapter line from 6-20 socket to
5-15 plug
1PCS
Wall mount installation
Wall mount
Wall mounted fasteners
1 PCS
Expansion screw
M8*60 expansion
screw
4 PCS
Charging cable hook
Iron hook
1 PCS
- 13 -
5.1 The installation method is wall hanging
a.Take out the provided wall mounting fasteners and carefully check the
installation dimensions of the screw holes.
b.Select the installation location of the device. The lowest position of the
equipment is a wall mounted fastener 1200 mm above the ground.
c.Drill 2 holes with a diameter of 8mm according to the location of the fixed
screw holes of Wall mounted fasteners, and tap in the expansion rubber
plugs. Fix the mounting plate with nuts to fix the chassis.
Dimension unit is mm.
Made In China
Technical Support and E-Warranty Certificate
www.vevor.com/support
  • Page 1 1
  • Page 2 2
  • Page 3 3
  • Page 4 4
  • Page 5 5
  • Page 6 6
  • Page 7 7
  • Page 8 8
  • Page 9 9
  • Page 10 10
  • Page 11 11
  • Page 12 12
  • Page 13 13
  • Page 14 14
  • Page 15 15
  • Page 16 16

VEVOR EV-B06-US003A User manual

Type
User manual

The VEVOR EV-B06-US003A is a portable EV charger designed for convenient charging of electric vehicles. It features a compact and lightweight design, making it easy to carry and store. With its IP66 protection rating, the charger can withstand dust and water, ensuring safe operation in various weather conditions. The device offers adjustable charging current, allowing you to select the appropriate power output for your vehicle's needs. Additionally, it comes equipped with a digital display that provides real-time information on charging status, including voltage, current, and charging time.

Ask a question and I''ll find the answer in the document

Finding information in a document is now easier with AI