Page is loading ...

Installation and mounting manuals for EK-FC275GTX water block:
This product is intended for installation only by expert users. Please consult with a qualified technician for installation. Improper installation may
result in damage to your equipment. EK Water Blocks assumes no liability whatsoever, expressed or implied, for the use of these products, nor
their installation. The following instructions are subject to change without notice. Please visit our web site at www.ekwaterblocks.com for
updates.
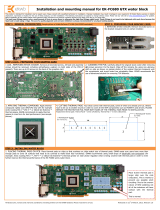
The barb hose fittings require only a small amount of force to screw them in; otherwise
the high flow fittings might break. These fittings do not need to be tightened with much
force because the liquid seal is made using o-rings.
Fitting with
Picture 1: Sample picture of fitting installation
Picture 2: Any of 4 holes can be used as inlet hole, and
any hole can be used as outlet hole. Hole on opposite
side has to be plugged with enclosed G1/4 plug.
o-ring Plug
Spacer
O-rin
g
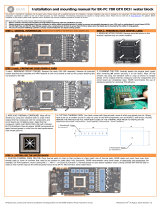
Step 1. Remove the graphic card from computer.
Step 2. Carefully detach the stock cooler after removing all 11 screws (encircled on picture 3) that are
securing original heatsink to the board and 2 screws securing the bracket. Remove the remains of the
original thermal compound until the components and circuit board are completely clean.
Picture 3: Back side of GeForce 275 GTX.
Picture 4: Picture of the bracket
Step 3. Apply thermal compound: lightly coat the GPU, RAMs and with for example Céramique™ thermal
compound. Follow this link http://www.arcticsilver.com/ceramique_instructions.htm for detailed
instructions. EK Water Blocks recommends non-conductive Arctic Silver Céramique™ or MX-2.
Remove these two screws

Picture 5: Applying thermal compound on Graphic card GeForce 275 GTX. Squared areas represent places where
thermal pads (thickness 1mm) must be placed in order to provide sufficient cooling.
Step 4. Place the graphic card on the inverted water block and attach it with enclosed screws as shown in
picture 5.
For
perfect thermal contact, the block does not use a spring mounting system; therefore when
attaching without standoffs be very careful to tighten all screws equally. If the screws are tightened too
much, when not using standoffs, the graphic card board will bend and could get damaged.
To prevent warping of card please use enclosed standoffs and apply them as shown on pictures bellow.
Prior aligning standoffs with mounting holes, please apply small amount of thermal grease around the
thread to fix the standoffs.
Picture 6:
Placing/fixing the standoffs
Picture 7:
Mounting the water block with enclosed M2,5 screws.
Step 5. Start tightening the enclosed screws from the GPU (M2,5x8 screws) and continue outwards. Please
make sure that spacers are well positioned and aligned with the holes.
Step 6. Remove the block and check for contact surface. Then repeat steps from 3 to 6. If you are not
using standoffs apply more or less pressure on area where you find it necessary.
Step 7. Attach the liquid cooling tubes and connect the water-block(s) into the cooling circuit. With EK-275
GTX series water blocks we recommend use of high flow fittings. To ensure that the tubes are securely
attached to the barb/fittings, please use hose clamps or an appropriate substitute. The use of an algaecide
is always recommended for any liquid cooling system.
VERY IMPORTANT NOTICE
While all efforts have been made to provide the most comprehensive tutorial possible, EKWB assumes no liability expressed or
implied for any consequential damage(s) occurring to your equipment as a result of using EKWB cooling products, either due
to errors or omissions on our part in the above instructions, or due to failure or defect in the EKWB cooling products.
WARRANTY:
Our products are warranted against defects in materials or workmanship for a period of 24 months beginning from the
date of delivery to the final user. During this period, products will be repaired or have parts replaced at our discretion
provided that: (I) the product is returned to the agent from whom it was purchased; (II) the product has been
purchased by an end user and has not used for commercial purposes; (III) the product has not been misused, handled
carelessly, or used in a manner other than in accordance with the instructions provided describing its installation and
proper use. This warranty does not confer rights other than those expressly set out above and does not cover any
claims for consequential loss or damage. This warranty is offered as an extra benefit and does not affect your statutory
rights as a consumer. This warranty is voided if the product comes in contact with aggressive UV additives.
Use 11 screws M2,5×8mm for
mounting the copper to PCB.
A
pp
l
y
thermal
g
rease on GPU and Nvio chi
p
.
/