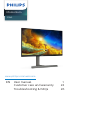
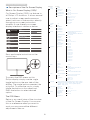
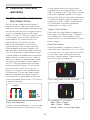
Philips 272M1 is a feature-rich monitor designed to enhance your computing experience. With its SmartImage technology, you can easily optimize the display performance for different applications, ensuring crisp and vibrant visuals. The SmartContrast feature dynamically adjusts the contrast for rich, deep blacks and bright, crisp whites, delivering exceptional detail and clarity. For a smooth and tear-free gaming experience, the monitor supports AMD FreeSync technology, synchronizing the refresh rate of the display with your graphics card to eliminate choppiness and stuttering.
Philips 272M1 is a feature-rich monitor designed to enhance your computing experience. With its SmartImage technology, you can easily optimize the display performance for different applications, ensuring crisp and vibrant visuals. The SmartContrast feature dynamically adjusts the contrast for rich, deep blacks and bright, crisp whites, delivering exceptional detail and clarity. For a smooth and tear-free gaming experience, the monitor supports AMD FreeSync technology, synchronizing the refresh rate of the display with your graphics card to eliminate choppiness and stuttering.


-
 1
1
-
 2
2
-
 3
3
-
 4
4
-
 5
5
-
 6
6
-
 7
7
-
 8
8
-
 9
9
-
 10
10
-
 11
11
-
 12
12
-
 13
13
-
 14
14
-
 15
15
-
 16
16
-
 17
17
-
 18
18
-
 19
19
-
 20
20
-
 21
21
-
 22
22
-
 23
23
-
 24
24
-
 25
25
-
 26
26
-
 27
27
-
 28
28
-
 29
29
-
 30
30
-
 31
31
-
 32
32


Philips 272M1 is a feature-rich monitor designed to enhance your computing experience. With its SmartImage technology, you can easily optimize the display performance for different applications, ensuring crisp and vibrant visuals. The SmartContrast feature dynamically adjusts the contrast for rich, deep blacks and bright, crisp whites, delivering exceptional detail and clarity. For a smooth and tear-free gaming experience, the monitor supports AMD FreeSync technology, synchronizing the refresh rate of the display with your graphics card to eliminate choppiness and stuttering.
Ask a question and I''ll find the answer in the document
Finding information in a document is now easier with AI
Related papers
-
Philips 275M1RZ/69 User manual
-
-
Philips 27 User manual
-
Philips 345M2CRZ/69 User manual
-
-
-
Philips 27M1N3500L Gaming Monitor User manual
-
-
Philips 278M1R/00 User manual
-