Roland R-07 Owner's manual

Type
Owner's manual

Roland R-07 is a portable digital recorder designed for musicians and audio professionals. It features high-quality recording and playback, a built-in stereo microphone, and a variety of input and output options. With its compact size and long battery life, the R-07 is perfect for recording on the go.

Roland R-07 is a portable digital recorder designed for musicians and audio professionals. It features high-quality recording and playback, a built-in stereo microphone, and a variety of input and output options. With its compact size and long battery life, the R-07 is perfect for recording on the go.

1
Functions Added in R-07 System Program Ver.1.10
Functions Added in Ver.1.10
5 By operating an “R-07 Remote app installed on your mobile device, you can simultaneously control up to four R-07 units.
& Controlling Multiple R-07 Units from One Mobile Device (p. 1)
5 You can connect the R-07 via USB to your computer, iPhone, or iPad, and use it as a USB audio interface.
* When using the R-07 as a USB audio interface, files inside the R-07 cannot be played back. Nor is it possible to record into the R-07.
& “Using the R-07 as a USB Audio Interface” (p. 4)
5 If “Recording mode is set to 2xWAV- (dual level recording), you can adjust the volume of the quieter recording.
Prior to version 1.10, you could record the sound both at the specified input level and at an input level 20 dB lower than this. In version 1.10,
you can choose not only 20 dB but also 12 dB or 6 dB.
& Changing the Lower-Level Volume for Dual-Level Recording” (p. 6)
Checking the R-07 System Program Version
Check the version of the R-07 system program as described below.
1.
Press [MENU] to access the “Menu” screen, use [r] / [q] to select “Information, and then press [t].
2.
Use [r] / [q] to access “VERSION” and check the version.
3.
Press [MENU] twice to return to the main screen.
If the version is lower than 1.10, an update is required.
For details, access the following URL, click “Downloads”0“R-07 System Program (Ver.1.10)” to read an explanation of the update.
http://roland.cm/r-07
Controlling Multiple R-07 Units from One Mobile Device
The “R-07 Remote app has also been updated to add the following functions.
5 A single screen can show the status of multiple R-07 units.
5 You can start or stop recording simultaneously on linked
R-07 units. You can also add markers.
Multi screen
Individual screen
5 You can control each R-07 individually.
Individual control is possible only for R-07 units that are
not linked.
Linked R-07 Units
Non-linked R-07
Units
Operations for
linked R-07 Units
© 2019 Roland Corporation01
2
Functions Added in R-07 System Program Ver.1.10
Preparations
By making the following settings, you can simultaneously operate up to four R-07 units from your mobile device.
1. Installing the “R-07 Remote app on your mobile device
You’ll need to install an app that supports R-07 system program version 1.10. If an old version of “R-07 Remote” is installed on your mobile device,
update it.
1.
On your mobile device, access the app download page.
From the page that appears, install the app that’s appropriate for your mobile device.
http://roland.cm/r-07
2. Setting the R-07’s Bluetooth ID
Make the following setting for each R-07 unit that you want to control.
1.
Press [MENU] to access the “Menu” screen, use [r] / [q] to select “Bluetooth, and then press [t].
2.
Use [r] / [q] to select “Remote Control, and then press [t].
3.
Use [r] / [q] to move the cursor to the “Bluetooth ID” line, and use [v] /
[w] to change the Bluetooth ID.
Specify a different Bluetooth ID for each unit. For example, if you have four R-07 units, specify “1” for the
first unit, “2” for the second unit, “3” for the third unit, and “4” for the fourth unit.
For details on the Bluetooth ID, refer to “If you have multiple R-07 units” in the “R-07 Reference
Guide” (PDF).
4.
Restart the R-07 units whose Bluetooth ID you changed.
3. Settings in “R-07 Remote
1.
Start the “R-07 Remote” app, and pair the app with the R-07.
In the screen, tap a device name (e.g., “Roland R-07 MIDI-1” or “Roland R-07 MIDI-2”) so that multiple R-07 units can be seen from the app.
2.
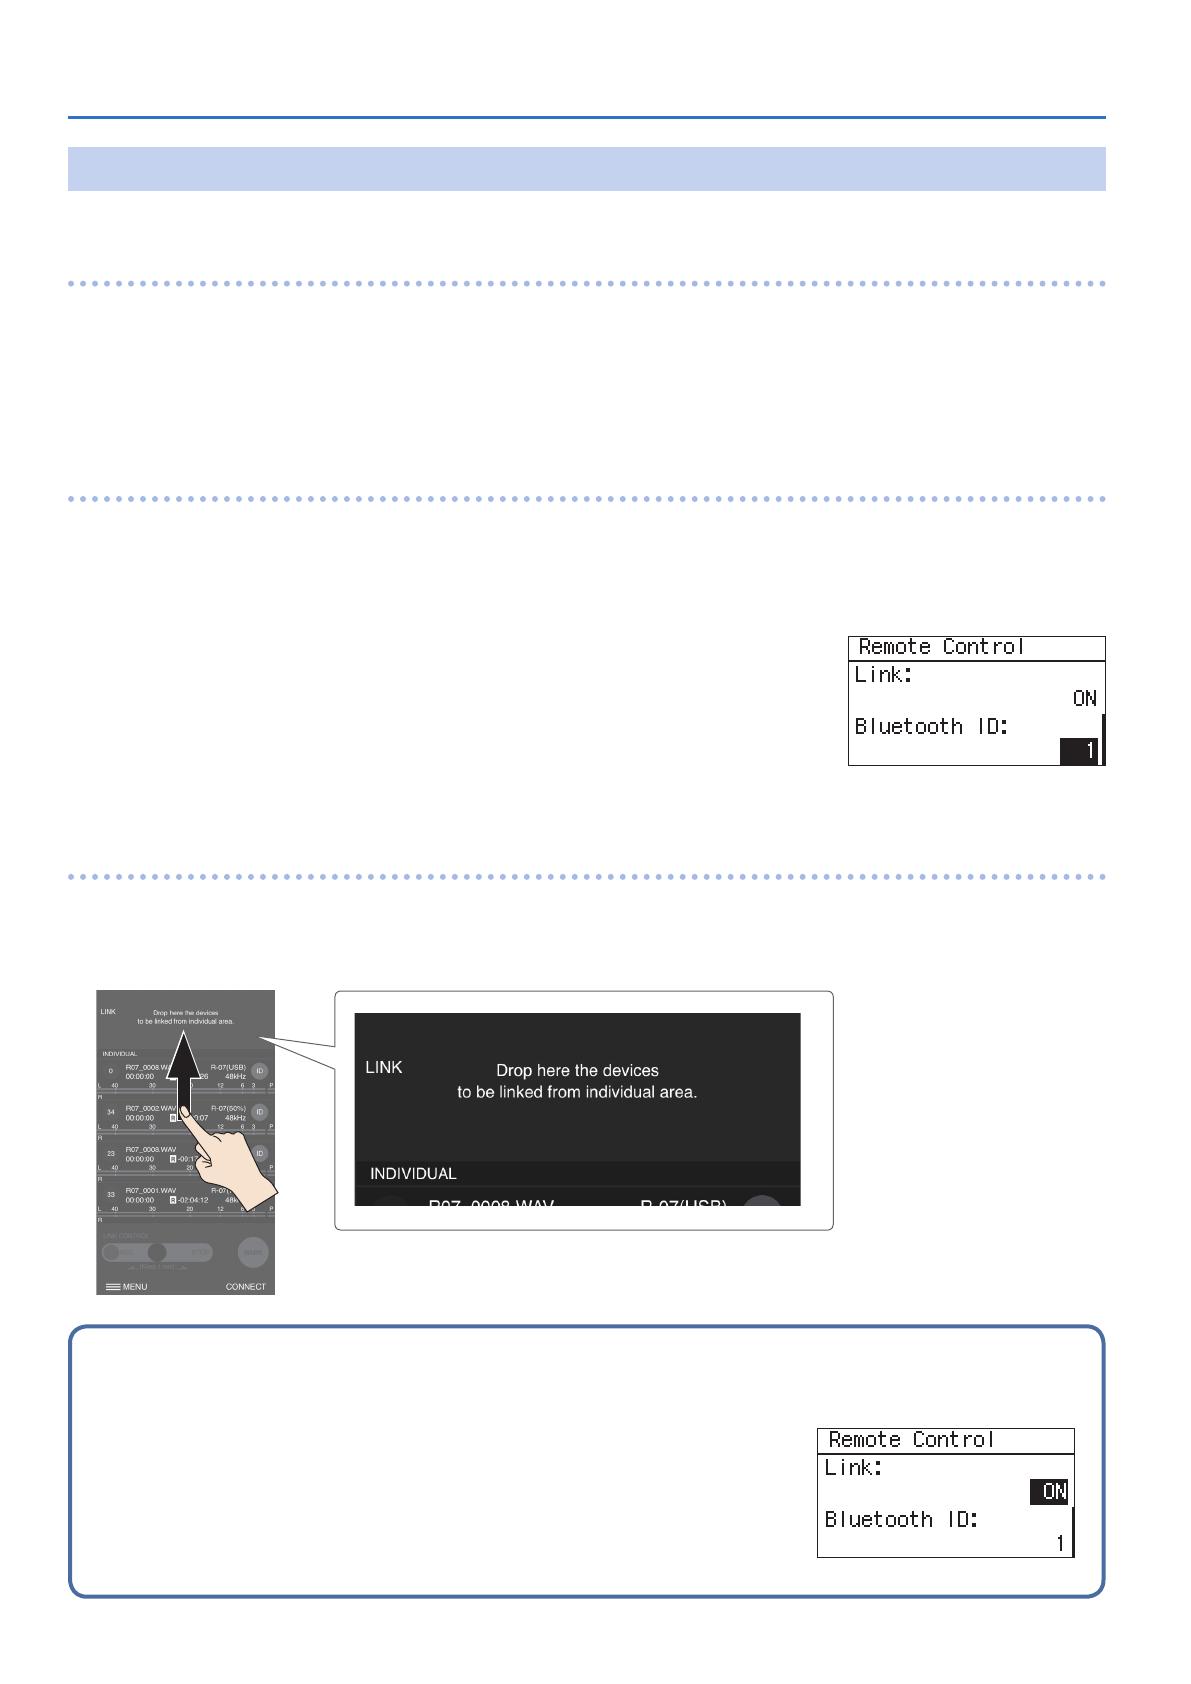
Drag the R-07 units that you want to operate simultaneously into the “LINK” area.
You can also enable linking from the R-07.
1.
Press [MENU] to access the “Menu” screen, use [r] / [q] to select “Bluetooth, and then press [t].
2.
Use [r] / [q] to select “Remote Control, and then press [t].
3.
Use [r] / [q] to move the cursor to the “Link line, and use [v] / [w]
to turn ON.
4.
Press [MENU] three times to return to the main screen.
3
Functions Added in R-07 System Program Ver.1.10
Simultaneously Controlling Multiple R-07 Units
Record/stop
When you drag the on-screen “LINK CONTROL switch to either “REC” or “STOP, the linked R-07 units will record or stop simultaneously.
* To record or stop, drag to “REC” or “STOP, and hold for one second.
Assigning a marker
You can assign markers while recording a WAV file to linked R-07 units.
Once you’ve assigned markers, you’ll be able to jump to the marked locations by touching [v] [w] buttons in the MARK tab during playback.
For details on markers, refer to “R-07 Reference Guide (PDF).
* Markers cannot be assigned to an MP3 file.
Linked R-07 Units
Non-linked R-07
Units
Operations for
linked R-07 Units
Drag to “REC”/”STOP and hold
for one second.
While recording a WAV file, tap this at
the moment you want to add a mark.
Tap to see the individual screen.
This lets you individually control
multiple R-07 units.
To see which R-07 unit corresponds
to the area, press the ID symbol.
While you hold down the ID
mark, the REC/PLAY indicator
and Remote indicator of the
corresponding R-07 unit will blink.
Remote indicator
REC/PLAY
indicator
You can also control multiple R-07 units simultaneously from the Apple Watch version of “R-07 Remote.
4
Functions Added in R-07 System Program Ver.1.10
Using the R-07 as a USB Audio Interface
Sound that is input to the R-07 can be recorded via USB by software on your computer or by an app in your iPhone or iPad, and played back.
* When using the R-07 as a USB audio interface, iOS is the only type of mobile device that is supported.
Signal Flow Diagram for R-07 Using USB Audio Connection
NOTE
When using the R-07 as a USB audio interface, files inside the R-07 cannot be played back. Nor is it possible to record into the R-07.
Internal MIC
AUX IN
AF
A/D
Int
/Ext
Input
Level
REC
Monitor Sw
Metronome
USB from PC
Player
Rec Bus
LIM
LCUT
USB Bus
Monitor Bus
Sw
Metronome
Level
DA
Digital Boost Output
USB to PC
Recorder
R-07 Audio Block Diagram
2018.12.28
Phones
/Speaker
Phones
Speaker
Bluetooth (A2DP)
Play
/Rec
/Metronome
USB
Direct
Monitor Sw
USB Level
USB Level
PHONES jack
Bluetooth speakers or headphones
Built-in mics
MIC/AUX IN jack
INPUT [+] [–]
buttons
VOL [+] [–]
buttons
Preparations
NOTE
When connecting with an iPhone or iPad, install batteries in the R-07 and turn on the power.
1. Setting the R-07’s sampling rate to “44.1 kHz or “48.0 kHz
Set the R-07’s sampling rate (44.1 kHz or 48.0 kHz) to match the sampling rate of your computer software or iPhone/iPad app.
NOTE
You cannot set the R-07’s sampling rate to “88.2 kHz” or “96.0 kHz.
1.
Press [MENU] to access the “Menu” screen, use [r] / [q] to select “USB Audio
I/F, and then press [t].
2.
Use [r] / [q] to move the cursor to the “Sampling Rate line, and use [v] /
[w] to change the sampling rate.
2. Connecting the R-07 to your computer or iPhone/iPad
* Set the R-07’s sampling rate before connecting it to your device. If you set the R-07’s sampling rate after connecting it to your device, re-connect
the USB cable.
If connecting to a computer
Theres no need to separately install a driver on your computer.
1.
Start up your computer.
2.
With the R-07 stopped so that the main screen is shown, use a commercially available USB cable to connect
the R-07 to your computer.
The USB mode select screen appears.
NOTE
Do not connect a USB cable while the R-07 is recording or playing back. If you connect the cable during recording or playback, the USB mode
select screen does not appear. In the USB mode select screen, “Power adaptor” is selected automatically.
USB cable
(micro-B type)
5
Functions Added in R-07 System Program Ver.1.10
3.
Use [r] / [q] to choose Audio I/F (PC), and press [t].
You return to the main screen.
NOTE
Be aware of your computer’s remaining battery capacity. The R-07 is operating on power supplied from
the computer.
4.
Make sound settings for your operating system.
When you make the following settings, sound is output via headphones connected to the R-07.
Windows
1. Open “Control Panel, click the [Hardware and Sound] icon, and then click the [Sound] icon.
If the Icon view or the Classic view is shown, double-click the [Sound] icon.
2. Click the [Playback] tab, choose the R-07’s [OUT], and then click the [Set as default] button.
3. Click the [OK] button.
Mac OS
1. Open “System Preferences, and click the [Sound] icon.
2. Click the [Output] tab, and choose [R-07].
3. When you have finished making settings, close “System Preferences.
If connecting to an iPhone or iPad
1.
Start your iPhone or iPad.
2.
With the R-07 stopped so that the main screen is shown, use a commercially available USB cable to connect
the R-07 to your iPhone or iPad.
The USB mode select screen appears.
NOTE
Do not connect a USB cable while the R-07 is recording or playing back. If you connect the cable during recording or playback, the USB mode
select screen does not appear. In the USB mode select screen, “Power adaptor” is selected automatically.
USB cable
(micro-B type)
Apple Inc.s Lightning to USB
Camera Adapter (sold separately)
3.
Use [r] / [q] to choose Audio I/F (iOS),” and press [t].
You return to the main screen.
NOTE
Be sure to select Audio I/F (iOS). If you select Audio I/F (PC), the system will not operate correctly.
6
Functions Added in R-07 System Program Ver.1.10
Auditioning Sound Input from the R-07
If “Direct Monitor is on, the sound being input to the R-07 is output from the R-07 without change.
1.
Press [MENU] to access the “Menu” screen, use [r] / [q] to select “USB Audio I/F, and then press [t].
2.
Use [r] / [q] to move the cursor to the “Direct Monitor” line, and use [v] /
[w] to turn ON.
3.
Press [MENU] twice to return to the main screen.
Adjusting the volume of a USB-connected computer or iPhone/iPad
To adjust the volume of a USB-connected computer or iPhone/iPad, use the following procedure.
* If the R-07 is connected to a computer or iPhone/iPad, you can’t adjust the volume on the connected device.
1.
Press [MENU] to access the “Menu” screen, use [r] / [q] to select “USB Audio
I/F, and then press [t].
2.
Use [r] / [q] to move the cursor to the “USB Level” line, and use [v] / [w]
to adjust the value.
Changing the Lower-Level Volume for Dual-Level Recording
When you record with the “Recording mode set to 2xWAV-, recording occurs simultaneously at the input level that you specify and also at a
lower input level. To change the input level of the lower-level recording, proceed as follows.
1.
Press [MENU] to access the “Menu” screen, use [r] / [q] to select “Recorder, and then press [t].
2.
Use [r] / [q] to move the cursor to the “2xWAV Low Level” line, and use [v] /
[w] to change the setting.
(Default in bold)
2xWAV Low Level
-20 dB
-12 dB
-6 dB
3.
Press [MENU] twice to return to the main screen.
* To adjust the level of the higher-level recording, use the INPUT [+] [–] buttons to adjust the level in the range of 0 and 42-100. Even if you
change the level of the lower-level sound, the range of the high-level recording does not change.
  • Page 1 1
  • Page 2 2
  • Page 3 3
  • Page 4 4
  • Page 5 5
  • Page 6 6

Roland R-07 Owner's manual

Type
Owner's manual

Roland R-07 is a portable digital recorder designed for musicians and audio professionals. It features high-quality recording and playback, a built-in stereo microphone, and a variety of input and output options. With its compact size and long battery life, the R-07 is perfect for recording on the go.

Ask a question and I''ll find the answer in the document

Finding information in a document is now easier with AI