Page is loading ...

INSTRUCTIONS FOR USE
CROSLEY C10


38
ESPA OL
Crosley Radio, Inc. garantiza que este producto está libre de defectos de materiales y mano
de obra en condiciones normales de uso por un período de un año desde la fecha original de
compra. Esta garantía no es transferible. Si se determina que el producto está defectuoso
durante el período de garantía, la unidad será reparada o reemplazada a exclusivo criterio de
Crosley Radio. Esta garantía cubre defectos de fabricación y los producidos por el uso normal
del consumidor y NO cubre daños ni fallas resultantes de abuso, accidente, alteraciones, uso
incorrecto, descuido, uso anormal y rotura, mantenimiento inadecuado, uso comercial o poco
razonable, daño causado por aumentos de tensión, mal manejo, accidentes, eventos de fuerza
mayor o intentos de reparación por parte de un agente de servicio no autorizado. Tampoco
están cubiertos los daños superficiales, los cables ni las antenas.
En caso de que este producto no funcione de manera satisfactoria, se recomienda comunicarse
primero con nuestro equipo de soporte técnico a fin de que lo asistan para asegurarse de que
la unidad funcione correctamente.
Soporte técnico y preguntas sobre el producto
LLAME SIN CARGO AL: 1-888-CROSLEY
(1-888-276-7539)
Si realmente se determina que la unidad ya no puede operarse, comuníquese con el minorista
que le vendió el producto. En muchos casos, el minorista podrá ofrecer una unidad de reemplazo
sin cargo dentro del alcance de su política de devolución. Si la fecha de devolución del minorista
expira, comuníquese directamente con Crosley Radio para participar en el programa de protección
de un año.
Programa de garantía de 1 año de Crosley
LLAME SIN CARGO AL: 1-800-926-7801
Deberá comunicarse con nuestras oficinas de lunes a viernes de 8 a. m. a 5 p. m. Hora del
Este para obtener un número de autorización de devolución (Return Authorization, RA). Recibirá
instrucciones para enviar la unidad (a su cargo) a nuestras oficinas en su embalaje original (o
sustituto razonable para evitar que se dañe). Deberá marcar claramente su número de RA en
la parte exterior del embalaje e incluir el recibo de venta original (o una copia) que indique la
fecha de compra, el monto pagado y el lugar de compra. También deberá incluir su nombre
completo, dirección de envío y número de contacto durante el día. Se le solicitará que incluya
un cheque o giro postal por cualquier tarifa de gestión y reenvío aplicable. Un asesor de Crosley
confirmará las tarifas asociadas con el peso y el tamaño de envío del producto. Los productos
devueltos no se enviarán a apartados de correo. Crosley Radio no será responsable por las
demoras ni los reclamos sin procesar resultantes de la falla del comprador para proporcionar,
en todo o en parte, la información necesaria.
No se ofrecen garantías expresas con excepción de las que se indican anteriormente.
El recibo de compra del comprador es la única prueba de derecho de garantía.
Esta garantía otorga al comprador derechos legales específicos, además de cualquier derecho que pueda
variar de un estado a otro.
De acuerdo con la “Moss-Magnuson Warranty Act” de 10 de julio de 1975, esto se denomina “garantía
limitada” que no compromete de manera alguna los altos estándares de calidad y mano de obra de Crosley
Radio.
GARANTÍA LIMITADA DEL FABRICANTE
1
IMPORTANT SAFETY INSTRUCTION
PLEASE READ CAREFULLY ALL THE FOLLOWING IMPORTANT SAFEGUARDS
THAT ARE APPLICABLE TO YOUR EQUIPMENT
1. Read Instructions - All the safety and operating instructions should be read before the product is operated.
2. Retain instructions - The safety and operating instructions should be retained for future reference.
3. Heed Warnings - All warnings on the product and in the operating Instructions should be adhered to.
4. Follow Instructions - All operating and use instructions should be followed.
5. Cleaning - Unplug this product from the wall outlet before cleaning. Do not use liquid cleaners or aerosol cleaners.Use
a damp cloth for cleaning.
6. Attachments - Do not use attachments not recommended by the product manufacturer as they may cause hazards.
7. Water and Moisture - Do not use this product near water - for example, near a bath tub, wash bowl, kitchen sink, or
laundry tub; in a wet basement; or near a swimming pool; and the like.
8. A product and cart combination should be moved with care. Quick stops, excessive force, and uneven
surfaces may cause the product and cart combination to overturn.
9. Ventilation - Slots and openings in the cabinet are provided for ventilation and to ensure reliable
operation of the product and to protect it from overheating, and these openings must not be blocked
or covered, The openings should never be blocked by placing the product on a bed, sofa, rug, or
other similar surface. This product should not be placed in a built - in installation such as a bookcase
or rack unless proper ventilation is provided or the manufacturer's instructions have been adhered to.
10. Power Sources - This product should be operated only from the type of power source indicated on the marking label,
if you are not sure of the type of power supply to your home. Consult your product dealer or local power company.For
products intended to operate from battery power, or other sources, refer to the operating instructions.
11. Grounding or Polarization - This product may be equipped with a polarized alternating-current line plug (a plug having
one blade wider than the other). This plug will fit into the power outlet only one way. This is a safety feature. If you
are unable to insert the plug fully into the outlet try reversing the plug, If the plug should still fail to fit, contact your
electrician to replace your obsolete outlet. Do not defeat the safety purpose of the polarized plug.
12. Power - Cord Protection - Power - supply cords should be routed so that they are not likely to
be walked on or pinched by items placed upon or against them, paying particular attention to
cords at plugs, convenience receptacles, and the point where they exit from the product.
13. Lightning - For added protection for this product during a lightning storm, or when it is left
unattended and unused for long periods of time, unplug it from the wall outlet and disconnect
the antenna or cable system. This will prevent damage to the product due to lightning and power - line surges.
14. Power Lines - An outside antenna system should not be located in the vicinity of overhead power lines or other electric
light or power circuits, or where it can fall into such power lines or circuits. When installing an outside antenna system,
extreme care should be taken to keep from touching such power lines or circuits as contact with them might be fatal.
15. Overloading - Do not overload wall outlets, extension cords, or integral convenience receptacles as this can result
in a risk of fire or electric shock.
16. Object and Liquid Entry - Never push objects of any kind into this product through openings as they may touch
dangerous voltage points or short - out parts that could result in a fire or electric shock. Never spill liquid of any kind
on the product.
17. Servicing - Do not attempt to service this product yourself as opening or removing covers may expose you to dangerous
voltage or other hazards. Refer all servicing to qualified service personnel.
18. Damage Requiring Service - Unplug this product from the wall outlet and refer servicing to qualified service personnel
under the following conditions;
a. When the power-supply cord or plug is damaged.
b. If liquid has been spilled, or objects have fallen into the product.
c. If the product has been exposed to rain or water.
d. If the product does not operate normally by following the operating instructions. Adjust only those controls that
are covered by the operating instructions as an improper adjustment of other controls may result in damage and
will often require extensive work by a qualified technician to restore the product to its normal operation.
e. If the product has been dropped or damaged in any way.
f. When the product exhibits a distinct change in performance - this indicates a need for service.
19. Replacement Parts - When replacement parts are required, be sure the service technician has used replacement
parts specified by the manufacturer or have the same characteristics as the original part. Unauthorized substitutions
may result in fire, electric shock, or other hazards.
20. Safety Check - Upon completion of any service or repairs to this product, ask the service technician to perform safety
checks to determine that the product is in proper operating condition.
21. Wall or ceiling Mounting - The product should be mounted to a wall or ceiling only as recommended by the manufacturer.
22. Heat - The product should be situated away from heat sources such as radiators. Heat registers, stoves, or other
products (including amplifiers) that produce heat.
WARNING: Changes or modifications to this unit not expressly approved by the party responsible for compliance could
void the user’s authority to operate the equipment.
NOTE: This equipment has been tested and found to comply with the limits for a Class B digital device, pursuant to Part
15 of the FCC Rules. These limits are designed to provide reasonable protection against harmful interference in a residential
installation. This equipment generates, uses, and can radiate radio frequency energy and, if not installed and used in
accordance with the instructions, may cause harmful interference to radio communications. However, there is no guarantee
that interference will not occur in a particular installation. If this equipment does cause harmful interference to radio or
television reception, which can be determined by turning the equipment off and on , the user is encouraged to try to correct
the interference by one or more of the following measures:
- Reorient or relocate the receiving antenna.
- Increase the separation between the equipment and receiver.
- Connect the equipment into an circuit different from that to which the receiver is connected.
-
Consult the dealer or an experienced radio TV technician for help.
AC
Polarized Plug
ENGLISH

17
16
4
1
18
3
2
10
8
7
6
13
5
5a
15
12
17
12
9
11
19
2a
14

CROSLEY C10
CONTROLS, FEATURES AND CONNECTIONS
1
Stepped Dive Pulley
2 Drive Belt * 2a Belt Hook *
3 Sub-Platter
4 Turntable Platter
5 Tonearm Counterweight * 5a Downforce Scale
6 Tonearm Lift Lever
7 Tonearm Rest
8 Tonearm
9 Lid *
10 Lid Hinges
11 Power Input Jack
12 Phono Out Cables
13 Anti-skating Weight Adjustment
14 Anti-skating Weight *
15 Anti-skating Weight Support Hook
16 Power Switch
17 Headshell with Finger Lift and Fitted Ortofon OM 5E Cartridge
18 Motor
19 45 RPM Adapter
20 Power supply (not shown)
Dear Music Lover,
Thank you for purchasing a Crosley Turntable.
In order to achieve maximum performance and reliability with this record player, you should study these instructions
for use carefully.
During assembly and adjustment of the deck, small parts could be lost if not carefully placed in a suitable area. Before
starting assembly, familiarize yourself with the parts listed above and corresponding numbers in the technical drawings
on the previous page. Separately packed items are marked with an asterisk *.
The Crosley C10 turntable is supplied with a factory fitted and adjusted cartridge.
** The following instructions for adjusting the cartridge are provided in case the cartridge is replaced by a different
model at a later date.
Set-Up
- Make sure the surface you wish to use the turntable on is flat and level before placing the turntable on it.
- Fit the drive belt (2) around the sub-platter (3) and the smaller diameter part of the motor pulley (1). Avoid getting
sweat or grease on the belt as these will deteriorate the performance and reduce the belt’s lifespan. Use absorbent cloth
or towels to remove any oil or grease from the outer edge of the sub-platter (3) and the belt. Fit the platter (4) and felt
mat over the spindle of the sub-platter (3).
- SAVE ALL PACKAGING.

Cartridge Downforce Adjustment
The counterweight (5) supplied is suitable for cartridges weighing between 3.5 - 5.5g. Adjust the downforce prior to
installing the anti-skating weight (14).
- Gently push and turn the counterweight (5) onto the rear of the tonearm. Remove the cartridge protection cap.
Lower the tonearm lift and position the cartridge in the space between tonearm rest and platter. Carefully rotate the
counterweight (5) until the tonearm balances out. The tonearm should return to the balanced position if it is moved up or
down. This adjustment must be done carefully.
- Once the tonearm is correctly balanced return it to its’ rest. Hold the counterweight (5) without moving it, and gently
rotate the downforce scale ring (5a) until the zero is in line with white line on the rear of the tonearm (15). Check
whether the arm still balances out.
- Rotate the counterweight counter clockwise (seen from the front) to adjust the downforce according to the cartridge
manufacturer’s recommendations. One mark on the scale represents 1 mN (= 0.1g / 0.1 Pond) of downforce.
NOTE: The recommended downforce for the factory fitted cartridge is 17.5mN.
Anti-skating Force Adjustment
The anti-skating force must be adjusted according to the mass of the cartridge as follows:
Anti-skating Force Groove in the Stub (15)
10 - 15mN 1st from bearing rings
15 - 20mN 2nd from bearing rings (Recommended setting for factory installed cartridge)
20mN and bigger 3rd from bearing rings
Slip the loop of the anti-skating weight’s thread over the second groove of the stub to set the correct anti-skating force
for the factory-fitted cartridge. Feed the thread through the loop of the wire support (15).
Connection to the Amplifier
The Crosley C10 uses a moving magnetic cartridge. Connect the phono out cables (12) to the phono input on your
amplifier or pre-amplifier (phono stage). Line inputs such as CD, Tuner, Tape, or Video are not suitable for
phono inputs. Make sure the amplification of the selected input matches the type of cartridge being used. The factory
installed cartridge is 47k ohms / MM-input.
NOTE: If your amplifier does not have an input suitable for phono cartridges, you will need to purchase a separate
phono amplifier for moving magnetic cartridges. This separate phono amplifier will then connect between your turntable
and your amplifier.
Main Power Connection
The power adaptor (20) is in a small white box located in the foam packing material. Unpack the power adaptor and
plug the small end into the power input jack (11) located at the underside of the turntable on the back side. Plug the
power adaptor into your power outlet.
Installing the Lid
Install the lid (9) carefully over the hinge prongs and adjust the screws until the lid stays open where you want it to
without being too stiff to open or close.
Switching On and Off
The power switch is located on the bottom of the front left corner of your turntable. Pressing the power switch (16)
alternately starts or stops the motor.
Changing Playback Speed
To play records at 45 RPM, first remove the platter (4). Using the belt hook (2a) provided, hook the belt (2) over the
larger diameter part of the motor pulley (1). Refit the platter. To revert to 33
1/3
RPM repeat the proceedings using the
smaller step on the pulley.

Maintenance and Cleaning
Your turntable requires little or no regular maintenance. Remove dust with a slightly damp antistatic cloth. Never use a
dry cloth, this will create static electricity and attract more dust! Antistatic cleaning agents are available at specialist
stores, but must be applied sparingly to avoid damage to rubber parts. It is recommended to install the needle cover
before cleaning or maintenance is carried out to avoid damage.
If the turntable is not used over a long period of time, the drive belt should be removed to prevent unequal stretching.
NOTE: Always disconnect the record player from the power supply as a precaution before maintenance!
Useful Tips
The turntable should be positioned on a low-resonance surface such as wood or multiple layer ply board to avoid
structural vibrations disturbing playback.
Installing New Cartridges
All cartridges with half inch mounting holes can be installed on this turntable. To install a new cartridge, start by
removing the two screws on the headshell, then remove the factory installed cartridge. Carefully remove the wire leads
from the factory cartridge, taking care not to damage the wire leads. Leaving the protective cover on, position the new
cartridge under the headshell, aligning the screw holes. Insert one screw in each hole and very lightly tighten (you will
need to rotate the cartridge for final adjustment before fully tightening). Connect the wire leads to the new cartridge as
listed below.
White Left channel positive (L+)
Red Right channel positive (R+)
Green Right channel negative (R-)
Blue Left channel negative (L-)
To achieve the best sound reproduction, the cartridge must be precisely aligned on the headshell. Position the included
paper alignment tool over the spindle. Carefully lift the tonearm and place the tip of the stylus on the points marked
130mm and 250mm. When the tip of the stylus is placed precisely on these points, the cartridge should be perfectly
parallel with the reference lines on the alignment tool. If necessary, gently rotate the cartridge on the headshell until the
cartridge is parallel with the reference lines at the two points. Once the new cartridge is positioned correctly, tighten the
cartridge mounting screws.
NOTE: If you are unfamiliar or uncomfortable with completing this procedure, we recommend consulting with a
professional to perform the installation.
Adjusting the Azimuth
The cartridge needle must be vertical in the record groove in order to track the groove wall modulations correctly. We
recommend the following adjustments to be made by a professional.
A small screw at the bearing end of the tonearm allows incorrect azimuth to be corrected if your needle is not mounted
exactly perpendicular to the cartridge body (which is often the case).
Loosen the screw just enough to be able to rotate the tonearm without applying force.
NOTE: Do not remove the screw completely!
When you are satisfied that the needle is vertical, retighten the screw carefully.
NOTE: Under no circumstances should the tonearm be adjusted with the needle still in the record groove! Permanent
damage may be caused to the cantilever suspension! The tonearm must be lifted each time an adjustment is made and
lowered afterwards to check the adjustment.

Technical Specifications: Crosley C10
Nominal Speeds 33
1/3
& 45RPM
Speed Variance ±0.8 %
Wow and Flutter ±0.12 %
Signal to Noise -65dB
Downforce Range 10 - 30mN
Effective Tonearm Length 8.6 “ ( 218.5mm)
Overhang 0.73in
Power Consumption
Outboard Power Supply
Dimensions (W x H x D) 16.34in x 4.65in x 12.60in, with lid open 16.34in x 14.37in x 16in
Weight 12.13lbs
Technical specifications: NP8 (ORTOFON OM 5E)
Frequency response 20Hz - 20kHz Recommended load resistance 47kohms
Channel balance <2dB Amplifier connection MM -input
Channel separation >22dB Recommended tracking force 17.5mN
Output voltage 4mV Weight 0.18 oz.
Potential Incorrect Use and Fault Conditions
Crosley turntables are manufactured to the highest standards and undergo strict quality controls before leaving the
factory. Faults that may possibly occur are not necessarily due to material or production faults but can sometimes be
caused by incorrect use or unfortunate circumstances. Therefore the following list of common fault symptoms is included.
The platter doesn’t turn although the unit is switched on:
- The unit is not connected to the main power supply.
- No power at the outlet.
- Drive belt is not installed or has slipped off.
No signal through one or other channel or both channels:
- Phono input not selected at amplifier.
- Amplifier not switched on.
- Amplifier or speakers muted.
- No connection to the speakers.
- No connection between turntable and amplifier.
- Wire leads not connected the cartridge.
Strong hum on phono input:
- No ground connection from cartridge, arm, or arm cable to amplifier or ground loop.
- Turntable too close to speakers.
Distorted or inconsistent sound from one or both channels:
- Turntable is connected to wrong input of amplifier.
- Needle or cantilever damaged.
- Belt is on wrong RPM groove.
- Drive belt overstretched or dirty.
- Platter bearing without oil, dirty or damaged.
- Dust on stylus.
- MM/MC switch on preamplifier set incorrectly.
4W
15 V 500 mA

Service
Should you encounter a problem which you are not able to alleviate or identify despite the above information, please
contact your dealer for further advice. Only when the problem cannot be resolved should the unit be sent to the
responsible distributor.
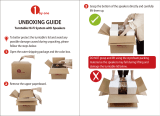
Never return a record player without making sure that is it safely disassembled and correctly packaged in the original
packaging according to the diagrams on page 6 of this booklet. Guarantee repairs will only be effected if the unit is
returned correctly packaged. For this reason we recommend keeping the original packaging.
Please remove these parts and pack them separately: lid (10), anti-skating weight (16) platter (5), belt (3). Insert the
transport lock for the tonearm prior to carefully packaging the record player.
LIMITED MANUFACTURERS WARRANTY
Crosley Radio, Inc. warrants the product to be free from defects in material and workmanship under normal use for a
period of one year from the original date of purchase. This warranty is not transferable. If the product is determined to
be defective during the warranty period, the unit will be repaired or replaced at Crosley Radio’s sole discretion. This
warranty covers manufacturing defects and normal consumer use and does NOT cover damage or failure as a result
of abuse, accident, alterations, misuse, neglect, abnormal wear and tear, inadequate maintenance, commercial or
unreasonable use, damage caused by power surges, mishandling, accident, acts of God or attempted repair by an
unauthorized service agent. Also not covered are cosmetic damages, cords and antennas.
Should this product fail to function in a satisfactory manner, it is best to first contact our technical support team for
assistance to ensure it is being operated properly.
Tech Support and Product Questions
CALL TOLL FREE: 1.888.CROSLEY (1.888.276.7539)
If it is indeed determined that the unit is no longer operational, please contact the retailer from which it was purchased.
In many cases, your retailer will be able to provide a replacement unit at no charge within the scope of their return
policy. If the retail return period has expired, please contact Crosley Radio directly to participate in the one year
protection program.
Crosley 1 Year Warranty Program
CALL TOLL FREE: 1.800.926.7801
You will need to contact our offices M-F 8am-5pm EST to obtain an RA (Return Authorization) Number. You will be
instructed to send the unit (at your cost) to our offices in its original packaging (or reasonable substitute to prevent
damage.) You will need to clearly mark your RA number on the outside packaging and include the original sales receipt
(or a copy) indicating date of purchase, amount paid, and place of purchase. You will also need to include your full
name, shipping address and daytime contact number. You will be instructed to include a check or money order for any
applicable return shipping and handling fees. A Crosley advisor will confirm the fees associated with your product’s
shipping size/weight. Returned products will not be shipped to PO Boxes. Crosley Radio will not be responsible for
delays or unprocessed claims resulting from a purchaser’s failure to provide any or all of the necessary information.
There are no express warranties except as listed above.
The purchaser’s bill of sale is the only proof of warranty entitlement.
This warranty gives the purchaser specified legal rights in addition to any rights which may vary from state to state.
In accordance with the “Moss-Magnuson Warranty Act” of July 10, 1975, this is termed a “limited warranty” which in no way
compromises Crosley Radio’s high standards of quality and workmanship.

CROSLEY®
/