Page is loading ...

®itchen_kid ®
WINE CELLAR
OVERLAY MODEL
For questions about features, operation/performance, parts, accessories or service, call: 1-800-422-1230
In Canada, call for assistance 1-800-461-5681, for installation and service, call: 1-800-807-6777 or visit our website at...
www.kitchenaid.com or www.KitchenAid.ca
CAVE A VIN
MODELE OVERLAY
Au Canada, pour assistance composez le 1-800-461-5681, pour installation ou service composez le 1-800-807-6777 ou visitez notre site web &...
www.KitchenAid.ca
Table of Contents/Table des matieres ............................................................................. 2
2300247

TABLE OF CONTENTS
WINE CELLAR SAFETY ................................................................. 2
Proper Disposal of Your Old Wine Cellar .................................... 3
INSTALLATION REQUIREMENTS ................................................ 3
Tools and Parts ............................................................................ 3
Custom Overlay Frame ................................................................ 3
Location Requirements ................................................................ 5
Electrical Requirements ............................................................... 5
Unpack the Wine Cellar ............................................................... 5
Install Custom Overlay Frame ...................................................... 5
Door Closing ................................................................................. 8
Base Grille .................................................................................... 8
WINE CELLAR USE ........................................................................ 8
Normal Sounds ............................................................................ 8
Using the Control ......................................................................... 8
Wine Racks .................................................................................. 9
Stocking the Wine Cellar .............................................................. 9
Lighting the Wine Cellar ............................................................... 9
WINE CELLAR CARE ..................................................................... 9
Cleaning ........................................................................................ 9
Changing the Light Bulb ............................................................ 10
Vacation and Moving Care ......................................................... 10
TROUBLESHOOTING .................................................................. 10
ASSISTANCE OR SERVICE ......................................................... 11
In the U.S.A ................................................................................ 11
In Canada ................................................................................... 11
Accessories ................................................................................ 12
WAR RANTY .................................................................................. 12
TABLE DES MATIERES
Sr!:CURIT¢: DE LA CAVE ._,VIN .................................................... 13
Mise au rebut de votre vieille cave & vin .................................... 13
EXIGENCES D'INSTALLATION ................................................... 14
Outillage et pieces ...................................................................... 14
Cadre decoratif personnalise ..................................................... 14
Emplacement d'installation ........................................................ 15
Sp6cifications electriques .......................................................... 16
Deballage de la cave a vin ......................................................... 16
Installation du cadre decoratif personnalise .............................. 16
Fermeture de la porte ................................................................. 19
Grille de la base .......................................................................... 19
UTILISATION DE LA CAVE ._,VIN ............................................... 19
Sons normaux ............................................................................ 19
Utilisation de la commande ........................................................ 20
Casiers a vin ............................................................................... 20
Stockage dans la cave a vin ...................................................... 20
¢clairage de la caisse ................................................................. 20
ENTRETIEN DE LA CAVE A VIN .................................................. 21
Nettoyage ................................................................................... 21
Changement de I'ampoule d'eclairage ...................................... 21
Precautions a prendre pour les
vacances et avant un demenagement ....................................... 21
DI_PANNAGE ................................................................................. 22
ASSISTANCE OU SERVICE ......................................................... 23
Aux Ctats-Unis ............................................................................ 23
Au Canada .................................................................................. 23
Accessoires ................................................................................ 23
GARANTIE ..................................................................................... 24
WINE CELLAR SAFETY
Your safety and the safety of others are very important.
We have provided many important safety messages in this manual and on your appliance. Always read and obey all safety
messages.
This is the safety alert symbol.
This symbol alerts you to potential hazards that can kill or hurt you and others.
All safety messages will follow the safety alert symbol and either the word "DANGER" or "WARNING."
These words mean:
You can be killed or seriously injured if you don't immediately
follow instructions.
You can be killed or seriously injured if you don't follow
instructions.
All safety messages will tell you what the potential hazard is, tell you how to reduce the chance of injury, and tell you what can
happen if the instructions are not followed.

IMPORTANT SAFETY INSTRUCTIONS
WARNING: To reduce the risk of fire, electric shock, or injury when using your wine cellar, follow these basic precautions:
• Plug into a grounded 3 prong outlet.
• Do not remove ground prong.
• Do not use an adapter.
• Do not use an extension cord.
• Disconnect power before servicing.
• Replace all parts and panels before operating.
• Remove doors from your old wine cellar.
• Use nonflammable cleaner.
• Keep flammable materials and vapors, such as gasoline,
away from wine cellar.
• Use two or more people to move and install wine cellar.
SAVE THESE INSTRUCTIONS
Proper Disposal of Your Old Wine Cellar
Before you throw away your old wine cellar:
• Take off the door.
• Leave the racks in place so that children may not easily climb
inside.
IMPORTANT: Child entrapment and suffocation are not problems
of the past. Junked or abandoned wine cellars are still dangerous
- even if they will sit for "just a few days." Ifyou are getting rid of
your old wine cellar, please follow these instructions to help
prevent accidents.
INSTALLATION REQUIREMENTS
TOOLS NEEDED:
Gather the required tools and parts before starting installation.
Read and follow the instructions provided with any tools listed
here.
• Hand drill or electric drill
(properly grounded)
• 7/e4"Drill bit
• 5/16"Drill bit
• Chamfer bit
• #16 Drill bit
• 7/e4"Allen wrench
• Phillips screwdriver
• Flat-blade screwdriver
• Scissors
• Masking tape
• Tape measure
• Petroleum jelly
PARTS NEEDED:
Custom Overlay Frame--See "Overlay Frame Dimensions."
Hardware (Optional)
PARTS SUPPLIED:
• Pivot plate (top) • #6 x 1/2"Flat-head
screws (2)
• 8 mm nylon insert (2)
• #6 x 1" Pan-head • 0.093 x 3/4"x 8 ft foam
screws (1O) tape
If you plan to install a custom overlay frame, you will need to
create the frame yourself or consult a qualified cabinetmaker or
carpenter. See "Overlay Frame Dimensions" for frame
specifications in creating your overlay frame.
IMPORTANT:
• The thickness of the overlay frame must be 3/4"(1.91 cm).
• Overlay frame must not weigh more than 20 Ibs. (9.07 kg).
• Overlay frames weighing more than recommended may
cause damage to your wine cellar.
• Before creating the custom overlay frame, determine the
direction you want the door to swing. Custom overlay
frames are hinge specific. A frame that is created for a
right-hinge door swing cannot be used for a left-hinge
door swing.

Overlay Frame Rear View
Rear view of overlay frame shows right-hand hinge. Mirror the
image for left-hand hinges. See "Pivot Plate Relief" for additional
dimensions.
211/2''
(54.6 crn)
H
233/4''
(60.3 cm)
i
30"
(76.2 crn)
I
273/4 ''
(70.5 cm)
A. Pivot plate relief
Overlay Frame TopView
211/2''
(54.6 crn)
_'///_
233/4" " I
(60,3 cm)
Pivot Plate Relief
1. Route the top and back of the overlay frame to create the
pivot plate relief as shown.
2. Drill two screw holes in the back of the pivot plate relief as
shown.
Side View Back View
1/8"
(3.18 mm)
13/32"
(10.32
R 1/32" I A
/ (0.79 ram) (3.18 ram) ....
117/32"
(3,89 cm)
m 3/4.
(1.91 cm)
7/16"
(11.11 mm) R 1/8"
13/16" (3.16 ram)
(2.06 cm)
I
A. _G" diam. x _" deep 7.94 mm x 1.25 cm)
Door Hinge Holes
Using a #16 drill bit, drill an 11/16"(1.75 cm) deep hole into the
top of the overlay frame for the top hinge pin as shown.
Top View
Ax_
%,,J
(9.53 mm)
13/32"
(10.32 ram)
A. Top hinge-pin hole
Drill a %6" diam x 1/4"deep (7.94 mm x 6.35 mm) hole in the
bottom of the overlay frame for the bottom hinge as shown
NOTE: CHAMFER: 1/32"(0.79 mm) x 45°.
Bottom View
3/8"
(9.53 turn) I I
A. Bottom hinge-pin hole

Explosion Hazard
Keep flammab{e materiams and vapors, such as
gaso}ine, away from wine ceHaro
Failure to do so can resu}t in death, expmosion, or fire.
To ensure proper ventilation for your wine cellar, allow for a 1/4"
(0.64 cm) space on each side and at the top. When installing your
wine cellar next to a fixed wall, leave 21/2'' (6.35 cm) minimum
clearance on each side to allow for the door to swing open.
NOTE: It is recommended that you do not install the wine cellar
near an oven, radiator, or other heat source. Do not install in a
location where the temperature will fall below 55°F (13°C). For
best performance, do not install the wine cellar behind a cabinet
door or block the base grille.
,,
Emectrica{ Shock Hazard
Plug into a grounded 3 prong outlet.
Do not remove ground prong.
Do not use an adapter.
Do not use an extension cord.
Fai{are to follow these instructions can result in death,
fire, or emectrica{ shock.
Before you move your wine cellar into its final location, it is
important to make sure you have the proper electrical
connection.
Recommended grounding method
A 115 Volt, 60 Hz., AC only 15- or 20-amp fused, grounded
electrical supply is required. It is recommended that a separate
circuit serving only your wine cellar be provided. Use an outlet
that cannot be turned off by a switch. Do not use an
extension cord.
NOTE: Before performing any type of installation, cleaning, or
removing a light bulb, unplug wine cellar or disconnect power.
;: t
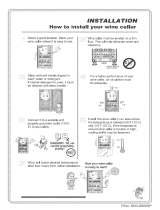
Remove the Packaging
Remove tape and glue residue from surfaces before turning
on the wine cellar. Rub a small amount of liquid dish soap
over the adhesive with your fingers. Wipe with warm water
and dry.
Do not use sharp instruments, rubbing alcohol, flammable
fluids, or abrasive cleaners to remove tape or glue. These
products can damage the surface of your wine cellar. For
more information, see "Wine Cellar Safety."
• Properly dispose of packaging.
When Moving Your Wine Cellar:
Your wine cellar is heavy. When moving the wine cellar for
cleaning or service, be sure to protect the floor. Always pu[[
the wine ce{Iar straight out when moving it. Do not wiggle
or "walk" the wine cellar when trying to move it, as floor
damage could occur.
Clean Before Using
After you remove all of the packaging materials, clean the inside
of your wine cellar before using it. See the cleaning instructions in
"Wine Cellar Care."
IMPORTANT:
• Create custom overlay frame according to the specifications
in the "Custom Overlay Frame" section.
• KitchenAid is not responsible for the removal or addition of
molding or decorative frames that would prevent the wine
cellar from being serviced.
Unpack the Door
1=
2.
Remove the wine cellar door from the box.
Remove the cardboard and set aside for later use. Be sure to
properly dispose of all packaging materials when installation
is complete.
NOTE: Place the cardboard on a level floor and use during
assembly to protect the wine cellar door and overlay frame
from scratches.

Remove the Gasket
1. Place the wine cellar door on the cardboard with the door
gasket facing upward.
2=
Remove the door gasket by pulling from the middle and
proceeding outward, moving toward the edge.
NOTE: To keep the door gasket from tearing, use care when
pulling it out of the groove.
B
we
t'
A,,I
.....i.....
I I
A.Door
B. Gasket-outside edges
C.Gasket-middle
Fit Overlay Frame
1. Turn the door over. Fully seat the overlay frame on all four
sides.
2. If there is a gap between the overlay frame and door front,
apply foam tape to the overlay frame. See "Apply Foam
Tape."
A, Not fully seated B. Little or no gap C, Objectionable gap
NOTE: If the overlay frame does not fit securely on all four sides,
review the instructions for "Overlay Frame Dimensions."
Apply Foam Tape (if required}
IMPORTANT:
• Trim each piece of tape after applying it to the overlay
frame.
• Do not allow any overlapping of the foam tape. Damage
to the overlay frame can occur if the foam tape is not
trimmed and fitted correctly.
Cut the foam tape into four pieces: two the width of and two
the height of the overlay frame.
Remove the adhesive protection-strip from one piece of the
cut foam tape. Align the edge of the foam tape with the inside
edge of the overlay frame, and adhere tape to the overlay.
Repeat Step 2 for all four sides.
A. Inside edge
Attach the Pivot Plate
1. Tap the nylon inserts into the two holes in the overlay frame.
2. Use two #6 screws to attach the pivot plate to the top of the
overlay frame.
A
\
C
i, ¸¸¸¸,.....
A. Overlay frame
B. 8 mm nylon inserts
C. Pivot plate
D. #6 x _" flat-head screws
If required, attach optional cabinet handle to the overlay
frame.
NOTE: If an optional cabinet handle is installed, be sure to
countersink the mounting screws.
Attach the Overlay Frame to the Door
1. Secure the front of the door to the back of the overlay frame
with masking tape.
NOTE: Ensure that all four edges are properly aligned.
B C
A. Back of overlay frame
B. Masking tape
C. Door frame
D. Front of overlay frame

2=
3.
4.
Place the door and overlay frame face down on the
cardboard.
Use the holes in the door frame as guides and drill pilot holes
for the screws that will attach the overlay frame to the door.
IMPORTANT:
• Do not use a drill bit larger than 7/_,,.
• Do not drill deeper than %" (9.53 mm).
• For correct door operation, align the overlay frame and
door frame properly.
Using ten of the #6 x 1" pan-head screws attach the door to
the overlay frame.
_ A ........................
A. #6 x 1" pan-head screws (10)
5. Remove the masking tape holding the overlay frame to the
door frame.
Reinstall the Gasket
1. Starting at the corners and working toward the center of each
side of the door, push the door gasket back into place.
2. Be sure the door gasket is fully installed on all four sides of
the door.
Install the Door
IMPORTANT: To ensure proper operation, the pivot posts must
be clean and the closers must be clean and greased with
petroleum jelly.
1. Remove the door closer-top and door closer-bottom from
the bottom hinge. Clean thoroughly and apply petroleum jelly
to the mating surfaces of the closers.
2. Install the door closer-bottom and door closer-top on the
bottom hinge.
IMPORTANT:
• Be sure to properly align the door closer-bottom bosses
with the holes in the bottom hinge.
• Be sure to properly align the door closer-top bosses with
the holes in the hinge plate.
3. Position the door onto the door closer assembly.
5=
A
B
A. Door frame E. Pivot post
B. Pivot plate F. Bottom hinge
C. Door closer-top G. Bosses
D. Door closer-bottom
Position the door frame and install the pivot post on the top
hinge. Using a%4" Allen wrench, secure the pivot post.
A. Pivot post
B. Top hinge
C. Top pivot plate
Adjust the door frame as needed for proper closure. See
"Door Closing."

Door Closing
Your wine cellar has four leveling legs. If your wine cellar seems
unsteady or you want the door to close more easily, adjust the
wine cellar's tilt using the instructions below.
3. Pull the base grille toward you.
A
E_ectrica_ Shock Hazard
P_ug into a grounded 3 prong outlet.
Do not remove ground prong.
Do not use an adapter.
Do not use an extension cord.
Failure to follow these instructions can result in death,
fire, or electrical shock.
1. Plug into a grounded 3 prong outlet.
2=
3.
Move the wine cellar into its final location.
Turn the leveling legs to the right to lower the wine cellar or
turn the leveling legs to the left to raise it. It may take several
turns of the leveling legs to adjust the tilt of the wine cellar.
NOTE: Having someone push against the top of the wine
cellar takes some weight off the leveling legs. This makes it
easier to adjust the leveling legs.
A. Screws
Replace the Base Grille:
1. Open the wine cellar door.
2. Position the base grille so that the holes are aligned and
replace the three screws.
WINE CELLAR USE
Your new wine cellar may make sounds that your old one didn't
make. Because the sounds are new to you, you might be
concerned about them. Most of the new sounds are normal. Hard
surfaces, such as the flooring and surrounding structures, can
make the sounds seem louder. The following describes the kinds
of sounds and what may be making them.
• Your wine cellar is designed to run more efficiently to keep
your food items at the desired temperatures and to minimize
energy usage. The high efficiency compressor and fans may
cause your wine cellar to run longer than your old one. You
may also hear a pulsating or high-pitched sound from the
compressor or fans adjusting to optimize performance.
• Rattling noises may come from the flow of refrigerant or items
stored inside the wine cellar.
• As each cycle ends, you may hear a gurgling sound due to
the refrigerant flowing in your wine cellar.
• You may hear water running into the drain pan when the wine
cellar is defrosting.
• You may hear clicking sounds when the wine cellar starts or
stops running.
4.
Open the door and check to make sure that it closes as easily
as you like. If not, tilt the wine cellar slightly more to the rear
by turning both front leveling screws to the right. It may take
several more turns, and you should turn both leveling legs the
same amount.
Remove the Base Grille:
1. Open the wine cellar door.
2. Using a Phillips screwdriver, remove the three screws
attaching the base grille to the wine cellar.
For your convenience, your wine cellar control is preset at the
factory. When you first install your wine cellar, make sure that the
control is still preset to the mid-setting as shown.
Colder
Adjusting Controls
The mid-setting indicated in the previous section should be
correct for normal usage. The control is set correctly when
beverages are as cold as you like.

Ifyouneedtoadjustthetemperature,waitatleast24hours
betweenadjustmentsandthenrecheckthetemperature.
Tomakethewinecellarcolder,adjustthecontroltothenext
highersetting.Tomakethewinecellarlesscold,adjustthe
controltothenextlowersetting•
ToRemove and Replace the Wine Racks
1. Pull the wine rack forward, lifting it up and out of the rack
supports.
2. Replace the rack by inserting the rack into the supports and
sliding it toward the rear of the wine cellar.
Wood Trim
IMPORTANT: To prevent permanent damage to the inner liner of
your wine cellar, the wine rack wood trim must be removed from
the unit for staining or finishing. Allow the stain or finish to dry
thoroughly for a minimum of 24 hours or in accordance with the
manufacturers directions whichever is longer, prior to reinstalling
the racks. Failure to do so may cause the inner liner to have a
permanent odor which is not covered under the warranty.
Your wine cellar has a natural wood trim on the wine racks. The
wood trim is coated with a clear vinyl sealer that will adequately
protect the wood in normal usage. You may choose to stain the
wood trim or to apply a clear finish coat. If you opt to stain or
coat the wood trim, remove the racks from the wine cellar before
staining. Allow the racks to dry for a minimum of 24 hours or in
accordance with the manufacturers directions, whichever is
longer, before returning them to the wine cellar.
NOTE: For optimum wine storage, place red wines at the top of
the wine cellar, white wines in the center and sparkling wines at
the bottom.
To Stock the Wine Cellar
1. Start stocking the wine cellar with the bottom display rack.
2. Starting on the left-hand side, place the first bottle on the
bottom of the rack with the neck of the bottle facing the back
of the wine cellar.
3. Place the next bottle on its side with the neck of the bottle
facing the front of the wine cellar.
t I
• V - c..'
4.
5.
6.
8.
9.
Alternate in this manner until the display rack is full•
Pull the next rack forward•
Starting on the left-hand side, place the first bottle on the
rack with the neck of the bottle facing forward.
Place the next bottle on the shelf with the neck of the bottle
facing the rear of the wine cellar•
/
Continue alternating in this manner until the rack is full,
Slide the rack into place and continue stocking each
remaining rack as described above.
The wine cellar has an interior light that comes on any time the
door is opened. You may also turn the light on at any time by
opening the door and pressing the exterior switch located beside
the temperature control knob on the base grille.
NOTE: Leaving the light on for an extended period of time will
slightly increase the temperature of the wine cellar•
WINE CELLAR CARE
E×p_oeion Hazard
Use nonflammable c_eaner.
Failure to do so can result in death, e×p_osion, or fire.
Clean the wine cellar about once a month to prevent odors from
building up. Wipe up spills immediately.
To clean your wine cellar:
1. Unplug wine cellar or disconnect power•
2. Remove all racks from inside the wine cellar•
3. Hand wash, rinse, and dry removable parts and interior
surfaces thoroughly. Use a clean sponge or soft cloth and a
mild detergent in warm water.
• Do not use abrasive or harsh cleaners such as window
sprays, scouring cleansers, flammable fluids, cleaning
waxes, concentrated detergents, bleaches or cleansers
containing petroleum products on plastic parts, interior
and door liners or gaskets• Do not use paper towels,
scouring pads, or other harsh cleaning tools. These can
scratch or damage materials.

4.
• To help remove odors, you can wash interior walls with a
mixture of warm water and baking soda (2 tbs to 1 qt
[26 g to 0.95 L] of water).
Wash exterior with a clean sponge or soft cloth and a mild
detergent in warm water. Do not use abrasive or harsh
cleaners. Dry thoroughly with a soft cloth.
• To keep your stainless steel wine cellar looking like new
and to remove minor scuffs or marks, it is suggested that
you use the manufacturer's approved Stainless Steel
Cleaner & Polish. To order the cleaner, see the
"Accessories" section.
IMPORTANT: This cleaner is for stainless steel parts only!
• Do not allow the Stainless Steel Cleaner & Polish to come
into contact with any plastic parts such as the trim pieces
or door gaskets. Ifaccidental contact does occur, clean
plastic part with a sponge and mild detergent in warm
water. Dry thoroughly with a soft cloth.
5. Replace the racks.
6. Clean the condenser coils regularly. They are located behind
the base grille. Coils may need to be cleaned as often as
every other month. This may help save energy.
• Remove the base grille. See "Base Grille."
• Use a vacuum cleaner with an extended attachment to
clean the condenser coils when they are dusty or dirty.
• Replace the base grille.
7. Plug in wine cellar or reconnect power.
NOTE: Not all appliance bulbs will fit your wine cellar. Be sure to
replace the bulb with one of the same size, shape, and wattage.
To change the light bulb:
1. Unplug wine cellar or disconnect power.
2. Slide the light shield toward the tab.
3. Press the tab down and lift the opposite end of the light
shield up.
4. Replace the bulb.
5. Reinstall the light shield by inserting the tab end first. Then
lower the light shield until it clicks into place.
A. Tab
6. Plug in wine cellar or reconnect power.
Vacations
If you choose to turn the wine cellar off before you leave, follow
these steps.
1. Remove all wine bottles from the wine cellar.
2. Unplug the wine cellar.
3. Clean the wine cellar. See "Cleaning."
4. Tape a rubber or wood block to the top of the door to prop it
open far enough for air to get in. This stops odor and mold
from building up.
Moving
When you are moving your wine cellar to a new home, follow
these steps to prepare it for the move.
1. Remove all wine bottles from the wine cellar.
2. Unplug the wine cellar.
3. Clean, wipe, and dry it thoroughly.
4. Take out all removable parts, wrap them well, and tape them
together so they don't shift and rattle during the move.
5. Tape the doors shut and tape the power cord to the wine
cellar.
When you get to your new home, put everything back and refer to
the "Installation Instructions" section for preparation instructions.
TROUBLESHOOTING
Trythe solutions suggested here first in order to avoid the cost of an unnecessary service call.
• Has a light bulb burned out? Replacewith an appliance
Your wine cellar will not operate
• Is the power supply cord unplugged? Plug into a grounded
3 prong outlet.
• Has a household fuse blown, or has a circuit breaker
tripped? Replace the fuse or reset the circuit. •
• Is the Wine Cellar Control turned to the OFF position? See
"Using the Control." •
The lights do not work
• Is the power supply cord unplugged? Plug into a grounded
3 prong outlet.
• Is a light bulb loose in the socket? Unplug wine cellar or
disconnect power. Gently remove the bulb and reinsert. Plug
in wine cellar or reconnect power.
bulb of the same wattage, size, and shape. See "Changing
the Light Bulb."
There is water in the defrost drain pan
Is the wine cellar defrosting? The water will evaporate. It is
normal for water to drip into the defrost pan.
Is it more humid than normal? Expect that the water in the
defrost pan will take longer to evaporate. This is normal when
it is hot or humid.
The motor seems to run too much
Is the temperature outside hotter than normal? Expect the
motor to run longer under warm conditions. At normal
temperatures, expect your motor to run about 40% to 80% of
the time. Under warmer conditions, expect it to run even
more of the time.
10

Is the door opened often? Expect the motor to run longer
when this occurs. In order to conserve energy, try to get
everything you need out of the wine cellar at once, keep wine
bottles positioned label side up so that they are easy to find,
and close the door as soon as the wine is removed.
• Is the control set correctly for the surrounding
conditions? See "Using the Control."
• Is the door closed completely? Push the door firmly shut. If
it will not shut all the way, see "The door will not close
completely" later in this section.
• Are the condenser coils dirty? This prevents air transfer and
makes the motor work harder. Clean the condenser coils. See
"Cleaning."
Temperature is too warm
Is the door opened often? Be aware that the wine cellar will
warm when this occurs. In order to keep the wine cellar cool,
try to get everything you need out of the wine cellar at once,
keep wine bottles positioned label side up so that they are
easy to find, and close the door as soon as the wine is
removed.
• Is the control set correctly for the surrounding
conditions? See "Using the Control."
• Is the base grille blocked? For best performance, do not
install the wine cellar behind a cabinet door or block the base
grille.
There is interior moisture buildup
Is the door opened often? To avoid humidity buildup, try to
get everything you need out of the wine cellar at once, keep
wine bottles positioned label side up so that they are easy to
find, and close the door as soon as the wine is removed. When
the door is opened, humidity from the room air enters the wine
cellar. The more often the door is opened, the faster humidity
builds up, especially when the room itself is very humid.
• Is it humid? It is normal for moisture to build up inside the
wine cellar when the air is humid.
• Is the control set correctly for the surrounding
conditions? See "Using the Control."
The door is difficult to open
• Is the gasket dirty or sticky? Clean the gasket and the
surface that it touches. Rub a thin coat of paraffin wax on the
gasket following cleaning.
The door will not close completely
• Are the racks out of position? Put the racks back into their
correct positions. See "Wine Cellar Use" for more
information.
• Is the gasket sticking? Clean the gasket and the surface
that it touches. Rub a thin coat of paraffin wax on the gasket
following cleaning.
ASSISTANCE OR SERVICE
Before calling for assistance or service, please check
"Troubleshooting." It may save you the cost of a service call. If
you still need help, follow the instructions below.
When calling, please know the purchase date and the complete
model and serial number of your appliance. This information will
help us to better respond to your request.
If you need replacement parts
If you need to order replacement parts, we recommend that you
only use factory specified replacement parts. Factory specified
replacement parts will fit right and work right because they are
made with the same precision used to build every new
KITCH ENAID® appliance.
To locate factory specified replacement parts in your area, call us
or your nearest designated service center.
Call the KitchenAid Customer eXperience Center
toll free: 1-800-422-1230.
Our consultants provide assistance with:
• Features and specifications on our full line of appliances.
• Installation information.
• Use and maintenance procedures.
• Accessory and repair parts sales.
• Specialized customer assistance (Spanish speaking, hearing
impaired, limited vision, etc.).
• Referrals to local dealers, repair parts distributors, and
service companies. KitchenAid designated service
technicians are trained to fulfill the product warranty and
provide after-warranty service, anywhere in the United States.
To locate the KitchenAid designated service company in your
area, you can also look in your telephone directory Yellow Pages.
For further assistance
If you need further assistance, you can write to KitchenAid with
any questions or concerns at:
KitchenAid Brand Home Appliances
Customer eXperience Center
553 Benson Road
Benton Harbor, M149022-2692
Please include a daytime phone number in your correspondence.
Call the KitchenAid Canada Customer Interaction Centre toll free:
1-800-461-5681 Monday to Friday 8:00 a.m. - 6:00 p.m. (EST).
Saturday 8:30 a.m. - 4:30 p.m. (EST).
Our consultants provide assistance with:
• Features and specifications on our full line of appliances.
• Referrals to local dealers.
For service in Canada
Call 1-800-807-6777. KitchenAid Canada designated service
technicians are trained to fulfill the product warranty and provide
after-warranty service, anywhere in Canada.
For further assistance
If you need further assistance, you can write to KitchenAid
Canada with any questions or concerns at:
KitchenAid Canada
Customer Interaction Centre
1901 Minnesota Court
Mississauga, Ontario L5N 3A7
Please include a daytime phone number in your correspondence.
11

To order accessories, call 1-800-442-9991 and ask for the
appropriate part number listed below or contact your authorized
KitchenAid dealer. In Canada, call f-800-807-6777.
Stainless Steel Cleaner & Polish
Order Part #4396095
KITCHENAID ®WINE CELLAR WARRANTY
ONE-YEAR FULL WARRANTY ON WINE CELLAR
For one year from the date of purchase, when this wine cellar is operated and maintained according to instructions attached to or
furnished with the product, KitchenAid will pay for factory specified replacement parts and repair labor costs to correct defects in
materials or workmanship. Service must be provided by a KitchenAid designated service company.
SECOND THROUGH FIFTH YEAR FULL WARRANTY ON
CAVITY LINER AND SEALED REFRIGERATION SYSTEM PARTS AS LISTED
In the second through fifth years from the date of purchase, when this wine cellar is operated and maintained according to instructions
attached to or furnished with the product, KitchenAid will pay for replacement or repair of the wine cellar/freezer cavity liner (including
labor costs) if the part cracks due to defective materials or workmanship. Service must be provided by a KitchenAid designated service
company.
Also, in the second through fifth years from the date of purchase, KitchenAid will pay for factory specified replacement parts and repair
labor costs to correct defects in materials or workmanship in the sealed refrigeration system. These parts are: compressor, evaporator,
condenser, dryer, and connecting tubing. Service must be performed by a KitchenAid designated service company.
KitchenAid or KitchenAid Canada will not pay for:
1. Service calls to correct the installation of your wine cellar, to instruct you how to use your wine cellar, to replace house fuses or
correct house wiring or plumbing, to replace light bulbs, or replacement water filters other than as noted above.
2. Repairs when your wine cellar is used in other than normal, single-family household use.
3. Pickup and delivery. Your wine cellar is designed to be repaired in the home.
4. Damage resulting from accident, alteration, misuse, abuse, fire, flood, improper installation, acts of God, or use of products not
approved by KitchenAid or KitchenAid Canada.
5. Any food loss due to product failure.
6. Repairs to parts or systems resulting from unauthorized modifications made to the appliance.
7. Replacement parts or repair labor costs for units operated outside the United States or Canada.
8. In Canada, travel or transportation expenses for customers who reside in remote areas.
KITCHENAID OR KITCHENAID CANADA SHALL NOT BE LIABLE FOR INCIDENTAL OR CONSEQUENTIAL DAMAGES.
Some states or provinces do not allow the exclusion or limitation of incidental or consequential damages, so this exclusion or limitation
may not apply to you. This warranty gives you specific legal rights, and you may also have other rights which vary from state to state or
province to province.
Outside the 50 United States and Canada, this warranty does not apply. Contact your authorized KitchenAid dealer to
determine if another warranty applies.
If you need service, first see the "Troubleshooting" section of this book. After checking "Troubleshooting," additional help can be found
by checking the "Assistance or Service" section or by calling the KitchenAid Customer eXperience Center, 1-800-422-1230 (toll-free),
from anywhere in the U.S.A. In Canada, contact your designated KitchenAid Canada service company or call 1-800-807-8777. 10/04
Keep this book and your sales slip together for future
reference. You must provide proof of purchase or installation
date for in-warranty service.
Write down the following information about your wine cellar to
better help you obtain assistance or service if you ever need it.
You will need to know your complete model number and serial
number. You can find this information on the model and serial
number label located on the inside wall of the wine cellar
compartment.
Dealer name
Address
Phone number
Model number
Serial number
Purchase date
12
/