-3-
COMPONENT LIST
Food-Grade Silicone Spray 03-0101-W
Hog Ring Pliers 47-1401
Hog Rings (500 count) 47-1452
-10-
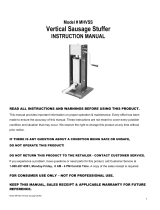
DIAGRAM PART PART
NUMBER DESCRIPTION NUMBER
1 Handle 86-0710
2 Plunger 86-1126
3 Plunger Seal 86-0716
4 Pressure Release Valve (4 Piece Set) 86-0715
5 Stainless Steel Funnel Set (4 Funnels) 86-0720
6 Stainless Steel Canister 7 lb 86-0712 11 lb 86-1112
7 Front Ring Nut 86-0721
8 Canister Mounting Hardware Kit (4 Sets) 86-0722
9 Plunger Shaft 7 lb 86-0711 11 lb 86-1111
10 Plunger Bolt 86-1125
11 Gear Housing Cover with Hardware Kit 86-1113
12 Gear Housing Cover Bottom Plate
with Hardware Kit 86-1114
13 Gear Housing with Hardware Kit 86-1117
14 Main Driving Gear 86-1119
15 Slow Speed Control Gear 86-1120
16 Fast Speed Control Gear 86-1121
17 Rubber Foot (4 Piece Set) 86-0717
ACCESSORIES Sold Separately
If any components of this unit are broken or the unit does not operate
properly, call Weston Products LLC Toll Free at
1-800-814-4895
Monday thru Friday 8:00am-5:00pm EST. Outside the U.S. call 440-638-3131
These products and many more products can be ordered by visiting
WestonProducts.com or by calling
Weston Products LLC Toll Free at 1-800-814-4895
Monday thru Friday 8:00am-5:00pm EST. Outside the U.S. call 440-638-3131
SAUSAGE INFORMATION
MEAT SELECTION FOR SAUSAGE MAKING
Sausage making has evolved over many years and generations, and as a result there are countless types
of sausage you can make using the basic ingredients of meat, fat and a few carefully blended spices.
Following are a few simple guidelines that will help you make the best tasting sausage possible.
Any type of meat can be used for making sausage: pork, beef, bison, moose and caribou, even antelope
make great sausage. It is important when preparing venison or other red game meats to trim all the fat
from the meat, as red game tallow will turn rancid in as few as ve days. Replace the fat with either pork
or beef fat, depending on the type of product you are making, at a ratio of 1 pound (0.5 kg) of fat for every
4 pounds (1.8 kg) of game meat.
The fat content of your sausage will affect the taste, texture, cooking characteristics and shelf life of your
product. Most commercially made sausage has a fat content of about 20%. Using less than 12% fat will
result in a very dry tasting sausage, while using more than 20% may result in a sticky avorless sausage
that will be difcult to cook.
CURING
It is important to properly cure meats to preserve meat and poultry, and to destroy undesirable
microorganisms on the meat surfaces that cause spoilage and food born illnesses. There are many steps
that help in this process, including smoking, cooking, drying, chilling and the addition of cure ingredients.
The oldest means of accomplishing this is by introducing salt into the meat. The resistance of bacteria
to salt varies widely among different types of bacteria. The growth of some bacteria is inhibited by salt
concentrations as low as 3%, e.g., Salmonella, whereas other types are able to survive in much higher salt
concentrations, e.g., Staphylococcus. Fortunately, the growth of many undesirable organisms normally
found in cured meat and poultry products is inhibited at low concentrations of salt.
Modern curing is based on Nitrates and is very scientic. The best way to ensure proper curing is to
purchase one of the many commercially available curing agents from either a grocery store or your local
butcher. A very common cure is Prague Powder, which is available in two types (#1 and #2).
CASING
There are many different types of casings available, the right choice depends on personal preference as
well as the type of sausage you wish to make. For most sausages, your choices are natural or collagen.
Don’t let the names fool you; collagen casings are not a synthetic product . They are made from beef skin
and other tissues. Collagen casings are uniform in size and texture and require almost no preparation.
“Natural” casings are the intestines of lamb, sheep, hogs or beef. They are less uniform in size and require
substantial preparation. For those reasons, more than 75% of commercially made sausage in the U.S. is
made with collagen casing. There are also brous non-edible casings that are used for some varieties of
smoked sausages and bolognas.
TYPES OF SAUSAGE
Most sausages fall into one of four categories: Fresh, Smoked, Cooked or Dried. All sausages, except
dried, require refrigerated storage. There is also a sub-category of uncooked smoked sausages.
Among the fresh and uncooked smoked sausages, you will nd such avors as kielbasa or Polish sausage,
Italian sausage, breakfast sausage and many others. Both fresh and uncooked smoked sausages require
cooking before eating and also require refrigerated storage.
Smoked and cooked sausages include salami, bologna, the ever-popular hot dogs and many others.
Proper smoking requires a smokehouse or smoker. These can be simple home-built structures made
from metal drums or even old refrigerators or they can be elaborate manufactured units. Most smoked
sausages are warmed before serving. Many people think that a smoked sausage will last much longer
without spoilage, but this is not true. Smoked sausages should be treated the same as fresh sausage in
terms of storage.
Dried sausages require the longest processing time, as they are air dried over a long period of time. Some
types of dry sausages are pepperoni, prosciutto and a variety of ham products, just to name a few. The
conditions under which the meat is dried are very exacting; temperature, time and humidity must all be
carefully monitored for a safe and delicious product.
STORAGE
It is important to remember that sausage will lose its avor the longer that it is stored. It is recommended
that you only make as much sausage as you will need for 4-6 weeks. Even frozen sausage will begin to
lose avor noticeably after 6 weeks. Frozen sausage should be thawed slowly in the refrigerator before
cooking or serving. Quick thawing of the product will degrade the taste as well.