Page is loading ...

2
Safety Marks CEI EN IEC60598-2-11
Dimensioni
Dimensions
Abmessung
Afmetingen
Dimensiones
Rozmery
Rozměry
Méretek
Spessore vetro
Glass thickness
Epaisseur verre
Glasstärke
Glasdikte
Espesor del vidrio
Hrúbka skla
Tloušťka skla
Lampada completa di riflettore
Lamp with reflector dish
Lampe avec reflecteur
Beleuchtung mit Réflektorschale
Verlichting met reflector
Lámpara con reflector
Lampa s reflexnou platňou
Lampa s reflexní deskou
Filtri
Filters
Filtres
Filtros
Filtre
Timer
Programmateur automatique
Zeitschaltuhr
Timerschakelaar
Temporizador
Časovač
Időzítő
Peso da pieno
Weight when full
Poids brut
Gewicht gefüllt
Gewicht indien gevult
Peso lleno
Hmotnosť pri plnom obsahu
Hmotnost při plném obsahu
Riscaldatore
Heater
Chauffage
Heizung
Verwarming
Calentador
Ohrievač
Melegítő
Spine elettriche
Power plugs
Fiches électriques
Anz. Stecker
Stroomstekkers
Tomas de corriente
Sieťové konektory
Síťové konektory
Dimensioner
Wymiary
Üvegvastagság
Glastjocklek
Glas tykkelse
Grubość szkła
Lámpa reflexlappal
Lamp med reflektor
Lampa z odblaskiem
Filtry
Szűrők
Filtr
Súly teljesen feltöltött tartalomnál
Vikt (fylld)
Vægt når fuld
Waga pełnego zbiornika
Doppvärmare
Heater/varmelegeme
Grzałka
Hálózati csatlakozók
Eluttag
Power stik
Wtyczki zasilające
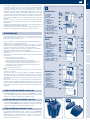
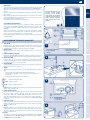
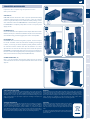
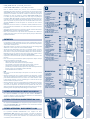
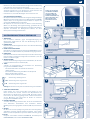
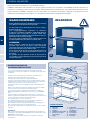
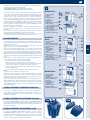
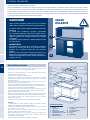
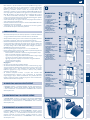
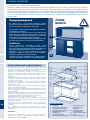
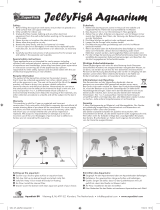
CAYMAN
COMPARISON CHART
BE = BLUEXTREME
BW = BLUWAVE
BC = BLUCOMPACT
110 80
SCENIC
PROFESSIONAL
110 80
L
W
H
110 cm
55 cm
61,5 cm
81,5 cm
46 cm
52,5 cm
110 cm
45 cm
58,5 cm
81,5 cm
36 cm
52,5 cm
300 L 150 L 230 L 120 L
39W (x2)
T5
24W (x2)
T5
39W (x2)
T5
24W (x2)
T5
YES YES YES YES
BLUCLIMA
300
BLUCLIMA
150
BLUCLIMA
200
BLUCLIMA
100
BW 09 BW 05 BW 07 BW 05
1 1 1 1
8 mm 6 mm 8 mm 8 mm
370 kg
200 kg
270 kg
150 kg
Volume
Volumen
Objem
Térfogat
Volym
Volumen
Objętość
Page is loading ...
Page is loading ...
Page is loading ...
Page is loading ...
Page is loading ...
Page is loading ...
Page is loading ...

10
PRELIMINARY WARNINGS
Before carrying out any installation, please read the following instructions
carefully to ensure your safety and prevent damage to the aquarium:
• Ensure that the voltage shown on the all electrical components corresponds
to that of your home electrical power supply.
• The aquarium is intended only for indoor use.
• Before switching on make sure your home is protected by an automatic
safety breaker switch (or individual breaker plug) with an operating
current of no more than 30 mA.
• Do not connect the aquarium to the power supply before correctly
completing all the installation procedures, including filling with water.
• Always disconnect all appliances from the electric power supply before
carrying out any maintenance.
• Always ensure that the water level stays above the minimum level and
below the maximum; both are marked on the front of the BLUWAVE filter.
• Remember that the protection of the lights from water and dust is
guaranteed only when the fluorescent tubes are correctly inserted and the
ring nuts perfectly tightened.
• The lights must never be submerged.
• The ventilation openings must never be obstructed, covered or positioned
near objects that could prevent them functioning efficiently.
• The power cable has Y-type wiring, so if damaged it must be replaced by a
qualified electrician.
• All special maintenance work must be carried out by a qualified
electrician.
Congratulations on having chosen the CAYMAN aquarium.
CAYMAN has been designed to give you the greatest pleasure and to fully safeguard the life and health of your fish and plants.
Setting up and running your CAYMAN aquarium will be simple and fun. A few minutes maintenance each month is all that’s
needed to ensure the aquarium is always perfectly efficient. CAYMAN is supplied with all the parts and accessories needed for
it to function at its best. The aquarium and all parts have been fully tested and comply with the relative international safety
regulations.
IT
PL
RU
DA
SV
HU
CS
SK
ES
NL
D
FR
EN
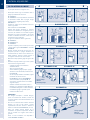
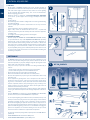
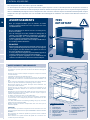
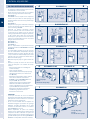
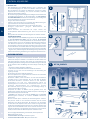
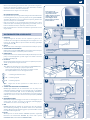
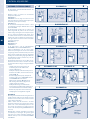
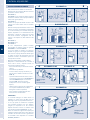
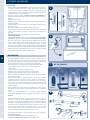
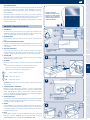
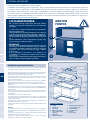
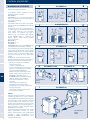
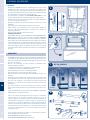
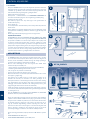
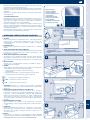
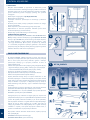
CAYMAN AQUARIUMS
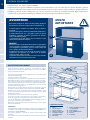
CAYMAN AQUARIUM
1 Tank
2 Lower frame
3 Upper frame
4 Safety seal
5 Filter attachment slots
6 Front hatch
8 Timer housing
9 Housing for food dispencer
with hatch (7)
10 Cable housing
11 Power cable
12 Hinges
13 Top cover
1
2
3
WARNINGS
Although Ferplast only uses high quality silicone, during
maintenance of your aquarium we recommend that you:
• do not damage the silicone cord with scissors, pliers, brushes
or scrapers;
• do not use detergents, solvents or chemical products
(descaler, ammonium-based products, etc.) to clean the
glass, as they could damage the silicone, causing it to
become detached (possibly some time later);
• do not use adhesives or adhesive tape near the silicone when
applying backgrounds.
MOREOVER
• You should always use a spirit level to make sure that
the aquarium is placed on a perfectly flat surface in both
directions (length and depth), so as not to break the glass or
damage the silicone.
• The floor (3) must hold the total weight of the support (2) and
of the set up tank (1) (including water, and decorations).
• The product guarantee becomes null and void if these
instructions and warnings are not followed.
VERY
IMPORTANT
!

11
IT
PL
RU
DA
SV
HU
CS
SK
ES
NL
D
FR
EN
IMPORTANT
‘Special maintenance’ means any kind of work not included in the paragraph
‘Maintaining the CAYMAN aquarium’ and ‘Maintaining the BLUWAVE filter’.
‘Qualified electrician’ means any qualified member of the register of
installer.
• Take care never to pour or splash liquids onto the cover because it contains
electrical parts.
• Never remove the heater from the water when it is connected to the electric
power supply. Before removing the heater, disconnect it and leave it to cool
inside its housing for at least 5 minutes.
• Check that the filter intake grilles are not blocked.
POSITIONING THE AQUARIUM
• The aquarium should be placed on a solid flat base with a smooth even
surface (see the CAYMAN aquariums weight when full at page 2). We
recommend using Ferplast display cabinets, especially designed for your
CAYMAN.
• Position the aquarium in a protected area not exposed to direct sunlight
(which could cause overheating and a proliferation of algae), away from
sources of heat (e.g. heating radiators), cold air and drafts.
• Position the aquarium away from electrical equipment that could be wet by
splashes of water.
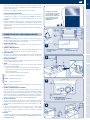
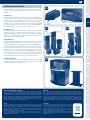
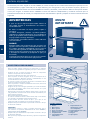
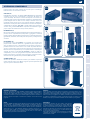
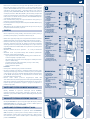
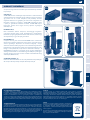
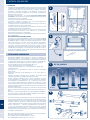
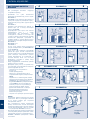
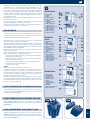
DISCOVERING THE GREAT QUALITIES
1 TOP COVER
Firmly hinged to the frame of the aquarium, it has been tested to prevent
humidity and splashes of water escaping; it can be raised to 95°. A special
self-supporting arm allows it to be kept partially raised (1d).
2 FRONT HATCH
Quick, handy access for feeding the fish without having to open the top
cover.
3 FOOD DISPENSER HOUSING
Housing for the CHEF PRO automatic food dispenser created by Ferplast to
always provide the exact amounts both for food in flakes and in granules.
4 CABLE HOUSING
A space where all the electrical components are connected. The cable
winder (2) lets you gather in any excess pump and heater cable so that loose
wires are not left lying in or above the water.
5 UPPER FRAME
Solid frame, perfectly matched to the design of the aquarium, allowing the
filter to be held in various positions.
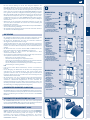
6 TIMER
Timer for setting the lights to switch on and off (CLASSIC model excluded)
(3a):
- Set the arrow to the right time by turning the timer wheel
- Set the time for the lights to come on by moving the pins towards
the outside
- Set the timer switch onto one of the positions:
T = lights controlled by timer
OFF = lights always off
ON = lights controlled by timer
N.B. Remember that the timer must always be reset whenever the electric
power supply is switched off.
7 PUMPHEATER SWITCH
Bipolar switch which completely disconnects the pump and heater from
the power supply, ensuring maximum safety and convenience during
maintenance inside the aquarium (3b). The bipolar switch can also be
used when distributing food so as to reduce water surface turbulence
and prevent the food being spread around the tank (CAYMAN CLASSIC
excluded).
8 SNAPOFF PLUGS
These can be easily removed to fit the intake and return pipes of an external
pump or for other accessories (aeration pipes, power cables for optional
accessories, CO
2
etc.) (4).
9 TANK
CAYMAN aquariums are manufactured from special float glass. A very
high performance silicone ensures the maximum stability and seal. Each
aquarium undergoes a number of advanced systems checks to make sure
there are no water leaks.
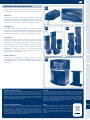
10 FILTER
According to the different aquarium models, CAYMAN includes BLUWAVE
integrated filter system 9, BLUEXTREME external filtering system 10a or
BLUCOMPACT internal filter 10b.
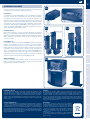
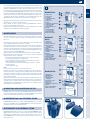
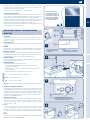
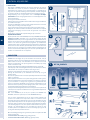
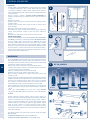
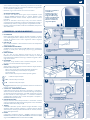
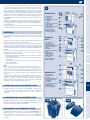
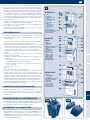
1
2
a. Watertight light fitting
b. Snap-off plugs
c. Hinges
d. Self-supporting arm
e. Automatic food dispenser
opening
4
3
a. Timer switch
b. Pump heater switch
c. Timer wheel
Connect the plugs to your
electric power supply
leaving a loop in the
cable below the electrical
socket to prevent drops of
water running down the
cable and into the power
supply.

12
IT
PL
RU
DA
SV
HU
CS
SK
ES
NL
D
FR
EN
CAYMAN AQUARIUMS
11 LIGHTING
All the lights in CAYMAN aquariums have been specially designed to
produce the best conditions for fish and plants. The electronic power supply,
with water-surface lights and reflector dish, ensures the correct lighting
for the aquarium with maximum safety, ease of use and maintenance.
Electronic lighting guarantees:
• Electricity savings in compliance with European Directive 2000/55/EC
on the use of power supplies for low energy consumption fluorescent
lighting;
• Longer tube life.
• More stable light: more similar to sunlight with none of the typical flickering
of traditional lighting.
• Superior quality light: it remains constant almost to the very end of the
tube’s life.
• Lower temperatures: electronic lighting produces less heat.
• Higher safety: when the fluorescent tube burns out, a sophisticated
electronic protection system cuts off the power and renders the equipment
completely safe.
• Less weight: electronic lighting systems are much lighter.
12 CAYMAN SOFTWARE
All tanks (except for CAYMAN 40 CLASSIC/COLOURS/PLUS/OPEN models)
are provided with the very useful AQUARIUM SOFTWARE CD, specifically
developed by a team of Ferplast experts to help install a freshwater or
marine aquarium without making mistakes. The software is divided into
three parts and is constantly updated and expanded at each edition. Apart
from helping to choose favourite fish, it enables to receive information on
any incompatibility among species and finally offers practical advice on how
to resolve many possible inconveniences encountered when installing and
maintaining an aquarium.
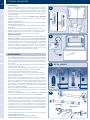
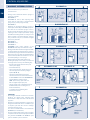
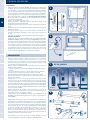
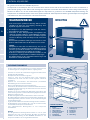
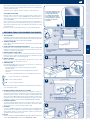
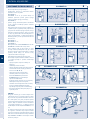
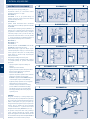
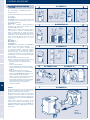
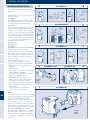
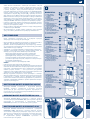
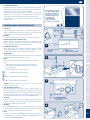
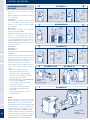
SETTING UP
• For CAYMAN models: remove the sucker from the back of the filter (it is only
there to secure the filter during transport). Position the filter at the side or
back of the aquarium, as you prefer, sliding it along the special guides on the
frame of the cover until you hear a click (5).
• It may be necessary to open the rear filter cover during installation (2) in
order to:
- take the pump and heater cable from the special cable winder;
- pass the cables through the cover in the CLASSIC versions.
• Ensure that the ring nuts on the lights are tightened (6).
• Attach the thermometer inside of the tank in a visible position.
• Decorate the aquarium as you please (your local retailer will be able to help
and advise you).
• Fill the aquarium by pouring water onto a dish placed on the bottom to
prevent the material used to create the base from being moved about.
In general, it is advisable to mix tap water with about 50% demineralised
water for aquariums; however, this percentage may vary according to the
chemical contents of your tap water (get advice and the right amount of
demineralised water from your retailer).
• Set the required heater temperature according to the type of fish and plants
used (e.g. for freshwater tropical fish the average temperature is about 25-
26°C).
• Put 1 (for CAYMAN 50, 60 and 80) or 2 capsules (CAYMAN 110) of BLUSTART
(bacterial activator) in the first BLUWAVE filter compartment.
Set the required lighting period with the timer (if included) and only now
should you connect the plug to the electric power supply and check all the
equipment is working correctly. In case of problems, contact your retailer.
We recommend lighting the aquarium for about 8 hours a day: if there are
signs of excessive algae development, reduce the lighting to 7 hours; if the
plants have difficulty growing, increase to 9-10 hours. Before arranging the
plants in the aquarium, we recommend waiting at least one day to allow
time for the heater to stabilise the required water temperature.
To guarantee a luxuriant plant growth, Ferplast produces two CO
2
diffusion
systems (7):
• KIT CO
2
ENERGY CLASSIC: fermentation CO
2
system
• KIT CO
2
ENERGY PROFESSIONAL: cylinder CO
2
system
5
6
12
8
7
ab
c
KIT CO
2
ENERGY
CLASSIC PROFESSIONAL

13
IT
PL
RU
DA
SV
HU
CS
SK
ES
NL
D
FR
EN
To care for and protect your fish, it is strongly advised to wait until the filter
has matured: the first fish should only be introduced 10-12 days after the
addition of BLUSTART filter activator capsules. Before doing so, it is in any
case advisable to check the readings and chemical levels of the water using
the special MULTISTICK TESTER gauge which allows you to check 5 main
parameters simultaneously: NO
2
, NO
3
, KH, GH and pH. Your local retailer
will be able to advise you on the ideal water temperature, hardness etc.,
according to the type of fish and plants you have decided to keep in your
CAYMAN aquarium. It is advisable to repeat these tests regularly.
• During the filter maturing period, add a small quantity of dry food each day:
this will help the formation of bacterial flora.
• When adding the fish, insert the remaining BLUSTART filter activator
capsules in the first filter compartment.
• We recommend not putting too many fish into the aquarium all at once, but
building up to the maximum population gradually.
MAINTENANCE
The main maintenance procedures we recommend, in addition to the daily
provision of food and regular checking of the temperature and chemical
levels, are:
• Siphoning the bottom when required using the special aquarium gravel
cleaner BLU 9025/9027 on sale at your local retailer.
• Adding demineralised water (both in salt-water and freshwater aquariums)
to replace that which is lost by evaporation as soon as the water level
approaches the minimum (shown on the front of the filter). Remember that
the water level should always be between the MIN and MAX levels, both
shown on the front of the BLUWAVE filter.
• Replacing 5-10% of the water with demineralised water at least monthly.
• Replacing the fluorescent tubes at least every year to retain an optimum
light spectrum. To replace a tube (8):
- firstly remove the plug from the electric power socket unscrew the
two watertight ring nuts on the light fitting;
- remove the tube by rotating it a quarter turn until the pins are both
lined up with the slit in the lamp holder;
- insert the new tube in the same way, rotating it a quarter turn (you’ll
hear a small click);
- carefully tighten the ring.
N.B.
• If one of the two tubes burns out, both will switch off.
Cleaning the outside of the aquarium, avoiding the use of detergents or
chemical substances. A sponge soaked in distilled water with a few drops
of vinegar is enough to remove any signs of lime scale from the glass. Be
particularly careful not to damage the bead of silicone that firmly bonds the
sheets of glass together.
Cleaning the inside of the aquarium using BLU 9031/9036/9038/9039, the
floating magnetic brushes designed by Ferplast in relation to the thickness
of the glass in your aquarium. The practical Ferplast cleaning kit BLU 9019
equipped with interchangeable blade and sponges, is also available. The use
of detergent is not recommended.
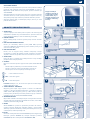
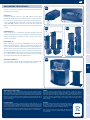
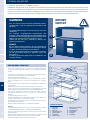
BLUWAVE 03/05/0709 INTERNAL FILTER
CAYMAN models are provided with BLUWAVE internal filter, the most
advanced integrated filter system (9). Look at the BLUWAVE user’s manual
to have more information about its use and maintenance.
BLUEXTREME 700/1100 EXTERNAL FILTER
CAYMAN OPEN models are provided with BLUEXTREME most powerful
filtering system (10a). Look at the BLUEXTREME user’s manual to have more
information about its use and maintenance.
BLUCOMPACT 01/02 INTERNAL FILTER
CAYMAN CLASSIC/PLUS models are provided with BLUCOMPACT filter
(10b). Compact yet powerful, it assures efficient water filtration. Great
flexibility of use, thanks to the suction cups and easy to clean. Look at
the BLUCOMPACT user’s manual to have more information about its use
and maintenance.
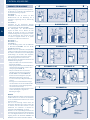
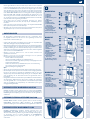
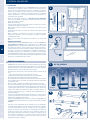
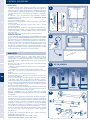
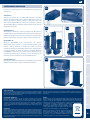
9
BLUWAVE 03
1 Filter body
2 Connection
3 Canisters
4 Biological filtering
material
5 Filter cover
6 Pump
7 Adjustable circulation jet
8 Mechanical filter
(fine sponge)
9 Pump delivery pipe
10 Heater
11 Mechanical filter
(coarse sponge)
12 Adsorbent filter
13 Water intake grills
BLUWAVE
05/07
1 Filter body
2 Connection
3 Pump delivery pipe
4 Biological filter
cartridges
5 Adsorbent filter
6 Pump
7 Filter cover
8 Adjustable circulation jet
9 Canister
10 Heater
11 Mechanical filter
(coarse sponge)
12 Mechanical filter
(fine sponge)
13 Removable bulkhead
14 Water intake grills
BLUWAVE 09
1 Filter body
2 BLUMODULAR
3 Spray-bar
4 Biological filter
cartridges
5 Adsorbent sponge
6 Connector
7 Filter cover
8 Adjustable circulation jet
9 Heater
10 Removable bulkhead
11 Water intake grills
10a 10b

14
IT
PL
RU
DA
SV
HU
CS
SK
ES
NL
D
FR
EN
CAYMAN AQUARIUMS
BLUWAVE INTERNAL FILTERS
The main maintenance procedures we
recommend are:
• Rinsing all the mechanical filtration sponges at
least every 2-3 weeks:
A BLUWAVE 03;
C BLUWAVE 05 and 07, when replacing them,
ensure that the right order is maintained (fine
sponge top (a), coarse sponge below (b);
E BLUWAVE 09.
• Replacing the mechanical filtration sponges at
least every 6 months. Only use BLUMEC spare parts.
• The effect of the adsorbent sponge ceases in
about 2-3 weeks; we therefore advise, if necessary,
replacing it with a Ferplast replacement sponge
available from leading retailers or leaving it in the
filter to perform a mechanical function, rinsing it
every 2-3 weeks. In any case, it should be changed
at least every 6 months:
B BLUWAVE 03;
D BLUWAVE 05-07;
F BLUWAVE 09.
BLUCARBON active carbon granules or the
BLUZEOLITE zeolite may also fit into this section.
• During periods when the fish are being treated with
a solution added to the water for illness or disease,
the adsorbent sponge should be removed from the
filter (so this does not reduce the beneficial effects
of the treatment). When the treatment is over, we
recommend putting in a new sponge.
• Always keeping the filter intake grilles clean.
• Checking the pump at least every 2 months and
cleaning it when necessary in the following way:
- disconnect the pump and heater from your
electric power supply;
- unscrew the filter top;
- remove the pump unit, adsorbent sponge
and return pipe from the filter, pulling it
upwards (B - D - F);
- remove the pump from the return pipe,
remove the front section and remove the rotor.
In the BLUWAVE 09 remove the BLUMODULAR
together with the relative spray-bar
(G - H - I). If necessary, replace the rotor
with an original Ferplast spare part;
- remove any lime scale or impurities with soft
brush BLU 9037 (never use detergents or
chemical substances);
- re-assemble the unit following these
instructions in reverse.
IMPORTANT
• The biological materials should not be washed.
Therefore, we suggest never removing them
from the filter so they retain their active bacterial
properties.
• However if you think it beneficial to replace these
biological materials with others of a different type
to Ferplast’s, put them into the two cartridges
separately, leaving a period
of at least 2-3 weeks between each introduction
(BLUWAVE 05, 07 and 09 filters).
• Use only original Ferplast parts to replace any filter
components. The use of non-Ferplast parts nullifies
the guarantee. BLURINGS and BLUBALLS spare
parts are available at your local retailer.
BLUWAVE 03
2 121
BLUWAVE 09
1 Pump body
2 Rotor
3 Cover
3
2
1
3
2
1
3
2
1
BLUWAVE 0305
1 Pump body
2 Rotor
3 Cover
BLUWAVE 07
BLUWAVE 09
2 121
BLUWAVE 05/07
2112
AB
I
GH
EF
CD

15
IT
PL
RU
DA
SV
HU
CS
SK
ES
NL
D
FR
EN
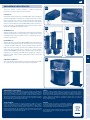
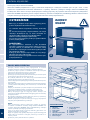
SUG GE STED ACCE SSOR IE S
Ferplast also offers a complete range of aquarium accessories.
Ask to your local retailer:
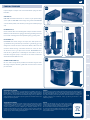
CHEF PRO 12
CHEF PRO automatic fish feeder is able to provide optimum fish feeding
conditions, keeping the fish food fresh over time. In fact, the container
houses an auger, which keeps the food well mixed while pushing constant
doses towards the outlet. The CHEF PRO feeder is ideal for flaked or granular
food. CHEF PRO is a completely safe product as it runs on a very low power
supply (3 Volts).
BLUMODULAR (13)
Internal modular filter with adjustable flow. Complete with filter material.
Modules (that may be combined and added at will) let various materials be
used simultaneously, guaranteeing high power suction and rapid flow.
BLUSKIMMER 14
BLUSKIMMER internal skimmer, designed by Ferplast, ensure full respect
for the life and health of fish and invertebrates. Installing and managing
it allows you to keep your marine aquarium perfectly efficient, thanks to
the innovative technical solutions that allow the formation of a dense,
dry foam that can retain the dirt and easily remove it from the aquarium.
BLUSKIMMER is supplied with all the parts and accessories needed for it to
function at its best. The integrated pump is homologated and conforms to
all the relative international safety standards (EN60335-2-41).
CAYMAN FURNITURES (15)
Here is a line of particularly sturdy products which enhances the designs
of the tanks. Those who choose a Ferplast stand will rest their tank on solid
supports.
SPARE PARTS AND ACCESSORIES
Every part of the CAYMAN aquarium and Ferplast filters can be easily replaced. The
parts are available from the retailer where you bought the aquarium. A full range of
updated Ferplast accessories are always available for adapting your aquarium to your
individual needs. To replace any part and always ensure the full working order and
safety of your product, use only Ferplast original parts. Installing non-Ferplast parts
nullifies the guarantee.
ADDITIONAL INFORMATION
The CAYMAN aquarium is designed for tropical salt-water or freshwater environments.
Its modularity and great flexibility also allow it to be used in a number of different
situations (including temperate ones, with the addition of a cooler), and the use of
various accessories (special filtration systems, skimmers, CO
2
dispensers, fertilized
gravel, different spectrum lights etc.). Contact your local retailer who will be able to
advise you. Your retailer will also be able to advise you on the choice of fish to keep in
your aquarium and the quantity and type of food to use and feeding frequency.
WARRANTY
Ferplast guarantees this product within the limits of the present clause and of the
current legal regulation. The guarantee is valid only against manufacturing faults and
it includes free product repair or replacement. The guarantee is not valid for damage
and/or faults caused by negligence, wear, improper use, accidents, tempering, incorrect
repairs, purchase not confirmed by receipt. The fluorescent tubes, starter (where
included), sponges and filtering materials are not covered by guarantee.
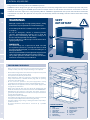
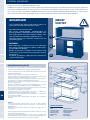
IMPORTANT
Within the European Union the barred rubbish container symbol
indicates that the product, at the end of its lifecycle, needs to
be sent to separate collection point for electrical and electronic
waste and cannot be disposed of together with domestic solid
waste.
To ensure correct product disposal, please dispose of this product
in compliance with the law provisions of the country where the
product is found.
14
12
13
15
Page is loading ...
Page is loading ...
Page is loading ...
Page is loading ...
Page is loading ...
Page is loading ...
Page is loading ...
Page is loading ...
Page is loading ...
Page is loading ...
Page is loading ...
Page is loading ...
Page is loading ...
Page is loading ...
Page is loading ...
Page is loading ...
Page is loading ...
Page is loading ...
Page is loading ...
Page is loading ...
Page is loading ...
Page is loading ...
Page is loading ...
Page is loading ...
Page is loading ...
Page is loading ...
Page is loading ...
Page is loading ...
Page is loading ...
Page is loading ...
Page is loading ...
Page is loading ...
Page is loading ...
Page is loading ...
Page is loading ...
Page is loading ...
Page is loading ...
Page is loading ...
Page is loading ...
Page is loading ...
Page is loading ...
Page is loading ...
Page is loading ...
Page is loading ...
Page is loading ...
Page is loading ...
Page is loading ...
Page is loading ...
Page is loading ...
Page is loading ...
Page is loading ...
Page is loading ...
Page is loading ...
Page is loading ...
Page is loading ...
Page is loading ...
Page is loading ...
Page is loading ...
Page is loading ...
Page is loading ...
Page is loading ...
Page is loading ...
Page is loading ...
Page is loading ...
Page is loading ...
Page is loading ...

82
PRODUCTION SITES
Ferplast S.p.A. Headquarters
Via 1° Maggio, 5 – Zona Industriale - 36070 Castelgomberto - Vicenza/Italia, P.O. Box 10
Tel. +39(0)445 429 111
Fax +39(0)445 429 115
Ferplast Slovakia s.r.o.
Novozámocká cesta 58 - 946 51 Nesvady, Slovakia
Tel. +421(0)35 7902 600
Fax +421(0)35 7902 610
Ferplast Ukraine L.L.C.
Prospekt Myru, 57 - 10004 Zhytomyr, Ukraine
Tel. +380 412 415 370
Fax +380 412 415 369
COMMERCIAL BRANCHES
Ferplast Benelux
Collseweg 21, 5674 TR Nuenen - P.O. Box 320, 5670 AH Nuenen, Nederland/Pays Bas
Tel. +31(0)40/284 2222
Fax +31(0)40/284 2200
Ferplast China
RM 2008, No. 18, Huanchengxi Road - Hangzhou 310006, P.R. China
Tel. +86 571/87921616
Fax +86 571/87921919
Ferplast Deutschland
Hans-Böckler Str. 10 - 40764 Langenfeld - Deutschland
Tel. +49(0)2173 39200-0
Fax +49(0)2173 39200-48
Ferplast France
Immeuble le Galilée Boulevard Sébastien Brant - 67400 ILLKIRCH-GRAFFENSTADEN
Tél. +33(0)3 88 55 58 58
Fax +33(0)3 88 55 58 55
Ferplast Italia
Via 1° Maggio, 5 – Zona Industriale - 36070 Castelgomberto, Vicenza/Italia, P.O. Box 10
Tel. +39(0)445 429 111
Fax +39(0)445 429 115
Ferplast Polska
ul. Ryżowa 49 - 02-495 Warszawa - Polska
Tel.: 22 589 51 65
Fax: 22 589 51 66
Ferplast Russia
Severniy proezd, korp. 1 - Sheremet’evo 1, Khimki
141412 Moskovskaya oblast’ - Russia
Tel. +7 (498) 654 00 15, +7 (495) 784 70 24
Ferplast Scandinavia
Russgatan 5 - 212 35 Malmö, Sweden
Tel. +46(0)40593330
Fax +46(0)40593339
Ferplast Slovakia
Novozámocká cesta 58 - 946 51 Nesvady - Slovakia
Tel. +421(0)35 7902 600
Fax +421(0)35 7902 610
Ferplast U.K.
Dawnwood Square, Hillridge Road - Martland Mill Industrial Estate, Wigan WN5 0LQ/U.K.
Tel. +44(0)1942/620 440
Fax +44(0)1942/620 410
Ferplast Ukraine
Prospekt Myru, 57 - 10004 Zhytomyr/Ukraine
Tel. +380 412 415 370
Fax +380 412 415 369
Page is loading ...

www.ferplast.com info@ferplast.com
363100-6
-
 1
1
-
 2
2
-
 3
3
-
 4
4
-
 5
5
-
 6
6
-
 7
7
-
 8
8
-
 9
9
-
 10
10
-
 11
11
-
 12
12
-
 13
13
-
 14
14
-
 15
15
-
 16
16
-
 17
17
-
 18
18
-
 19
19
-
 20
20
-
 21
21
-
 22
22
-
 23
23
-
 24
24
-
 25
25
-
 26
26
-
 27
27
-
 28
28
-
 29
29
-
 30
30
-
 31
31
-
 32
32
-
 33
33
-
 34
34
-
 35
35
-
 36
36
-
 37
37
-
 38
38
-
 39
39
-
 40
40
-
 41
41
-
 42
42
-
 43
43
-
 44
44
-
 45
45
-
 46
46
-
 47
47
-
 48
48
-
 49
49
-
 50
50
-
 51
51
-
 52
52
-
 53
53
-
 54
54
-
 55
55
-
 56
56
-
 57
57
-
 58
58
-
 59
59
-
 60
60
-
 61
61
-
 62
62
-
 63
63
-
 64
64
-
 65
65
-
 66
66
-
 67
67
-
 68
68
-
 69
69
-
 70
70
-
 71
71
-
 72
72
-
 73
73
-
 74
74
-
 75
75
-
 76
76
-
 77
77
-
 78
78
-
 79
79
-
 80
80
-
 81
81
-
 82
82
-
 83
83
-
 84
84


Ferplast Cayman 110 Professional Owner's manual
- Type
- Owner's manual
- This manual is also suitable for
Ask a question and I''ll find the answer in the document
Finding information in a document is now easier with AI
in other languages
- italiano: Ferplast Cayman 110 Professional Manuale del proprietario
- français: Ferplast Cayman 110 Professional Le manuel du propriétaire
- español: Ferplast Cayman 110 Professional El manual del propietario
- Deutsch: Ferplast Cayman 110 Professional Bedienungsanleitung
- русский: Ferplast Cayman 110 Professional Инструкция по применению
- Nederlands: Ferplast Cayman 110 Professional de handleiding
- slovenčina: Ferplast Cayman 110 Professional Návod na obsluhu
- dansk: Ferplast Cayman 110 Professional Brugervejledning
- polski: Ferplast Cayman 110 Professional Instrukcja obsługi
- čeština: Ferplast Cayman 110 Professional Návod k obsluze
- svenska: Ferplast Cayman 110 Professional Bruksanvisning
Related papers
-
Ferplast Capri 50 User manual
-
-
-
-
Ferplast cayman 40 colours User manual
-
-
-
-
-
Other documents
-
Aqueon 158065 click here.
-
 Aquadistri Home 85 Owner's manual
-
Franke 0738038 Datasheet
-
Sera aquarium heater thermostats Information For Use
-
 Aquadistri SuperFish AquaVac User manual
-
-
API AP12500 Operating instructions
-
EHEIM thermopreset 200 Owner's manual
-
 Aquadistri Jellyfish Quick start guide
-
EHEIM aquastar 54 LED Owner's manual


