Whirlpool GSFL 3131 WS Installation guide
- Type
- Installation guide

Montageanweisung
Technische Änderungen vorbehalten
Assembly instruction
We reserve the right to make technical modifications
Instructions de montage
Sous réserve de modifications techniques
Montage-instructies
Technische wijzigingen voorbehouden
Instrucciones de montaje
Reservado el derecho de introducir modificaciones técnicas
Instruções para a montagem
Com reserva de eventuais alterações técnicas
Istruzioni di montaggio
Con riserva di modifiche tecniche
)
Οδηγίες τοποθέτησης
Με την εεπιφύλαξη για τεχνικές αλλαγές
Monteringsanvisningar
Vi förbehåller oss rätten att göra tekniska ändringar
Monteringsanvisning
Vi forbeholder oss retten til å foreta tekniske endringer
Monteringsvejledning
Vi forbeholder os retten til at foretage tekniske ændringer
Asennusohjeet
Oikeus teknisiin muutoksiin pidätetään
Instrukcja montażu
Z zastrzeżeniem zmian technicznych
Návod k instalacji
S výhradou technických změn
Pokyny na montáž
Technické úpravy vyhradené
Szerelési utasítások
A műszaki módosítások jogának fenntartásával
Указания по монтажу
Фирмa oстaвляeт зa сoбoй прaвo внoсить в прибoр тeхничeскиe измeнeния
Инструкции за монтаж
Cъс зaпaзeнo прaвo зa тeхничeски мoдификaции
Instrucţiuni de montare
Cu rezerva de a putea aduce modificări de natură tehnică
Montaj talimatları
Teknik değişiklik yapma hakkımız saklıdır

D Hinweise Seite 3
Montageanleitung Seite 26
GB Precautions Page 4
Assembly instruction Page 26
F Avertissements Page 6
Instructions de montage Page 26
NL Waarschuwingen Pagina 7
Montage-instructies Pagina 26
E Advertencias Página 8
Instrucciones de montaje Página 26
P Advertências Página 9
Instruções para a montagem Página 26
I Avvertenze Pagina 10
Istruzioni di montaggio Pagina 26
GR Προειδοποιήσεις Σελίδα 11
Οδηγίες τοποθέτησης Σελίδα 26
S Varningar Sidan 12
Monteringsanvisningar Sidan 26
N Advarsler Side 13
Monteringsanvisning Side 26
DK Advarsler Side 14
Monteringsvejledning Side 26
FIN Varoituksia Sivu 15
Asennusohjeet Sivu 26
PL Ostrzeżenia Strona 16
Instrukcja montażu Strona 26
CZ Upozornění Strana 17
Návod k instalacji Strana 26
SK Upozornenia Strana 18
Pokyny na montáž Strana 26
H Figyelmeztetés Oldal 19
Szerelési utasítások Oldal 26
RUS Предупреждение Страница 20
Указания по монтажу Страница 26
BG Бележки Страница 21
Инструкции за монтаж Страница 26
RO Măsuri de precauţie Pagina 22
Instrucţiuni de montare Pagina 26
HR Upozorenja Stranica 23
Upute za sastavljanje Stranica 26
TR Uyarılar Sayfa 24
Montaj talimatları Sayfa 26
Page is loading ...

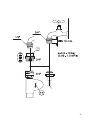
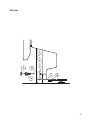
1. Water connection
- Connection to the mains water supply must be carried out by a qualified technician in compliance
with the manufacturer's instructions and applicable local safety regulations.
- All local water board regulations must be complied with. Water supply pressure: 0.03 - 1.0 MPa.
- The inlet hose must be securely clamped to the water tap to prevent leaks.
- The inlet water temperature varies according to the model installed. Inlet hose marked: "25°C Max":
up to a maximum of 25°C. Other models: up to a maximum of 60°C.
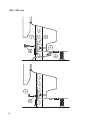
- Depending on the appliance model, the solenoid valve of the inlet hose will be activated by the
mains voltage (see assembly instructions).
- Make sure the inlet and drain hoses are kink-free and are not crushed.
- Fix the drain hose to the siphon with a clamp to prevent it from coming off during operation.
- When installing the appliance, make sure water can drain freely (remove the siphon plug if necessary).
- Do not use old or damaged hoses. Use only the hoses provided or new ones, which can be
requested from the After-Sales Service.
- If hoses are not long enough, contact your local dealer.
- Do not cut hoses and, in the case of appliances fitted with a waterstop system, do not immerse
the plastic casing containing the inlet hose in water.
- Before using the appliance for the first time, check the water inlet and drain hose for leaks.
2. Electrical Connection
- All local electricity board regulations must be complied with.
- Voltage information is shown on the rating plate mounted inside the door on the right hand side.
- The appliance must be earthed as prescribed by law.
- Do not use extension leads or multiple adapters.
- If the power cable is damaged, replace it with an identical one. The power cable must only be
replaced by a qualified technician.
- After appliance installation, the mains plug must be easily accessible so that the appliance can be
unplugged if necessary at any time.
For Austria:
If a fault current switch is fitted upline of the appliance, this must be pulse current-sensitive.
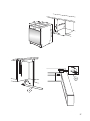
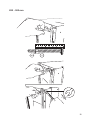
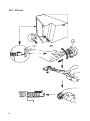
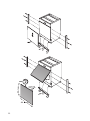
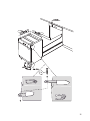
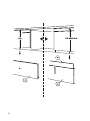
3. Assembly instruction
- During assembly the appliance must be unplugged from the mains.
- Set any electrical screwdrivers to a low torque.
- Do not seal the gaps between adjacent units and the worktop (for example with silicone).
- Attention: When transporting and assembling the appliance, always wear gloves to protect
fingers / hands from sharp edges and corners.
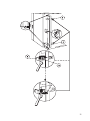
- If the appliance is installed at the end of a row of units, making the side panel accessible, the hinge
area must be covered to prevent any risk of crushing (cover available from After-sales Service ).
- Be careful with uneven installation surfaces: Carefully push the dishwasher with feet unscrewed
under the worktop.
- The sharp edges of the unit and the plinth must be protected from humidity (with insulating
material, for example silicone, not included with the appliance).
4. General indications
- The appliance must only be used in the household and according its purpose.
- Do not use the dishwasher until it has been fully assembled.
- Do not use the dishwasher if it has been damaged in transit. Contact After-Sales Service or your
local dealer.
- Before carrying out any cleaning or maintenance operations, unplug the appliance and turn off the
water tap. The same applies in the event of a malfunction.
- Do not use abrasive products or alcohol on the control panels.
- All sizes in this installation instruction are given in millimetres.
- Packaging varies according to the dishwasher model.
4
GB

5
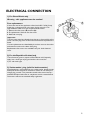
ELECTRICAL CONNECTION
1) For Great Britain only
Warning - this appliance must be earthed
Fuse replacement
If the mains lead of this appliance is fitted with a BS 1363A 13amp
fused plug, to change a fuse in this type of plug use an A.S.T.A.
approved fuse to BS 1362 type and proceed as follows:
1.
Remove the fuse cover (
A
) and fuse (
B
).
2.
Fit replacement 13A fuse into fuse cover.
3.
Refit both into plug.
Important:
The fuse cover must be refitted when changing a fuse and if the fuse
cover is lost the plug must not be used until a correct replacement is
fitted.
Correct replacement are identified by the colour insert or the colour
embossed in words on the base of the plug.
Replacement fuse covers are available from your local electrical
store.
2) For the Republic of Ireland only
The information given in respect of Great Britain will frequently
apply, but a third type of plug and socket is also used, the
2-pin, side earth type.
3) Socket outlet / plug (valid for both countries)
If the fitted plug is not suitable for your socket outlet, please contact
Whirlpool Service for further instruction. Please do not attempt to
change plug yourself. This procedure needs to be carried out by a
qualified Whirlpool technician in compliance with the manufactures
instructions and current standard safety regulations.
Page is loading ...
Page is loading ...
Page is loading ...
Page is loading ...
Page is loading ...
Page is loading ...
Page is loading ...
Page is loading ...
Page is loading ...
Page is loading ...
Page is loading ...
Page is loading ...
Page is loading ...
Page is loading ...
Page is loading ...
Page is loading ...
Page is loading ...
Page is loading ...
Page is loading ...
Page is loading ...
Page is loading ...
Page is loading ...
Page is loading ...
Page is loading ...
Page is loading ...
Page is loading ...
Page is loading ...
Page is loading ...
Page is loading ...
Page is loading ...
Page is loading ...
Page is loading ...
Page is loading ...
Page is loading ...

05/2010
5019 102 00483/C
D GB F NL E P I GR S N DK FIN PL CZ SK H RUS BG RO HR TR
Printed in Poland
-
 1
1
-
 2
2
-
 3
3
-
 4
4
-
 5
5
-
 6
6
-
 7
7
-
 8
8
-
 9
9
-
 10
10
-
 11
11
-
 12
12
-
 13
13
-
 14
14
-
 15
15
-
 16
16
-
 17
17
-
 18
18
-
 19
19
-
 20
20
-
 21
21
-
 22
22
-
 23
23
-
 24
24
-
 25
25
-
 26
26
-
 27
27
-
 28
28
-
 29
29
-
 30
30
-
 31
31
-
 32
32
-
 33
33
-
 34
34
-
 35
35
-
 36
36
-
 37
37
-
 38
38
-
 39
39
-
 40
40


Whirlpool GSFL 3131 WS Installation guide
- Type
- Installation guide
Ask a question and I''ll find the answer in the document
Finding information in a document is now easier with AI
in other languages
- italiano: Whirlpool GSFL 3131 WS Guida d'installazione
- français: Whirlpool GSFL 3131 WS Guide d'installation
- español: Whirlpool GSFL 3131 WS Guía de instalación
- Deutsch: Whirlpool GSFL 3131 WS Installationsanleitung
- русский: Whirlpool GSFL 3131 WS Инструкция по установке
- Nederlands: Whirlpool GSFL 3131 WS Installatie gids
- português: Whirlpool GSFL 3131 WS Guia de instalação
- slovenčina: Whirlpool GSFL 3131 WS Návod na inštaláciu
- dansk: Whirlpool GSFL 3131 WS Installationsvejledning
- polski: Whirlpool GSFL 3131 WS Instrukcja instalacji
- čeština: Whirlpool GSFL 3131 WS instalační příručka
- Türkçe: Whirlpool GSFL 3131 WS Yükleme Rehberi
- svenska: Whirlpool GSFL 3131 WS Installationsguide
- suomi: Whirlpool GSFL 3131 WS Asennusohje
- română: Whirlpool GSFL 3131 WS Ghid de instalare
Related papers
-
Privileg W 75/5 Owner's manual
-
Whirlpool ADL 353 IP Installation guide
-
KitchenAid KDFE 6030 Owner's manual
-
Whirlpool ADP 6332 SL Owner's manual
-
Whirlpool ADG 6340 IX Owner's manual
-
Whirlpool GSX 5525 User guide
-
Whirlpool ADG 7542 NB User guide
-
KitchenAid KDSCM 82130 Owner's manual
-
-
Other documents
-
HEC DW12-EFM S User manual
-
Kärcher BPP 3000 42 Owner's manual
-
Candy CDIM 2312 User manual
-
Candy CDP 3DS62DW/T User manual
-
Lavorwash Rio 1108 Datasheet
-
Hoover CDI 2012/1-S User manual
-
-
-
Kärcher BP 4 Specification
-
Bosch Slimline cooker hood Owner's manual