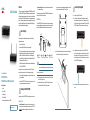
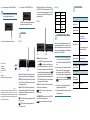
Cisco RV180 is a wireless-N VPN router that provides simple, affordable, and highly secure business-class connectivity to the Internet for small offices and remote workers. It features 4-port Gigabit Ethernet LAN ports, a Gigabit Ethernet WAN port, and an intuitive browser-based device manager, making it easy to set up and manage your network. With its multi-function operation, the RV180 can function as a wireless router, bridge, or access point, giving you the flexibility to customize your network to meet your specific needs.
Cisco RV180 is a wireless-N VPN router that provides simple, affordable, and highly secure business-class connectivity to the Internet for small offices and remote workers. It features 4-port Gigabit Ethernet LAN ports, a Gigabit Ethernet WAN port, and an intuitive browser-based device manager, making it easy to set up and manage your network. With its multi-function operation, the RV180 can function as a wireless router, bridge, or access point, giving you the flexibility to customize your network to meet your specific needs.


-
 1
1
-
 2
2
-
 3
3


Cisco RV180 is a wireless-N VPN router that provides simple, affordable, and highly secure business-class connectivity to the Internet for small offices and remote workers. It features 4-port Gigabit Ethernet LAN ports, a Gigabit Ethernet WAN port, and an intuitive browser-based device manager, making it easy to set up and manage your network. With its multi-function operation, the RV180 can function as a wireless router, bridge, or access point, giving you the flexibility to customize your network to meet your specific needs.
Ask a question and I''ll find the answer in the document
Finding information in a document is now easier with AI
Related papers
-
Cisco RV180W Owner's manual
-
-
-
-
Cisco WIC-1SHDSL-V3= Datasheet
-
-
-
Cisco SPA112 Quick start guide
-
-
Other documents
-
Cisco Systems CISCO7206 User manual
-
-
-
-
-
-
-
-
-