Whirlpool AMW 834/IXL is a versatile kitchen appliance that combines microwave and grill functions, offering a variety of cooking options. Equipped with multiple power levels, it allows you to adjust the intensity of heat for different cooking needs. The grill function adds a crispy touch to your dishes, while the defrost setting helps thaw frozen foods quickly and evenly. With its compact design, the Whirlpool AMW 834/IXL fits seamlessly into your kitchen countertop, providing convenience and culinary flexibility.
Whirlpool AMW 834/IXL is a versatile kitchen appliance that combines microwave and grill functions, offering a variety of cooking options. Equipped with multiple power levels, it allows you to adjust the intensity of heat for different cooking needs. The grill function adds a crispy touch to your dishes, while the defrost setting helps thaw frozen foods quickly and evenly. With its compact design, the Whirlpool AMW 834/IXL fits seamlessly into your kitchen countertop, providing convenience and culinary flexibility.


-
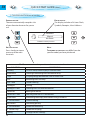
 1
1
-
 2
2
-
 3
3
-
 4
4
-
 5
5
-
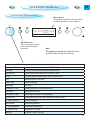
 6
6
-
 7
7
-
 8
8
-
 9
9
-
 10
10
-
 11
11
-
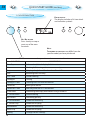 12
12
-
 13
13
-
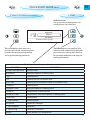
 14
14
-
 15
15


Whirlpool AMW 834/IXL is a versatile kitchen appliance that combines microwave and grill functions, offering a variety of cooking options. Equipped with multiple power levels, it allows you to adjust the intensity of heat for different cooking needs. The grill function adds a crispy touch to your dishes, while the defrost setting helps thaw frozen foods quickly and evenly. With its compact design, the Whirlpool AMW 834/IXL fits seamlessly into your kitchen countertop, providing convenience and culinary flexibility.
Ask a question and I''ll find the answer in the document
Finding information in a document is now easier with AI
Related papers
-
Whirlpool AMW 429/IX User guide
-
Whirlpool AMW 592/IXL User guide
-
Whirlpool AMW 843 IXL Owner's manual
-
-
Whirlpool AMW 578 IX Program Chart
-
-
-
Whirlpool EMCHD 8145/SW User guide
-
-