Dell iDRAC7 Version 1.30.30 Quick start guide
- Type
- Quick start guide
Dell iDRAC7 Version 1.30.30 is an advanced remote access controller that provides comprehensive management and monitoring capabilities for Dell PowerEdge servers. With its enhanced features, you can efficiently manage your server infrastructure, ensuring optimal performance and availability.
Key capabilities of Dell iDRAC7 Version 1.30.30 include:
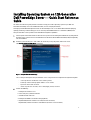
- Remote Server Management: Access and control your server remotely, regardless of its location, using a web browser or mobile device. Perform essential tasks such as power control, configuration changes, and firmware updates without being physically present at the server.
Dell iDRAC7 Version 1.30.30 is an advanced remote access controller that provides comprehensive management and monitoring capabilities for Dell PowerEdge servers. With its enhanced features, you can efficiently manage your server infrastructure, ensuring optimal performance and availability.
Key capabilities of Dell iDRAC7 Version 1.30.30 include:
- Remote Server Management: Access and control your server remotely, regardless of its location, using a web browser or mobile device. Perform essential tasks such as power control, configuration changes, and firmware updates without being physically present at the server.


-
 1
1
-
 2
2
-
 3
3
-
 4
4
-
 5
5
-
 6
6


Dell iDRAC7 Version 1.30.30 Quick start guide
- Type
- Quick start guide
Dell iDRAC7 Version 1.30.30 is an advanced remote access controller that provides comprehensive management and monitoring capabilities for Dell PowerEdge servers. With its enhanced features, you can efficiently manage your server infrastructure, ensuring optimal performance and availability.
Key capabilities of Dell iDRAC7 Version 1.30.30 include:
- Remote Server Management: Access and control your server remotely, regardless of its location, using a web browser or mobile device. Perform essential tasks such as power control, configuration changes, and firmware updates without being physically present at the server.
Ask a question and I''ll find the answer in the document
Finding information in a document is now easier with AI
Related papers
-
Dell Lifecycle Controller 2 Version 1.3.0 User manual
-
-
Dell iDRAC7 User guide
-
-
-
-
Dell PowerEdge M630 User guide
-
Dell PowerEdge C6320p User guide
-
Dell DSS 1510 User guide
-