Pioneer MVH-S720BHS Owner's manual

Category
Car media receivers
Type
Owner's manual
English Français Español
DIGITAL MEDIA RECEIVER
RÉCEPTEUR NUMÉRIQUE MULTIMÉDIA
RECEPTOR DE MEDIOS DIGITALES
MVH-S720BHS
Operation Manual
Mode d’emploi
Manual de operación
Important (Serial number)
The serial number is located on the bottom of this unit. For your own security and convenience, be sure to
record this number on the enclosed warranty card.
Important (Numéro de série)
Le numéro de série se trouve au bas de cet appareil. Pour votre sécurité et votre commodité, veillez à noter ce
numéro sur la carte de garantie fournie.
Importante (Número de serie)
El número de serie se encuentra en la parte inferior de esta unidad. Por su propia seguridad y comodidad,
asegúrese de anotar este número en la tarjeta de garantía que se adjunta.
- 2 -
English
Getting Started ........................................................................................ 3
HD Radio™ Technology .......................................................................... 7
USB/iPhone®/AUX................................................................................. 10
Bluetooth ............................................................................................... 12
Pandora® ................................................................................................ 16
Spotify® .................................................................................................. 18
SiriusXM Satellite Radio ...................................................................... 19
Using Pioneer Smart Sync/APP.......................................................... 23
Audio Adjustments .............................................................................. 26
Settings .................................................................................................. 28
FUNCTION settings ............................................................................... 28
AUDIO settings ...................................................................................... 31
SYSTEM settings .................................................................................... 34
ILLUMINATION settings........................................................................ 37
MIXTRAX settings.................................................................................. 38
Additional Information ....................................................................... 40
About this manual:
In the following instructions, a USB memory or USB audio player are referred to as
“USB device”.
Table of Contents
CAN ICES-3 B/NMB-3 B
- 3 -- 3 -
English
MVH-S720BHS
Optional remote control
The remote control CD-R510 is sold separately.
Frequently used operations
Getting Started
Basic operation
Purpose Operation
Turn on the power* Press SRC/OFF to turn on the power.
Press and hold SRC/OFF to turn off the
power.
Adjust the volume Turn the M.C. dial.
Select a source Press SRC/OFF repeatedly.
Change the display information Press DISP repeatedly.
Return to the previous display/list Press BAND/.
Return to the normal display from the menu Press and hold BAND/.
Change the display brightness (not
available when [SIRIUSXM] is selected as a
source)
Press and hold BAND/.
SRC (source)/OFF
Detach button
Display window
M.C. (multi-control) dial
BAND/
DISP (display)
(navigation)/LIST
USB port
AUX input jack (3.5 mm stereo jack)
BASS
- 4 -
English
* When this units blue/white lead is connected to the vehicle’s auto-antenna relay control terminal,
the vehicle’s antenna extends when this units source is turned on. To retract the antenna, turn the
source off.
Display indication
Detach the front panel to prevent theft. Remove any cables and devices attached to the
front panel and turn off the unit before detaching it.
Important
Avoid subjecting the front panel to excessive shock.
Keep the front panel out of direct sunlight and high temperatures.
Always store the detached front panel in a protective case or bag.
Answering a call Press any button.
Ending a call Press .
Boost the bass level Press BASS.
You can select the bass level ([HI] or
[LOW]) in [D.BASS] (page 33).
Indication Description
Appears when a lower tier of the menu or folder exists.
BASS Appears when the BASS function is activated.
Appears when random/shuffle play is set (except when BT AUDIO is
selected as the source).
Appears when repeat play is set (except when BT AUDIO is selected as the
source).
Appears when a Bluetooth connection is made (page 12).
APP Appears when a Pioneer Smart Sync connection is made (page 23).
Detaching the front panel
Purpose Operation
Detach Attach
- 5 -- 5 -
English
The microprocessor must be reset in the following situations:
Before using this unit for the first time after installation
If the unit fails to operate properly
When strange or incorrect messages appear on the display
1 Remove the front panel (page 4).
2 Press the RESET button with a pointed instrument longer than 8 mm.
When you turn the ignition switch to ON after installation, the setup menu appears in
the display.
WARNING
Do not use the unit in standard mode when a speaker system for network mode is connected to the
unit. Do not use the unit in network mode when a speaker system for standard mode is connected to
the unit. This may cause damage to the speakers.
1 Turn the M.C. dial to select the options, then press to confirm.
To proceed to the next menu option, you need to confirm your selection.
Resetting the microprocessor
Setup menu
Menu Item Description
LANGUAGE Select the language to display the text information from a
compressed audio file.
[ENG](English),
[ESP](Spanish),
[FRA] (Canadian
French)
CLOCK SET Set the clock.
1 Turn the M.C. dial to adjust the hour, then press to confirm.
The indicator moves to the minute setting automatically.
2 Turn the M.C. dial to adjust the minute, then press to confirm.
RESET button
- 6 -
English
2 [QUIT :YES] appears.
To return to the first item of the setup menu, turn the M.C. dial to select [QUIT :NO],
then press to confirm.
3 Press the M.C. dial to confirm the settings.
NOTE
These settings other than [SPEAKER MODE] can be made at any time from the SYSTEM settings
(page 34).
1 Press the M.C. dial to display the main menu.
2 Turn the M.C. dial to select [SYSTEM], then press to confirm.
3 Turn the M.C. dial to select [DEMO OFF], then press to confirm.
4 Turn the M.C. dial to select [YES], then press to confirm.
1 Press and hold SRC/OFF until the unit turns off.
2 Press the M.C. dial to display the main menu.
3 Turn the M.C. dial to select [INITIAL], then press to confirm.
4 Turn the M.C. dial to select an option, then press to confirm.
SPEAKER MODE Switch between two operation modes: the 2-way network mode
(NETWORK) and the standard mode (STANDARD) according to
the connections you have established. For details on operation
modes, see page 26.
After selecting the appropriate mode, turn the M.C. dial to
select [YES], then press to confirm.
You cannot complete the setup menu without setting the
[SPEAKER MODE].
Once the speaker mode is set, this setting cannot be changed
unless the default settings of this product are restored. Restore
the default settings to change the speaker mode setting (refer
to SYSTEM RESET on page 7).
When [NETWORK] is selected, the beep tone function is not
available.
[STANDARD],
[NETWORK]
Canceling the demonstration display (DEMO OFF)
INITIAL settings
Menu Item Description
- 7 -- 7 -
English
The tuner frequencies on this unit are allocated for use in North America. Use in other
areas may result in poor reception.
About HD Radio™ stations
HD Radio™ stations offer high-quality audio and data services. HD Radio stations are
brought to you by local FM/AM stations.
HD Radio stations feature the following:
High quality audio
–FM multicasting
Data services
Menu Item Description
REAR-SP Select when there is a full-range speaker connected to the rear
speaker output leads.
[FUL]
[SW] Select when there is a subwoofer connected directly to the rear
speaker output leads without any auxiliary amplifier.
SYSTEM UPDATE Select [SYSTEM INFO] to confirm the latest system information
on the unit.
Select [S/W UPDATE] to update the unit to the latest software
and initialize the unit settings. For details on the latest software
and updating, visit our website.
[SYSTEM INFO], [S/
W UPDATE]
SXM RESET Select to initialize the SiriusXM settings.
[YES], [NO]
SYSTEM RESET Select [YES] to initialize the unit settings. The unit will be
restarted automatically.
[YES], [NO]
HD Radio™ Technology
- 8 -
English
Program Service Data: Contributes to the superior user experience of HD Radio
Technology. Presents song name, artist, station IDs, HD2/HD3 Channel Guide, and other
relevant data streams.
Adjacent to traditional main stations are extra local FM channels. These HD2/HD3
Channels provide new, original music as well as deep cuts into traditional genre.
Digital, CD-quality sound. HD Radio Technology enables local radio stations to broadcast
a clean digital signal. AM sounds like todays FM and FM sounds like a CD.
1 Press SRC/OFF to select [HD RADIO].
2 Press BAND/ to select the band from [FM1], [FM2], [FM3] or [AM].
3 Press a number button (1/ to 6/).
The six strongest stations are stored on the number buttons (1/ to 6/).
1 After selecting the band, press the M.C. dial to display the main menu.
2 Turn the M.C. dial to select [FUNCTION], then press to confirm.
Receiving preset stations
Best stations memory (BSM)
Analog AM Digital AM
Analog FM
Analog FM
Analog FM
Digital FM-1 ch
Digital FM-2 ch
Digital FM-3 ch
Digital FM
FM band
Analog AM
AM band
- 9 -- 9 -
English
3 Turn the M.C. dial to select [BSM], then press to confirm.
To seek a station manually
1
After selecting the band, press / to select a station.
Press and hold / then release to seek an available station. Scanning stops
when the unit receives a station. To cancel seek tuning, press / .
NOTE
Depending on the reception status, seek tuning can be changed between digital station seek and all
station seek (page 28).
To store stations manually
1
While receiving the station you want to store, press and hold one of the number
buttons (1/ to 6/ ) until it stops flashing.
In emergency situations, drivers can receive messages via their local radio stations when
[AR] is set to [ON] in the FUNCTION settings (page 29).
While receiving an emergency alert, the following functions are available.
To ignore the alert
1
Press the M.C. dial, SRC/OFF, or .
To postpone the alert
1
Press BAND/.
1 While receiving an emergency alert, press and hold .
The last four items that have been received appear.
2 Turn the M.C. dial to select one of the items, then press to confirm.
The detail of the selected item appears.
NOTE
[/TEST/] appears at the beginning of an item if it was a test message.
Emergency alerts
Alert history
- 10 -
English
To delete an alert history
1
Press and hold the M.C. dial in step 2 above.
2 Turn the M.C. dial to select [DELETE YES], then press to confirm.
(iPhone source is not available when [USB MTP] is set to [ON] in the SYSTEM settings
(page 35).)
Disconnect headphones from the device before connecting it to the unit.
USB devices (including Android™)/iPhone
1
Open the USB port cover.
2 Plug in the USB device/iPhone using an appropriate cable.
NOTE
To automatically switch to USB source when a USB device/iPhone is connected to the unit, set [USB
AUTO] to [ON] in the SYSTEM settings (page 36).
CAUTION
Use a USB cable (sold separately) to connect the USB device as any device connected directly to the
unit will protrude out from the unit, which could be dangerous.
Before removing the device, stop playback.
AOA connections
A device running Android OS 4.1 or later installed and also supports AOA (Android Open
Accessory) 2.0 can be connected to the unit via AOA, using the cable supplied with the
device.
NOTE
If you use an AOA connection, [APP CONTROL] needs to be set to [WIRED] (page 35) and [USB MTP]
needs to be set to [OFF] (page 35) in the SYSTEM settings.
MTP connection
A device installed with Android OS 4.0 or most of later versions can be connected to the unit via MTP,
using the cable supplied with the device. However, depending on the connected device, OS version or
the numbers of the files in the device, audio files/songs may not be able to be played back via MTP.
Note that MTP connection is not compatible with WAV file formats and FLAC file formats, and cannot be
used with the MIXTRAX function.
USB/iPhone®/AUX
Playing back
- 11 -- 11 -
English
NOTE
If you use an MTP connection, [USB MTP] needs to be set to [ON] in the SYSTEM settings (page 35).
AUX
1
Insert the stereo mini plug into the AUX input jack.
2 Press SRC/OFF to select [AUX IN] as the source.
NOTE
If [AUX] is set to [OFF] in the SYSTEM settings, [AUX IN] cannot be selected as a source (page 35).
You can make various adjustments in the FUNCTION settings (page 28) (except for AUX
IN/USB source).
Note that the following operations do not work for an AUX device. To operate an AUX
device, use the device itself.
*1 Compressed audio files only
*2 When you use the fast forward or reverse function while playing a VBR file, the playback time may
be not correct.
Operations
Purpose Operation
Select a folder*1 Press 1/ or 2/.
Select a track/song (chapter) Press or .
Fast forward or reverse*2 Press and hold or .
Search for a file from a list (USB only) 1 Press and hold to display the list.
2 Turn the M.C. dial to select the desired
file (folder) name or category, then press
to confirm.
3 Turn the M.C. dial to select the desired
file, then press to confirm.
Playback starts.
View a list of the files in the selected folder/
category*1
Press the M.C. dial when a folder/category
is selected.
Play a song in the selected folder/
category*1
Press and hold the M.C. dial when a folder/
category is selected.
Repeat play Press 6/.
Random/shuffle play Press 5/.
Pause/resume playback Press 4/PAUSE.
Return to root folder (USB only)*1 Press and hold 1/.
- 12 -
English
The MIXTRAX function creates a non-stop mix of your music library, accompanied by
illumination effects. For details on MIXTRAX settings, see page 38.
NOTES
iPhone needs to be connected with Pioneer Smart Sync via USB for using this function (page 23).
Depending on the file/song, sound effects may not be available.
Turn the MIXTRAX function off if the illumination effects it produces interfere with driving.
1 Press 3/MIX to turn MIXTRAX on/off.
Important
If ten or more Bluetooth devices (e.g. a phone and separate audio player) are connected, they may not
work properly.
TIP
The next connection to the unit is performed automatically if the Bluetooth device has been connected
previously in the following steps.
1 Turn on the Bluetooth function of the device.
If you make a Bluetooth connection from the device, proceed to step 4.
2 Press to display the [ADD DEVICE] setting.
The unit starts to search for available devices, then displays them in the device list.
To cancel searching, press the M.C. dial.
If the desired device is not in the list, select [RE-SEARCH].
If there is no device available, [NOT FOUND] appears in the display.
If there is already a connected device, the phone menu appears by pressing .
3 Turn the M.C. dial to select a device from the device list, then press to confirm.
Press and hold the M.C. dial to switch the displayed device information between the
Bluetooth device address and device name.
If you make a Bluetooth connection from the unit, proceed to step 5.
4 Select the unit name shown in the device display.
5 Make sure the same 6-digit number appears on this unit and the device, then
select [YES] if the 6-digit numbers displayed on this unit and the device are the
same.
About MIXTRAX (USB/iPhone only)
Bluetooth
Bluetooth connection
- 13 -- 13 -
English
First, make a Bluetooth connection with the Bluetooth telephone (page 12). Up to two
Bluetooth telephones can be connected simultaneously.
Important
Leaving the unit on standby to connect to your phone via Bluetooth while the engine is not running
can drain the vehicles battery.
Be sure to park your vehicle in a safe place and apply the parking brake before operation.
To make a phone call
1
Press to display the phone menu.
When two phones are connected, a phone name appears first then a phone menu
will display. To switch to another phone, press again.
2 Turn the M.C. dial to select [RECENTS] or [PHONE BOOK], then press to confirm.
If you select [PHONE BOOK], proceed to step 4.
3 Turn the M.C. dial to select [MISSED], [DIALED] or [RECEIVED], then press to
confirm.
4 Turn the M.C. dial to select a name or phone number, then press to confirm.
The phone call starts.
To answer an incoming call
1
Press any button when a call is received.
TIP
When two phones are connected to the unit via Bluetooth and there is an incoming call while one
phone is being used for a call, a message will appear in the display. To answer that incoming call, you
need to end the existing call.
Basic operations
Bluetooth telephone
Purpose Operation
End a call Press .
Reject an incoming call Press and hold when a call is received.
Switch between the current caller
and a caller on hold
Press the M.C. dial.
Cancel a caller on hold Press and hold .
Adjust the volume of the callers
voice (When private mode is on,
this function is not available.)
Turn the M.C. dial during the call.
- 14 -
English
To preset phone numbers
1
Select a phone number from a phone book or call history.
2 Press and hold one of the number buttons (1/ to 6/).
The contact is stored in the selected preset number.
To make a call using a preset number, press one of the number buttons (1/ to 6/),
then press the M.C. dial, while the phone menu is displayed.
Voice recognition
This function is only available when an iPhone/Android device equipped with voice
recognition is connected to the unit via Bluetooth.
1 Press and hold and then talk into the microphone to input voice commands.
To exit the voice recognition mode, press BAND/.
NOTE
For details on the voice recognition features, refer to the manual supplied with your device.
TIP
When a Pioneer Smart Sync connection is made (page 23), you can also use the voice recognition
function from Pioneer Smart Sync installed on your iPhone/Android device by pressing and holding
. For details on the voice recognition features, see the application’s help section.
Phone menu
1
Press to display the phone menu.
Turn the private mode on or off Press BAND/ during the call.
Menu Item Description
RECENTS Display the missed call history.
[MISSED]
[DIALED] Display the dialed call history.
[RECEIVED] Display the received call history.
PHONE BOOK Display the contacts in your phone.
PRESET 1-6 Recall the preset phone numbers. You can also recall the preset
phone numbers by pressing one of the number buttons (1/
to 6/).
Purpose Operation
- 15 -- 15 -
English
* If two phones are connected, this function does not work on incoming calls that are received while
one of the phones is being used for a call.
Important
Depending on the Bluetooth audio player connected to this unit, the available operations will be
limited to the following two levels:
– A2DP (Advanced Audio Distribution Profile) can only play back songs on your audio player.
– AVRCP (Audio/Video Remote Control Profile) can perform functions such as playback, pause, select
song, etc.
The sound of the Bluetooth audio player will be muted when the phone is in use.
When the Bluetooth audio player is in use, you cannot connect to a Bluetooth telephone
automatically.
Depending on the type of Bluetooth audio player you have connected to this unit, operation and
information displayed may vary based on availability and functionality.
1 Make a Bluetooth connection with the Bluetooth audio player.
2 Press SRC/OFF to select [BT AUDIO] as the source.
3 Press BAND/ to start playback.
NOTE
You must reconnect the Bluetooth connection when the source is switched or the unit is turned off.
TIP
When more than two and up to five devices are registered to the unit via Bluetooth, you can switch the
Bluetooth device by playing back songs on the device. By doing so, playing back a song from the
Bluetooth device of each passenger is easily available. However, depending on the usage conditions,
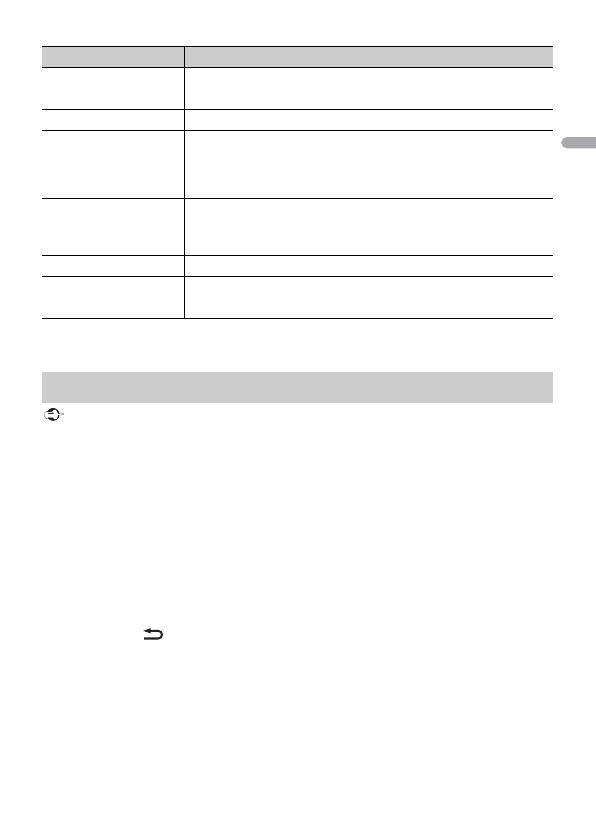
A.ANSR* Select [ON] to answer an incoming call automatically.
[ON], [OFF]
PB INVT Invert the order of names in the phone book (name view).
DEVICELIST Display the list of paired Bluetooth devices. “*” appears on the
device name when the Bluetooth connection is established.
When no device is selected in the device list, this function is not
available.
DEL DEVICE Delete the device information.
[DELETE YES],
[DELETE NO]
ADD DEVICE Register a new device.
DEV. INFO Switch the device information on the display between the
device name and Bluetooth device address.
Bluetooth audio
Menu Item Description
- 16 -
English
multiple connections may not be available and the audio files/songs may not be able to be played back
properly.
Basic operations
You can make various adjustments in the FUNCTION settings (page 28).
* Depending on the connected device, these operations may not be available.
(Not available when [USB MTP] is set to [ON] in the SYSTEM settings (page 35).)
Pandora music is a music service not affiliated with Pioneer. More information is
available at http://www.pandora.com.
The Pandora mobile application is available for iPhone and Android phones. Please visit
www.pandora.com/everywhere/mobile for the latest compatibility information.
Update the firmware of the Pandora application to the latest version before use.
1 Connect this unit with the mobile device.
iPhone via USB (page 10)
iPhone/Android device via Bluetooth (page 12)
2 Press SRC/OFF to select [PANDORA].
3 Press and hold 1/ to display [APP CONTROL].
4 Turn the M.C. dial to select one of the below.
Purpose Operation
Fast forward or reverse Press and hold or .
Select a track Press or .
Repeat play* Press 6/.
Random play* Press 5/.
Pause/resume playback Press 4/PAUSE.
Search for a file from a list 1 Press and hold to display a list.
2 Turn the M.C. dial to select the desired
folder name, then press to confirm.
3 Turn the M.C. dial to select the desired
file, then press to confirm.
Playback starts.
Pandora®
Listening to Pandora
- 17 -- 17 -
English
Select [WIRED] for the USB connection.
Select [BLUETOOTH] for the Bluetooth connection.
5 Press SRC/OFF to select [PANDORA].
6 Launch the Pandora application on the mobile device and start playback.
NOTE
When you connect a mobile device other than an iPhone/Android device, it may not operate correctly
depending on your mobile device.
Basic operations
You can make various adjustments in the FUNCTION settings (page 28).
NOTE
Some functions of Pandora may not be operated from the unit.
Purpose Operation
Skip a track Press .
Switch between Shuffle and the
station
Press and hold , then turn the M.C. dial to select
the Shuffle or the desired station.
Change the sort order Press and hold , then select one of the following.
[ABC]: Sort the items in the list alphabetically.
[DATE]: Sort the items in the list in order of the
dates on which the items were created.
Play When Shuffle or the station is selected, press the
M.C. dial.
Delete a station 1 When the station is selected, press and hold the
M.C. dial.
[DELETE YES] appears.
2 Press the M.C. dial.
To cancel, press BAND/ in step 1.
Pause/resume playback Press 4/PAUSE.
Thumbs Up Press 1/.
Thumbs Down Press 2/.
Create a new station based on the
track currently being played
Press and hold 5/.
Create a new station based on the
artist currently being played
Press and hold 6/.
Store the track information currently
being played in your Pandora
account.
1 Press and hold 3/MIX.
[BOOKMARK] appears.
2 Press the M.C. dial.
- 18 -
English
(Not available when [USB MTP] is set to [ON] in the SYSTEM settings (page 35).)
Spotify is a music streaming distribution service not affiliated with Pioneer. More
information is available at http://www.spotify.com.
The Spotify application is available for compatible smartphones, please visit https://
support.spotify.com/ for the latest compatibility information.
To enjoy Spotify as you drive, first download the Spotify app to your iPhone or Android
device. You can download it on the iTunes® App Store® or Google Play™. Choose a free
account or a paid Premium account, either in the app or at spotify.com. A Premium
account gives you more features, like offline listening.
Important
This product incorporates Spotify software which is subject to 3rd party licenses found here:
www.spotify.com/connect/third-party-licenses.
For information on the countries and regions where Spotify can be used, take a look at https://
spotify.com/us/select-your-country/.
Update the firmware of the Spotify application to the latest version before use.
1 Connect this unit with the mobile device.
iPhone via USB (page 10)
iPhone/Android device via Bluetooth (page 12)
2 Press SRC/OFF to select [SPOTIFY].
3 Press and hold 1/ to display [APP CONTROL].
4 Turn the M.C. dial to select one of the below.
Select [WIRED] for the USB connection.
Select [BLUETOOTH] for the Bluetooth connection.
5 Press SRC/OFF to select [SPOTIFY].
6 Launch the Spotify application on the mobile device and start playback.
NOTE
When you connect a mobile device other than an iPhone/Android device, it may not operate correctly
depending on your mobile device.
Basic operations
You can make various adjustments in the FUNCTION settings (page 28).
Spotify®
Listening to Spotify
- 19 -- 19 -
English
NOTE
The available operations may vary according to the type of contents (track/album/artist/playlist/radio)
you want to play.
NOTE
Some functions of Spotify may not be operated from the unit.
Only SiriusXM® brings you more of what you love to listen to, all in one place. Get over
140 channels, including commercial-free music plus the best sports, news, talk, comedy
and entertainment. Welcome to the world of satellite radio. A SiriusXM Vehicle Tuner and
Subscription are required. For more information, visit www.siriusxm.com
TuneStart™
Automatically start songs from the beginning when you tune to one of your preset
music channels stored on the current band of presets. For details, refer to TUNE START on
page 30.
NOTE
TuneStart is compatible with SXV200 or later tuner models. Not compatible with SXV100.
Purpose Operation
Skip a track Press or .
Search for a track from a list 1 Press and hold to display the list.
2 Turn the M.C. dial to select the desired
category, then press to confirm.
3 Turn the M.C. dial to select the desired
file, then press to confirm.
Playback starts.
Pause/resume playback Press 4/PAUSE.
Thumbs Up (Only for radio) Press 1/.
Thumbs Down (Only for radio) Press 2/.
Random play (Only for track/album/artist/
playlist)
Press 5/.
Repeat play (Only for track/album/artist/
playlist)
Press 6/.
Start a radio channel based on the song
currently being played.
1 Press and hold 5/ to start a radio.
2 Press the M.C. dial.
This function may not be available
depending on the selected song.
SiriusXM Satellite Radio
- 20 -
English
TuneScan
Scan through short previews of songs you may have missed on music channels stored
on the current band of presets.
Each song in the current channel plays for six seconds at a time.
For details, refer to TUNE SCAN (scanning the songs) on page 30.
NOTE
TuneScan is compatible with SXV200 or later tuner models. Not compatible with SXV100.
TuneMix
Create a TuneMix™ preset made up of 2 or more of your favorite SiriusXM music
channels. You can then access the TuneMix preset just like you would a traditional preset
channel. You can also edit your TuneMix preset to add or remove channels. For details,
refer to TUNEMIX on page 30.
NOTE
TuneMix™ is compatible with the SXV300 or later tuner models. Not compatible with the SXV200 or
SXV100.
1 Press SRC/OFF to select [SIRIUSXM].
You should be able to hear the SiriusXM preview channel on Channel 1. If you cannot
hear the preview channel, please check the installation instructions to make sure
your SiriusXM Connect tuner is properly installed.
2 Press / to select Channel 0.
The Radio ID appears on the display.
In addition, the Radio ID is located on the bottom of the SiriusXM Connect Vehicle
Tuner.
NOTE
The Radio ID does not include the letters I, O, S or F.
3 Activate the SiriusXM service online or by phone.
For US Subscriptions:
Visit www.siriusxm.com/activatenow
Call SiriusXM Listener Care at 1-866-635-2349
For Canadian Subscriptions:
Visit www.siriusxm.ca/activatexm
Call 1-877-438-9677
4 [SUBSCRIPTION UPDATED] appears on the display when your SiriusXM Connect
Vehicle Tuner has been subscribed successfully.
Press any key to clear the activation message.
Preparing for the SiriusXM Satellite Radio service
  • Page 1 1
  • Page 2 2
  • Page 3 3
  • Page 4 4
  • Page 5 5
  • Page 6 6
  • Page 7 7
  • Page 8 8
  • Page 9 9
  • Page 10 10
  • Page 11 11
  • Page 12 12
  • Page 13 13
  • Page 14 14
  • Page 15 15
  • Page 16 16
  • Page 17 17
  • Page 18 18
  • Page 19 19
  • Page 20 20
  • Page 21 21
  • Page 22 22
  • Page 23 23
  • Page 24 24
  • Page 25 25
  • Page 26 26
  • Page 27 27
  • Page 28 28
  • Page 29 29
  • Page 30 30
  • Page 31 31
  • Page 32 32
  • Page 33 33
  • Page 34 34
  • Page 35 35
  • Page 36 36
  • Page 37 37
  • Page 38 38
  • Page 39 39
  • Page 40 40
  • Page 41 41
  • Page 42 42
  • Page 43 43
  • Page 44 44
  • Page 45 45
  • Page 46 46
  • Page 47 47
  • Page 48 48
  • Page 49 49
  • Page 50 50
  • Page 51 51
  • Page 52 52
  • Page 53 53
  • Page 54 54
  • Page 55 55
  • Page 56 56
  • Page 57 57
  • Page 58 58
  • Page 59 59
  • Page 60 60
  • Page 61 61
  • Page 62 62
  • Page 63 63
  • Page 64 64
  • Page 65 65
  • Page 66 66
  • Page 67 67
  • Page 68 68
  • Page 69 69
  • Page 70 70
  • Page 71 71
  • Page 72 72
  • Page 73 73
  • Page 74 74
  • Page 75 75
  • Page 76 76
  • Page 77 77
  • Page 78 78
  • Page 79 79
  • Page 80 80
  • Page 81 81
  • Page 82 82
  • Page 83 83
  • Page 84 84
  • Page 85 85
  • Page 86 86
  • Page 87 87
  • Page 88 88
  • Page 89 89
  • Page 90 90
  • Page 91 91
  • Page 92 92
  • Page 93 93
  • Page 94 94
  • Page 95 95
  • Page 96 96
  • Page 97 97
  • Page 98 98
  • Page 99 99
  • Page 100 100
  • Page 101 101
  • Page 102 102
  • Page 103 103
  • Page 104 104
  • Page 105 105
  • Page 106 106
  • Page 107 107
  • Page 108 108
  • Page 109 109
  • Page 110 110
  • Page 111 111
  • Page 112 112
  • Page 113 113
  • Page 114 114
  • Page 115 115
  • Page 116 116
  • Page 117 117
  • Page 118 118
  • Page 119 119
  • Page 120 120
  • Page 121 121
  • Page 122 122
  • Page 123 123
  • Page 124 124
  • Page 125 125
  • Page 126 126
  • Page 127 127
  • Page 128 128
  • Page 129 129
  • Page 130 130
  • Page 131 131
  • Page 132 132
  • Page 133 133
  • Page 134 134
  • Page 135 135
  • Page 136 136
  • Page 137 137
  • Page 138 138
  • Page 139 139
  • Page 140 140
  • Page 141 141
  • Page 142 142
  • Page 143 143
  • Page 144 144
  • Page 145 145
  • Page 146 146
  • Page 147 147
  • Page 148 148
  • Page 149 149
  • Page 150 150
  • Page 151 151
  • Page 152 152
  • Page 153 153
  • Page 154 154
  • Page 155 155
  • Page 156 156

Pioneer MVH-S720BHS Owner's manual

Category
Car media receivers
Type
Owner's manual

Ask a question and I''ll find the answer in the document

Finding information in a document is now easier with AI