Part No 812379 Form No F060711B
11
DL12/13/14/18 Owner’s Manual
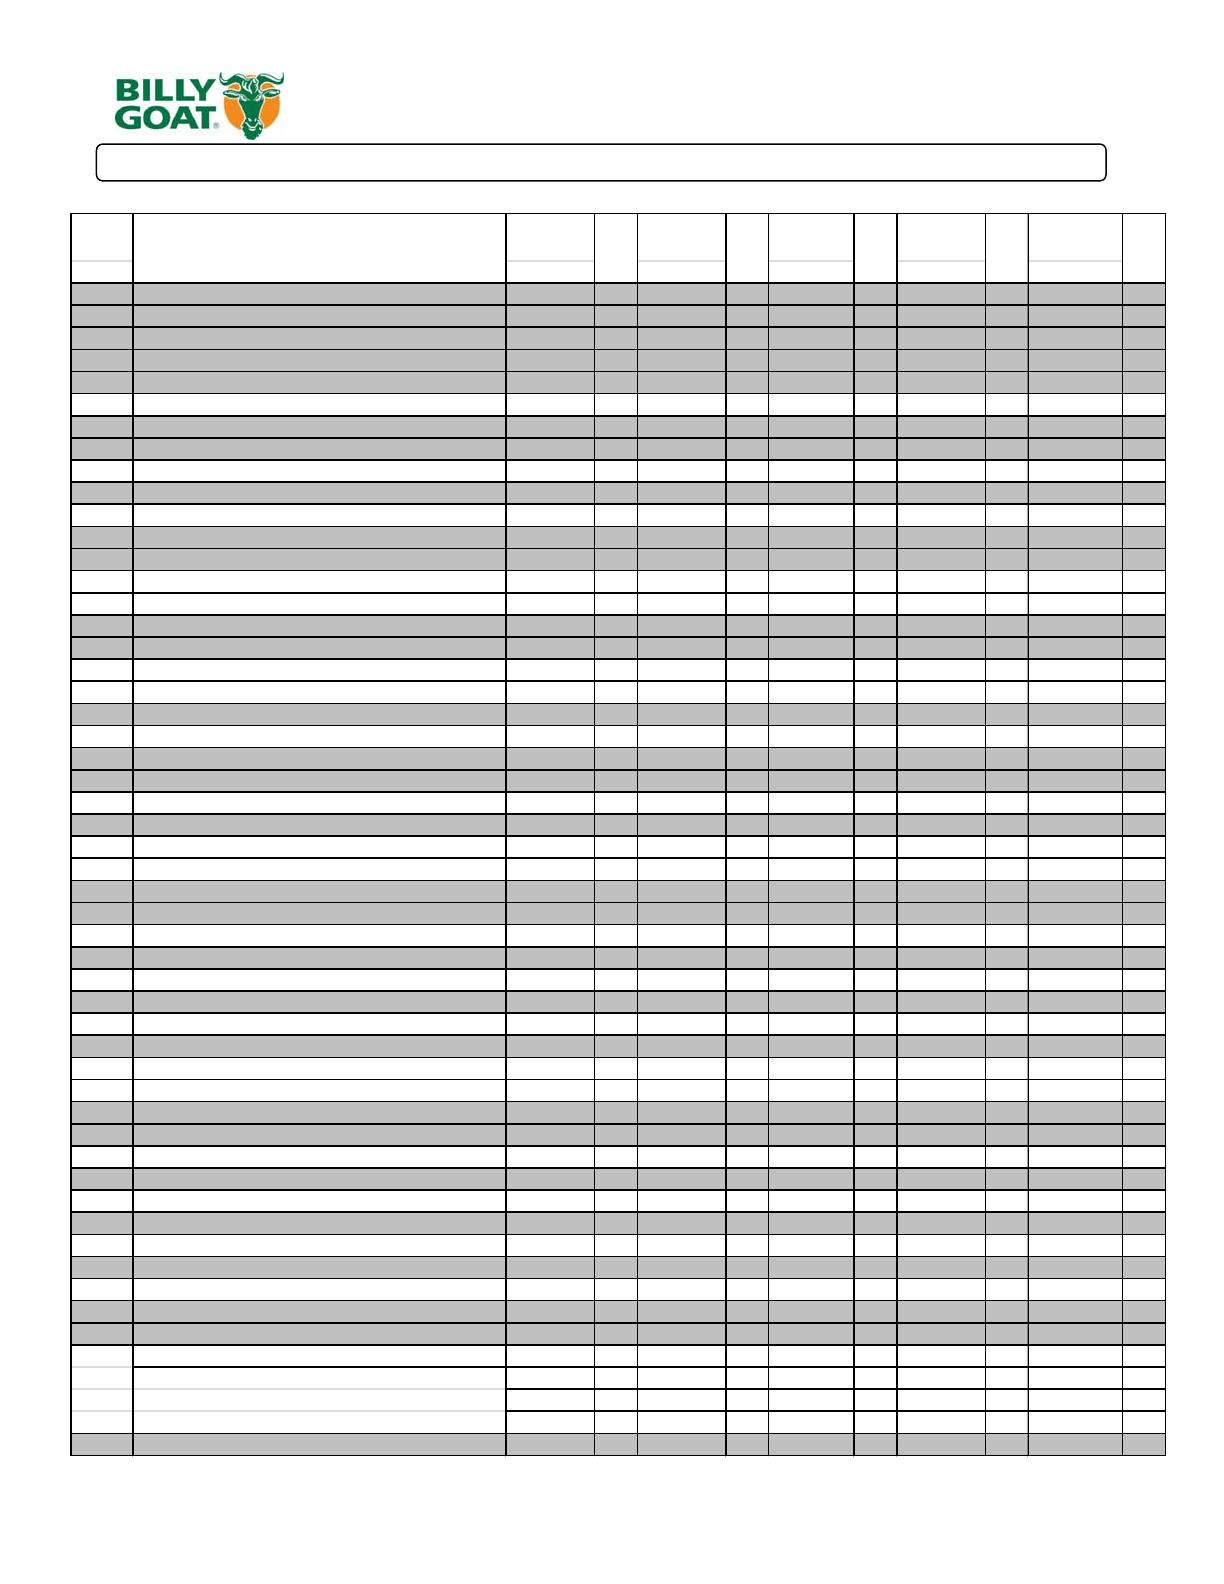
PARTS LIST
ITEM
DL1201L
PART
DL1301H
PART
DL1401SE
PART
DL1801V
PART
DL1801VE
PART
NO. NO. NO. NO. NO. NO.
1 ENGINE LCT 811250 1 - - - - - - - -
ENGINE HONDA - - 430366 1 - - - - - -
ENGINE VANGUARD - - - - - - 812240 1 - -
ENGINE VANGUARD ELECTRIC - - - - - - - - 812241 1
ENGINE SUBARU ELECTRIC - - - - 812369 1 - - - -
2 BASE ENGINE WA 812100-S 1 812100-S 1 812100-S 1 812100-S 1 812100-S 1
3 HOUSING WA DL12/13 W/LABELS 812216-S 1 812216-S 1 - - - - - -
HOUSING WA DL18 W/LABELS - - - - 812101-S 1 812101-S 1 812101-S 1
4 ELBOW ASSY 7" DL 812248-S 1 812248-S 1 812248-S 1 812248-S 1 812248-S 1
5 BOOM WA DL 812245 1 812245 1 812245 1 812245 1 812245 1
6 CHAIN HOSE HANG DL 791117 1 791117 1 791117 1 791117 1 791117 1
7 HOSE 8"X10" 811244 1 811244 1 - - - - - -
HOSE 10" X 10" - - - - 791033 1 791033 1 791033 1
8 CLAMP QUICK RELEASE 8" 812254 1 812254 1 - - - - - -
CLAMP QUICK RELEASE 10" - - - - 791064 1 791064 1 791064 1
9 CLAMP HOSE 8" 810566 1 810566 1 - - - - - -
CLAMP HOSE 10" - - - - 810706-01 1 810706-01 1 810706-01 1
10 NOZZLE 8" STEEL FORMED W/LABELS 811007-S 1 811007-S 1 - - - - - -
NOZZLE 10" STEEL FORMED W/LABELS - - - - 811005-S 1 811005-S 1 811005-S 1
11 HANDLE NOZZLE WA DEBRIS LOADER 791116 1 791116 1 791116 1 791116 1 791116 1
12 GRIP 1 1/4 I.D. X 9.5 LONG 440146 2 440146 2 440146 2 440146 2 440146 2
13 BAND HOSE BOOM 8" FORMED 810880 1 810880 1 - - - - - -
BAND HOSE BOOM 10" FORMED - - - - 810868 1 810868 1 810868 1
14 LABEL WARNING ENGINE OVERHEAT 811215 2 811215 2 811215 2 811215 2 811215 2
15 LABEL SPARK ARRESTOR 100252 1 100252 1 100252 1 100252 1 100252 1
16 PLATE FRONT WA DL 8" 812104-S 1 812104-S 1 - - - - - -
PLATE FRONT WA DL 10" - - - - 812103-S 1 812103-S 1 812103-S 1
17 FLAPPER WA 8" W/LABELS 812230-S 1 812230-S 1 - - - - - -
FLAPPER WA 10" W/LABELS - - - - 791102-S 1 791102-S 1 791102-S 1
18 LABEL WARNING OPEI 400424 1 400424 1 400424 1 400424 1 400424 1
19 STRAIN RELIEF HEYCO 1244 500282 1 500282 1 500282 1 500282 1 500282 1
20 LEVER HOSE SWITCH 791068 1 791068 1 791068 1 791068 1 791068 1
21 SWITCH AND HARNESS DL ASSY 791130 1 791130 1 791130 1 791130 1 791130 1
22 CONNECTOR TAP IN SQUEEZE 810673 1 810673 1 810673 1 - - - -
23 SPACER 3/8" X 2 1/2" 900503 1 900503 1 900503 1 900503 1 900503 1
24 LINER DL12/13 812221 1 812221 1 - - - - - -
LINER DL18 - - - - 812214 1 812214 1 812214 1
25 PLATE ENGINE MOUNT DL12/13 812235 1 812235 1 - - - - - -
PLATE ENGINE MOUNT DL18 - - - - 812238 1 812238 1 812238 1
26 GUARD MUFFLER DL18 - - - - - - 812242 1 812242 1
27 GUARD MANIFOLD DL18 - - - - - - 812243 1 812243 1
28 LABEL DL INSTRUCTION/WARNING 790142 1 790142 1 790142 1 790142 1 790142 1
29 LABEL LOGO DL12/13/18 812213 1 812213 1 812213 1 812213 1 812213 1
30 SPACER CONTROL LIFT - - - - - - 850198 4 850198 4
31 SCREW SN #10 X 1" TYPE A SLOT HWH - - - - - - 8122066 4 8122066 4
32 LABEL WARNING FUEL EN/SP 100261 1 - - - - 100261 1 100261 1
33 IMPELLER ASSY 812257-S 1 812257-S 1 - - - - - -
IMPELLER ASSY - - - - 810930 1 810930 1 810930 1
34 SCREWCAP 3/8"-24 X 2 3/4" GR 8. W/PATCH 790167 1 790167 1 - - - - - -
SCREWCAP 3/8"-24 X 2 1/4" GR 8. - - - - - - 810932 1 810932 1
SCREWCAP 3/8"-24 X 2" GR 8. W/PATCH - - - - 440237 1 - - - -
TORQUE 33-38 FT LBS. (45-52 N.m)
35 WASHER LOCK 3/8" 8177012 5 8177012 5 8177012 5 8177012 5 8177012 5
QTYQTY DESCRIPTION QTY QTY QTY