SOUNDIGITAL 20000.1 EVOX Owner's manual

Category
DJ controllers
Type
Owner's manual

SOUNDIGITAL 20000.1 EVOX, a high-quality Class D amplifier, offers exceptional audio performance with total efficiency over 70%. Its compact design allows versatile installation, while advanced technologies like Low Bass Correction and I-Power Supply ensure superior bass response and power without draining your battery. Experience the power and precision of pure sound with SOUNDIGITAL 20000.1 EVOX.

SOUNDIGITAL 20000.1 EVOX, a high-quality Class D amplifier, offers exceptional audio performance with total efficiency over 70%. Its compact design allows versatile installation, while advanced technologies like Low Bass Correction and I-Power Supply ensure superior bass response and power without draining your battery. Experience the power and precision of pure sound with SOUNDIGITAL 20000.1 EVOX.

OWNER´S MANUAL
20000.1
OWNER´S MANUAL
TABLE OF CONTENTS
Code document review: 1000750347-001/SEP2022
Introduction .................................................................................................................................................... 3
Package contents...................................................................................................................................... 3
Safety instructions ..................................................................................................................................... 4
Technologies
Low Bass Correction ...................................................................................................... 5
Ultra Compact PCB......................................................................................................... 5
Vibration Absorption Device ....................................................................................... 6
I-Power Supply.................................................................................................................... 6
Assembling and Disassembling the plastic cover ................................................................. 7
Panels description
Audio inputs, outputs and controls ........................................................................ 8
Power inputs........................................................................................................................ 9
Electrical Dimensioning ....................................................................................................................... 10
Audio input and output......................................................................................................................... 10
Installation sequence............................................................................................................................. 11
Gain Setting ................................................................................................................................................ 12
Bass Boost set up .................................................................................................................................. 13
Crossovers set up................................................................................................................................... 13
Wiring Diagram ......................................................................................................................................... 14
Technical specs
Parameters........................................................................................................................ 15
Dimensional data .......................................................................................................... 15
INTRODUCTION
3
DEAR CUSTOMER,
CONGRATULATIONS ON ACQUIRING A PRODUCT WITH THE HIGHEST
QUALITY AND TECHNOLOGY!
You have just purchased a SounDigital product of the highest technology and
quality, so we thank you for your confidence.
Class D Amplifiers:
Class D amplifiers have as main characteristics the audio quality, efficiency,
application versatility and compact design. Following are the advantages of these
features:
Audio Quality In the past, Class D products had limited response and for higher
frequencies, Class AB products performed better, but their efficiency was very low.
The new technologies introduced by SounDigital resulted in a Class D amplifier
with high efficiency and superior Class AB performance.
Efficiency – SounDigital Class D amplifiers have total efficiency (output + power
source) greater than 70%, which guarantees lower battery consumption and less
heating.
Application Versatility The flat full-frequency response of SounDigital
amplifiers allows them to be used in all car sound systems. Meeting the demands
with extreme quality.
Compact Design The high efficiency and high technology applied, allows
SounDigital amplifiers to be very compact, facilitating installation in vehicles where
space is limited.
IMPORTANT INFORMATIONS
On this manual you will learn about the product, its features and characteristics, in
order to obtain the best result and to be able to enjoy your music with SounDigital
quality and power.
To better understand and take advantage of all the functions of the product and use
it safely, read this manual carefully and if you have any questions, consult our
support by email: [email protected].
PACKAGE CONTENTS
01 Amplifier20000.1EVOX
01 Installation quick guide with warranty card
01 Allen wrench 2.5mm
01 Allen wrench 3.0mm
01 Allen wrench 4.0mm
01 Promotional sticker
SAFETY INSTRUCTIONS
THIS "WARNING" SIGN ALERTS THE USER OF IMPORTANT INFO. NOT FOLLOWING
THIS INSTRUCTIONS MAY CAUSE INJURIES TO THE USER OR DAMAGE TO THE
EQUIPMENT.
Warning!
To prevent injuries to the user or damage to the amplifier, read all safety instructions
written on this manual;
If you are insecure about the installation of this equipment, get in touch with our
tech support or with a professional specialized in car audio installation;
Before proceeding with the installation of any electric equipment on your vehicle,
unplug the negative (-) terminal of the battery to avoid fires, injuries or damages;
Use your sound system safely. The continuous exposure to sound pressures over
85dB may cause irreversible hearing damage;
This equipment is for use in automotive DC voltage batteries between 12.6 and
14.4 volts. Before installing the equipment, check voltage of the batteries;
Do not install the amplifier in places exposed to water, dirt or humidity;
Choose a ventilated place to install the amplifier and avoid blocking the side
ventilation windows;
Mount the amplifier in a secure way. Avoid mounting it on metallic parts of the
vehicle, because it may cause ground looping (noise);
Make sure that the location chosen for the amplifier installation does not effect the
operation of the vehicle;
When passing cables through metallic walls, use rubber O-rings to avoid cable
cutting and short-circuits;
Clean the amplifier periodically with brush or dry cloth to assure the thermal
efficiency of the heatsink;
This product may reach temperatures over 60°C/140°F. Make sure it is cold before
touching it;
Be careful when making holes in the vehicle. Make sure you are not making holes
in the fuel tank, brake lines or electrical cables of the vehicle;
Make sure the cables are properly secured throughout the installation;
Wear gloves, safety glasses and and all necessary PPE during the installation of
SounDigital amplifiers.
4
TECHNOLOGIES
An intelligent layout, with great use of the PCB area
and the use of modern components with reduced
structure guarantee SounDigital products a
compact design, at the same time robust and with
excellent thermal efficiency.
ULTRA COMPACT PCB
ROBUST CONSTRUCTION
Thinking about the application of power sports,
the product has an extremely robust assembly,
both the fixing points and the layout of the PCB
were designed to withstand high vibrations,
bumps and impacts.
5
The design of the EVOX line of amplifiers aims to give users the feeling of the
smooth and deep bass, without compromise! Our Low Bass Correction
technology compares the input signals to the amplifier against the output after
the amplification stage, making real time correction of the signal, delivering a
deeper bass with less distortion.
LOW BASS CORRECTION
TECHNOLOGIES
VIBRATION ABSORPTION
®
DEVICE - VAD
REDUCED SIZE
34"
8.9"
Our Technology reduces all impact
®
VAD
caused by vibration on the electronic circuit
board. This can include road vibration and
even vibration caused by sound waves,
increasing the reliability of our amplifiers.
The technology used in our
amplifiers bring both high
performance and power a
compact chassis, providing
flexible installation solutions for
vehicles with limited space.
6
*Efficiency measured at power supply only
SounDigital amplifiers are known for their low
consumption of battery, and this feature was
i m p r o v e d o n t h e E V O X L i n e . T h e n e w
I-POWER SUPPLY is even more modern, which
r e p l a c e s t h e o l d t o r o i d a l t r a n s f o r m e r s
by a new generation of "E-E" core transformers
delivers efficiency above 90%*, ensuring more
hours of sound without battery recharge.
I-POWER SUPPLY
1 2
21
DISASSEMBLING OF THE PLASTIC COVER
ASSEMBLING THE PLASTIC COVER
1. Carefully pull out the top of plastic cover to release the upside latches, as shown in the picture 1.
2. Slide up the plastic cover in a continuous movement to remove it.
1. To fit the plastic cover back, carefully insert the point A of the plastic cover into point B of the
amplifier, slowly sliding it down.
2. Gently press the sides of the top of the plastic cover towards the bottom of the amplifier until
you hear a clicking noise.
EN
ASSEMBLING AND DISASSEMBLING THE PLASTIC COVER
The plastic covers have the function of finishing and hiding the amplifier fixing
screws. To disassembling and assembling them, follow the instructions below.
7
B
A
*Merely illustrative images.
"Power ON" LED indicator
"Clip" LED indicator
"Protection" LED indicator
10
9
11 Red
Blue
Yellow
Variable Bass Boost Level Control (0dB ~ +12dB)
Variable Bass Boost Frequency Control (35Hz ~ 55Hz)
Variable Low Pass filter control (50Hz ~ 500Hz)
Variable Subsonic filter control (3Hz ~ 30Hz)
Variable Gain control
Audio RCA connectors
5
7
12
8
13
6
2
1Input
-
-
-
-
-
-
Output
-
Speaker output connectors
Remote level control connector
Minimun speaker load allowed (impedance)
PANELS DESCRIPTION
9
2
8
1 3 4 9 10 11 12
5 6 7 138
4
3
-
-
PANELS DESCRIPTION
9
17
16
15 18 20 23
14 22
21
19
Remote power supply connector (REM)
16
Negative power supply connector (GND)
-
-
15
14
Negative power supply connector (GND)
Positive power supply connector (+12VDC)
-
-
18
17
Positive power supply connector (+12VDC)
-Remote power supply connector (REM)
21
Negative power supply connector (GND)
-
-
23
22
Negative power supply connector (GND)
Positive power supply connector (+12VDC)
-
-
20
19
Positive power supply connector (+12VDC)
ELECTRICAL DIMENSIONING AND AUDIO INPUTS
ELECTRICAL DIMENSIONING
For proper operation of your SounDigital amplifier, you need the proper
dimensioning of the electrical system and the cables used.
The table below shows the minimum section of GND cables, +12VDC cables
and speaker output cables according to the power generated by the amplifier.
We recommend the use of ONLY OFC (Oxygen Free Copper) Cables on the
installation of our products.
RCA INPUTS
Example of two RCA cables connection (mono input).
Example of one RCA cable connection only
POWER CABLE
GROUND CABLE
SPEAKER CABLE
20000
WRMS
90mm² - 000 AWG
2 x 21mm² - 4 AWG
Example of one RCA cable connection only and using the RCA output to
connect another amplifier.
10
ØMount the amplifier in such a way you have access to the connectors;
ØInstall the power cables in the vehicle properly, starting from the battery to the fuse
holder or circuit breaker, use the cable with the appropriate size. Make all
connections, install fuse holders or circuit breakers, but without placing the fuses
or with the circuit breakers in the "OFF" position;
ØConnect the power cables in to the amplifier, observing the polarity. Connect all the
positive cables from the fuse holder or circuit breaker to the positive conector of
the amplifier and all the negative power cables from the batteries to the negative
connector of the amplifier;
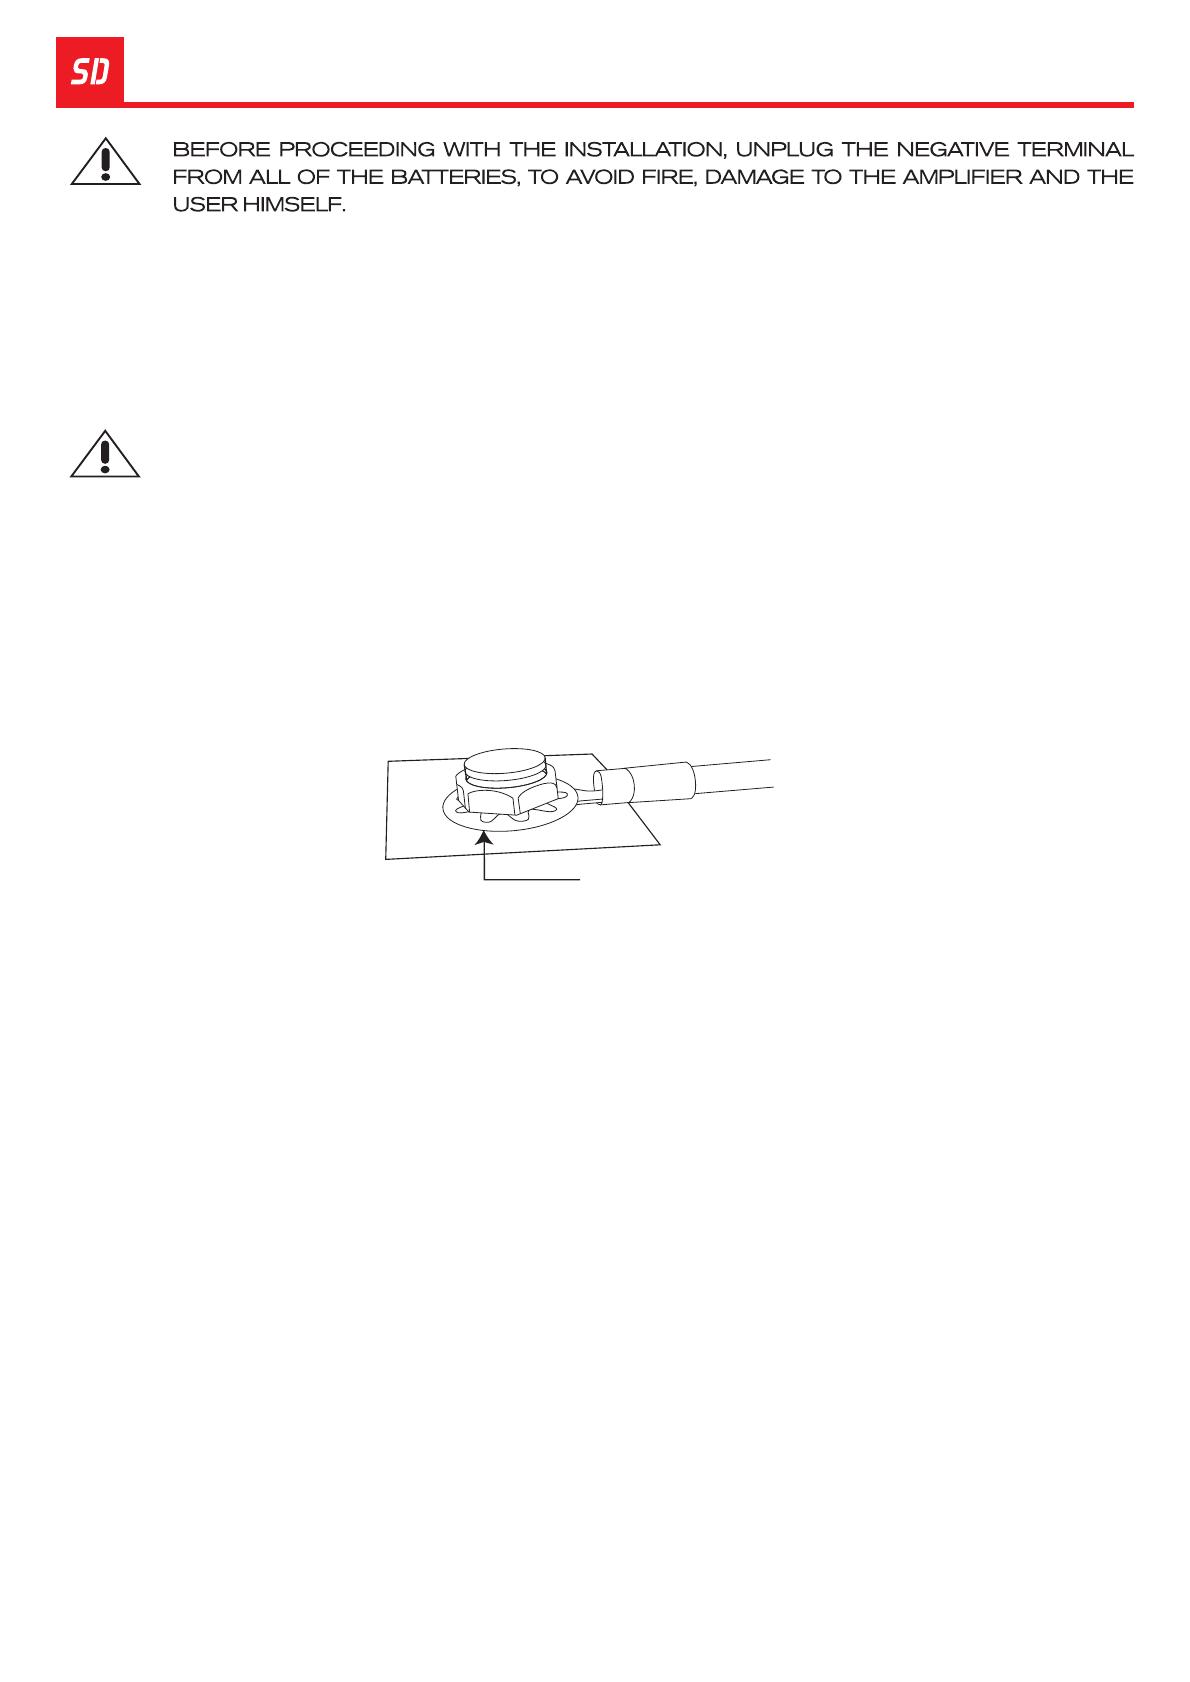
ØThe ground cable must be as short as possible and must be connected to the
vehicle chassis and the battery negative;
ØInstall the signal input cables in a proper way, distant from the power cables;
ØConnect the RCA or the high level signal input cables to the head unit and
amplifiers;
ØInstall the audio output cables with the appropriate section, distant from the power
and audio input cables;
ØConnect the audio output cables to the amplifier and speakers respecting the
positive (+) and negative (-) polarities;
ØInstall the remote cable with the power cables, using 1.5mm² (15 AWG) cable or
thicker;
ØConnect the remote power cable to the amplifier's "REM" terminal at the main unit's
remote power output (when not using the high level signal inputs);
ØBefore powering the system, verify all the connections and make sure there are no
mistakes or short-circuits on the power and ground cables;
Ø;Reconnect the ground of the batteries
ØCheck if the head unit is turned off and then place the fuses in the fuse holders or
switch the circuit breakers on;
ØTurn on the main unit and the amplifier will turn on the "ON" LED indicating that it is
in operation.
INSTALLATION SEQUENCE
Warning!
Warning!
Remove the paint between
the terminal and chassis
11
THE MAXIMUM DISTANCE FOR THE INSTALLATION OF THE FUSE/CIRCUIT
BREAKER IS 12 INCHES (30cm) AWAY FROM THE BATTERY.
GAIN SETING
GAIN SETTING
Necessary equipament:
ØDigital AC voltmeter;
ØMedia with sine wave test tone
60Hz recorded at 0dB;
ØScrewdriver 1/8" ( for gain set);
Set up procedure
Turn the gain control all the way
Ø
down;
ØDisconnect the output cables from
the amplifier outputs;
ØTurn off all processing (bass, treble,
loudness, EQ, etc.);
ØSet the source unit volume to 3/4 of
full volume;
ØOn the CD player, set the fader
control to center position;
ØSet the variable "LOW" crossover in
500Hz and the "HIGH" in 3Hz;
Ø Use a 60Hz sine wave;
ØIncrease the gain control until the
"CLIP" LED starts blinking;
ØReturn the gain to the limit where
the "CLIP" LED stops blinking and
remains off;
ØOnc e y ou have adjusted the
amplifier to the correct voltage
output, turn off the source unit and
reconnect the speaker(s).
12
Download the tracks for set up in https://soundigitalusa.com/tracks-for-set-up/
Reproduce your favorite song and set the variable frequency control to the
frequency you want boost between 35Hz and 55Hz. Set boost intensity between
0dB and +12dB at the variable control Level.
BASS BOOST AND CROSSOVER SET UP
Set in the "HIGH" variable control between 3Hz and 30Hz ("A") where you want to
perform the subsonic cut filter;
Set in the "LOW" variable control between 50Hz and 500Hz ("B") where you want
to perform the low pass cut filter;
Using Bass Boost
The Amplifier Bass Boost setting enables the user to boost the sound intensity at
low frequencies of the sound system, where boost intensity can be adjusted, as
well as the frequency of the region to be boosted, as indicated in the chart . This
is a semi-parametric equalizer type circuit with "Q" value for the fixed filter, with an
intensity boost adjustment from 0 to + 12dB (16 times), and a central frequency
adjustment of the filter between 35 and 55Hz, making it versatile for several types
of sound systems.
How to Adjust Bass Boost
How to Adjust the Crossovers
Bass Boost Chart
Bass Boost Level
12dB
dB
Hz
0dB
3dB
0
9dB
6dB
Boost
Frequency
-3dB
c/2
ƒ
High
Pass
c
ƒ
High
Pass
A
0dB
-12dB
dB
Hz
-6dB
0dB
-24dB
Low
Pass
B
c
ƒc*2
ƒ
Low
Pass
dB
Hz
13
WIRING DIAGRAM
MAIN UNIT REMOTE OUTPUT
POWER CONNECTIONS
AUDIO INPUT AND OUTPUT CONNECTIONS
REMOTE INPUT CONNECTIONS
Unplug the negative (-) terminal of the battery before proceeding
with any eletrical installation in the vehicle to avoid fire starts,
wounds or damage to the amplifier.
FUSES
FUSE
14
*Sold separately
GND
+12V
+12V
POWER CLIP
LEVEL
SD REMOTE
LEVEL CONTROL*
GND
TECHNICAL SPECS
RMS Power @ 2Ω**
RMS Power @ 1Ω**
Low Pass Filter (24dB/oct)
Operating Voltage
SNR
Input Sensitivity
Current Draw (music)
Total Efficiency
Damping Factor (@100Hz nominal impedance)
Fuse* (music)
Recommended Battery (minimum)
Current Draw (max.)
Subsonic Filter (12dB/oct)
1 x 13200W
1 x 20000W
5Hz ~ 500Hz
8V ~ 16V
76dB
0.2V ~ 4V
980A
1960A
71%
200
1000A
1000Ah
50Hz ~ 500Hz
3Hz ~ 30Hz
PARAMETERS
DIMENSIONAL DATA
20000.1 1Ω
833,7mm (32.8")
204,4mm (8.0")
863,2mm (34.0")
224,8mm (8.9")
71,5mm (2.8")
*It is mandatory to install the fuse at a maximum distance of 12 inches from the battery.
Gross Weight:
14,82 kg (32.67 lb)
Net Weight:
12,76 kg (28.13 lb)
RMS Power @ 4Ω**
1 x 8712W
Power cable
Audio output cable
90mm² (000 AWG)
2 x 21mm² (4 AWG)
15
**Power at 14.4V @ 60Hz with a maximum THD of 1%.
Frequency Response (-3dB)
CODE: 1000750347-001/SEP2022
  • Page 1 1
  • Page 2 2
  • Page 3 3
  • Page 4 4
  • Page 5 5
  • Page 6 6
  • Page 7 7
  • Page 8 8
  • Page 9 9
  • Page 10 10
  • Page 11 11
  • Page 12 12
  • Page 13 13
  • Page 14 14
  • Page 15 15
  • Page 16 16

SOUNDIGITAL 20000.1 EVOX Owner's manual

Category
DJ controllers
Type
Owner's manual

SOUNDIGITAL 20000.1 EVOX, a high-quality Class D amplifier, offers exceptional audio performance with total efficiency over 70%. Its compact design allows versatile installation, while advanced technologies like Low Bass Correction and I-Power Supply ensure superior bass response and power without draining your battery. Experience the power and precision of pure sound with SOUNDIGITAL 20000.1 EVOX.

Ask a question and I''ll find the answer in the document

Finding information in a document is now easier with AI