Page is loading ...

© 2022, A/C Solutions. All rights reserved.
BMW E28 Sanden Conversion Kit
Version 1.5.1
6/30/2022

E28 Sanden Conversion Kit V1.5.1
© 2022, A/C Solutions. All rights reserved. 2
Forward
Welcome to the official A/C Solutions E28 Sanden Conversion Kit user guide. This document
contains product specifications, installation instructions, and troubleshooting for the E28 chassis.
This user guide is intended for the BMW owner with basic mechanical skills; however, the
evacuation and charging of freon should be handed by a licensed A/C professional. Assembly
instructions assume the vehicle is stock and still retains all its original equipment. Always conform
to basic safety standards and procedures when working with automotive chemicals, tools, and
electrical equipment. If you are uncertain about your mechanical abilities during the removal or
installation, please consult a certified professional mechanic. If you or your mechanic has any
questions regarding this kit, or would like to provide feedback, please do not hesitate to contact
us at [email protected].
Disclaimers
R134a is a potent greenhouse gas with a global warming potential that is 1,430 times that of CO2.
Use of HFC-134a in MVAC systems accounts for an estimated 24% of total global HFC
consumption. It is the most abundant HFC in the atmosphere. HFC-134a will no longer be
approved for use in new light-duty vehicles manufactured or sold in the United States as of model
year 2021 as a result of EPA’s July 2015 final rule under SNAP (July 20, 2015, 80 FR 42870);
however, servicing of existing vehicles using HFC-134a with HFC-134a will not be impacted and
will continue to be allowed. This information is current as of April, 2022.
Prop 65 WARNING: This product can expose you to tetrafluoroethylene, which is known to the
State of California to cause cancer. For more information, go to www.P65Warnings.ca.gov.
By opening this product, the user assumes all risk. Improper use or handling of automotive
equipment and tools can lead to injury or death.

E28 Sanden Conversion Kit V1.5.1
© 2022, A/C Solutions. All rights reserved. 3
Components Included:
• Parallel flow condenser (complete with fan brackets)
• Sanden compressor (SD5H14 6630) w/ 1-year warranty
• Low-pressure suction line (LINE A)
• High-pressure discharge line (LINE B)
• High-pressure condenser return line (LINE C)
• Sanden compressor bracket
• Compressor mounting hardware
• Condenser supporting bracket mounting hardware
• Condenser supporting brackets
• Fan mounting hardware
• R134a compliant engine bay O-ring kit
• Filter drier
• V-belt
• Heat shrink tubing
• 22ga crimp
• Body edge trim
• Trim screw
• Instructions
Tools Needed for Assembly:
Tools and equipment needed for removal will vary by model/year.
• Metric combo wrench set
• Metric socket set
• Combo crimp tool
• Pencil torch/lighter (for heat shrink)
• PAG oil (for O-ring installation)
• PTFE thread sealant or freon compatible sealer

E28 Sanden Conversion Kit V1.5.1
© 2022, A/C Solutions. All rights reserved. 4
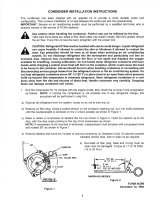
Diagrams
Figure 1
Figure 2 Figure 3

E28 Sanden Conversion Kit V1.5.1
© 2022, A/C Solutions. All rights reserved. 5
System Check & Optional Items Needed:
Depending on the condition of the vehicle, the following components should be inspected for
proper functionality/leaks/damage/etc. prior to the assembly of the new system as they will all
affect A/C cooling performance. Ohm values and other system specifications can be found in your
workshop manual. Freon operates in a closed system and will not function properly with leaks. It
is imperative that the system be flushed and decontaminated prior to installing the new
components.
• A/C high-pressure switch (ensure ohm values are within range; inspect for leaks)
• High-pressure drier return line (inspect rubber hose for leaks)
• Auxiliary fan and auxiliary fan relays, switches, etc. (check for functionality)
• Expansion valve (R12 type is acceptable, but R134a type is preferred)
• Evaporator (inspect for leaks and/or damage)
• Interior A/C selector switch (check for functionality)
• Interior A/C line O-rings (inspect for leaks)
• Interior A/C blower motor (check for functionality)
• Interior temperature sensor (ensure ohm values are within range)
• Evaporator temperature sensor (check for functionality)
• Evaporator regulator/control module (check for functionality)
• Fresh air flap control unit, actuator, and potentiometer (check for functionality)

E28 Sanden Conversion Kit V1.5.1
© 2022, A/C Solutions. All rights reserved. 6
Installation Instructions
Do not discard of any of the original components as some may be used during the installation
process.
PART 1 OF 2: DISASSEMBLY .................................................................................................... 7
A. Remove A/C compressor ...................................................................................................... 7
B. Remove filter drier ................................................................................................................ 7
C. Remove condenser and auxiliary fan ................................................................................... 8
PART 2 OF 2: ASSEMBLY .......................................................................................................... 9
A. Install auxiliary fan to parallel flow condenser ...................................................................... 9
B. Install condenser to chassis ................................................................................................ 10
C. Install compressor and mounting bracket ........................................................................... 11
D. Install filter drier .................................................................................................................. 11
E. Install A/C lines ................................................................................................................... 12
F. Vacuum test and charge ..................................................................................................... 13
TROUBLESHOOTING ............................................................................................................... 15

E28 Sanden Conversion Kit V1.5.1
© 2022, A/C Solutions. All rights reserved. 7
PART 1 OF 2: DISASSEMBLY
A. Remove A/C compressor
Discharge and evacuate the existing freon. Once evacuated, flush the system to
remove old oil and contaminants.
NOTE –
The evacuation of freon (R12 or R134a), must be done by a certified
A/C shop as its chemicals are toxic and harmful to the environment.
Always perform an evacuation/discharge in a well-ventilated area.
Disconnect the negative ( - ) cable from the battery.
Remove the low-pressure suction line (LINE A).
NOTE –
For model with fuel coolers, you will be required to remove and cap
the fuel lines as the fuel cooler will not be reused during install.
Remove the high-pressure discharge line (LINE B).
Disconnect the wiring from the wiring harness to the compressor.
NOTE –
Depending on the year, the vehicle may have 2 wires exiting the
compressor for the external temp sensor cut off switch. Disconnect
one/both from the wiring harness loom.
Remove the compressor V-belt and compressor.
Remove the compressor adjustment bracket – leaving the aluminum accessory
bracket on the engine block.
B. Remove filter drier
Disconnect/loosen the high-pressure condenser return line (LINE C) and high-
pressure drier return line (LINE D) from the filter drier.
NOTE –
Do NOT open or install the new drier at this time.
Disconnect the high-pressure switch connector from the wiring harness and unbolt and
remove the filter drier.

E28 Sanden Conversion Kit V1.5.1
© 2022, A/C Solutions. All rights reserved. 8
Remove the high-pressure switch from the existing drier, but do NOT yet install on the
new drier.
C. Remove condenser and auxiliary fan
Remove the aux fan/condenser plastic cover.
Remove the high-pressure condenser return line (LINE C) (this will not be reused).
Disconnect the aux fan connector from the wiring harness.
While leaving the aux fan attached, remove the condenser and fan assembly from the
condenser supporting brackets that are attached to the chassis/core support.
Remove the 4 condenser supporting brackets that are attached to the chassis/core
support.
NOTE –
Set the 4 10mm screws aside as they will be used during install.
With the condenser out of the car, remove the 3 nuts that hold the fan and separate
the fan from the condenser.
NOTE –
Set the fan hardware aside as it will be used during install.
This concludes disassembly. At this time, it is suggested to clean and degrease any areas of the
chassis that are now accessible with the A/C system partially removed. Keep all your original
components as some will be used during the installation process.

E28 Sanden Conversion Kit V1.5.1
© 2022, A/C Solutions. All rights reserved. 9
PART 2 OF 2: ASSEMBLY
A. Install auxiliary fan to parallel flow condenser
Place the new condenser on a flat surface with a piece of cardboard overtop to protect
the fins.
Rotate and align the fan in position with the wiring and isolator block mounted to the
top side of the condenser as shown:
Using the 3 supplied washers, assemble and tighten the fan to the condenser in the
following orientation with the nut on the outside of the fan shroud as shown:
NOTE –
The fan brackets may not initially line up, but once the bolts are
tightened, the fan will lock into place.
Auxiliary fan assembly is now complete.

E28 Sanden Conversion Kit V1.5.1
© 2022, A/C Solutions. All rights reserved. 10
B. Install condenser to chassis
Using the original 10mm trim screws used during removal, install the 2 short condenser
supporting brackets (hand tight) to the driver’s side (R) of the chassis/core support in
following orientation:
NOTE –
Install the driver’s side condenser supporting brackets with the large
slot to the chassis/core support.
With the aux fan attached, loosely install the condenser into position with the adjuster
tabs behind the condenser supporting brackets.
NOTE –
It may be helpful to hang and float the condenser from the hood
latch while aligning the adjuster brackets.
With the condenser in its approximate location, install the 2 long, passenger side (L)
condenser supporting brackets (hand tight) using the original 10mm trim screws. Refer
to the orientation in the diagram above.
Using the 4 supplied 8mm trim screws, adjust, align, and tighten down the condenser
so that it is 3-8mm from the front of the radiator on all 4 corners.
Once tightened to final position, connect the aux fan to the wiring harness.
R
R
L
L
R

E28 Sanden Conversion Kit V1.5.1
© 2022, A/C Solutions. All rights reserved. 11
Condenser and aux fan installation is now complete.
C. Install compressor and mounting bracket
Using the supplied wiring kit, splice and crimp the original male bullet connector from
the end of the old compressor to the single wire coming off the new compressor.
NOTE –
Depending on the year, the vehicle may have 2 wires exiting the
compressor for the external temp sensor cut off switch. This can be
bypassed as it will not be needed on the new compressor.
Apply heat shrink and check electrical connection.
With the old compressor adjustment bracket and accessory bracket removed, fit and
install the new compressor bracket with the supplied hardware and tighten. Refer to
the orientation below:
Install new V-belt and tighten.
NOTE –
For initial installation, it is recommended to tighten the V-belt before
installing the AC lines to ensure they are positioned in the proper
orientation. This will ensure easy removal of the V-belt in the future
without damaging the lines.
Connect compressor wiring to the wiring harness.
Compressor and mounting bracket installation are now complete and ready for lines.
D. Install filter drier
Carefully open the filter drier (it will be charged with Nitrogen), and transfer over the
high-pressure cut off switch (or install new). Coat with a freon compatible thread
sealant or PTFE tape and tighten until snug.

E28 Sanden Conversion Kit V1.5.1
© 2022, A/C Solutions. All rights reserved. 12
Place filter drier into location leaving the mounting nut loose for ease of installing lines.
Connect high-pressure switch to the wiring harness.
The filter drier installation is now ready for lines.
E. Install A/C lines
Install the high-pressure condenser return line (LINE C) from the drier to the condenser
using the supplied O-rings (1x small, 1x medium) and tighten.
NOTE –
O-rings must be lubricated with PAG oil when installed.
Refit the original high-pressure drier return line (LINE D) to the drier using the supplied
O-ring (1x medium).
Install the high-pressure discharge line (LINE B) from the condenser to the compressor
using the supplied O-rings (2x medium).

E28 Sanden Conversion Kit V1.5.1
© 2022, A/C Solutions. All rights reserved. 13
NOTE –
It is recommended to install the compressor side first, then snake
the hose up underneath the ABS unit and around the tow hook to
attach to the condenser.
Using the supplied 8mm trim screw and the original hose clamp, support the using the
factory brake ducting mount underneath the ABS unit.
NOTE –
If you have factory brake ducting, you can reuse your original trim
screw or install new.
Tighten the filter drier mounting nut to chassis.
Using the supplied edge trim, cut and install to any areas where the new rubber hoses
(LINE B or C) may contact sharp edges of the chassis.
Install the low-pressure suction line (LINE A) from the bulkhead to the compressor
using the supplied O-rings (2x large).
NOTE –
For M30 applications, the charge port adapter (LINE A-1) is fitted
between the bulkhead line and LINE A using an additional O-ring
(1x large). A slight rotation of this fitting may be required to clear the
intake boot.
Install the aux fan/condenser plastic cover.
A/C line installation is now complete.
F. Vacuum test and charge
Do NOT add oil as the compressor already contains the proper amount of oil for the
system.
NOTE –
If you are driving the vehicle to an A/C shop for charging and/or
vacuum/pressure testing, it is recommended to disconnect the A/C
compressor wire to protect the system from running without freon.
Pull a vacuum on the system for a minimum of 1 hour.
Using a gauge set or A/C machine, let the system sit for a minimum of 1 hour and
ensure no pressure is lost. If pressure is lost, inspect all components for leaks, then
diagnose, repair, and retest.
Refer to the following table when filling the system to capacity.

E28 Sanden Conversion Kit V1.5.1
© 2022, A/C Solutions. All rights reserved. 14
NOTE –
Charging and filling of the system should be completed by a
licensed A/C professional. Do NOT overcharge the system as it will
result in catastrophic failure.
This concludes assembly. If you or your mechanic has any questions regarding this kit, or would
like to provide feedback, please do not hesitate to contact us at info@acsolutions.co.
Model
R134a Capacity
528e
1.91 lbs ± 0.05
533i
1.91 lbs ± 0.05
535i
1.91 lbs ± 0.05
535is
1.91 lbs ± 0.05
M5
1.69 lbs ± 0.05

E28 Sanden Conversion Kit V1.5.1
© 2022, A/C Solutions. All rights reserved. 15
TROUBLESHOOTING
Problem
Solution
System leaks/does
not hold vacuum or
freon.
Inspect all line and hose connections, fittings, and components for
leaks.
Interior vent temps
are >50 deg
Fahrenheit.
Ensure the system is charged to the correct pressure/capacity, check
to see if compressor clutch is engaging/disengaging properly, check
system for leaks, confirm functionality of expansion valve.
Interior vent temps
are <32 deg
Fahrenheit.
Ensure the system is charged to the correct pressure/capacity, check
to see if compressor clutch is engaging/disengaging properly, check
functionality of evaporator temp sensor, evaporator control module,
and high-pressure cutoff switch.
Compressor is not
engaging.
Check electrical connection to the compressor, check all interior
sensors and switches to ensure continuity/functionality, ensure system
is not over or undercharged.
Auxiliary fan is not
running.
Check fan relay, fuses, and electrical connection at the front of the
vehicle.
/