Frymaster 8263755 Installation guide

Category
Car kits
Type
Installation guide

Frymaster 8263755 is a cooling fan and shroud kit designed to improve the performance and longevity of Jabil Common Controller Touch Screen Fryers. It includes a 5VDC USB fan, mounting bracket, screws, nuts, and instructions. This kit helps prevent overheating by actively cooling the controller, extending its lifespan and ensuring reliable operation. Installation involves disconnecting the fryer from power, removing the old bezel and controller, attaching the cooling shroud and fan assembly, and reconnecting the controller.

Frymaster 8263755 is a cooling fan and shroud kit designed to improve the performance and longevity of Jabil Common Controller Touch Screen Fryers. It includes a 5VDC USB fan, mounting bracket, screws, nuts, and instructions. This kit helps prevent overheating by actively cooling the controller, extending its lifespan and ensuring reliable operation. Installation involves disconnecting the fryer from power, removing the old bezel and controller, attaching the cooling shroud and fan assembly, and reconnecting the controller.

Document Number: FRY_INST_8197999 11/2022 1 of 4
*8197999*
Follow these instructions to install a
Cooling fan/shroud on a Jabil Common
Controller.
1. Disconnect the fryer from the electrical power
supply. On electrical fryers, the indivudual fryer
can be
switched
off with
the
switch
next to
the fuses
inside the
door (see
Figure 1).
2. Remove the acorn nuts, washer and
plates on both ends of the guard if
applicable (see Figure 2) and discard.
3. Slide one end of the guard up the rail at an
angle until it can be removed if applicable
(see Figure 3) and discard.
4. Remove the two Phillips head screws from
the upper left and right corners of the
controller (see Figure 4).
5. Slide the controller up to disengage it
from the bezel (see Figure 5).
6. Lift the controller out from the bezel (see
Figure 6).
7. Lower the controller and rest it on the
bottom of the control box (see Figure 7). The
black tether on the right will support the
controller.
8. Disconnect the RJ45 cable from the SIB board
FIRST (see Figure 8).
FRYMASTER DEAN
8700 LINE AVENUE, SHREVEPORT, LA 71106
318-865-1711
800-551-8633
WWW.FRYMASTER.COM
EMAIL: FRYSERVICE@WELBILT.COM
Subject: 8263755 Jabil Common Controller
Cooling Fan/Shroud Kit Installation Instructions
Models affected: Jabil Common Controller
Touch Screen Fryers
Instruction Sheet
In This Kit
Part #
Description
130000437
STUD ASSY, FQ4K SERVICE UI
130151658
COVER, JABIL UI W/FAN
130011822 BRACKET, CONVECTION FAN 1
130000436
FAN, 5VDC USB 40MMX10MM
130009402
SCREW, #8 X ¼ BRITTLE PLASTIC
8090250
8-32 KEPS NUT ZC
W15C578 WIRE 15C 03 8.0 15 36 1
8090364
SCREW, #8X5/8 HX WSHR HD ZP
8197999
FAN/SHROUD KIT INSTRUCTIONS
Figure 1
Figure 2
Figure 4
Figure 5
Figure 3
Figure 8
Figure 6
Figure 7
2 of 4
Document Number: FRY_INST_8197999 11/2022
9. Disconnect the
ground cable and
the speaker cable
and the USB cable (if
applicable) (see
Figure 9).
10. Disconnect the
lanyard tether from
the frame (see Figure
10) to remove the
controller.
11. If installing in
an electric
fryer bend the
speaker down
towards the
rear of the
component
box (see Figure 11) and skip to step 20.
12. If installing in a gas fryer, remove the bezel by removing the two screws on the
bottom of the bezel (see Figure 12) and tilting the bezel up from the bottom and
lowering towards the front of the
fryer (see Figure 13).
13. The speaker bracket and relay(s) will
need to be relocated to allow room
for the cooling shroud (see Figure
14).
14. Remove the two (2) screws attaching
the speaker to the bracket (see
Figure 15).
15. Remove the two (2) screws attaching
the speaker bracket to the
component box (see
Figure 16).
16. Reattach the speaker to
the bracket (see Figure
17).
17. Rotate the speaker 180
degrees so the speaker
is facing the rear of the
component box and reattach the bracket to the component
box using the screws and the existing holes (see Figure 18).
18. Remove the two (2)
screws attaching the
relay to the top of the
component box (see
Figure 19).
19. Using supplied drill point
screws to relocate the
relay about one (1) inch
behind its existing
position (holes), toward
the rear of the box as
shown (see Figure 20).
20. Relocate the controller to a flat surface away from the
fryer to attach the cooling shroud.
Figure 9
Figure 10 Figure 11
Figure 12
Figure 13
Figure 14
Figure 15
Figure 16
Figure 17
Figure 18
Figure 19
Figure 20
3 of 4
Document Number: FRY_INST_8197999 11/2022
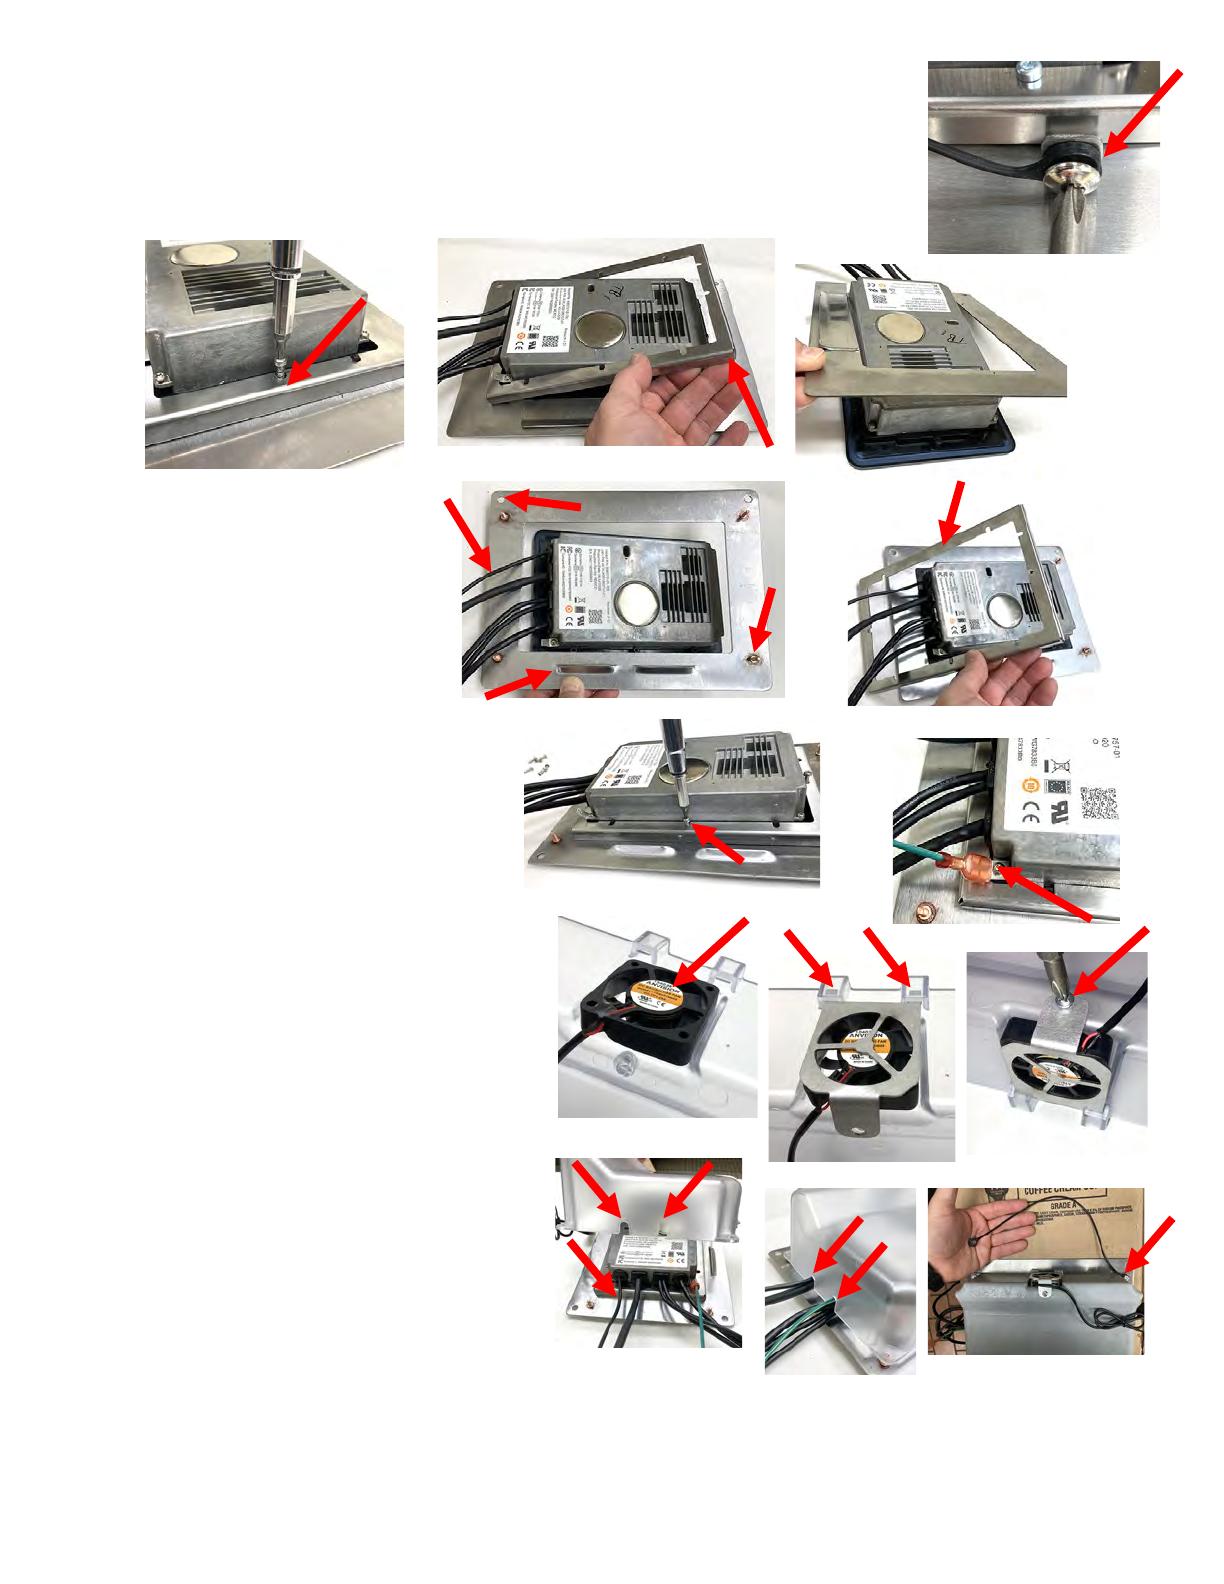
21. Disconnect the lanyard from the existing bezel and set aside for reassembly (see Figure
21).
22. Using a T15 Torx driver, remove the eight (8) screws attaching the controller frame to the
bezel (see Figure 22). Set aside for reassembly.
23. Lift and remove the controller frame from the bezel (see Figure 23).
24. Lift and remove the bezel from the controller (see Figure 24).
25. Discard the bezel removed in the previous step.
26. Orient the controller with the
cables to the left. With the studs
facing up, the mounting holes
away from you and the vent
towards you, orient the new bezel
as shown. Route the cables
through the bezel and lower onto
the controller (see Figure 25).
Ensure the bezel is laying flat on
the lip of the controller.
27. Route the cables through the controller
mounting frame that was removed in
step 23 and mount on rear of controller
(see Figure 26).
28. Attach the controller mounting frame to
the controller using the screws removed
in step 22 (see Figure 27).
29. Attach supplied ground wire to the
ground lug on the controller (see Figure 28).
30. Orient and place the micro-fan on top of the
cooling shroud as shown with the label
facing up (see Figure 29).
31. Insert the two (2) tabs of the mounting
bracket into the rear mounting slots on top
of the fan (see Figure 30).
32. Attach the fan mounting bracket with
supplied screw (see Figure 31).
33. Align the slots of the cooling shroud with the
cables (see Figure 32).
34. Insert the two (2) cables on the upper side of
the controller in the top slot and the other
four (4) cables in the lower slot while gently
lowering the cooling shroud over the studs
(see Figure 33).
35. Attach the lanyard removed in step 21 to the
top right corner of the cooling shroud with
the supplied nut (see Figure 34).
36. Attach the other three corner studs using the supplied nuts.
Figure 22
Figure 23
Figure 24
Figure 25
Figure 26
Figure 27
Figure 28
Figure 21
Figure 29
Figure 30
Figure 31
Figure 32
Figure 33
Figure 34
4 of 4
Document Number: FRY_INST_8197999 11/2022
37. Attach the cooling fan USB connection to the USB port
of the controller that DOES NOT have the heat shrink
sleeve on the cable (see Figure 35). The other USB
(with heat shrink sleeve) is used to connect to the USB
extension in the far-left fryer position (see Figure 36)
and should NOT be used with the fan.
38. Reattach the controller to the fryer ensuring the lanyard is connected FIRST (see
Figure 37).
39. Attach the speaker wire, the ground wire and the USB with the sleeve to the USB
extension if in the far-left position on the fryer (see Figure 38).
40. Attach the RJ45 cable to the SIB board (see Figure 39).
41. Wait a minute or more to ensure the fan is functioning.
42. Attach the controller to the bezel
reversing steps 4, 5 and 6.
Attach using the two (2) screws
removed in step 4.
Figure 35
Figure 36
X
Figure 37
Figure 38
Figure 39
  • Page 1 1
  • Page 2 2
  • Page 3 3
  • Page 4 4

Frymaster 8263755 Installation guide

Category
Car kits
Type
Installation guide

Frymaster 8263755 is a cooling fan and shroud kit designed to improve the performance and longevity of Jabil Common Controller Touch Screen Fryers. It includes a 5VDC USB fan, mounting bracket, screws, nuts, and instructions. This kit helps prevent overheating by actively cooling the controller, extending its lifespan and ensuring reliable operation. Installation involves disconnecting the fryer from power, removing the old bezel and controller, attaching the cooling shroud and fan assembly, and reconnecting the controller.

Ask a question and I''ll find the answer in the document

Finding information in a document is now easier with AI