LG 55XS2B-B Installation guide

Type
Installation guide
www.lg.com
Please read this manual carefully before operating your set and retain it
for future reference.
webOS 1.0
INSTALLATION MANUAL
LG Digital
Signage
(MONITOR SIGNAGE)
2
ENG
ENGLISH
CONTENTS
ACCESSING INSTALLATION MENU ...... 3
INSTALLATION MENU ........................... 4
- Signage Setup ................................................................. 4
- USB Cloning .................................................................... 8
- Password Change ........................................................... 8
- Tile Mode ......................................................................... 9
- Fail Over ...........................................................................11
- ISM Method ....................................................................12
- Server ...............................................................................14
- Lock Mode ......................................................................14
3
ENG
ENGLISH
ACCESSING INSTALLATION MENU
NOTE
Images in the manual may look different from the actual product.
1
Press and hold the SETTINGS button for 5 seconds.
S.MENU
AUTO
MUTE
MENU
2
When Toast (The top right corner ) is displayed, enter your password.
(The default value is 0, 0, 0, 0 )
3
When the Installation Menu is displayed, select the desired option.
- Signage Setup
- USB Cloning
- Password Change
- Tile Mode
- Fail Over
- ISM Method
- Server
- Lock Mode
4
ENG
ENGLISH
INSTALLATION MENU
NOTE
Some features described in the Installation manual may not be supported in certain models.
Signage Setup
Use this menu to congure the digital signage after installation.
Power On Status
You can select the operating status of the monitor when the main power is switched on.
You can select from among PWR, STD, and LST.
PWR sets the status of the monitor to On whenever the main power is switched on.
STD sets the status of the monitor to Standby when the main power is switched on.
LST sets the status of the monitor back to its previous status.
IR Operation
If you set IR Operation to Normal, you can use the remote control.
If you set IR Operation to Power Key Only, you can only use the Power Key.
If you set IR Operation to Block All, you cannot use the remote control.
Local Key Operation
If you set Local Key Operation to Normal, you can use the Local Key.
If you set Local Key Operation to Power Key Only, you can only use the Power Key.
If you set Local Key Operation to Block All, you cannot use the Local Key.
Wake On LAN
You can set whether to use the Wake On LAN feature.
You can set this option to On or Off.
If you set this option to On, the Wake On LAN feature is enabled and you can turn on the product remotely via
LAN.
If you set this option to Off, the Wake On LAN feature is disabled.
No Signal Power O (15 Min)
You can choose whether to use the 15 Min Force Off feature.
You can set this option to On or Off.
If you set this option to On, the product turns off when it has remained in No Signal status
for 15 minutes.
If you set this option to Off, the 15 Min Force Off feature is disabled.
Set this option to Off when you use the product for a long period of time.
5
ENG
ENGLISH
Auto Power O
You can choose whether to use the 4 Hours Off feature.
You can set this option to 4 Hours or Off.
If you set this option to 4 Hours, the product turns off when you have not pressed any buttons on the remote
control for 4 hours.
If you set this option to Off, the 4 Hours Off feature becomes disabled.
Set this option to Off when you use the product for a long period of time.
DPM
You can configure the DPM (Display Power Management) function.
Off: you can set this option to Off, 5 sec./10 sec./15 sec./1 min./3 min./5 min./10 min.
If this option is not set to Off, the monitor set enters the DPM mode when there is no input signal.
If you set this option to Off, the DPM function is disabled.
In the following cases, you can set DPM to Off or 10 min only. If DPM was set to 5 sec, 10 sec, 15 sec, 1 min, or 5
min, it will be changed to 10 min.
- When USB Auto Playback is set to Photo or Movie
- When Fail Over is set to Auto or Manual
Baud rate (9600/115200)
You can change the RS-232 communication speed for controlling your monitor.
You can choose 9600 or 115200.
If you set this option to 9600, the RS-232 communication speed is set at 9600 bps.
If you set this option to 115200, the RS-232 communication speed is set at 115200 bps.
OSD Portrait Mode (O, On)
Rotates the OSD counterclockwise.
You can set this option to On or Off.
If you set this option to Off, the function is deactivated.
If turned On, the OSD will rotate 90 degrees counterclockwise. In this case, you can not use a mouse.
Check Screen
The Check Screen feature judges whether there are abnormalities at the edges of the screen. R, G, and B OSDs
are formed on the screen at one second intervals and an RGB Sensor tests the areas.
If set to On, the Check Screen feature is enabled.
If set to Off, the Check Screen feature is disabled.
When the Portrait mode is On, the Check Screen feature is Off and deactivated.
6
ENG
ENGLISH
Power On Delay (0 ~ 250)
This feature delays power on in order to prevent overload when multiple monitor sets are turned on simultane-
ously.
You can set the delay interval in the range of 0 to 250 seconds.
Digital Audio Input
HDMI/DISPLAYPORT: you can hear the sounds of digital signals carried by HDMI, or DISPLAYPORT through the
monitor speakers.
Audio In: you can hear sounds through the monitor speaker by connecting HDMI, or DISPLAYPORT ports to the
Audio In port.
Speaker
If you set this option to On, you can hear sounds through the monitor speaker. (* The monitor speaker is sold
separately.)
If you set this option to Off, you cannot hear sounds through the monitor speaker.
USB Auto Playback
This is a feature that auto-playbacks photos and videos when a USB device is connected. You can view photos
and videos without manually selecting the View Photos/Movies menu.
If you select Movie for USB Auto Playback, then the video files in the top level folder on the USB device will
automatically play in sequence. When switched on, Signage automatically searches and plays video files from a
USB.
If you select Photo for USB Auto Playback, then the image files in the top level folder on the USB device will
automatically play in sequence. When switched on, Signage automatically searches and plays photos from a
USB. However, this feature is unavailable while the SuperSign contents are played.
Set ID (1 ~ 1000)
When several products are connected for display, you can assign a unique Set ID No. to each product. Assign
numbers ranging from 1 to 1000 and exit the option. You can control each product separately by using the Set
ID you assigned to each product.
Reset Set ID
You can reset the Set ID of the product to 1.
Standby PWR Control
Sets the option to keep an EDID value when the monitor is turned off.
It can be set to On or Off.
If you set it to On, the EDID value will be kept when the monitor is turned off.
If you set it to Off, the EDID value will be lost when the monitor is turned off.
If set to Off, the EDID value can be stored according to the Input and Model.
7
ENG
ENGLISH
BLU Maintenance Mode
Enables or disables the luminance maintenance function.
If turned On, the luminance maintenance function is enabled. (XF2B, XF3C: Luminance 2500 nit)
If turned Off, the luminance maintenance function is disabled. (XF2B: Luminance 2500 nit, XF3C: Luminance
3000 nit)
Power Indicator
This feature allows you to configure the power indicator settings.
If turned On, the power indicator is on.
If turned Off, the power indicator is off.
Regardless if the power indicator setting is On or Off, the power indicator is turned on for approximately 15
seconds when the monitor is turned on.
Wi-Fi Zone (1~17)
This function configures the wireless channel zone allowed for each country.
The range is between 1 and 17. Enter the appropriate zone for your country before use.
If the zone is changed, rebooting will be performed in five seconds.
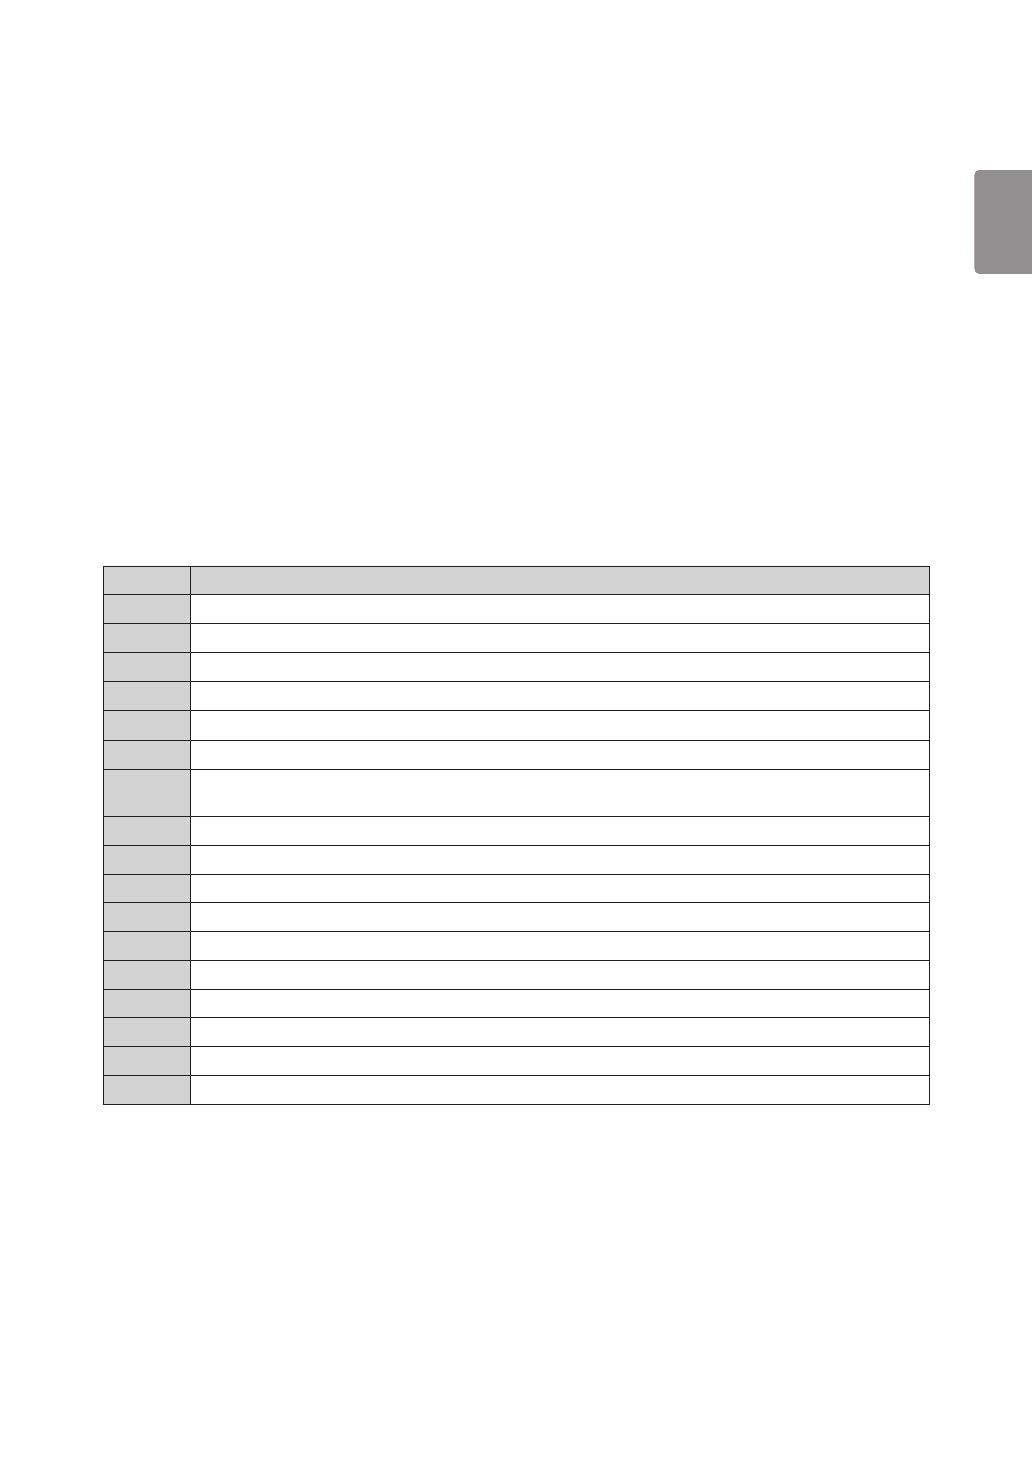
The Wi-Fi zone for each country is as follows:
Wi-Fi Zone Country
1 Myanmar, Iraq, Libya, Yemen, Oman, Kuwait, Bahrain, UAE, Uzbekistan, Kyrgyzstan, Tajikistan, Turkmenistan
2 Myanmar, Iraq, Libya, Yemen, Oman, Kuwait, Bahrain, UAE, Uzbekistan, Kyrgyzstan, Tajikistan, Turkmenistan
3 South Africa, Kenya, Algeria, Israel, Tunisia, Uganda
4 Pakistan, Qatar, Nigeria, China
5 Saudi Arabia
6 Myanmar, Iraq, Libya, Yemen, Oman, Kuwait, Bahrain, UAE, Uzbekistan, Kyrgyzstan, Tajikistan, Turkmenistan
7 Vietnam, Malaysia, Thailand, India, Australia, New Zealand, Singapore, Iran, Jordan,
Sri Lanka, Lebanon, HongKong, Kazakhstan
8 Brazil, Ecuador, Argentina, Peru, Chile, Venezuela, Philippines, Mexico, Columbia, Panama
9 Canada, USA
10 Taiwan, Honduras, El Salvador, Guatemala
11 Korea
12 Japan
13 Other European countries
14 Morocco
15 Indonesia
16 Egypt
17 Ukraine, Russia
Factory Reset
You can reset the product to factory settings.
8
ENG
ENGLISH
USB Cloning
You can copy the product settings to other sets.
Send to USB
You can save the current settings in file format to a USB device.
Select the file name and press the OK button to complete
You cannot save the following items: Advanced Control under PICTURE, Clock, Sleep Time, Power on Delay, Set
ID, Tile ID, and items under NETWORK.
Receive from USB
You can import configuration files from a USB device and change the settings for the current set.
Using a settings file from a different model may not work properly on this product.
When import is complete, the power turns off after five seconds.
Logo Image Download
You can download and apply the boot images.
The image you want to apply must be stored in the LG_MONITOR folder at the top level of a USB device.
When downloading is complete, the set reboots and the boot image will be applied.
CAUTION
To use the Configuration Cloning function, be sure to use a USB storage device formatted using the FAT32 file
system. If the USB storage device has been formatted with another file system, it may not work correctly.
Password Change
You can change your password in the Installation menu.
You can change your password for security purposes. Enter a new 4-digit password. Enter the same password
again in Confirm Password for confirmation.
9
ENG
ENGLISH
Tile Mode
You can configure the integrated screen in the same way as each screen is configured.
To use this function
- Must be used with multiple monitors.
- Must be operated after connecting the monitors using DP Cable and distributor.
- Tile mode: row x column (r = 1 to 15, c = 1 to 15)
- 15 x 15 available
Row (1-15)
Set the number of Tile rows.
Column (1-15)
Set the number of Tile columns.
Tile ID (1-225)
Set an ID for the Tile.
The ID you selected will be displayed on the screen.
Natural
For more natural display, the image is partly omitted to account for the distance between the screens.
Reset
Resets the Tile Mode option.
If you select Tile Reset, all Tile settings are reset and the screen returns to the Full Screen Mode.
NOTE
If Tile Mode is enabled, Smart Energy Saving will be disabled to provide the same picture quality as other
displays.
10
ENG
ENGLISH
Tile Mode
This monitor can be tiled with additional monitors to
create a large tiled display.
Off
When the Tile Mode
option is disabled
1X2
When using 2 monitors
ID 1
ID 2
Tile ID
2X2
When using 4 monitors
3X3
When using 9 monitors
ID 1
ID 2
ID 3
ID 4
ID 1
ID 2
ID 4
ID 5
ID 3
ID 6
ID 7
ID 8
ID 9
4X4
When using 16 monitors
ID 1
ID 2
ID 5
ID 6
ID 3
ID 7
ID 9
ID 10
ID 11
ID 4
ID 8
ID 12
ID 13
ID 14
ID 15
ID 16
5X5
When using 25 monitors
ID 1
ID 2
ID 6
ID 7
ID 3
ID 8
ID 11
ID 12
ID 13
ID 4 ID 5
ID 9 ID 10
ID 14 ID 15
ID 16
ID 21
ID 17
ID 22
ID 18
ID 23
ID 19
ID 24
ID 20
ID 25
Tile Mode - Natural mode
When active, the part of the image that would
normally be displayed in the gap between the
monitors is omitted.
Before
After
11
ENG
ENGLISH
Fail Over
The input source with the highest priority will be selected.
O
The Auto-Fail Over feature is disabled.
Auto
The input source changes according to the specified order. When several input sources are found, the input
source with the highest priority will be selected.
Priority: 1.HDMI1, 2.HDMI2, 3.DISPLAYPORT, 4. DVI-D, 5.Internal Memory
Manual
The input source changes according to the specified order. When several input sources are found, the input
source with the highest priority will be selected.
You can set Priority 1 - Priority 4. Priority 5 is fixed to Internal Memory.
NOTE
Content copied using File Manager will be saved in the root folder.
If the input is switched to Internal Memory due to Fail Over, videos files or image files saved in the top-level
folder in the Internal Memory will be displayed.
If there are both video files and image files in the same folder, then only the video files will be played.
Content distributed by SuperSign will be saved in the folder named 'normal' in the internal memory. Therefore,
content distributed by SuperSign will not be automatically played due to Fail Over.
12
ENG
ENGLISH
ISM Method
If a still image is displayed on the screen for an extended period of time, image sticking can occur. The ISM method
is a feature that prevents image sticking.
Mode
Selects the desired ISM Method mode.
Normal : Disables the ISM method.
Inversion: Inverts screen colors to remove image sticking. (This option is disabled when the current input
source is No Signal.)
Orbiter: Moves the position of the screen as much as three pixels at a time in a certain order to prevent image
sticking. (This option is disabled when the current input source is No Signal.)
White Wash : Displays a white pattern to remove image sticking.
Color Wash : Alternately displays a white pattern and a color pattern to remove image sticking.
Washing Bar: Displays a bar on the screen to make the image move smoothly. You can download your desired
image and display it on the bar.
User Image : Displays your desired images using a USB storage device.
Repeat
Off, just 1 time: If you select the desired mode and press DONE, ISM operates immediately.
On: If the screen remains still for a specified wait time, ISM operates for the specified duration time.
Wait
You can set the time between 1–24 hours.
This option is available only when you have set Repeat to On.
The ISM feature starts when the image freezes for a specified period of time.
Duration
You can select from among 1–10 mins/20 mins/30 mins/60 mins/90 mins/120 mins/180 mins/240 mins.
This option is available only when you have set Repeat to On.
ISM operates for the specified time.
Action Cycle
You can select from among 1–10 mins/20 mins/30 mins/60 mins/90 mins/120 mins/180 mins/240 mins.
This option is available only when you have selected Inversion or Orbiter.
Orbiter: Moves the position of the screen at specified intervals.
Inversion: Inverts the screen color at specified intervals.
Bar Image
Off: Displays a bar with a fixed resolution of 300 x 1080, then moves the bar.
On: Displays and moves an image downloaded by the user. The image is displayed with a fixed height of 1080
and the same width as downloaded. However, if the width of the image is below 300, it will have a fixed
value of 300.
This option is available only when you have selected Washing Bar.
If you have downloaded only one image, the bar is moved and the image is displayed alone.
If you have downloaded multiple images, up to four images are displayed in sequence per cycle.
13
ENG
ENGLISH
Bar Color
You can choose from six colors: red, green, blue, white, black, and gray.
This feature is only applicable when Bar Image is set to Off.
This option is available only when you have selected Washing Bar.
Transparency
Off: Displays the bar opaquely.
On: Displays the bar translucently. (Transparency: 50%)
This option is available only when you have selected Washing Bar.
Direction
Left To Right: The bar is moved from left to right.
Right To Left: The bar is moved from right to left.
This option is available only when you have selected Washing Bar.
Bar Image Download
To download an image, the image file must be located under the folder titled "ISM" on your USB drive.
Make sure to delete the old images stored in the internal memory before downloading a new image file.
Supported image file types:"BMP", "JPG", "JPEG", "PNG", "GIF"
You can download up to four images. (Resolution: 1920 x 1080 or lower)
If there are no images, or if the existing images have been deleted, the default image is used. (The default im-
age is an image of a white bar.)
This option is available only when Bar Image is On.
User Image Download
To download an image, the image file must be located under the folder titled "ISM" on your USB drive.
Make sure to delete the old images stored in the internal memory before downloading a new image file.
Supported image file types:"BMP", "JPG", "JPEG", "PNG", "GIF"
You can download up to four images.(Resolution: 1920 x 1080 or lower)
If there are no images, or if the existing images have been deleted, the default image is used. (The default im-
age is a white background image.)
This option is available only when you have selected User Image.
* How to reset or delete downloaded Bar images/User images
To reset, go to Installation > Signage Setup > Factory Reset.
In the File Manager, go to Internal Memory and delete the downloaded content.
14
ENG
ENGLISH
Server
Set Automatically
The monitor set will be set automatically so that the SuperSign server can search it.
Server IP
This is a menu where you can set an IP address for the SuperSign server.
Server Status
Server Status displays the status of the connection between your monitor and the SuperSign server.
Not connected: indicates that your monitor is not connected to the SuperSign server.
Waiting for approval: i ndicates that your monitor is connected to the SuperSign server but not yet approved.
Rejected: indicates that your monitor is connected to the SuperSign server but has been rejected.
Connected: indicates that your monitor is connected to the SuperSign server and has been approved.
Lock Mode
USB
You can prevent the use of USB devices.
Reset to Initial Settings
You can prevent the use of the initial settings.
  • Page 1 1
  • Page 2 2
  • Page 3 3
  • Page 4 4
  • Page 5 5
  • Page 6 6
  • Page 7 7
  • Page 8 8
  • Page 9 9
  • Page 10 10
  • Page 11 11
  • Page 12 12
  • Page 13 13
  • Page 14 14
  • Page 15 15

LG 55XS2B-B Installation guide

Type
Installation guide

Ask a question and I''ll find the answer in the document

Finding information in a document is now easier with AI