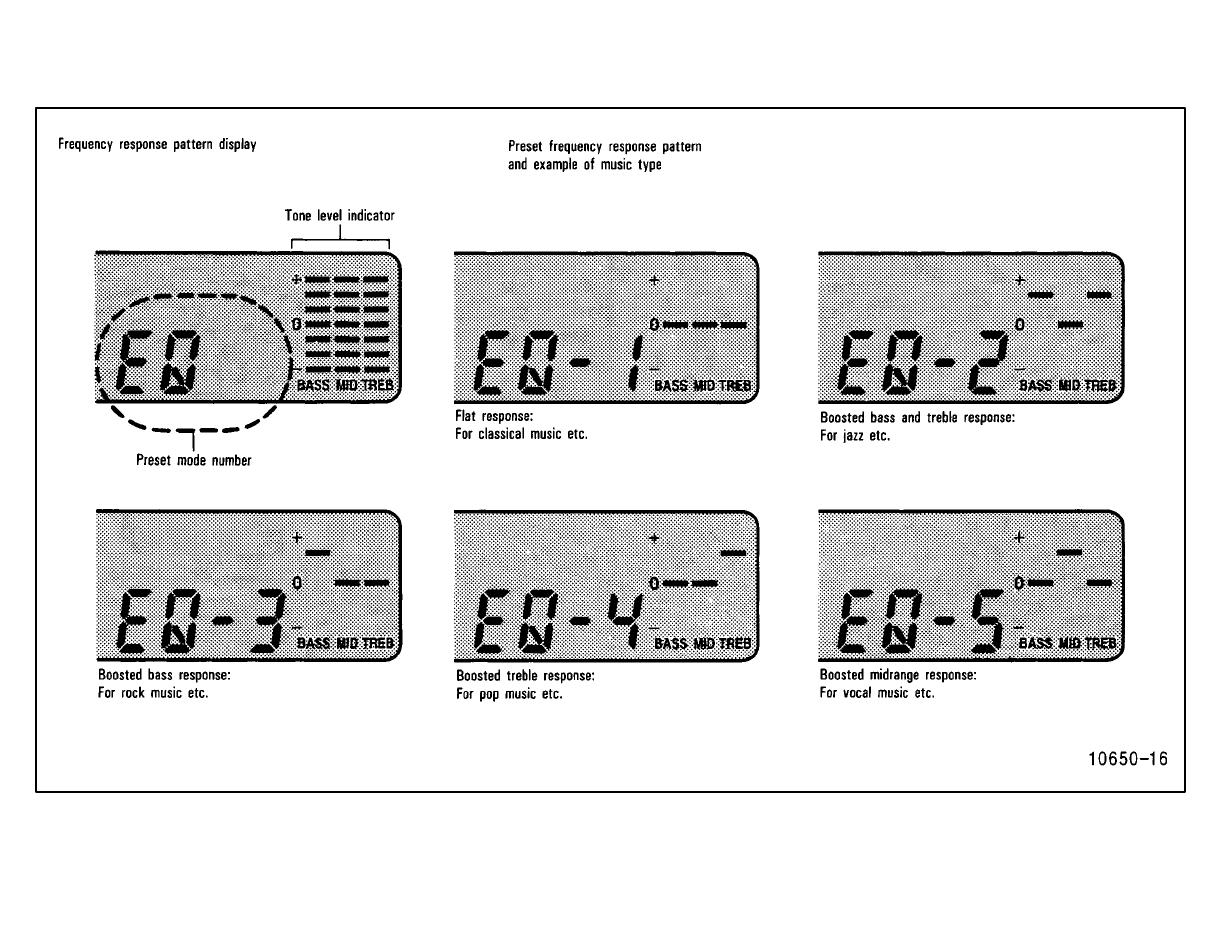
Page is loading ...

Part 1
Car audio system operating tips
67
OPERATION OF
INSTRUMENTS AND
CONTROLS—
Chapter 1-7
Car audio system
and Air conditioning
system
Car audio system operating
tips
Power antenna
AM-FM radio with electronic
tuner and cassette tape player
AM-FM radio with electronic
tuner, cassette tape player and
Compact Disc player
Air conditioning controls
Heater controls
Rear heater controls
Side vents
Lower vent
You can listen to the car audio system
when the ignition key is at “ON” or
“ACC”. However, if the engine is not
running, the key must be in the “ACC”
position.
ILLUMINATION CONTROL LOGIC
When the instrument panel lights are on,
the letters on operable buttons of the
mode in current use light up. On some au-
dio-units, the mode selection and eject
buttons also light up.
On some audio-units, when a cassette
tape is not in the slot, the letters on the
tape mode buttons do not light up, but the
slot lights up for easy access. Once a cas-
sette tape is inserted, the letters on the
tape mode buttons light up, and the slot
stops illuminating.
RADIO
FM reception tips
Most of us are not aware that a vehicle is
not an ideal place to listen to a radio. Be-
cause it moves, reception conditions
change continuously. Buildings, terrain,
signal distance and noise from other ve-
hicles are all working against good recep-
tion. Some FM reception conditions may
appear to be problems even though they
are normal.
The following characteristics are normal
for a given reception area, and they do not
indicate any problem with the radio itself.
Fading and Drifting: On the average,
the broadcast range of FM stations is
limited to about 40 km (25 miles), ex-
cept for some high power stations.
If a vehicle is moving away from the
desired station’s transmitter, the signal
will tend to fade and/or drift. This phe-
nomenon is more noticeable with FM
than with AM, and is accompanied by
distortion.
Fading and drifting can be minimized
to a certain degree by fine tuning, or
you should tune in to a stronger signal.
Static and Fluttering: When the line-
of-sight path between a transmitter
and vehicle is blocked by large build-
ings or the like, static or fluttering may
occur because of the characteristic of
FM. In a similar effect, a fluttering
noise is sometimes heard when driv-
ing along a tree-lined road.
This static and fluttering can be re-
duced by adjusting the tone control for
greater bass response until the distur-
bance has passed.
68
Multipath: Because of the reflection
characteristics of FM, direct and re-
flected signals may reach the antenna
at the same time (a phenomenon
called multipath reception) and cancel
each other out. As a vehicle moves
through these electronic dead spots,
the listener may hear a momentary
flutter or lose reception.
Station swapping: When two FM
stations are close to each other, and
an electronic dead spot, such as is
caused by static or multipath recep-
tion, interrupts the original signal,
sometimes the stronger second signal
is picked up automatically until the
original one returns. This swapping
can also occur as you drive away from
the selected station and approach
another station with a stronger signal.
To prevent damage to the antenna,
make sure it is retracted before
running your vehicle through an
automatic car wash.
NOTICE
CASSETTE TAPE PLAYER
Use only undamaged cassette tapes of
good quality. Avoid using tapes with a
total playing time longer than 90 min-
utes.
Using damaged tapes will cause trouble
with the tape player. Longer tapes are not
recommended because of their thinness.
Before inserting a cassette, make sure
the tape is not slack and that the label
is firmly stuck on the shell.
Wind the tape firmly by turning the hub
with a pencil or the like.
Be careful not to touch the exposed tape
surface.
When not in use, take the cassette out
of the player, put it back to its case and
store it away from dust, magnets and
direct sunlight.
Leaving cassettes on the dashboard in
the sun could damage your tapes.
Keep the playback head, capstan and
pinch roller clean.
Remove tape coating residue accumu-
lated on the head, capstan and pinch roll-
er once or twice a month. A cleaning tape
is available on the market.
Do not oil any part of the player and
do not insert anything other than
cassette tapes into the slot, or the
tape player may be damaged.
NOTICE
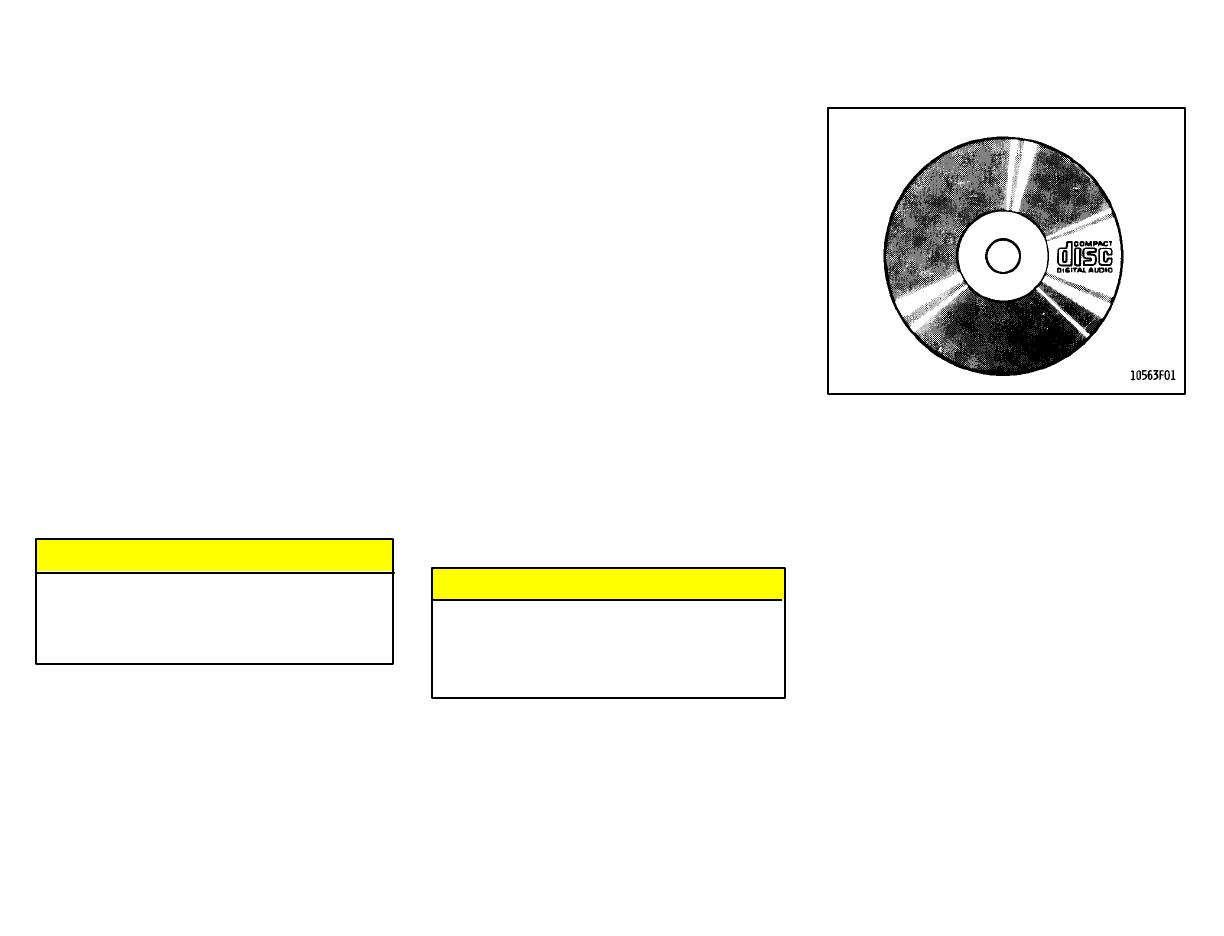
COMPACT DISC PLAYER
Use only Compact Discs labeled as
shown, having no dirt, damage or
warp.
Never attempt to disassemble or oil
any part of the player unit. Do not in-
sert any object other than a Disc into
the slot.
Remember there are no user-serviceable
parts inside.
Do not put fingerprints, stickers,
scratches or pen marks on the sur-
faces of the Disc.
Hold the Disc only on the edge or center
hole.
69
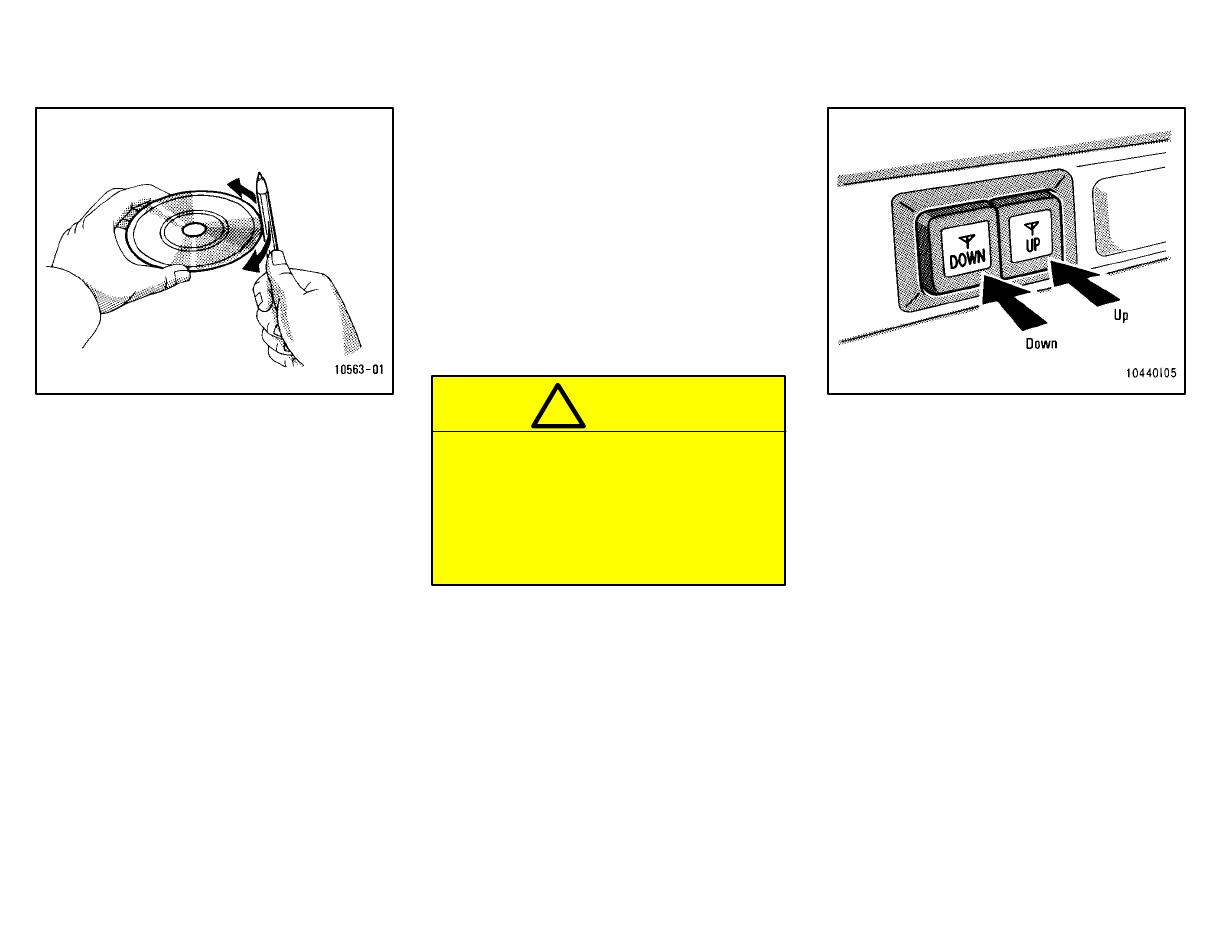
A new Disc may have rough edges on
its inner and outer perimeter. Remove
the rough edges by pressing the side
of a ball-point pen or pencil against
the inner and outer perimeter of the
Disc as shown.
If you continue to lay a Disc with rough
edges, flakes will fall on to the signal side
of the Disc and cause sound skipping or
other problems.
When not in use, take the Disc out of
the player, put it back into its case and
store it away from dust, heat, damp
and direct sunlight.
Leaving Discs on the dashboard in the
sun may damage or warp them.
If the Disc gets dirty, wipe it clean with
a soft cloth, wiping radially out from
the center.
Do not use a conventional record cleaner
or anti-static record preservative.
CAUTION
!
Compact Disc players use invisible
laser beam which could cause haz-
ardous radiation exposure if di-
rected outside the unit. Be sure to
operate the player correctly as
instructed.
To adjust the antenna height, push the
switch.
Confirm that no one is close enough to get
pushed before extending the antenna.
Clean the antenna mast periodically with
a clean dry cloth.
Power antenna
70
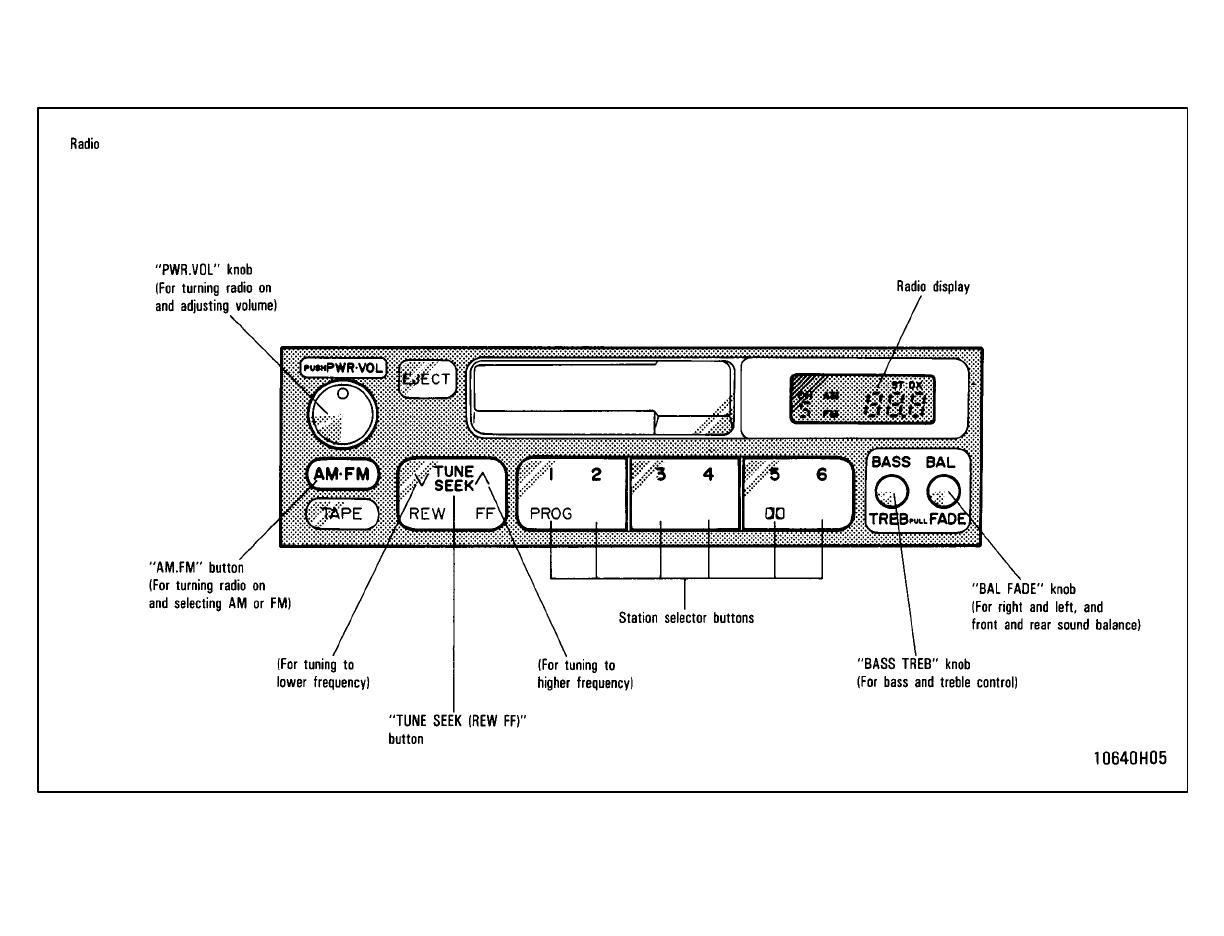
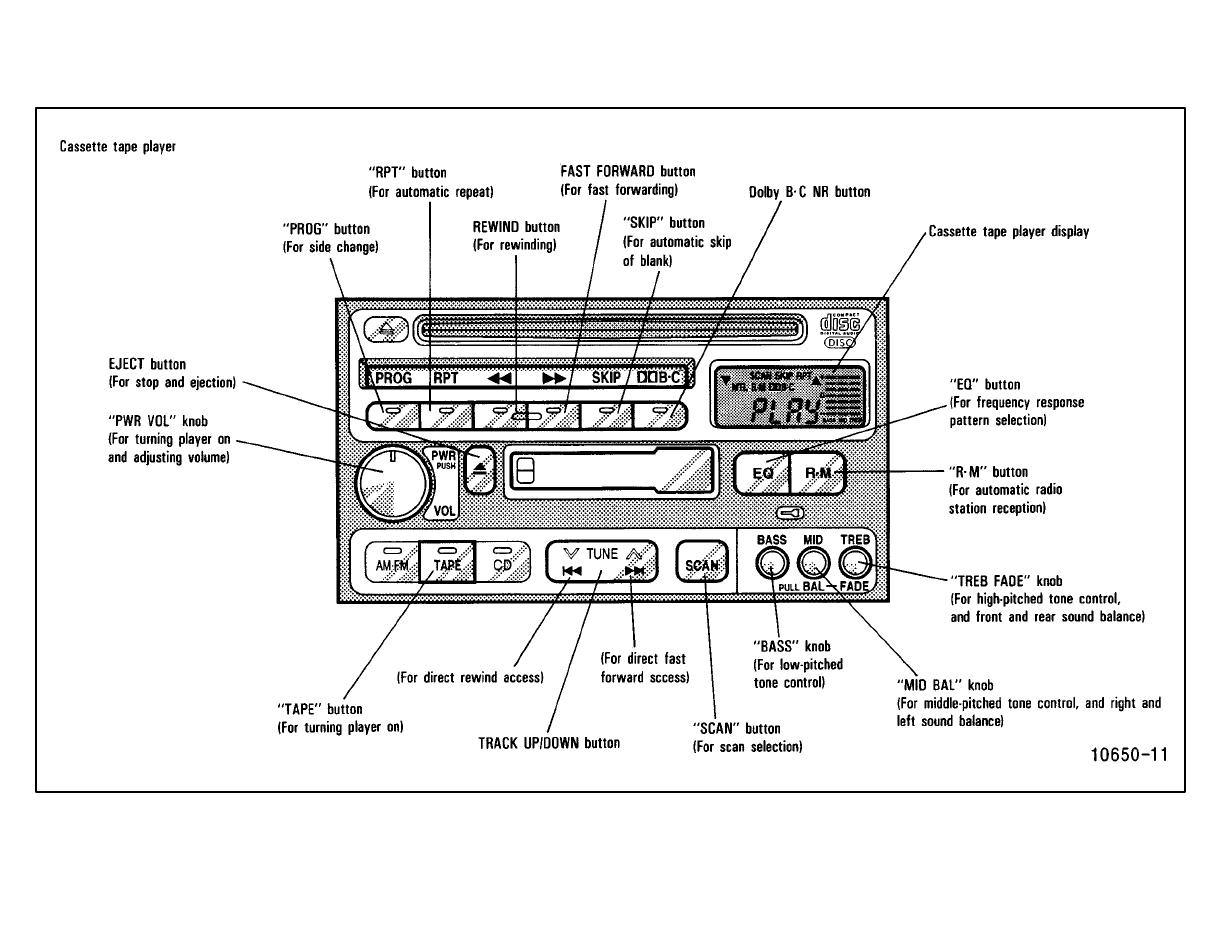
AM-FM radio with electronic tuner and cassette tape player (type A)
71

72
(a) Listening to the radio
1. Push the “AM⋅FM” button to turn the
radio on and select either an AM or FM
broadcast.
“AM” or “FM” will appear on the display.
The radio can also be turned on by push-
ing the “PWR.VOL” knob if the radio was
on when the system was turned off.
2. Turn the “PWR.VOL” knob to adjust
the volume.
3. Tune in the desired station. (See “(b)
Selecting a station” and “(c) Presetting a
station”.)
The radio will change automatically to ste-
reo reception when an FM stereo broad-
cast is being received. At the same time,
“ST” will appear on the display. When the
receiving signal gets weak, the channel
separation will automatically be reduced
for the lowest noise. If the signal becomes
extremely weak, the radio will switch over
to monaural reception.
4. Adjust the tone and sound balance.
(See “(d) Adjusting the tone” and “(e) Ad-
justing the sound balance”.)
5. To turn the radio off, push the
“PWR.VOL” knob.
(b) Selecting a station
Tune in the desired station using one of
the following methods. The frequency will
appear on the display.
Preset tuning: Use for tuning-in to a de-
sired preset station. (See “(c) Presetting
a station”.)
Push the station selector button which
has been preset to the desired station.
The radio will tune in to the station and the
button number will appear on the display.
Seek tuning: Use for automatic station
search and stop.
Push the “TUNE SEEK (REW FF)” button
on either side and hold it until a beep is
heard. The radio will begin seeking up or
down for a station of the nearest frequen-
cy and will stop on reception. Each time
you push the button, stations will be
seeked out one after another.
Manual tuning
Push the “TUNE SEEK (REW FF)” button
on either side for less than 0.5 second.
Each time you push the button, the radio
will step up or down to another frequency
where stations could exist.
(c) Presetting a station
1. Tune in the desired station. (See “(b)
Selecting a station”.)
2. Push either side of the station selector
buttons and hold it until a beep is heard.
This sets the station to the button and the
button number will appear on the display.
Each side of the buttons can store one AM
station and one FM station. To change the
preset station to a different one, follow the
same procedure.
The preset station will be cancelled when
the power source is severed (battery dis-
connected, burnt fuse, etc.).
(d) Adjusting the tone
To adjust a low-pitched tone, push the
“BASS TREB” knob (if pushed in) and
turn it.
To adjust a high-pitched tone, push the
“BASS TREB” knob (if pushed in), pull it
fully out and turn it.

73
(e) Adjusting the sound balance
To balance the sound between the right
and left speakers, push the “BAL FADE”
knob (if pushed in) and turn it.
To balance the sound between the front
and rear speakers, push the “BAL FADE”
knob (if pushed in), pull it fully out and
turn it.
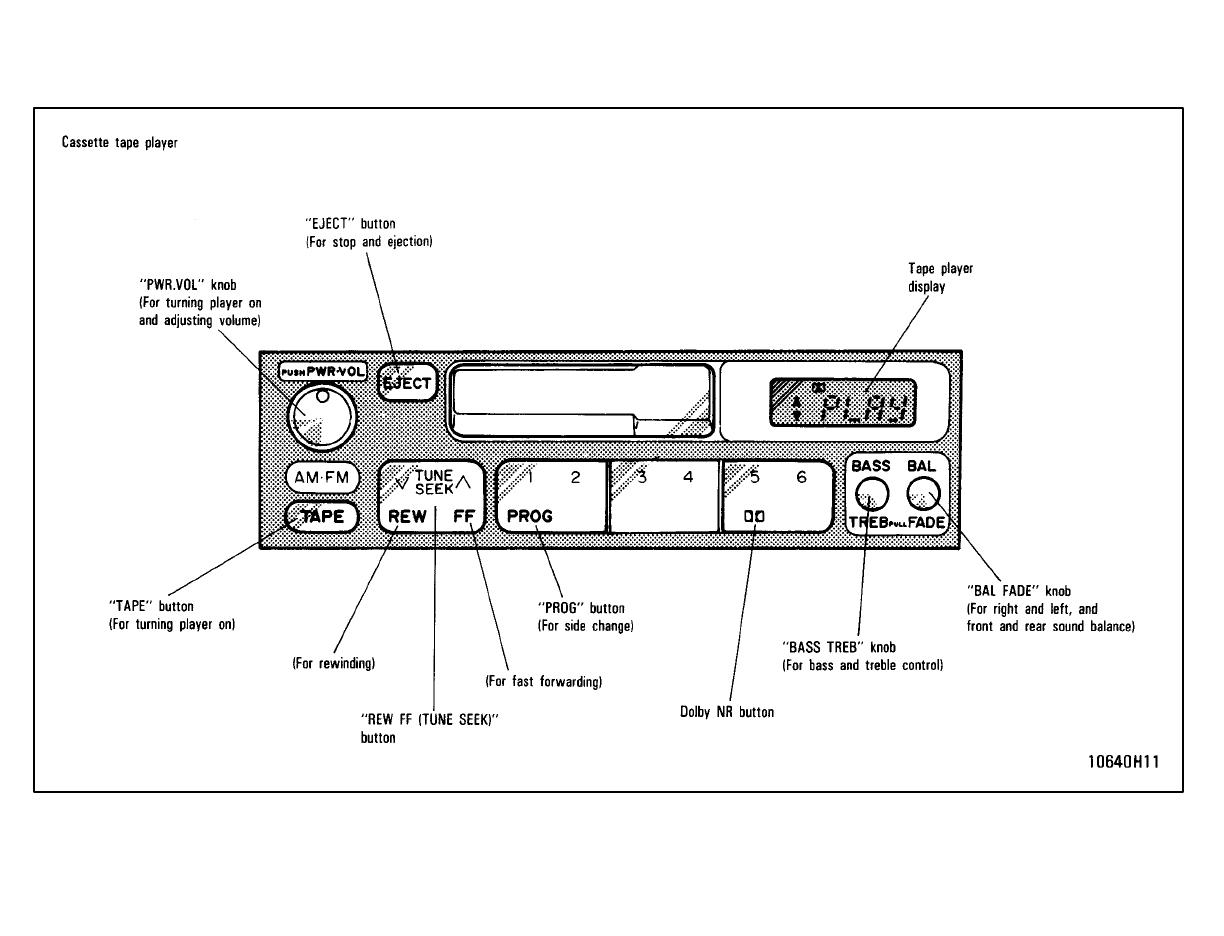
(f) Listening to the cassette tape
1. Put the cassette into the slot, with the
tape side to the right and lightly push it in.
The tape player will grab the cassette and
slide it into place to play it. If the radio is
on when inserting the cassette, the radio
will automatically turn off.
If the cassette is already in the slot, push
the “TAPE” button.
At this time, “PLAY” will appear on the dis-
play.
The tape player can also be turned on by
pushing the “PWR.VOL” knob if the tape
player was playing when the system was
turned off by pushing the knob.
2. If using a tape recorded with Dolby
NR*, push the button marked with the
double-D symbol. The display will indi-
cate that the Dolby noise reduction sys-
tem is on.
The Dolby NR mode reduces tape noise
by about 10 dB. For best sound reproduc-
tion, play your tapes with the Dolby NR*
on or off according to the mode used for
recording the tape.
To play a tape recorded without Dolby
NR*, push the button again to turn off the
Dolby NR*.
*: Dolby noise reduction manufactured under license from Dolby Lab-
oratories Licensing Corporation. “DOLBY” and the double-D symbol
are trademarks of Dolby Laboratories Licensing Corporation.
3. Turn the “PWR.VOL” knob to adjust
the volume.
4. Select your program. (See “(g) Select-
ing a program”.)
5. Adjust the tone and sound balance.
(See “(d) Adjusting the tone” and “(e) Ad-
justing the sound balance”.)
6. To turn the player off, push the
“PWR.VOL” knob.
7. To eject the cassette, push the
“EJECT” button. As this is done, the play-
er will turn off. If the radio was on when the
cassette tape was inserted, it will auto-
matically turn on again.
You can eject the cassette only once after
the system is turned off.
(g) Selecting a program
1. Push the “PROG” button to select a
side to play. The tape operation indicator
display shows you which side is being
played.
The player will automatically reverse di-
rections at the end of the tape to play the
other side.
2. Push the “REW FF (TUNE SEEK)”
button on either side to fast forward or re-
wind the tape. At this time, “FF” or “REW”
will appear on the display. To stop the tape
while it is fast forwarding, push “FF” or
“TAPE”; to stop the tape while it is rewind-
ing, push “REW” or “TAPE”. The tape will
immediately begin to play.

74
AM-FM radio with electronic tuner and cassette tape player (type B)

75

76
(a) Listening to the radio
1. Push the “AM⋅FM” button to turn the
radio on and select either an AM or FM
broadcast.
“AM”, “FM1” or “FM2” will appear on the
display.
The radio can also be turned on by push-
ing the “PWR VOL” knob if the radio was
on when the system was turned off.
2. Turn the “PWR VOL” knob to adjust the
volume.
3. Tune in the desired station. (See “(b)
Selecting a station” and “(c) Presetting a
station”.)
The radio will change automatically to ste-
reo reception when an FM stereo broad-
cast is being received. At the same time,
“ST” will appear on the display. When the
receiving signal gets weak, the channel
separation will automatically be reduced
for the lowest noise. If the signal becomes
extremely weak, the radio will switch over
to monaural reception.
4. Adjust the tone and sound balance.
(See “(d) Adjusting the tone” and “(e) Ad-
justing the sound balance”.)
5. To turn the radio off, push the “PWR
VOL” knob.
(b) Selecting a station
Tune in the desired station using one of
the following methods. The frequency will
appear on the display.
Preset tuning: Use for tuning-in to a de-
sired preset station. (See “(c) Presetting
a station”.)
1. Push the “AM⋅FM” button repeatedly
until the desired selection appears on the
display.
2. Push the station selector button which
has been preset to the desired station.
The radio will tune in to the station and the
button number will appear on the display.
Seek tuning: Use for automatic station
search and stop.
Push the “TUNE (REW FF)” button on ei-
ther side and hold it until a beep is heard.
The radio will begin seeking up or down for
a station of the nearest frequency and will
stop on reception. Each time you push the
button, stations will be seeked out one af-
ter another.
Scan tuning: Use for station-to-station
scanning.
Scanning for all frequencies—Push the
“SCAN” button and hold it until a beep is
heard. With “SCAN” on the display, the ra-
dio will automatically seek out a station of
a higher frequency, hold it for 5 seconds
and scan to the next. To continue listening
to the broadcast of your choice, simply
push the “SCAN” button once again.
Scanning for preset stations—Push the
“SCAN” button within 2 seconds. With
“SCAN” on the display, the radio will auto-
matically seek out a preset station, hold it
for 5 seconds and scan to the next. To
continue listening to the station of your
choice simply push the “SCAN” button
once again.
Manual tuning
Push the “TUNE (REW FF)” button on ei-
ther side for less than 0.5 second. Each
time you push the button, the radio will
step up or down to another frequency
where stations could exist.
(c) Presetting a station
1. Push the “AM⋅FM” button repeatedly
until the desired selection, “AM”, “FM1” or
“FM2”, appears on the display.

77
The radio has two FM selections, “FM1”
and “FM2”. You can preset any desired six
stations in each selection. When you pre-
set an FM station, check which selection
you have used.
2. Tune in the desired station. (See “(b)
Selecting a station”.)
3. Push one of the station selector but-
tons and hold it until a beep is heard. This
sets the station to the button and the but-
ton number will appear on the display.
To change the preset station to a different
one, follow the same procedure.
The preset station will be cancelled when
the power source is severed (battery dis-
connected, burnt fuse, etc.).
(d) Adjusting the tone
To adjust the low-pitched tone, push the
“BASS TREB” knob (if pushed in) and turn
it.
To adjust the high-pitched tone, push the
“BASS-TREB” knob (if pushed in), pull it
fully out and turn it.
(e) Adjusting the sound balance
To balance the sound between the right
and left speakers, pull out the “BAL” knob
and turn it.
To balance the sound between the front
and rear speakers, turn the “FADE” knob.
(f) Listening to the cassette tape
1. Put the cassette into the slot, with the
tape side to the right and lightly push it in.
The tape player will grab the cassette and
slide it into place to play it. If the radio is
on when inserting the cassette, it will auto-
matically turn off.
If the cassette is already in the slot, push
the “TAPE” button.
At this time, “PLAY” will appear on the dis-
play.
The tape player can also be turned on by
pushing the “PWR VOL” knob if the tape
player was playing when the system was
turned off by pushing the knob.
When a metal or chrome equivalent tape
is inserted, the player will automatically
adapt to it and “MTL” will appear on the
display.
2. If using a tape recorded with Dolby
NR*, push the button marked with the
double-D symbol to select the Dolby B
NR or Dolby C NR mode. The display will
indicate which Dolby noise reduction sys-
tem is operating.
The Dolby NR mode reduces tape noise
by about 10 dB. The Dolby C NR mode re-
duces tape noise by another 10 dB, or
about 20 dB total. For best sound repro-
duction, select the same NR mode that
was used to record the tape.
To play a tape recorded without Dolby
NR*, push the button until the Dolby NR
indicator disappears.
*: Dolby noise reduction manufactured under license from Dolby Lab-
oratories Licensing Corporation. “DOLBY” and the double-D symbol
are trademarks of Dolby Laboratories Licensing Corporation.
3. Turn the “PWR VOL” knob to adjust the
volume.
4. Select your program. (See “(g) Select-
ing a program”.)
5. Adjust the tone and sound balance.
(See “(d) Adjusting the tone” and “(e) Ad-
justing the sound balance”.)
6. If desired, other functions may be used
for your convenience. (See “(h) Other
tape player functions”.)
7. To eject the cassette, push the EJECT
button. As this is done, the player will turn
off. If the radio was on when the cassette
tape was inserted, it will automatically turn
on again.
8. To turn the player off, push the “PWR
VOL” knob.

78
You can eject the cassette only once after
the system is turned off.
(g) Selecting a program
1. Push the “PROG” button to select a
side to play. The tape operation indicator
display shows you which side is being
played.
The player will automatically reverse di-
rections at the end of the tape to play the
other side.
2. Have a desired program played using
either of the following methods.
Manual program selection
Push the “REW FF (TUNE)” button on ei-
ther side to rewind or fast forward the
tape. At this time, “REW” or “FF” will ap-
pear on the display. To stop the tape while
it is fast forwarding, push “FF” or “TAPE”;
to stop the tape while it is rewinding, push
“REW” or “TAPE”. The tape will immedi-
ately begin to play.
Automatic program selection: Use for
quick access to a desired program.
1. Push the “APS” button. “APS” and pro-
gram number “1” will appear on the dis-
play.
2. Repeat the push until the number indi-
cates how many programs ahead of/be-
hind the one currently being played you
wish to listen to (include the program you
are currently listening to when counting
back previous programs).
The maximum number of settings is nine.
The tenth push on the button will cancel
the function and “APS” will disappear on
the display.
3. Push the “REW FF (TUNE)” button on
either side to get the tape going in the di-
rection of the program. The player will au-
tomatically stop at the beginning of the se-
lected program and play it.
If the number you set exceeds the number
of the programs remaining on the side
currently being played, the tape will fast
forward to the beginning of the other side
(when fast forwarding) or rewind to the be-
ginning of that side (when rewinding).
This function does not work properly un-
less the blank portions on the tape have 3
seconds or more between one program
and another.
(h) Other tape player functions
“RPT” button: Use for automatic repeat
of the program currently being listened to.
Push the “RPT” button while the program
is being played. As this is done, “RPT” will
appear on the display. When the program
is finished, the tape will automatically be
rewound to the beginning of the program
and the program will be played again. To
cancel it, push the button once again.
This function does not work properly un-
less the blank portions on the tape have 3
seconds or more between one program
and another.
“SKIP” button: Use for automatic skip-
ping of blank portions between programs.
Push the “SKIP” button. “SKIP” appears
on the display. The player will automati-
cally skip any blank portions of 15 sec-
onds or more and play the next program,
even if it is on the other side. To cancel it,
push the button once again.
“SCAN” button: Use for program-to-
program scanning.
Push the “SCAN” button. With “SCAN” on
the display, each program will be played
for 12 seconds and scan to the next. To
continue listening to the program of your
choice, simply push the “SCAN” button
once again.
The player will automatically reverse di-
rections at the end of the tape and keep
scanning.

79
“R⋅M” button (radio monitor system):
Use for automatic station reception.
Push the “R⋅M” button. “R⋅M” appears on
the display. In this mode, if you push the
“REW FF (TUNE)” button on either side
when listening to the tape, the system will
change the radio mode and automatically
receive the last station which was set. At
the time, the received station condition
appears on the display.
The system will be cancelled out when the
power source is severed (battery discon-
nected, burnt fuse, etc.)
(i) Anti-theft system
To deter theft of your radio unit, the sys-
tem is designed so that the radio unit be-
comes inoperable if the unit is stolen from
the vehicle.
The system is not preset at factory. You
must input a three-digit identification
number decided by you.
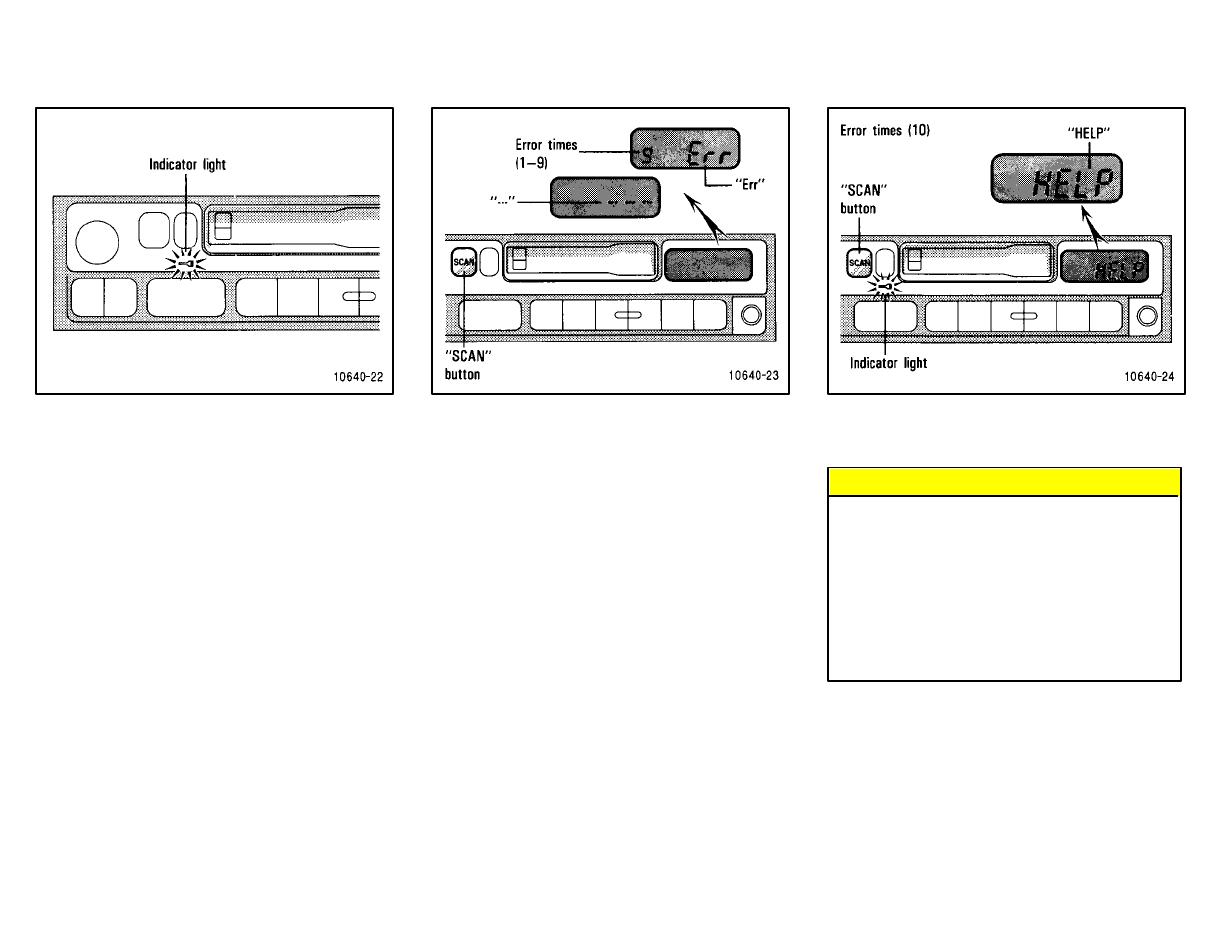
NOTICE
If you pushed any wrong buttons on
the anti-theft system, the following
messages will appear on the
display.
”Err”—You have pushed wrong
buttons.
“1-9”—Indicates the number of
errors you have made. You may
make up to nine errors, but no
more!
”HELP”—The number of errors
you can make was exceeded. The
audio system is completely
inoperable. Contact your Toyota
dealer.
Setting the anti-theft system
1. Make sure the radio unit is turned off
with the ignition switch in “ACC”.
2. While holding the “1” and “6” buttons
in, push and hold the “PWR⋅VOL” knob in
until “SEC” appears on the display.

80
3. Press the “1” button while holding the
right side of “TUNE SEEK” button in. “_ _ _”
and the tape operation indicator will appear
on the display.
4. Input your identification number by
pressing the “1”, “2”, and “3” buttons re-
peatedly. Use the “1” button for the first
digit, the “2” button for the second digit
and the “3” button for the last digit. For ex-
ample, if your number is 824, press the “1”
button nine times, the “2” button three
times and the “3” button five times. If the
display returns to “- - -” while inputting,
try again.
We recommend that your identification
number be associated with something
easy to remember. In case you are unsure
of the number, write it in a notebook you
normally carry. Do not leave it behind in
your vehicle.
5. With your identification number ap-
pearing on the display, press the “SCAN”
button and hold it in until “SEC” appears
on the display. “SEC” will go off to indicate
the system is set. If invalid buttons have
been used, “Err” will appear on the display
before “SEC” appears. Try again from the
step 3.
Once the system is set, the indicator light
turns on and off with the ignition switch in
“OFF” and “SEC” will appear each time
the key is turned to the “ACC” position.
To change the identification number for
some reason, cancel the system (See
“Cancelling the anti-theft system”) and
set it again with a new number.
81
The system will be activated if the electri-
cal power source is disconnected from the
radio unit. When the system is activated,
the audio system cannot be turned on
even after the power supply resumes and
“SEC” will appear on the display. If this
happens, such as when the battery is dis-
charged, see “If the anti-theft system is
activated.
Cancelling the anti-theft system
1. Follow the steps 1 to 4 described in
“Setting the anti-theft system”.
2. With your identification number ap-
pearing on the display, press the “SCAN”
button and hold it in until “- - -” appears
on the display. “- - -”will go off to indicate
the system is cancelled. If invalid buttons
have been used, “Err” will appear on the
display and “SEC” appears. Try again
from step 3 in “Setting the anti-theft sys-
tem”.
The figure with “Err” indicates how many
errors you have made. You may make up
to nine errors, but no more!
A tenth error will activate the
anti-theft system and “HELP” will
appear on the display. The audio
system will be completely
inoperable. At this time, the
indicator light also comes on. If this
occurs, contact your Toyota dealer.
NOTICE
At the time of resale of your vehicle, can-
cel the system for the new owner.

82
If the anti-theft system is activated
The audio system made inoperable by the
activated anti-theft system will be oper-
able if you give it the correct identification
number.
1. Follow the steps 3 and 4 described in
“Setting the anti-theft system”.
2. With your identification number ap-
pearing on the display, press the “SCAN”
button and hold it in until “SEC” appears
on the display. “Sec” will go off to indicate
that the system is reset and the audio sys-
tem is inoperable. If invalid buttons have
been used, “Err” will appear on the display
before “SEC” appears. Try again from the
beginning.
See “Cancelling the anti-theft system” for
notes on the figure with “Err”.

83
AM-FM radio with electronic tuner, cassette tape player and Compact Disc player
84
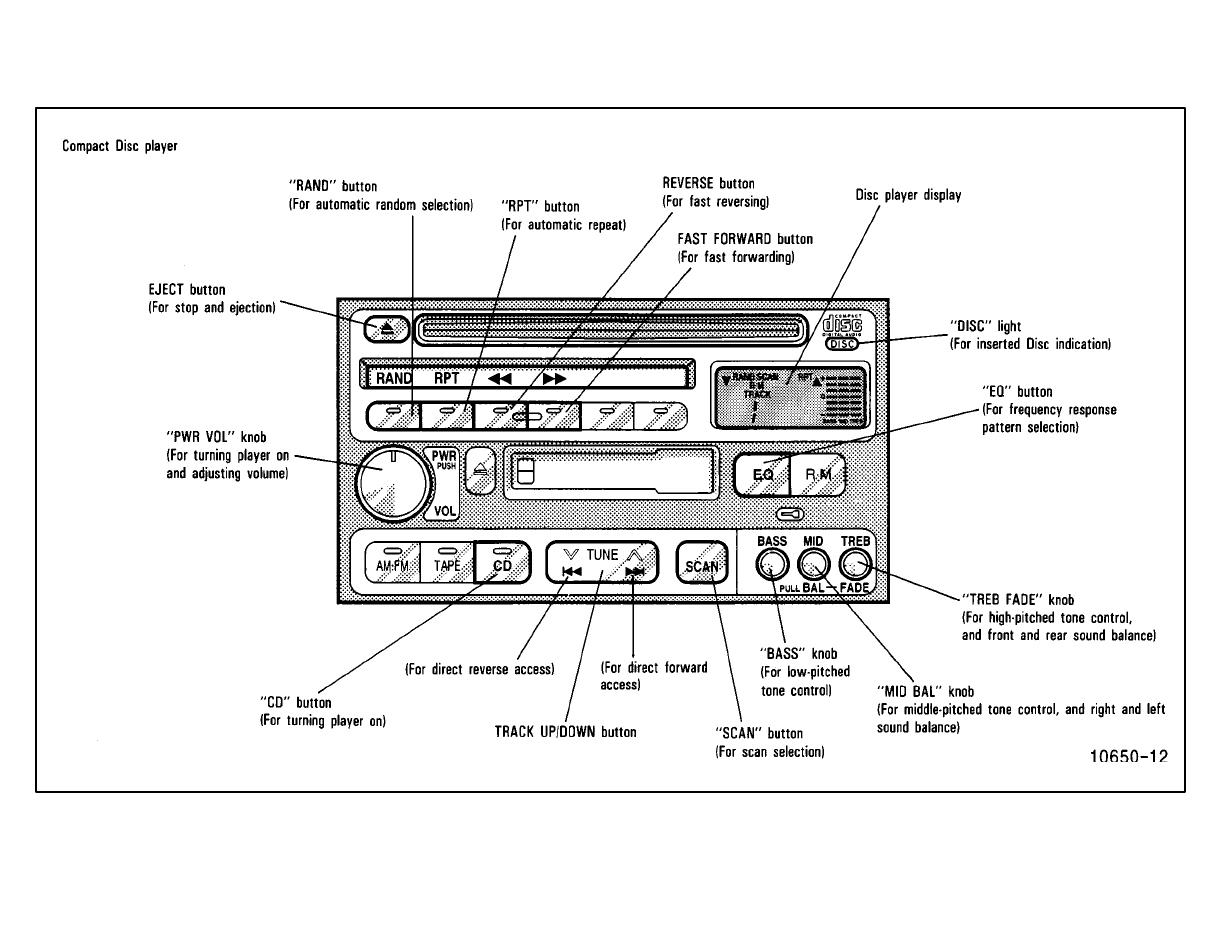
85
86
/