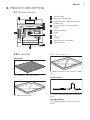
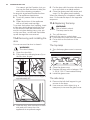
Electrolux EBGL4XBR is a built-in electric oven with a variety of cooking functions to help you prepare delicious meals. With its user-friendly control panel, you can easily select from various cooking programs, including automatic programs for specific dishes like pizza or lasagna. The oven also features a core temperature sensor for precise cooking results, ensuring your food is cooked to perfection every time. Additionally, the oven's spacious interior and flexible shelf positions provide ample space for accommodating different types of cookware and ingredients.
Electrolux EBGL4XBR is a built-in electric oven with a variety of cooking functions to help you prepare delicious meals. With its user-friendly control panel, you can easily select from various cooking programs, including automatic programs for specific dishes like pizza or lasagna. The oven also features a core temperature sensor for precise cooking results, ensuring your food is cooked to perfection every time. Additionally, the oven's spacious interior and flexible shelf positions provide ample space for accommodating different types of cookware and ingredients.


-
 1
1
-
 2
2
-
 3
3
-
 4
4
-
 5
5
-
 6
6
-
 7
7
-
 8
8
-
 9
9
-
 10
10
-
 11
11
-
 12
12
-
 13
13
-
 14
14
-
 15
15
-
 16
16
-
 17
17
-
 18
18
-
 19
19
-
 20
20
-
 21
21
-
 22
22
-
 23
23
-
 24
24
-
 25
25
-
 26
26
-
 27
27
-
 28
28


Electrolux EBGL4XBR User manual
- Category
- Microwaves
- Type
- User manual
Electrolux EBGL4XBR is a built-in electric oven with a variety of cooking functions to help you prepare delicious meals. With its user-friendly control panel, you can easily select from various cooking programs, including automatic programs for specific dishes like pizza or lasagna. The oven also features a core temperature sensor for precise cooking results, ensuring your food is cooked to perfection every time. Additionally, the oven's spacious interior and flexible shelf positions provide ample space for accommodating different types of cookware and ingredients.
Ask a question and I''ll find the answer in the document
Finding information in a document is now easier with AI
Related papers
-
Electrolux EBGL40SP User manual
-
-
Electrolux EHGL40XWE User manual
-
Electrolux EBKGL4XWE User manual
-
-
Electrolux EHGL4SP User manual
-
-
-
-