KitchenAid KCBPZ 18120.1 Daily Reference Guide
- Category
- Side-by-side fridge-freezers
- Type
- Daily Reference Guide

Product sheet


3
Quick Guide
Carefully read the user handbook provided before using the appliance.
10
9
1
6
4
2
3
5
7
8
11
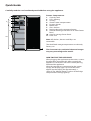
Freezer Compartment
1. Control panel
2. LED’s lighting
3. Ice tray
4. Shock Freeze compartment
5. Drawer divider
6. Bottle rack
7. Glass shelves
8. Rating plate with commercial name
9. Area for freezing fresh food or to store frozen
food
10. Area for storing frozen foods
11. Door seal
Note: All shelves, drawers and aps are
removable.
The ideal food storage temperatures are already
factory-set.
The characteristics, technical data and images
may vary according to the model.
HOW TO START THE APPLIANCE
After plugging the appliance to the mains, it starts
the operation automatically. After starting the
appliance, wait at least 4-6 hours before placing
food into the appliance.
When the appliance is connected to the power
supply, the display lights up and all the icons
appear on the display for approximately 1
second. The default (factory) values of the fridge
compartment settings light-up.

4
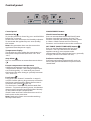
Control panel
Control panel
On/Stand-by
To put the product in Stand-by, press and hold the
button for 3 seconds.
All the icons turn o except On/Standby indicator.
To reactivate the appliance press once (briey)
this button.
Note: this operation does not disconnect the
appliance from the power supply.
Temperature display
The display can show either the temperature in
the freezer compartment (between -16°C and
-24°C).
Stop Alarm
Press in case of alarm to mute the acoustic alarm
.
Freezer compartment temperature
A dierent temperature can be set using the
“Temperature” button. The storage temperature
can be changed by -1°C with each pressure of
the button: the value changes cyclically between
-16°C and -24°C.
Fast Freeze
Long-press the “Freezer” button for 3 seconds
24 hours before placing large amounts of food in
the freezer compartment. When the function is
activated, the symbol
lights up.
This function is automatically deactivated after
50 hours. To speed up freezing times, the bottom
drawer can be removed and food placed directly
on the bottom of the compartment.
Shock Freeze and Fast Freeze functions can’t be
both active at the same time.
Note: food to be frozen must not be touching
already frozen food.
SHOCK FREEZE button
Shock Freeze function
Press to activate/deactivate the Shock Freeze
function (see the Instructions for Use). The
function switches o automatically after about
4-5 hours. Shock Freeze and Fast Freezing
functions can’t be both active at the same time.
OPT TARIFF (NIGHT TIME RATE) button
Press to activate/deactivate the Opt Tari
function. The Opt Tari function enables
appliance energy consumption to be
concentrated in the reduced rate hours, generally
at night (see the Instructions for Use).
ProFreeze technology
ProFreeze technology automatically works to
ensure the optimal conditions to preserve the
stored food.

5
What to do if… Possible causes Solutions
The control panel
is switched o, the
appliance does not
work.
The appliance could be in On/
Standby mode.
There may be a problem
with the power supply to the
appliance.
Activate the appliance with the On/
Standby button. Make sure:
- there is no power cut
- the plug is properly inserted in
the socket and that any double-
pole mains switch is in the correct
position (i.e. allowing the appliance
to be powered)
- the household electrical system
protection devices are in good
working order
- the power supply cable is not
damaged.
The inside light does
not work.
The light may need replacing. Models with LED lights: contact the
authorised Service Centre.
The appliance could be in On/
Standby mode.
Activate the appliance with the On/
Standby button.
The temperature inside
the compartments is
not low enough.
There could be various causes
(see “Solutions”).
Make sure:
- the doors close properly
- the appliance is not installed near a
heat source
- the set temperature is adequate
- the air circulation through the
vents at the bottom of the
appliance is not obstructed.
-
The Black Out Alarm
icon remains on, the
Alarm indicator blinks
and the Temperature
display (°C) blinks,
showing the maximum
temperature reached
during blackout.
Prolonged power failure, able to
cause the inside temperature to
increase to 0°C.
Press the Stop Alarm button
the acoustical alarm stops, the
Temperature Display (°C) blinks and
the Alarm Indicator remains on until a
temperature < -10°C is reached.
The front edge of the
appliance, at the door
striker seal, is hot.
This is not a defect. It prevents
condensation.
No solution is necessary.

6
What to do if… Possible causes Solutions
The red led
ashes
and an acoustic signal
sounds.
Door open alarm
Activates when the freezer
compartment door has
remained open for more than 2
minutes.
Close the door or press the Stop Alarm
to mute the acoustical alarm.
The red led
ashes,
an acoustic signal
sounds and the symbol
is displayed.
Blackout alarm
Activates when a prolonged
power cut causes the freezer
compartment temperature to
rise.
Note: a dierent product
temperature cannot be set
until the blackout alarm is
deactivated.
Before deactivating the acoustic
signal, it is advisable to pay attention
to the temperature shown on the
temperature display, corresponding
to the highest temperature reached
in the freezer compartment during
the power failure. Press the “Stop
Alarm” button briey to deactivate
the acoustic signal. After pressing
the button, the temperature display
shows the set temperatures again.
If the freezer compartment has
not yet reached the optimum food
storage temperature, the freezer
compartment temperature alarm
could be activated (see freezer
compartment temperature alarm).
Check the food before consuming it.
The red led
lights
up (without ashing),
an acoustic signal
sounds and the
freezer compartment
temperature display
ashes.
Freezer compartment
temperature alarm
The freezer compartment
temperature alarm indicates that
the temperature is not at the
optimum level. This may happen:
with rst use, after defrosting
and/or cleaning, if large amounts
of food are placed inside the
freezer or when the freezer door
has not been closed properly.
To deactivate the acoustic signal,
press the Stop Alarm button ;
the acoustical alarm stops, the
Temperature Display (°C) blinks and
the Alarm Indicator remains on until a
temperature < -10°C is reached.
The red led
lights
up, an acoustic signal
sounds and the letter
“F” ashes on the
display.
Malfunction Alarm
The alarm indicates a fault in a
technical component.
Call the authorised Service Centre.
Press the “Stop Alarm” button briey
to deactivate the acoustic signal.
Note: it is normal for the refrigeration system to produce some noises, such as gurgling and hissing.


Printed in Italy
04/17
19514595401
GB
-
 1
1
-
 2
2
-
 3
3
-
 4
4
-
 5
5
-
 6
6
-
 7
7
-
 8
8


KitchenAid KCBPZ 18120.1 Daily Reference Guide
- Category
- Side-by-side fridge-freezers
- Type
- Daily Reference Guide
Ask a question and I''ll find the answer in the document
Finding information in a document is now easier with AI
Related papers
-
KitchenAid KCBPZ 18120.1 Setup and user guide
-
KitchenAid KCBPZ 18120 2 Daily Reference Guide
-
-
-
-
-
KitchenAid KCBFS 18602 User guide
-
KitchenAid KCBCR 18600 Program Chart
Other documents
-
BORETTI BVN179 Program Chart
-
HOTPOINT/ARISTON BF 1801 E F AA Program Chart
-
Hotpoint HF 1801 E F AA.UK.1 Program Chart
-
-
-
Whirlpool BF 1801 E F AA Program Chart
-
Whirlpool HF 1801 E F AA.UK.1 User guide
-
Whirlpool UW8 F2Y XBI F 2 User guide
-
Whirlpool UW8 F1C WB F User guide
-
Whirlpool UW8 F2Y WBI F User guide