Electrolux E30DF74TPS Owner's manual

Category
Microwaves
Type
Owner's manual

This manual is also suitable for

808638903 Rev A April 2017
Use and Care Guide Dual Fuel Range
CUSTOMER CARE AND SERVICE
Keep a Record for Quick Reference
Purchase Date
Electrolux model number
Electrolux serial number
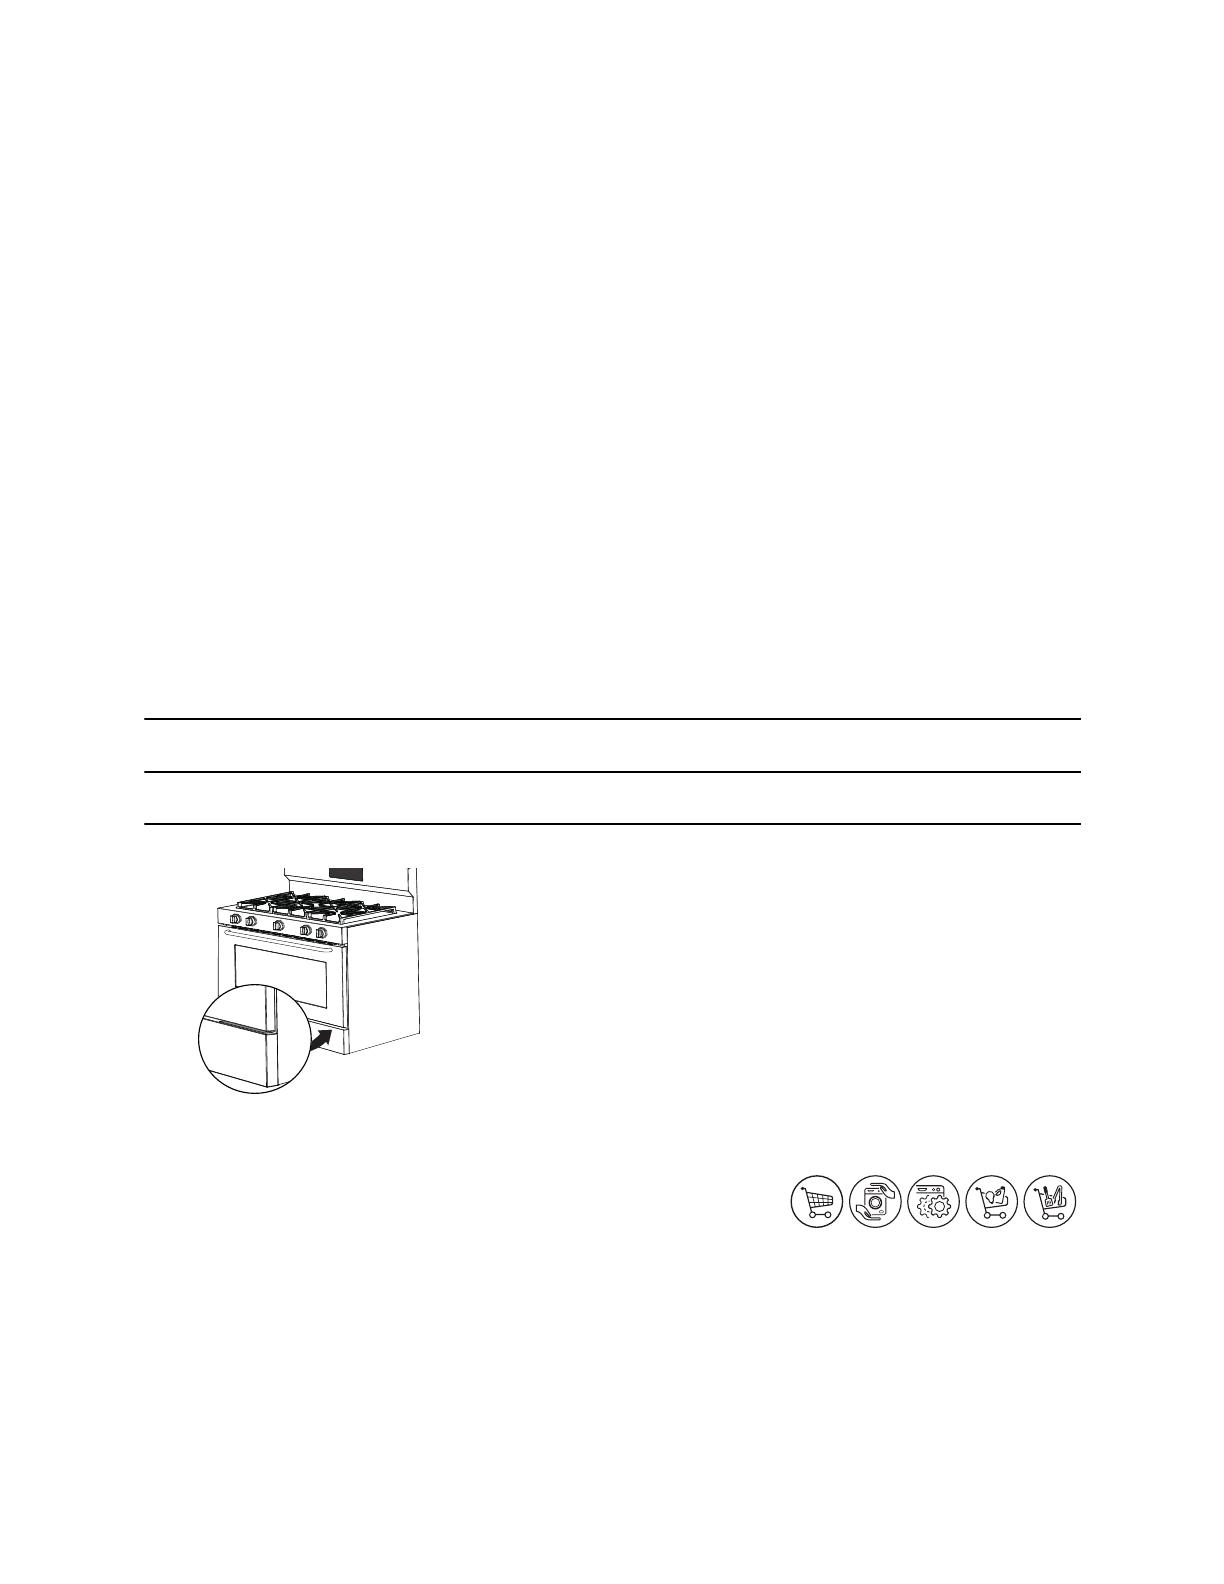
When contacting Service, ensure that you have the following data available. The informa-
tion can be found on the serial plate. The serial plate is located on top of the range’s lower
front panel, and can be clearly viewed when door is open.
We recommend the use of original spare parts. Registering your product with Electrolux
enhances our ability to serve you. You can register online at www.electroluxappli-
ances.com or by dropping your Product Registration Card in the mail. For toll-free
telephone support in the U.S. and Canada: 1-877-4ELECTROLUX (1-877-435-3287).
VISIT OUR WEBSITE FOR ACCESSORIES, CONSUMABLES, AND MORE!
The Electrolux Webshop
In the Electrolux webshop you’ll find everything you need to keep all your Elec-
trolux appliances looking spotless and working
perfectly. Electrolux offers a wide range of accessories designed and built to
the high quality standards you would expect from specialist cookware to cutlery baskets, bottle holders to delicate laundry bags.
Visit the webshop at:www.electrolux.com/shop
On the Electrolux Website
Want to learn more about your product or discover additional Electrolux appliances? If so, then check out the link below for product
overviews, a list of features, photo galleries, product manuals (complete owner’s guide, installation instructions, wiring diagrams,
product spec sheets), specifications, reviews, related accessories, and video guides.
For online support and Internet production information, visit http://www.electroluxappliances.com www.electrolux.com
1-877-435-3287
All Rights Reserved. Printed in U.S.A
CONTENTS
PLEASE READ AND SAVE THIS GUIDE
Thank you for purchasing an Electrolux appliance. You’ve
chosen a product that brings with it decades of professional
experience and innovation. Ingenious and stylish, it has been
designed with you in mind. So whenever you use it, you can be
safe in the knowledge that you’ll get great results every time.
This Use & Care Guide is part of our commitment to customer
satisfaction and product quality throughout the service life of
your new appliance. We view your purchase as the beginning of
a relationship. To ensure our ability to continue serving you,
please use this page to record important product information.
3
9 Before Setting Surface Controls
13 Setting Surface Burners
14 Before Setting Oven Controls
17 Setting Oven Controls
26 Care and Cleaning
32 Before You Call
35 Warranty
3
Important Safety Instructions
Read all instructions before using this appliance.
Save these instructions for future reference.
This manual contains important safety
symbols and instructions. Please pay
attention to these symbols and follow all
instructions given.
Do not attempt to install or operate your
appliance until you have read the safety
precautions in this manual. Safety items
throughout this manual are labeled with a
WARNING or CAUTION statement based on
the risk type.
Warnings and important instructions
appearing in this guide are not meant to
cover all possible conditions and situations
that may occur. Common sense, caution, and
care must be exercised with installing, main
-
taining, or operating your appliance.
Definitions
This is the safety alert symbol. It is used
to alert you to potential personal injury
hazards. Obey all safety messages that
follow this symbol to avoid possible injury or
death.
indicates a potentially hazardous situation
which, if not avoided, may result in death or
serious injury.
indicates a potentially hazardous situation
which, if not avoided, may result in minor or
moderate injury.
IMPORTANT! indicates installation, opera-
tion, maintenance or valuable information
that is not hazard related.
Indicates a short, informal reference –
something written down to assist the memory
or for future reference.
If the information in this manual is not
followed exactly, a fire or explosion may
result causing property damage, personal
injury, or death.
FOR YOUR SAFETY: Do not store or use
gasoline or other flammable vapors and
liquids in the vicinity of this or any other
appliance.
—WHAT TO DO IF YOU SMELL GAS
Do not try to light any appliance.
Do not touch any electrical switch.
Do not use any phone in your building.
Immediately call your gas supplier from a
neighbor’s phone. Follow the gas supplier’s
instructions.
If you cannot reach your gas supplier, call the
fire department.
Installation and service must be performed by a
qualified installer, servicer, or the gas supplier.
Tip Over Hazard
Range
leveling leg
Anti-tip
bracket
A child or adult can tip the range
and be killed.
• Verify the anti-tip device has been
installed to floor or wall.
• Ensure the anti-tip device is re-engaged to floor or wall
when the range is moved.
• Do not operate the range without the anti-tip device in
place and engaged.
• Failure to follow these instructions can result in death or
serious burns to children and adults.
To check if the anti-tip bracket is installed properly, use both
arms to grasp the rear edge of the range back. Carefully
attempt to tilt range forward. When properly installed, the range
should not tilt forward.
Refer to the anti-tip bracket installation instructions supplied
with your range for proper installation.
4
Save these instructions for future reference.
Important Safety Instructions
Read all instructions before using this appliance.
IMPORTANT INSTRUCTIONS FOR
UNPACKING AND INSTALLATION
IMPORTANT - Read and follow the below
instructions and precautions for unpacking,
installing, and servicing your appliance:
Remove all tape and packaging before using
the appliance. Destroy the carton and plastic
bags after unpacking the appliance. Never
allow children to play with packaging
material. Do not remove the wiring label and
other literature attached to the appliance. Do
not remove model/serial number plate.
Cold temperatures can damage the elec-
tronic control. When using this appliance for
the first time, or when the appliance has not
been used for an extended period of time, be
sure the appliance has been in temperatures
above 32ºF (0ºC) for at least 3 hours before
turning on the power to the appliance.
Never modify or alter the construction of the
appliance by removing the leveling legs,
panels, wire covers, anti-tip brackets/screws,
or any other part of the appliance.
Be sure to have an appropriate foam-type fire
extinguisher available, visible, and easily
accessible located near the appliance.
Air curtain or other overhead range hoods
which operate that operate by blowing a
downward air flow onto a range or cooktop,
shall not be used in conjunction with gas
ranges or cooktops other than when the
range or cooktop and hood have been
designed, tested, and listed by an indepen
-
dent test laboratory for use in combination
with each other.
GROUNDING INSTRUCTIONS
Avoid fire hazard or electrical shock. Failure
to follow this warning may cause serious
injury, fire, or death.
Avoid fire hazard or electrical shock. Do not
use an adapter plug, use an extension cord,
or remove grounding prong from the power
cord. Failure to follow this warning may cause
serious injury, fire, or death.
Proper Installation—Be sure your appliance
is properly installed and grounded by a
qualified technician. In the United States,
install in accordance with the National Fuel
Gas Code ANSI Z223.1/NPFA No. 54, latest
edition and National Electrical Code NFPA
No. 70 latest edition, and local electrical code
requirements. In Canada, install in accor
-
dance with CAN/CGA B149.1 and CAN/CGA
B149.2 and CSA Standard C22.1, Canadian
Electrical code, Part 1-latest editions and
local electrical code requirements. Install only
per installation instructions provided in the
literature package for this appliance.
For personal safety, this appliance must be
properly grounded. For maximum safety, the
power cord must be securely connected to
an electrical outlet or junction box that is the
correct voltage, is correctly polarized and
properly grounded, and protected by a circuit
breaker in accordance with local codes.
It is the personal responsibility of the
consumer to have the appropriate outlet or
junction box with the correct, properly
grounded wall receptacle installed by a
qualified electrician. It is the responsibility
and obligation of the consumer to contact a
qualified installer to assure that the electrical
installation is adequate and is in confor
-
mance with all local codes and ordinances.
This appliance is equipped with a 4-prong
grounding plug for your protection against
shock hazard and should be plugged directly
into a properly grounded receptacle. Do not
cut or remove the grounding prong from this
plug.
5
Important Safety Instructions
Read all instructions before using this appliance.
Save these instructions for future reference.
For personal safety, the appliance must be
properly grounded. For maximum safety, the
power cord must be plugged into an electrical
outlet that is correctly polarized and properly
grounded.
If a 2-prong wall receptacle is the only
available outlet, it is the personal responsi
-
bility of the consumer to have it replaced with
a properly grounded 4-prong wall receptacle,
installed by a qualified technician.
Conversion to (L.P.) Gas
This appliance allows for conversion to
Liquefied Petroleum (L.P.) Gas.
Personal injury or death from electrical shock
may occur if the conversion to L.P. gas is not
made by a qualified installer or electrician.
Any additions, changes or conversions
required in order for this appliance to satisfac
-
torily meet the application needs must be
made by a qualified technician.
If L.P. conversion is needed, contact your
local L.P. Gas provider for assistance.
See the installation instructions packaged
with this appliance for complete installation
and grounding instructions.
IMPORTANT INSTRUCTIONS FOR USING
THE APPLIANCE
Storage In or On Appliance—Flammable
materials should not be stored in an oven or
microwave, near surface burners or
elements, or in the storage or warmer drawer
(if equipped). This includes paper, plastic,
and cloth items, such as cookbooks, plastic
ware, and towels, as well as flammable
liquids. Do not store explosives, such as
aerosol cans, on or near the appliance.
Do not leave children alone - Children should
not be left alone or unattended in the area
where appliance is in use. They should never
be allowed to sit or stand on any part of the
appliance, including the storage drawer,
lower broiler drawer, warmer drawer, or lower
double oven.
Do not store items of interest to children in the
cabinets above the appliance or on the back
-
guards of ranges. Children climbing on or
near the appliance to reach items could be
seriously injured.
Do not allow children to climb or play around
the appliance. The weight of a child on an
open over door may cause the appliance to
tip, resulting in serious burns or other injury.
An open drawer when hot may cause burns.
Stepping, leaning, or sitting on the door or
drawers of this appliance can result in serious
injuries and also cause damage to the appli-
ance.
Never cover any slots, holes, or passages in
the oven bottom or cover an entire oven rack
with any materials, such as aluminum foil or
240V grounded
wall receptacle
Power supply
cord with 4-prong
grounding plug
6
Save these instructions for future reference.
Important Safety Instructions
Read all instructions before using this appliance.
aftermarket oven liners. Aluminum foil and
other liners may trap heat, causing a fire
hazard
Do not use oven or warmer drawer (if
equipped) for storage.
Never use your appliance as a space heater
to heat or warm the room. Doing so may result
in carbon monoxide poisoning and over
-
heating of the appliance.
When heating fat or grease, watch it closely.
Grease may catch fire if it becomes too hot.
Do not use water or flour on grease fires.
Smother fire or flame or use dry chemical or
foam-type extinguisher. Cover the fire with a
pan lid or use baking soda.
Use dry potholders. Moist or damp potholders
on hot surfaces may result in burns from
steam. Do not let potholders touch hot
cooking areas. Do not use towels or other
bulky cloths.
Do not heat unopened food containers -
Build-up of pressure may cause container to
burst and result in injury.
Wear proper apparel - Loose-fitting or
hanging garments should never be worn
while using the appliance. Do not let clothing
or other flammable materials contact hot
surfaces.
Do not touch surface burners or elements,
areas near these burners or elements, interior
surfaces of the oven, or the warmer drawer (if
equipped). Surface burners and elements
may be hot even though they appear cool.
Areas near surface burners and elements
may become hot enough to cause burns.
During and after use, do not touch, or let
clothing or other flammable materials touch
these areas until they are cool. These areas
may include the cooktop, surfaces facing the
cooktop, oven vent areas, oven door, and
oven window.
Do not attempt to operate the appliance
during a power failure. If the power fails,
always turn off the appliance. If the appliance
is not turned off and the power resumes,
electric surface elements may resume
operation when power is restored. Once the
power resumes, reset the clock and the oven
function.
IMPORTANT INSTRUCTIONS FOR USING
YOUR GAS COOKTOP
Use Proper Flame Size — Adjust flame size
so it does not extend beyond the edge of the
utensil. The use of undersized utensils will
expose a portion of the burner flame to direct
contact and may result in ignition of clothing.
Proper relationship of utensil to flame will also
improve efficiency.
Know which knob or key controls each
surface heating area. Place cookware with
food on the cooking area before turning it on.
Turn the cooking area off before removing
the cookware.
Use proper pan size. This appliance is
equipped with one or more surface units of
different sizes. Select cookware with flat
bottoms that match the surface unit heating
element. The use of undersized cookware
may expose a portion of the flame to direct
contact and may result in the ignition of
clothing or other items. Using the proper
cookware on the cooking areas will improve
efficiency.
Always turn knob to the full LITE position
when igniting top burners. Visually check that
burner has lit. Then adjust the flame so it
does not extend beyond the edge of the
utensil.
To reduce the risk of burns, ignition of
flammable materials, and spillage due to
unintentional contact with the utensil, the
7
Important Safety Instructions
Read all instructions before using this appliance.
Save these instructions for future reference.
handle of the utensil should be positioned so
that it is turned inward, and does not extend
over adjacent surface burners.
Never leave surface burners unattended at
high heat settings — Boil overs cause
smoking and greasy spill overs that may
ignite, or a pan that has boiled dry may melt.
Glazed cooking utensils — Only certain types
of glass, glass/ceramic, ceramic, earthen
-
ware, or other glazed utensils are suitable for
cook top service without breaking due to the
sudden change in temperature. Check the
manufacturer’s recommendations for cook
top use.
When you are flaming foods under a venti-
lating hood, turn the fan on.
IMPORTANT INSTRUCTIONS FOR USING
YOUR OVEN
Protective liners—Do not use aluminum foil,
aftermarket oven liners, or any other
materials or devices to line oven bottom,
oven racks, or any other part of the appli
-
ance. Only use aluminum as recommended
for baking, such as lining cookware or as a
cover placed on food. Any other use of
protective liners or aluminum foil may result
in a risk of electric shock or fire or a short
circuit.
Use care when opening oven door, lower
oven door, or warmer drawer (some models).
Stand to the side of the appliance when
opening the door of a hot oven. Let hot air or
steam escape before you remove or replace
food in the oven.
Keep oven vent ducts unobstructed.
Touching surfaces in this area when the oven
is on may cause severe burns. Do not place
plastic or heat-sensitive items on or near the
oven vent. These items can melt or ignite.
Placement of oven racks - Always place oven
racks in desired location while oven is cool. If
rack must be moved while oven is hot, do not
let potholder contact hot burner or element in
oven. Use potholders and grasp the rack with
both hands to reposition. Remove all
cookware and utensils before moving the
rack.
Do not use a broiler pan without its insert.
Broiler pans and inserts allow dripping fat to
drain away from the high heat of the broiler.
Do not cover the broiler insert with aluminum
foil; exposed fat and grease could ignite.
Do not cook food on the oven bottom. Always
cook in proper cookware and always use the
oven racks.
IMPORTANT INSTRUCTIONS FOR
CLEANING YOUR APPLIANCE
Before manually cleaning any part of the
appliance, be sure all controls are turned off
and the appliance is cool. Cleaning a hot
appliance can cause burns.
Clean the appliance regularly to keep all
parts free of grease that could catch fire. Do
not allow grease to accumulate. Greasy
deposits in the fan could catch fire.
Always follow the manufacturer’s recom-
mended directions for use of kitchen cleaners
and aerosols. Be aware that excess residue
from cleaners and aerosols may ignite
causing damage and injury.
Clean ventilating hoods frequently - Grease
should not be allowed to accumulate on hood
or filter. Follow the manufacturer’s instruc-
tions for cleaning vent hoods.
8
Save these instructions for future reference.
Important Safety Instructions
Read all instructions before using this appliance.
IMPORTANT INSTRUCTIONS FOR SELF
CLEANING OVENS
Do not clean the oven door gasket. The door
gasket is essential for a good seal. Care
should be taken not to rub, damage, or move
the gasket.
Do not use oven cleaners. No commercial
oven cleaner or oven liner protective coating
of any kind should be used in or around any
part of the appliance.
Before using self clean, remove the broiler
pan, any food, utensils, and cookware from
the oven, storage drawer or warming drawer
(if equipped). Remove oven racks unless
otherwise instructed.
Use the self clean cycle to clean only the
parts listed in this manual.
Some birds are extremely sensitive to the
fumes given off during the self clean cycle of
any oven. Move birds to another well-venti
-
lated room.
IMPORTANT INSTRUCTIONS FOR
SERVICE AND MAINTENANCE
Do not repair or replace any part of the
appliance unless specifically recommended
in the manuals. All other servicing should be
done only by a qualified technician. This
reduces the risk of personal injury and
damage to the appliance.
Always contact your dealer, distributor,
service agent, or manufacturer about
problems or conditions you do not under
-
stand.
Ask your dealer to recommend a qualified
technician and an authorized repair service.
Know how to disconnect the power to the
appliance at the circuit breaker or fuse box in
case of an emergency.
Remove the oven door from any unused
oven if it is to be stored or discarded.
Do not touch a hot oven light bulb with a
damp cloth. Doing so could cause the bulb to
break. Handle halogen lights (if equipped)
with paper towels or soft gloves. Disconnect
the appliance or shut off the power to the
appliance before removing and replacing the
bulb.
Important Safety Notice - The California
Safe Drinking Water and Toxic Enforcement
Act requires the governor of California to
publish a list of substances known to cause
cancer, birth defects, or other reproductive
harms, and requires businesses to warn
customers of potential exposures to such
substances.
Before Setting Surface Controls 9
BEFORE SETTING SURFACE CONTROLS
Gas Surface Burners
Your built-in range is equipped with gas surface burners with
different BTU ratings. The ability to heat food quicker and in
larger volumes increases as the burner size increases
(
Figure 1).
Regardless of size or location, always select cookware that is
suitable for the amount and type of food being prepared. Select
a burner and flame size appropriate to the pan. Never allow
flames to extend beyond the outer edge of the pan.
Burner Caps and Burner Grates Assembly
To prevent flare-ups use the cooktop with all burner caps
properly installed.
Placement of burner caps
IMPORTANT! Your new range comes with two styles of
burners.
Follow the instructions carefully when placing caps on
burners as shown in Figure 2.
Place a burner cap on each burner head, matching the cap size
to the head size. The cap for each burner has an inner locating
ring which centers the cap correctly on the burner head. Be
sure that all the burner caps and burner heads are correctly
placed before using your appliance.
Make sure each burner cap is properly aligned and level.
Turn the burner on to determine if it will light. If the burner does
not light, contact the installer. Do not service the sealed burner
yourself.
ATTENTION: Do not slide the burner caps on the cooktop,
doing so can damage the surface.
Setting Regular Burner Caps
Figure 1: Burner controls and location
Figure 2: Placing cap properly on burner head
Burner Cap
Burner Head
Correct Burner Cap
Placement
Incorrect Burner Cap
Placement
Burner Cap Lip
10 Before Setting Surface Controls
Assembling the G5 burners
IMPORTANT! For proper ignition: Burner Ring Alignment
Tab Must Align with Burner Base Alignment Tab Slot.
NOTE: When the burner ring is properly seated, it will click into
place. When the burner cap is properly set in place it should not
move out of the recessed area of the burner head.
Installing Burner Grates
Do not use surface burners without burner caps and grates
properly installed. Missing pieces or improper installation may
lead to spills, burns, or damage to your range and cookware.
Make sure the burner grates are properly placed on the cooktop
before using the surface burners. The grates are designed to
rest inside the recess on the cooktop.To install burner grates,
place grates flat-side down and align into the cooktop recess.
Grates should rest flush against each other and against the
sides of the recess (
See Figure 4).
Home Canning
Be sure to read and observe all the following points when
home canning with your appliance.
Check with the United States Department of Agriculture
(USDA) website and be sure to read all the information
they have available and follow their recommendations for
home canning procedures.
Use only quality flat bottom canners when home canning.
Use a straight-edge to check canner bottom.
When home canning, use only a completely flat bottom
canner with no ridges that radiate from the bottom center.
Be sure the diameter of the canner does not exceed 1 inch
beyond the grate.
Start with hot tap water to bring water to boil more quickly.
Use the highest heat setting when first bringing the water to
a boil.
Once boiling is achieved, reduce heat to lowest possible
setting to maintain that boil.
Figure 3: Make sure burner cap and ring are secure before attempting to light the burner.
Ring
Alignment Tab
Burner
Cap
Burner
Ring
Burner
Base
Simmer
Head
Burner
Alignment
Tab
Slot
Burner
Figure 4: How to properly place burner grates
Before Setting Surface Controls 11
Setting Proper Burner Flame Size
Never extend the flame beyond the outer edge of the cooking
utensil. A higher flame wastes energy and increases your risk of
being burned by the flame (
Figure 5).
The color of the flame is the key to proper burner adjustment. A
good flame is clear, blue and hardly visible in a well-lighted
room. Each cone of flame should be steady and sharp. Adjust
or clean burner if flame is yellow-orange.
Using Proper Cookware
Do not place flammable items such as plastic salt and pepper
shakers, spoon holders or plastic wrappings on the cooktop
when it is in use. These items could melt or ignite. Potholders,
towels or wooden spoons could catch fire if placed too close to
the range cooktop.
Do not place aluminum foil, or any material that can melt on the
cooktop. If these items melt they may damage the cooktop.
For best cooking results, cookware should have flat bottoms
that rest level on the burner grate. Before using cookware,
check for flatness by rotating a ruler across the bottom of the
cookware (
Figure 6).
Cookware Material Types
The most popular materials available are:
Aluminum - Excellent heat conductor. Some types of food
will cause it to darken (Anodized aluminum cookware
resists staining and pitting).
Copper - Excellent heat conductor but discolors easily.
Stainless - Slow heat conductor with uneven cooking
results. Is durable, easy to clean and resists staining.
Cast Iron - A slow heat conductor; however, it will retain
heat very well. Cooks evenly once cooking temperature is
reached.
Porcelain - enamel on metal - Heating characteristics will
vary depending on base material.
Glass - Slow heat conductor.
Please note: The size and type of utensil used and the amount
and type of food being cooked will influence the burner flame
setting needed for best cooking results.
Specialty pans such as lobster pots, griddles and pressure
cookers may be used but must conform to the above recom
-
mended cookware requirements.
IMPORTANT! Never place or straddle a cooking utensil over
two different surface cooking areas heating at the same time.
This can cause uneven heating results.
Figure 5: How to set flame for efficient cooking
Figure 6: Check for flat bottom cookware
Correct
flame setting
Incorrect
flame setting
Figure 7: Cookware recommendations
CORRECT
• Flat bottom and straight
sides.
• Tight fitting lids.
Weight of handle does
not tilt pan. Pan is well
balanced.
Pan sizes match the
amount of food to be
prepared.
Made of material that
conducts heat well.
Easy to clean.
INCORRECT
Curved and warped pan
bottoms.
• Pan overhangs unit by
more than 1” (2.5 cm).
Heavy handle tilts pan.
Flame extends beyond unit.
12 Before Setting Surface Controls
Using a Wok
Using a Griddle
A griddle (optional) is intended for direct food cooking and can be used on both sides. Do not use pans or other cookware on the
griddle. Doing so could damage the finish. With the griddle in position over the burners, set the griddle on top of the grates.
A griddle can be purchased as an accessory by ordering online at www.electrolux-store.com/cooking-accessories.html.
Always place the griddle on the grate before lighting the burner. Be sure the griddle is positioned correctly and stable before use
to prevent hot spills and possible burns.
Always use potholders to remove the griddle from the grate. Allow the griddle to cool before removing. Do not set a hot griddle on
surfaces that cannot withstand high heat, such as counter tops.
Place on grates
before lighting burners
Griddle showing
grilling side
Griddle showing
at side
Figure 8: Use extra care when setting the wok stand onto the burner grates and test stability before using
IMPORTANT! Do not use a wok if it is equipped with a metal ring that extends beyond the burner grates. This ring traps heat,
and the surface unit and cooktop surface could be damaged as a result.
Woks with flat bottoms suitable for use on your cooktop are available in most cookware or hardware stores.
Round bottomed woks (with a support ring that does not extend beyond the burner grates) may also be used. The metal ring
was designed to support the wok safely when it is filled with large amounts of liquids (soup making) or fat (frying).
Wire trivets: Do not use wire trivets. Cookware bottoms must be in direct contact with the grates.
Setting Surface Burners 13
SETTING SURFACE BURNERS
Your gas appliance is equipped with different sized surface
burners (
Figure 9). The ability to heat food quicker and in larger
volumes increases as the burner size increases. It is important
to select cookware that is suitable for the amount and type of
food being prepared.
The smaller simmer burner is best suited for simmering
delicate sauces, etc.
Use standard size burners for most cooking needs.
Larger power burners are recommended for bringing
large quantities of liquid to temperature and when preparing
larger quantities of food.
IMPORTANT!
Do not cook with the surface control knob left in the Lite
position. The electronic ignitor will continue to spark if the
control knob setting remains in the position.
When setting any surface control knob to the position,
all electronic surface ignitors will spark at the same time.
However, only the surface burner you are setting will ignite.
Never place or straddle a cooking utensil over two different
surface cooking areas at the same time, unless the
cookware was designed for that purpose (such as griddles).
This can cause uneven heating results.
In the event of an electrical power outage, the surface
burners can be lit manually. Use caution when lighting
surface burners manually. To light a surface burner, hold a
lit match to the burner head, then slowly turn the surface
control knob to Lite. After burner lights push in and turn
knob to desired setting.
When operating the oven, it is possible for residual heat
from the oven to build-up and over time to eventually
transfer to the surface control knobs located directly above
the oven door.
Do not place flammable items such as plastic salt and pepper
shakers, spoon holders or plastic wrappings on the cooktop
when it is in use. These items could melt or ignite. Potholders,
towels or wooden spoons could catch fire if placed too close to
the range cooktop.Do not place aluminum foil, or any material
that can melt on the range cooktop. If these items melt they may
permanently damage the cooktop surface.
To set surface burners:
1. Place cooking utensil on center of surface burner grate. Be
sure the cooking utensil sets stable on the burner grate.
2. Push the desired surface control knob in and turn counter-
clockwise out of the OFF position and rotate to the
position (Figure 10). Visually check that the burner has lit.
3. Once the burner has a flame, turn the control knob counter-
clockwise to the desired flame size. Use the control
markings and adjust the flame as needed.
For most cooking:
Start on the highest setting and then turn to a lower setting to
complete cooking. Use the recommendations below as a guide
for determining proper flame size for various types of cooking
(
Table 1 ).
For deep fat frying:
Use a thermometer and adjust the surface knob accordingly. If
the fat is too cool, the food will absorb the fat and be greasy. If
the fat is too hot, the food will brown so quickly that the center
will be under cooked. Do not attempt to deep fat fry too much
food at once as the food will neither brown or cook properly.
Table 1: Suggested flame settings
Figure 9: Typical burner sizes
Figure 10: Correct way to set burners
Flame size
1)
1) These settings are based on medium weight metal or alumi-
num pans with lids. Settings may vary when using other types
of pans.
Type of cooking
High flame Start most foods, bring water to a boil, pan
broiling
Medium flame Maintain a slow boil, thicken sauces, gravies,
steaming
Low flame Keep foods cooking, poaching and stewing
hi
14 Before Setting Oven Controls
BEFORE SETTING OVEN CONTROLS
Oven Vent Location
The oven vent is located in the front of the oven just below the
burner controls. When the oven is in use, warm air passes
through this vent for proper air circulation and provides good
baking results. Steam or moisture may appear near the oven
vent. This is normal. Do not block this vent.
IMPORTANT! Some models are equipped with a cooling fan
that runs during the cooking process to cool internal electronic
components. It is normal for this fan to continue to run for an
extended period of time, even when the oven is off.
Protective liners — Do not line the oven walls, racks, bottom or
any other parts of the range with aluminum foil. Doing so will alter
heat distribution, produce poor baking results, and may cause
permanent damage to the oven interior. During self clean
temperatures the oven will be hot enough to melt foil.
Use aluminum foil only as recommended in this manual.
Improper installation or use of these liners may result in risk
of electric shock or fire.
Always use potholders or oven mitts when removing food or
adjusting the oven racks. Wait until the oven has
completely cooled if possible. Oven racks may be very hot
and may cause burns.
Remove all oven racks and rack ladders before starting a
self clean cycle. If oven racks are left inside the oven during
a cleaning cycle, the slide ability of the Luxury-Glide™ oven
racks may be damaged and all of the oven racks will lose
their shiny finish. Clean oven racks according to the instruc
-
tions provided in the “Care and Cleaning” section.
Oven Racks
Your appliance comes with the following rack types (See
Figure 12 for the following descriptions):
Flat handle oven racks are used for most cooking needs
and can be placed in most oven rack positions.
The fully extendable Luxury-Glide™ oven rack allows the
user to effortlessly extend food away from the oven. It has
glide tracks that allow the rack to be pulled away from the
oven without rubbing the sides of the oven wall.
For ease of removal, racks should not be placed in
adjacent rack positions.
Figure 11: Oven vent location
oven vent
Figure 12: Rack types
Before Setting Oven Controls 15
Arranging, Removing, and Replacing Oven Racks
IMPORTANT! Remove all oven racks, rack ladders, and any other accessories from the oven before starting a self clean
cycle.
To arrange - Always arrange the oven racks when the oven is cool (prior to operating the oven).
To remove - pull the oven rack straight forward until it reaches the stop position. Lift up front of oven rack slightly and slide
out. For ease of removal, racks should not be placed in adjacent rack positions.
To replace - place the oven rack on the rack guides on the oven walls. Tilt the front of the rack upward slightly and slide the
oven rack back into place.
To prevent possible damage to the oven, do not attempt to close the oven door until all oven racks are fully positioned inside
the oven cavity.
Installing Oven (Ladder) Rack Supports
IMPORTANT! Always install oven rack support before turning on the oven (when the oven is cool).
To aid installation of the porcelain oven rack supports, apply a thin layer of cooking oil to all the prongs of the supports shown
below.
To install oven rack supports:
1. Hold the oven rack support at a slight angle and insert prongs into the holes at the top of the oven cavity (Arrow 1).
2. Lift the rack into the top holes, aligning the bottom prongs with the bottom holes (Arrow 2).
3. Once the upper prongs are in place, hold the oven rack support flush with the oven side and insert the bottom prongs into
the bottom holes (Arrow 3).
4. Slide the bottom prongs down into the lower holes. Some force may be required to set the rack into place (Arrow 4).
Note: To remove the ladder rack support for a self-clean cycle, reverse the order used when installing the ladder rack
supports.
Top prong inserts
into oven piercing
Bottom prong inserts
into piercing to make
support ush with
oven wall
16 Before Setting Oven Controls
Luxury Glide™ oven racks
.
IMPORTANT! Remove all oven racks before starting a self clean cycle. If oven racks are left inside the oven during a
cleaning cycle, the slide ability of the Luxury-Glide™ oven racks may be damaged and all of the oven racks will lose their
shiny finish. Clean oven racks according to the instructions provided in the Care and Cleaning section.
The fully extendable Luxury Glide™ rack makes food preparation easier. This oven rack has glide tracks that allow the
rack to be pulled away from the oven without rubbing the sides of the oven wall.
The Luxury Glide™ rack installs like all other oven racks. Before sliding the rack all the way in, lift the back of the rack
slightly to set the rack past the glide stop position. Be sure to slide the rack all the way in so that the back of the rack
stops by touching the vertical support of the ladder rack.
The glide portion of the rack can be easily pulled in and out in this position while the frame of the rack remains locked into
the ladder supports. This allows bakeware to remain in place on the Luxury Glide™ rack and slide out easily to check
food items without removing them from the oven.
Glide
Stop
Setting Oven Controls 17
SETTING OVEN CONTROLS
1. Oven Light Switch - On the left side of the oven control
panel; use to turn oven lights on or off while oven is in use.
2. Function Dial
•Bake - Use for regular baking at normal temperatures
(page 18).
ConvectIon bake - Uses a convection fan for even
browning of foods (
page 19).
Convection roast - Uses convection fan for roasting
foods such as hams, turkey, and roasts (page 22).
•Broil - Use to broil meats and foods at a default
temperature of 550°F (288°C, page 20).
Clean - use to select fixed 3 hour self cleaning cycle
(
page 24).
3. Indicator Lights
•Bake - When illuminated, indicates bake function is in
use.
ConvectIon bake - When illuminated, indicates
convection bake function is in use.
Convection roast - When illuminated, indicates
convection roast is in use.
•Broil - When illuminated, indicates broil function is in
use.
Clean - When illuminated, indicates cleaning cycle in
process.
•Lock - When illuminated, shows oven door is fully
locked. When blinking, shows door either locking or
unlocking for self clean.
Remove Racks - Blinks to inform user to remove all
racks prior to performing a self clean cycle.
4. Temperature Adjust Dial - Use to select from a tempera-
ture range of 170ºF to 500ºF (77ºC to 260ºC).
Getting Started
When the unit is first plugged in, or when the power supply to
the range has been interrupted, the indicator lights will flash and
the control will beep. To stop the lights from flashing, turn the
selector control knob to bake and back to OFF.
Oven Lights
Your appliance includes theater style oven lighting that gradu-
ally lights the oven interior to full brightness. The oven is
equipped with 2 halogen lights that turn on automatically when
the oven door is opened. The interior oven lights are located on
either side of the oven cavity. Each is covered with a glass
shield that must be in place whenever the oven is in use.
Do not leave oven lights on while baking.
You can turn the oven lights on by using the oven light switch
located on the left side of the control panel. The oven lights will
not operate during a self clean cycle.
To change the interior light, see “Caring for your glide racks” on
page 31.
Bake
Conv Bake
Conv Roast
Broil
Clean
-Lock
-Remove Racks
Oven Minimum and Maximum Control Settings
Feature Min. Temp Max. Temp
Bake 170°F (77°C) 500°F (260°C)
Convection Bake 170°F (77°C) 500°F (260°C)
Convection Roast 170°F (77°C) 500°F (260°C)
Broil
550°F (288ºC)
Clean 3 Hours
18 Setting Oven Controls
Bake
Use the bake function to cook food items with normal cooking
temperatures. The convection fan will rotate when Bake is pre
-
heating. This is normal. The fan will turn off when the oven
reaches the set temperature and the control will chime once to
indicate the oven is ready. While baking, the oven will continue
to cycle on and off to maintain the preset temperature.
IMPORTANT! For batter and dough-based baked goods such
as cakes, pastries, and breads, use the convection bake
function for best results.
For best results:
Leave oven light off while baking.
When using a single rack for baking, use position 4 Glide
rack or 5 flat rack.
For best results when baking cakes and cookies using 2
racks use convection bake.
For cakes and cookies place cookware on oven rack
positions 6 Glide rack (or 7 using flat rack) and position 2
Glide rack (or 3 using flat rack) as show in (
Figure 13)
Allow at least 2 inches (5 cm) space between the food
items to ensure proper circulation. (Figure 14)
Dark or dull pans and glass absorb more heat than shiny
bakeware resulting in dark or over browning of foods. To
prevent this it may be necessary to reduce the oven tem
-
perature or cook time to prevent over browning of some
foods. Shiny pans are recommended for cakes, cookies
and muffins.
Do not open the oven door too often. Opening the door will
reduce the temperature in the oven.
Do not cook foods directly on the oven bottom. To avoid
damaging the oven interior and surfaces, always cook foods in
the oven using cookware positioned on an oven rack.
Always use pot holders or oven mitts when working with a hot
oven. When cooking, the oven interior, oven racks and cooktop
will become hot enough to cause burns.
IMPORTANT! The oven Bake light will blink and the oven will
not turn on if the temperature dial is set higher than 500ºF
(260ºC).
To set the oven for bake at 350ºF (177ºC):
1. Arrange the oven racks as desired before preheating.
2. Turn the function dial to bake. The Bake indicator light will
flash (
Figure 15).
3. Turn the temperature control knob to 350. The Bake
indicator light will remain on but stop flashing. The oven will
begin to preheat.
4. When the set temperature is reached the oven control will
chime.
5. Place the food in the oven and close the door.
6. When baking is completed or to cancel Bake at any time,
turn the temperature and the function selector control
knobs to OFF.
Figure 13: Rack positions
1
2
3
4
5
6
7
8
Figure 14: Suggested Pan Spacing for cakes
Figure 15: Selecting the bake function
Bake
Conv Bake
Conv Roast
Broil
Clean
-Lock
-Remove Racks
Setting Oven Controls 19
Convection Bake
Convection bake uses a fan to circulate the oven heat through-
out the oven cavity (Figure 16). The improved heat distribution
allows for even cooking results.
Benefits of convection bake:
Multiple oven rack baking.
Foods cook more evenly.
For best results:
Leave oven light off while baking.
When using a single rack, use glide rack in position 4 or the
flat rack in position 5.
When using two racks for layer cakes, use glide rack in
rack positions 5 (or flat rack in position 6) and glide rack in
position 1 (or flat rack in position 2) (Figure 16) and position
cookware as shown in Figure 17.
Allow at lease 2 inches (5 cm) space between bakeware for
proper air circulation.
When using two racks to bake cookies and biscuits, place
cookware on glide rack in position 1 (or flat rack in position
2) and the other glide rack in position 4 (or flat rack in
position 5).
Bake foods such as cookies and biscuits on pans with no
sides or very low sides to allow heated air to circulate
around the food. Food items baked on pans with a dark
finish will cook faster.
If using standard recipe, reduce temperature by 25° when
using convection bake.
Dark or dull pans and glass absorb more heat than shiny
bakeware resulting in dark or over browning of foods. To
prevent this it may be necessary to reduce the oven tem
-
perature or cook time to prevent over browning of some
foods. Shiny pans are recommended for cakes, cookies
and muffins.
Do not open the oven door often. Doing so will reduce the
oven temperature and may increase cook time.
Use the convection bake feature for layer cakes
IMPORTANT! The oven Conv Bake light will blink and the oven
will not turn on if the temperature dial is set higher than 500ºF
(260ºC). The oven control has been factory set to reduce oven
temperature for optimum convection bake performance.
To set the oven for convection bake at 350°F (177°C):
1. Arrange the oven racks as desired before preheating.
2. Turn the function dial to conv bake. The Conv Bake
indicator light will flash (Figure 18).
3. Turn the temperature control knob to the 350. The Conv
Bake indicator light will remain on but stop flashing. The
oven will begin to preheat. The convection fan will turn on
and remain on during the cooking process.
4. When the set temperature is reached the oven control will
chime.
5. Place the food in the oven and close the door.
6. When baking is completed or to cancel Conv Bake at any
time, turn the temperature and the function selector control
knobs to OFF.
Figure 16: Rack positions and convection air flow
1
2
3
4
5
6
7
8
Figure 17: Suggested pan spacing
Figure 18: Convection bake selection
Bake
Conv Bake
Conv Roast
Broil
Clean
-Lock
-Remove Racks
20 Setting Oven Controls
Broil
Use the broil feature to cook meats requiring direct exposure to
radiant heat for optimum browning results. Broil foods with the
oven door closed.
If an oven fire occurs, turn the oven off and do not open the door.
Opening the door will feed oxygen to the fire. If the fire continues,
you can throw baking soda on the fire or use a Class B/C fire ex
-
tinguisher. Do not put water or flour on the fire. Flour can be ex-
plosive and water can cause a grease fire to spread possibly
causing personal injury.
Always use pot holders or oven mitts when working with a hot ov-
en. When broiling, the oven interior, oven racks and cooktop will
become hot enough to cause burns. Do not use the broiler pan
without the insert. Do not cover the broil pan or insert with alumi
-
num foil; the exposed grease could ignite.
To prevent food from contacting the broil element place on
appropriate rack position to avoid grease splattering. and use
the broil pan and insert when broiling.
Do not use the broiler pan without the insert. Do not cover the
broiler insert with foil. The exposed grease could ignite.The
insert is slotted and allows the grease to drain away from the
meat and the high heat of the broiler into the broiler pan
(
Figure 20).
To set Broil:
1. Place broiler pan insert on the broiler pan. Then place the
food on the broiler pan insert. Do not use the broiler pan
without the insert.
2. Arrange the interior oven rack and place the broiler pan on
the rack. Be sure to center the broiler pan directly under the
broiler element. If preheating the broil element, position the
broiler pan with food after step 4.
3. Turn the Selector knob to broil. The corresponding
indicator light will flash.
4. Turn the Temperature knob to broil. The indicator light will
remain on until the Selector or Temperature knob is turned
OFF. Broil with oven door closed.
Broil Auto Shut Off: If oven door is open for more than one
minute during Broil and the oven temperature is above 350°F,
the control will beep. If door is not closed it will turn off Broil
element after another 30 seconds.
5. Turn the temperature and the selector control knobs to OFF
when cooking is completed or to cancel broil.
For best results:
For optimum browning results, fully preheat for 2 minutes
before placing meat in the oven. To avoid burning food,
watch the food carefully when broiling and turn meat when
needed. Broil with the oven door closed.
Refer to Table 3 for the type and amount of meat being
prepared.
Figure 19: Rack positions
1
2
3
4
5
6
7
8
Figure 20: Broil pan and insert
  • Page 1 1
  • Page 2 2
  • Page 3 3
  • Page 4 4
  • Page 5 5
  • Page 6 6
  • Page 7 7
  • Page 8 8
  • Page 9 9
  • Page 10 10
  • Page 11 11
  • Page 12 12
  • Page 13 13
  • Page 14 14
  • Page 15 15
  • Page 16 16
  • Page 17 17
  • Page 18 18
  • Page 19 19
  • Page 20 20
  • Page 21 21
  • Page 22 22
  • Page 23 23
  • Page 24 24
  • Page 25 25
  • Page 26 26
  • Page 27 27
  • Page 28 28
  • Page 29 29
  • Page 30 30
  • Page 31 31
  • Page 32 32
  • Page 33 33
  • Page 34 34
  • Page 35 35
  • Page 36 36

Electrolux E30DF74TPS Owner's manual

Category
Microwaves
Type
Owner's manual
This manual is also suitable for

Ask a question and I''ll find the answer in the document

Finding information in a document is now easier with AI