
CHOCOLATE FOUNTAIN
FUENTE DE CHOCOLATE
User Guide & Recipes/ Guía del Usuario & Recetas
FPSTCF7500
www.oster.com
P.N. 135656
Safety
Seguridad
How to use
Cómo usar
Care & Cleaning
Cuidado y Limpieza
FAQs
Preguntas frecuentes
Recipes
Recetas
Warranty
Garantía
For product questions contact:
Sunbeam Consumer Service
USA : 1.800.334.0759
Canada : 1.800.667.8623
www.oster.com
©2009 Sunbeam Products, Inc. doing business as
Jarden Consumer Solutions. All rights reserved.
Distributed by Sunbeam Products, Inc. doing business as
Jarden Consumer Solutions, Boca Raton, Florida 33431.
Para preguntas sobre los productos llame:
Sunbeam Consumer Service
EE.UU.: 1.800.334.0759
Canadá : 1.800.667.8623
www.oster.com
©2009 Sunbeam Products, Inc. operando bajo el nombre de
Jarden Consumer Solutions. Todos los derechos reservados.
Distribuido por Sunbeam Products, Inc. operando bajo el nombre de
Jarden Consumer Solutions, Boca Raton, Florida 33431.
SPR-052209
Printed in China
Impreso en China
FPSTCF7500-IB.indd 28-1 5/22/09 5:19:11 PM

www.oster.com
2
www.oster.com
3
IMPORTANT SAFEGUARDS
1. Read all instructions before using the Chocolate Fountain.
2. To protect against re, risk of electrical shock, and personal injury, do not immerse the
Chocolate Fountain Base, its cord or plug, in water or other liquid.
3. Close supervision is necessary when any appliance is used by or near children.
4. Unplug from outlet when not in use, before putting on or taking o parts, and before cleaning.
Allow to cool before putting on or taking o parts.
5. Avoid contacting moving parts.
6. Do not operate any appliance with a damaged cord or plug or after the appliance malfunctions, or is
dropped or damaged in any manner. Contact Customer Service (see warranty) to return for examination,
repair or electrical or mechanical adjustment.
7. The use of attachments not recommended or sold by the manufacturer may cause re,
electric shock or injury.
8. Do not use outdoors.
9. Do not let cord hang over edge of table or counter or touch hot surfaces.
10. Do not touch hot surfaces. Use handles or knobs.
11. If any item drops into the Chocolate Fountain, turn control dial to “OFF” and remove
the power cord from the electrical outlet before attempting to remove the item.
12. Do not place on or near a hot gas or electric burner, or in a heated oven.
13. Extreme caution must be used when moving an appliance containing hot oil or other hot liquids.
14. To disconnect, turn control dial to “OFF”, then remove plug from wall outlet.
15. Do not use appliance for other than intended use.
16. Do not operate unless Chocolate Fountain is fully assembled. Make sure the bowl, auger, tower, and
canopies are properly secured before operating appliance.
17. Only use the Chocolate Fountain on a smooth level surface.
SAVE THESE INSTRUCTIONS
THIS APPlIANCE IS FOR HOUSEHOlD USE ONlY.
No user-serviceable parts inside. Power unit never needs lubrication. Do not attempt to service this product.
POlARIZED PlUG
This appliance has a polarized plug (one blade is wider than the other). To reduce
the risk of electric shock, this plug is intended to t into a polarized outlet only
one way. If the plug does not t fully into the outlet, reverse the plug. If it
still does not t, contact a qualied electrician. Do not attempt to modify the
plug in any way. If the plug ts loosely into the AC outlet, or if the AC outlet
feels warm, do not use that outlet.
AUTO SAFETY SHUT OFF
This Chocolate Fountain is equipped with an auto safety shuto. Should the motor become overheated, it will
turn o. In order to restart the Chocolate Fountain, follow the steps below.
1. Turn the control dial to OFF and unplug the Chocolate Fountain.
2. Remove the chocolate mixture from the bowl and place the mixture into a microwave safe container.
3. Wait at least 20 minutes for the motor to cool.
4. Reheat the chocolate mixture in the microwave and add it back into the bowl.
5. Plug in and operate normally.
Thank you for purchasing the OSTER
™
Chocolate Fountain.
Before you use this product for the rst time, please take a few moments
to read these instructions and keep it for reference. Pay particular attention
to the Safety Instructions provided. Please review the product service and
warranty statements. To learn more about Oster® products, please visit us
at www.oster.com or call us at 1-800-334-0759.
FPSTCF7500-IB.indd 2-3 5/22/09 5:19:12 PM

www.oster.com
4
www.oster.com
5
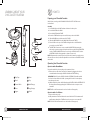
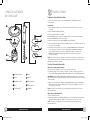
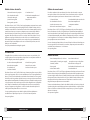
LEARNING ABOUT YOUR
CHOCOLATE FOUNTAIN
a
b
e
f
g
h
i
j
c
d
Drip Tray
Bowl
Control Knob
Base
Auger
Tower
Cap
Small Canopy
Large Canopy
Guard
a
b
c
f
i
d
e
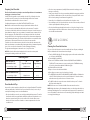
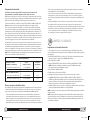
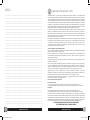
HOW TO
Preparing your Chocolate Fountain
Wash all parts according to the CLEANING YOUR CHOCOLATE FOUNTAIN section
in this manual.
Assembly
1 Insert the BOWL into the BASE and turn clockwise to lock into place.
2 Insert the AUGER into the BOWL.
3 Cover the AUGER with the TOWER.
4 Rotate the TOWER until it snaps twice and locks into position in the BOWL.
5 Slide the GUARD down to the bottom of the TOWER.
6 Slide the LARGE CANOPY then the SMALL CANOPY down the TOWER.
7 Place the CAP onto the top of the TOWER and align the tab on the CAP with the
groove in the top of the TOWER.
8 The DRIP TRAY comes in two sections, assemble the DRIP TRAY by inserting the
tabs into the opposite opening and snap the two halves together. Slide the DRIP TRAY
over the TOWER and CANOPIES and rest it on the edge of the BOWL. NOTE: Notches
in DRIP TRAY should be facing upwards so skewers can rest easily.
NOTE: All parts must be securely in place for the Chocolate Fountain to properly operate.
If the unit does not sit level, rotate the adjustable foot on the bottom of the BASE until the
unit is stable.
Operating Your Chocolate Fountain
Operation with a Warm Mixture
Prepare the melted chocolate according to the instructions below:
1 Preheat the Oster
™ Chocolate Fountain for 3-5 minutes by plugging the cord into
a standard outlet and turning the CONTROL KNOB to the HEATER setting.
IMPORTANT: DO NOT turn the CONTROL KNOB to HEATER/MOTOR until the melted
chocolate has been added to the BOWL. Operating the Chocolate Fountain dry may
cause damage to the unit.
2 Add the melted chocolate to the BOWL and turn the CONTROL KNOB to HEATER/MOTOR.
Chocolate will start owing up through the TOWER and over the canopies to create
a waterfall.
NOTE: The Chocolate Fountain must be on a level surface to ow properly.
Operation with a Cool Mixture
1 Prepare the dressing or dip.
2 Add your mixture to the bowl and turn the control dial to MOTOR. Your mixture will
start owing up through the TOWER and over the canopies to create a waterfall.
NOTE: The Chocolate Fountain must be on a level surface to ow properly.
g
j
i
h
FPSTCF7500-IB.indd 4-5 5/22/09 5:19:13 PM

www.oster.com
6
www.oster.com
7
Preparing Your Chocolate
The Chocolate Fountain is very simple to use and will provide hours of entertainment
turning any occasion into an event!
You MUST mix oil (vegetable or canola) with the chocolate. The oil allows the chocolate
to reach the smooth consistency for an even ow through the Chocolate Fountain.
Please follow the table below for chocolate-to-oil ratios.
For additional information see the CHOCOLATE HINTS AND TIPS section.
Note: The Chocolate Fountain will not run properly without the addition of the oil.
The chocolate can be melted with a double boiler or in the microwave. To melt the
chocolate in a double boiler, add 2 inches of water to the lower pan. Heat the lower pan on
the medium heat setting of your range to simmer. You want the water to simmer, not boil.
Place the upper pan of the double boiler over the lower pan and add the chocolate and
the vegetable oil. As the chocolate begins to melt, stir the chocolate mixture frequently to
avoid overheating and burning. The chocolate should avoid direct contact with the steam
and the water as the moisture will cause the chocolate to become unusable.
To melt the chocolate in the microwave, place the chocolate and oil in a microwave safe
bowl. Heat the mixture on a medium setting. Heating time will vary. Stir mixture frequently
(every 15-30 seconds) as chocolate melts to avoid overheating and burning.
The approximate melting time is 2 minutes for 8 oz. (1 cup) of chocolate.
NOTE: Chocolate should be melted completely, and of a smooth consistency with
no lumps before adding to the Chocolate Fountain.
Chocolate Hints & Tips
No special chocolate is required; any brand of morsels or chips will work well. This includes
semi-sweet, milk, white, or dark chocolate. If you use chunk chocolate, be sure to chop it
coarsely before melting to ensure even heat distribution.
• Chocolate should have a smooth, even, and glossy unblemished appearance. The surface
should not be dull or have grayish-white streaks (bloom). Bloom occurs when the cocoa
butter has separated causing it to rise to the surface of the chocolate. Bloom occurs
when the chocolate is stored in too humid or too warm a temperature-the chocolate
can still be used.
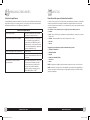
Measuring Chart
Milk, Semi-Sweet, or Oil Serves
Bittersweet Chocolate (Vegetable or Canola) Approximately
3 12-ounce bags of chips 10 liquid ounces 8-12
4 12-ounce bags of chips 14 liquid ounces 10-15
White or Premium* Chocolate
3 11-ounce bags of chips 12 liquid ounces 8-12
4 11-ounce bags of chips 16 liquid ounces 10-15
*Premium chocolate contains 30%-40% cocoa.
CARE & CLEANING
Cleaning Your Chocolate Fountain
The Oster™ Chocolate Fountain is easy to disassemble and clean. All parts, excluding the
BASE, are dishwasher-safe. Do not immerse base in liquids.
1 Turn the CONTROL KNOB to OFF and unplug the power cord from the outlet and allow
to cool. Remove the DRIP TRAY.
2 Twist the BOWL from the BASE.
3 Remove the TOWER from the BOWL. Slide the CAP, CANOPIES and GUARD o the
TOWER. NOTE: You may want to use a paper towel to grip the TOWER while twisting
o, as the chocolate mixture will make it dicult to grasp.
4 Pull the AUGER out of the BOWL.
5 Dispose of excess chocolate from the BOWL.
6 Rinse all parts to remove excess chocolate, dip, or dressing.
7 The DRIP TRAY, BOWL, AUGER, TOWER, CANOPIES, GUARD and CAP are all dishwasher-
safe. NOTE: Place all plastic parts on the top rack of dishwasher. To clean the skewers,
wash with warm soapy water and use a non-abrasive cleaner.
8 The BASE should not be exposed to water-electrical shock may occur. To clean the
BASE, wipe with a damp cloth.
NOTE: Do not store excess chocolate in BOWL. Clean entire unit after each use.
NOTE: A slight discoloration of the aluminum bowl may occur after the product has been
run through the dishwasher. This is caused by the natural properties of the material, and
is in no way harmful. The discoloration can be removed by gently scrubbing the area with
a scouring pad and detergent.
• Chocolate is very temperamental; carefully follow instructions for melting to avoid
burning or overheating.
• Seizing occurs when the chocolate you are melting suddenly becomes grainy and rms
up; it looks like a dull thick paste. If the chocolate seizes, you may still be able to rescue
the chocolate by mixing in a small amount of vegetable oil.
• Never add cool or cold liquid, because this will cause the chocolate to seize.
• Do not add liquor to the chocolate, this will cause it to seize. For best results, use avored
oil that is specically made for avoring chocolate.
• Chocolate should be wrapped tightly and stored in a cool dry place. Storing chocolate
in the refrigerator could cause condensation to form on the chocolate and, in turn, the
chocolate will seize when melted.
FPSTCF7500-IB.indd 6-7 5/22/09 5:19:15 PM

www.oster.com
8
www.oster.com
9
FAQS
Troubleshooting
If you experience diculties when operating the chocolate fountain, review the
troubleshooting information in this section to nd a solution. If you are unable to nd
a solution, please call our Consumer Relations Department at 1(800)334-0759.
Troubleshooting
Chocolate is not owing Mixture is too thick; add a
small amount of oil.
Chocolate is not owing evenly Chocolate Fountain is not level, carefully
rotate the adjustable foot on the bottom
of the BASE until the unit is level; or
chocolate mixture is not thin enough,
add a small amount of oil.
Chocolate changes to a lighter color This is normal.
Full waterfall eect is not achieved Chocolate to oil ratio may be incorrect.
Try adding more oil or chocolate.
Chocolate Fountain suddenly stops Turn CONTROL KNOB to OFF, unplug unit,
check for/remove obstructions, let cool
(5 minutes), plug back in, and turn
CONTROL KNOB to START setting.
RECIPES
Entertaining Ideas for Your Chocolate Fountain
The Oster™ Chocolate Fountain will provide hours of entertaining and delight guests of all
ages. You can dip virtually anything in the chocolate fountain, for best results cakes are not
recommended-they may break and crumb easily.
Be creative with the items you choose for your guests to dip:
• Pretzels
• Fruits – strawberries, bananas, pineapples, apples, oranges, raspberries,
cherries, grapes, and even dried fruits!
• Cookies – peanut butter, sugar, chocolate chip.
• Biscotti
• Nuts
Dipping suggestions for a more youth oriented party:
• Animal crackers
• Graham crackers
• Licorice
• Marshmallows
• Candy Canes
• Fruit
NOTE: Close supervision is required when this product is used near children.
NOTE: The Oster
™ Chocolate Fountain is equipped with a safety guard to prevent
dropped food or skewers from getting caught in the auger and jamming the machine.
FPSTCF7500-IB.indd 8-9 5/22/09 5:19:17 PM

www.oster.com
10
www.oster.com
11
Cherry and Pistachio Biscotti
Any dried fruits or nuts work well in this recipe. However, the red of a dried cherry or
cranberry with the green of the pistachio nut make these cookies a festive holiday cookie -
perfect for dipping in the Chocolate Fountain!
1 cup butter, cold 1 1/2 cups sugar
1 1/2 cups light brown sugar 4 eggs
3 Tablespoon vanilla 6 cups our
3 teaspoon baking powder 1/2 teaspoon salt
2 teaspoon cinnamon 1 teaspoon nutmeg
2 cups dried cherries 3 cups pistachios
Preheat oven to 350°F. Prepare 4 cookie sheets by lining with wax paper. Combine butter and
sugars in a mixer and beat until creamy and light. Beat in eggs, one at a time; add vanilla and
blend well. Add in remaining ingredients until just incorporated. Do not over mix. Remove
dough, place on a well oured surface and knead dough until it comes together. Shape
dough into four 12-inch loaves, using more our if necessary. Place each loaf on its own
cookie sheet. Bake 2 loaves at a time, rotating cookie sheet 1/2 turn during baking time.
Bake for about 35 minutes. Remove loaves from oven. Bake remaining 2 loaves.
Lower oven temperature to 300°F. Slice loaves lengthwise with a serrated knife 1/4 to 1/2 inch
thick. Bake 10-12 minutes. Then turn biscotti over and bake them for an additional 5 minutes.
Repeat with remaining batches. Once they have cooled, the biscotti can be frozen or can be
stored in a vacuum sealed bag for about 12 weeks.
Makes 6 dozen biscotti.
Fortune Cookies
1 cup butter, cold 1 1/2 cups sugar
10 Tablespoon butter, melted 8 large egg whites
2 cups superne sugar 2 cups our, sifted
1/8 teaspoon salt 6 Tablespoon heavy cream
1 teaspoon vanilla
Preheat oven to 400°F. Line 2 cookie sheets with a silicone pad or parchment paper. Spray
with nonstick cookie spray. Beat eggs and sugar on medium speed in an electric mixer
for about 30 seconds. Add remaining ingredients and beat until just incorporated. Pour a
spoonful of batter onto left half of prepared cookie sheet. Spread batter with back of a spoon
to create a thin circle about 5 inches wide. Repeat on right half of cookie sheet. Bake about
8 minutes, checking to make sure cookies are not cooking too quickly around edges. Adjust
oven temperature, if necessary.
Carefully lift cookie o with spatula. Shape quickly by folding in half and then, with thumb
and index nger, bend open ends together. Repeat with remaining dough.
When cookies are cool, thread or fold fortunes made out of sturdy paper inside cookie.
Makes 24 cookies.
Classic Vanilla Shortbread
1 3/4 cups all-purpose our 1/2 teaspoon salt
2 1/2 Tablespoon vanilla 1 1/4 sticks unsalted butter,
1 1/4 cups powdered sugar room temperature
1 large egg yolk Pinch salt
1 large egg, separated
Preheat oven to 300°F. Cut parchment paper to t a square 8x8 or a 9-inch cake pan.
Combine our, salt, vanilla in bowl. In mixer, cream butter, sugar, and egg yolk until light and
well incorporated. Add our mixture and blend. Remove dough and press into pan lined with
parchment paper. To smooth dough, roll with jar or can. Beat egg white with salt and lightly
brush dough with mixture. Carefully slice dough to form uniform wedges and prick with a
fork. Bake approximately 15 minutes, until dough is a light golden brown. Let cool, remove
from pan, and slice.
Makes approximately 8 large wedges.
Tuile Pirouettes
This classic cookie can be made into a variety of shapes, such as a cup for ice cream. Just
place the pirouette into an egg carton to cool. Or tie a rolled pirouette with a thin ribbon for a
graduation party.
10 Tablespoon butter, melted 8 large egg whites
2 cups superne sugar 2 cups our, sifted
1/8 teaspoon salt 6 Tablespoon heavy cream
1 teaspoon vanilla
Preheat oven to 400°F. Line 2 cookie sheets with a silicone pad or parchment paper.
Spray with nonstick cookie spray. Beat eggs and sugar on medium speed in an electric
mixer for about 30 seconds. Add remaining ingredients and beat until just incorporated.
Pour a spoonful of batter onto left half of prepared cookie sheet. Spread batter with back
of a spoon to create a thin circle about 5 inches wide. Repeat on right half of cookie sheet.
Bake about 8 minutes, checking to make sure cookies are not cooking too quickly around
edges. Adjust oven temperature, if necessary.
Carefully lift cookie o with spatula and shape quickly by rolling over a pencil.
Repeat with remaining batter.
Makes 24 cookies.
FPSTCF7500-IB.indd 10-11 5/22/09 5:19:18 PM

www.oster.com
12
www.oster.com
13
Peanut Butter Cookies
The classic combination of peanut butter and chocolate are highlighted when dipped into
the Chocolate Fountain. Add 1/2 cup of chopped peanuts or crunchy peanut butter chips for
a more intense peanut butter avor.
1 1/4 cups our 1/2 teaspoon baking soda
1/2 teaspoon kosher salt 1 stick unsalted butter,
1 cup light brown sugar room temperature
1/4 cup crunchy peanut butter 1 egg
Preheat oven to 350°F. Grease 2 cookie sheets. Sift together the our, baking soda, and
salt; set aside. Beat the butter and sugar in an electric mixer until light. Beat egg into butter
and sugar. Add in peanut butter (and chips or peanuts). Blend in dry ingredients until just
combined. Place in refrigerator for about 30 minutes to rm.
Roll teaspoonfuls of dough into balls. Place the balls onto the greased cookie sheets.
With fork tines, make a crisscross pattern on each ball. Bake about 12 to 15 minutes.
Makes 24 cookies.
Sugar Cookies
1 stick unsalted butter, (or 1/2 stick butter, 1 cup sugar plus additional
1/2 cup vegetable shortening), for coating the cookies
melted and cooled 2 cups all-purpose our
1 large egg 2 teaspoon baking soda
1 teaspoon vanilla 1/8 teaspoon salt
Preheat the oven to 375°F. Lightly grease 2 cookie sheets. With an electric mixer, beat
together the butter and 1 cup of the sugar until light. Add the egg and the vanilla and
beat until well combined. Sift together the our, the baking soda, and the salt. Add the
our mixture into the batter until it forms a dough. Put dough into a zippered bag and
place in the refrigerator until rm.
Measure tablespoons of dough and roll into balls. Roll the balls in sugar and place 3 inches
apart on cookie sheet. Flatten the balls with the bottom of a glass dipped in the sugar (the
edges will crack slightly) and bake the cookies for 8 to 12 minutes.
Makes about 32 cookies.
1 Year Limited Warranty
Sunbeam Products, Inc. doing business as Jarden Consumer Solutions or if in Canada, Sunbeam
Corporation (Canada) Limited doing business as Jarden Consumer Solutions (collectively “JCS”) warrants
that for a period of one year from the date of purchase, this product will be free from defects in material and
workmanship. JCS, at its option, will repair or replace this product or any component of the product found
to be defective during the warranty period. Replacement will be made with a new or remanufactured
product or component. If the product is no longer available, replacement may be made with a similar
product of equal or greater value. This is your exclusive warranty. Do NOT attempt to repair or adjust any
electrical or mechanical functions on this product. Doing so will void this warranty.
This warranty is valid for the original retail purchaser from the date of initial retail purchase and is not
transferable. Keep the original sales receipt. Proof of purchase is required to obtain warranty performance.
JCS dealers, service centers, or retail stores selling JCS products do not have the right to alter, modify or any
way change the terms and conditions of this warranty.
This warranty does not cover normal wear of parts or damage resulting from any of the following: negligent
use or misuse of the product, use on improper voltage or current, use contrary to the operating instructions,
disassembly, repair or alteration by anyone other than JCS or an authorized JCS service center. Further, the
warranty does not cover: Acts of God, such as re, ood, hurricanes and tornadoes.
What are the limits on JCS’s Liability?
JJCS shall not be liable for any incidental or consequential damages caused by the breach of any express,
implied or statutory warranty or condition.
Except to the extent prohibited by applicable law, any implied warranty or condition of merchantability or
tness for a particular purpose is limited in duration to the duration of the above warranty.
JCS disclaims all other warranties, conditions or representations, express, implied, statutory or otherwise.
JCS shall not be liable for any damages of any kind resulting from the purchase, use or misuse of, or
inability to use the product including incidental, special, consequential or similar damages or loss
of prots, or for any breach of contract, fundamental or otherwise, or for any claim brought against
purchaser by any other party.
Some provinces, states or jurisdictions do not allow the exclusion or limitation of incidental or consequential
damages or limitations on how long an implied warranty lasts, so the above limitations or exclusion may
not apply to you.
This warranty gives you specic legal rights, and you may also have other rights that vary from province to
province, state to state or jurisdiction to jurisdiction.
How to Obtain Warranty Service
In the U.S.A.
If you have any question regarding this warranty or would like to obtain warranty service, please call
1-800-334-0759 and a convenient service center address will be provided to you.
In Canada
If you have any question regarding this warranty or would like to obtain warranty service, please call
1-800-667-8623 and a convenient service center address will be provided to you.
In the U.S.A., this warranty is oered by Sunbeam Products, Inc. doing business as Jarden Consumer
Solutions located in Boca Raton, Florida 33431. In Canada, this warranty is oered by Sunbeam Corporation
(Canada) Limited doing business as Jarden Consumer Solutions, located at 20 B Hereford Street, Brampton,
Ontario L6Y 0M1. If you have any other problem or claim in connection with this product, please write our
Consumer Service Department.
PLEASE DO NOT RETURN THIS PRODUCT TO ANY OF THESE ADDRESSES
OR TO THE PLACE OF PURCHASE.
FPSTCF7500-IB.indd 12-13 5/22/09 5:19:19 PM

www.oster.com
14
www.oster.com
15
INDICACIONES DE SEGURIDAD
IMPORTANTES
1. Lea todas las instrucciones antes de usar la fuente de chocolate.
2. Para evitar riesgos de incendio, descarga eléctrica o lesiones, no sumerja la base de la fuente de chocolate,
su cable o enchufe en agua ni cualquier otro líquido.
3. Mantenga en vigilancia estrecha la unidad cuando la usen niños o haya niños en las cercanías.
4. Desconéctela del tomacorriente cuando no esté en uso, antes de montar o desmontar piezas y antes de
limpiarla. Permita que se enfríe la unidad antes de montar o desmontar piezas.
5. Evite el contacto con partes en movimiento.
6. No opere ningún aparato con el cable o el enchufe dañados, ni cuando el aparato funcione mal o se haya
caído o recibido cualquier tipo de daño. Contacte a Servicio al Cliente (vea la garantía) para regresar la
unidad para su revisión, reparación o ajuste mecánico o eléctrico.
7. El uso de accesorios no recomendados o no vendidos por el fabricante puede ocasionar incendios, descargas
eléctricas o lesiones.
8. No lo use en exteriores.
9. No deje el cable colgando de la mesa o mostrador, ni toque las supercies calientes.
10. No toque las supercies calientes. Use los mangos o las perillas.
11. Si cayera un objeto en la fuente de chocolate, gire la perilla de control a la posición “OFF” y desconecte el
enchufe del tomacorriente antes de intentar retirar el objeto.
12. No coloque el aparato cerca o encima de una estufa eléctrica o de gas calientes, ni tampoco en un
horno caliente.
13. Se debe tener mucho cuidado cuando se mueve un aparato que contiene aceite caliente u otros
líquidos calientes.
14. Para desconectar el aparato, gire la perilla de control a la posición “OFF” y luego desconecte el
enchufe del tomacorriente.
15. No use el aparato con nes distintos para los que fue diseñado.
16. No use la fuente de chocolate a menos que esté completamente ensamblada. Compruebe que el tazón, el
tornillo sinfín, la torre y los discos estén bien asegurados antes de usar el aparato.
17. Use la fuente de chocolate sólo en una supercie nivelada.
GUARDE ESTE INSTRUCTIVO
ESTE APARATO ESTá DISEñADO PARA SU
USO DOMÉSTICO SOlAMENTE.
En el interior no hay piezas a las que el usuario les pueda dar mantenimiento. El motor de la unidad no necesita
lubricación. No intente dar mantenimiento ni reparar este producto.
ENCHUFE POlARIZADO
Este aparato tiene un enchufe polarizado (una pata es más ancha que la otra).
Para reducir el riesgo de descarga eléctrica, este enchufe está diseñado para
ajustarse sólo de una forma en un tomacorriente polarizado. Si el enchufe
no se ajusta completamente en el tomacorriente, dé vuelta al enchufe. Si
todavía no se ajusta, contacte a un electricista calicado. No intente modicar
el enchufe de ninguna manera. Si el enchufe está ojo en el tomacorriente de CA,
o si el tomacorriente se siente caliente, no utilice ese tomacorriente.
APAGADO AUTOMáTICO DE SEGURIDAD
Esta fuente de chocolate está equipada con un apagado automático de seguridad. Si el motor se sobrecalienta,
se apagará. Para encender de nuevo la fuente de chocolate, siga estos pasos:
1. Gire la perilla de control a la posición OFF y desconecte la fuente de chocolate.
2. Retire la mezcla de chocolate del tazón y colóquela dentro de un recipiente diseñado para horno de
microondas.
3. Espere al menos 20 minutos para que el motor se enfríe.
4. Recaliente la mezcla de chocolate en el horno de microondas y vuelva a añadirla al tazón.
5. Conecte la unidad y vuelva a usarla normalmente.
Gracias por adquirir la fuente de chocolate OSTER™. Antes de usar este
producto por primera vez, tómese unos momentos para leer este instructivo
y luego guárdelo como referencia. Preste especial atención a las Instrucciones
de seguridad que se indican. Revise la declaración de garantía y de servicio
del producto. Para saber más sobre los productos Oster®, visítenos en nuestra
página Web www.oster.com o llámenos al 1-800-334-0759.
FPSTCF7500-IB.indd 14-15 5/22/09 5:19:20 PM

www.oster.com
16
www.oster.com
17
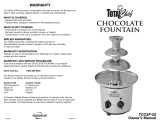
CONOZCA SU FUENTE
DE CHOCOLATE
a
b
e
f
g
h
i
j
c
d
Bandeja colectora
Tazón
Perilla de control
Base
Tornillo sinfín
Torre
Tapón
Disco pequeño
Disco grande
Cubierta
a
b
c
f
i
d
e
g
j
i
h
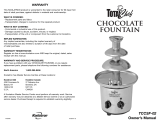
INSTRUCCIONES
Preparar su fuente de chocolate
Lave todas las partes de acuerdo a la sección LIMPIEZA DE SU FUENTE DE CHOCOLATE
de este manual.
Ensamblado
1 Inserte el TAZÓN en la BASE y gire en el sentido de las manecillas del reloj para colocarla
en su lugar.
2 Inserte el TORNILLO SINFÍN en el TAZÓN.
3 Cubra el TORNILLO SINFÍN con la TORRE.
4 Gire la TORRE hasta que se escuchen dos chasquidos y fíjela en su posición dentro del TAZÓN.
5 Deslice la CUBIERTA hasta el fondo de la TORRE.
6 Deslice hacia abajo de la torre el DISCO GRANDE y luego el PEQUEÑO.
7 Coloque el TAPÓN en la parte superior de la TORRE y alinee la ceja en el TAPÓN con la ranura en
la parte superior de la TORRE.
8 La bandeja colectora consta de dos secciones, ensamble la BANDEJA COLECTORA insertando
las cejas en la abertura opuesta y una las dos mitades. Deslice la BANDEJA COLECTORA
sobre la TORRE y los DISCOS y apóyela en la orilla del TAZÓN. NOTA: Las muescas de la
BANDEJA COLECTORA deberán apuntar hacia arriba para que las brochetas puedan
apoyarse con facilidad.
NOTA: Todas las piezas deberán asegurarse en su sitio para que la fuente de chocolate funcione
apropiadamente. Si la unidad no está nivelada, gire la pata ajustable de la parte de abajo de la
BASE hasta que la unidad se estabilice.
Uso de su fuente de chocolate
Operación con una mezcla caliente
Prepare el chocolate derretido de acuerdo con las siguientes instrucciones:
1 Precaliente la fuente de chocolate Oster™ durante 3 a 5 minutos conectando el cable en un
tomacorriente estándar y girando la PERILLA DE CONTROL en la posición HEATER (calentador).
IMPORTANTE: NO gire la PERILLA DE CONTROL a HEATER & MOTOR (calentador y motor) hasta
que el chocolate derretido se haya añadido al TAZÓN. Si opera la Fuente de chocolate seca podría
dañarse la unidad.
2 Añada el chocolate fundido en el TAZÓN y gire la PERILLA DE CONTROL a la posición HEATER
& MOTOR. El chocolate empezará a uir hacia la parte de arriba de la TORRE y caerá sobre los
discos para crear una cascada.
NOTA: La Fuente de chocolate debe estar en una supercie nivelada para que el chocolate
uya adecuadamente.
Operación con una mezcla fría
1 Prepare el aderezo o la salsa.
2 Añada la mezcla al tazón y gire la PERILLA DE CONTROL a la posición MOTOR. La mezcla empezará
a uir hacia la parte de arriba de la TORRE y caerá sobre los discos para crear una cascada.
NOTA: La Fuente de chocolate debe estar en una supercie nivelada para que la mezcla
uya adecuadamente.
FPSTCF7500-IB.indd 16-17 5/22/09 5:19:21 PM

www.oster.com
18
www.oster.com
19
Preparación de chocolate
La Fuente de chocolate es muy sencilla de usar y le proporcionará horas de
entretenimiento, ¡convirtiendo cualquier ocasión en todo un evento!
DEBE mezclar aceite (vegetal o canola) con el chocolate. El aceite permite que el chocolate
logre una consistencia suave para que uya con facilidad en la fuente de chocolate. Siga las
indicaciones de la tabla de abajo para saber la proporción chocolate-aceite.
Si desea más información, consulte la sección PISTAS Y CONSEJOS SOBRE EL CHOCOLATE.
Nota: La fuente de chocolate no funcionará adecuadamente si no agrega el aceite.
El chocolate se puede derretir a baño María o en un horno de microondas. Para derretir
el chocolate a baño María, ponga dos pulgadas de agua en la cacerola de abajo. Caliente
lentamente la cacerola de abajo a fuego medio. No debe permitir que el agua hierva, sólo
que se caliente. Coloque la cacerola de arriba sobre la de abajo y agregue el chocolate y el
aceite vegetal. Cuando el chocolate empiece a derretirse, remueva la mezcla con frecuencia
para evitar que se sobrecaliente y se queme. El chocolate no deberá entrar en contacto con
el vapor ni el agua, pues si el chocolate se mezcla podría no ser utilizable.
Para derretir el chocolate en un horno de microondas, coloque el chocolate y el aceite en
un tazón para horno de microondas. Caliente la mezcla a temperatura media. El tiempo de
calentamiento puede variar. Revuelva la mezcla con frecuencia (cada 15 a 30 segundos)
según se vaya derritiendo el chocolate, pues así se evita que se sobrecaliente y se queme. El
tiempo aproximado para que se derrita es de 2 minutos para 8 onzas. (1 taza) de chocolate.
NOTA: El chocolate deberá derretirse completamente y tener una consistencia suave, sin
grumos antes de añadirla a la fuente de chocolate.
Tabla de cantidades
Chocolate con leche, Aceite Porciones
semidulce o semiamargo (vegetal o canola) aproximadas
3 bolsas de 12 onzas de chispas 10 onzas líquidas 8-12
4 bolsas de 12 onzas de chispas 14 onzas líquidas 10-15
White or Premium* Chocolate
3 bolsas de 11 onzas de chispas 12 onzas líquidas 8-12
4 bolsas de 11 onzas de chispas 16 onzas líquidas 10-15
*El chocolate premium contiene de 30 a 40% de cocoa.
Pistas y consejos sobre el chocolate
No se requiere un chocolate especial, puede usarse cualquier marca de chocolate en pedacitos
o chispas. Esto incluye el chocolate semidulce, con leche, blanco u oscuro. Si usa chocolate en
trozos, córtelo en trozos gruesos para asegurarse una distribución equilibrada del calor.
• El chocolate deberá tener una apariencia, suave, uniforme, brillante y sin impurezas.
La supercie no deberá tener una apariencia opaca o tener pedazos blanco-grisáceos
(pelusas). Las pelusas se forman cuando la manteca de cacao se ha separado y emerge
en la supercie del chocolate. Esto se debe a que el chocolate se almacenó en un sitio
demasiado húmedo o caliente, una temperatura en que el chocolate todavía se puede usar.
• El chocolate es muy temperamental, para derretirlo, siga las instrucciones con el n de
evitar quemaduras o sobrecalentamiento.
• Se dice que el chocolate se agarrota cuando lo está derritiendo y repentinamente se
vuelve granuloso y duro; parece una pasta mate y espesa. Si el chocolate se agarrota,
puede ser que todavía pueda salvarlo mezclándolo con una pequeña cantidad de aceite
vegetal.
• Nunca añada líquido frío o fresco porque esto provocará que el chocolate se agarrote.
• No añada licor al chocolate, esto provocará que se agarrote. Para obtener mejores
resultados, use aceite con sabor que esté hecho especialmente para dar sabor al chocolate.
• Para almacenar el chocolate, deberá envolverlo muy bien y guardarlo en un sitio fresco
y seco. Si guarda el chocolate en el refrigerador se producirá condensación, lo que
provocará que el chocolate se agarrote cuando se derrita.
LIMPIEZA Y CUIDADOS
Limpieza de su fuente de chocolate
La Fuente de chocolate Oster™ se desensambla y limpia con facilidad. Todas las piezas,
excepto la BASE, están diseñadas para lavarse en lavavajillas. No sumerja la base en ningún
tipo de líquido.
1 Gire la PERILLA DE CONTROL a la posición OFF, desconecte el cable del tomacorriente y
deje que el aparato se enfríe. Quite la BANDEJA COLECTORA.
2 Gire el TAZÓN sobre la BASE.
3 Quite la TORRE del TAZÓN. Saque el TAPÓN, los DISCOS y la CUBIERTA de la TORRE.
NOTA: Puede usar servilletas desechables para sujetar la TORRE mientras la gira,
pues la mezcla de chocolate dicultará el agarre.
4 Jale el TORNILLO SINFÍN del TAZÓN.
5 Elimine el exceso de chocolate del TAZÓN.
6 Enjuague todas las piezas para quitar el exceso de chocolate, salsa o aderezo.
7 La BANDEJA COLECTORA, el TAZÓN, el TORNILLO SINFÍN, la TORRE, los DISCOS, la
CUBIERTA y el TAPÓN están diseñados para usarse en lavavajillas. NOTA: Coloque todas
las partes de plástico en la rejilla superior del lavavajillas. Para limpiar las brochetas,
lávelas con agua jabonosa caliente y use un limpiador no abrasivo.
8 La BASE no deberá entrar en contacto con el agua, pues podría producirse una descarga
eléctrica. Para limpiar la BASE, límpiela con un paño húmedo.
NOTA: No almacene el chocolate sobrante en el TAZÓN. Limpie completamente la unidad
después de usarla.
NOTA: Puede producirse una ligera decoloración del tazón de aluminio después de que
el producto haya pasado por el lavavajillas. Esto se debe a las propiedades naturales del
material y no es dañino. La decoloración se puede eliminar tallando ligeramente el área
con una bra y detergente.
19
FPSTCF7500-IB.indd 18-19 5/22/09 5:19:23 PM

www.oster.com
20
www.oster.com
21
PREGUNTAS FRECUENTES
Solución de problemas
Si tiene dicultades cuando use la fuente de chocolate, revise la información sobre solución
de problemas de esta sección para resolverlos. Si no puede encontrar una solución, llame al
Departamento de Relaciones con el Cliente al 1(800)334-0759.
Solución de problemas
El chocolate no uye La mezcla es demasiado espesa; añada
una pequeña cantidad de aceite
El chocolate no uye con normalidad La fuente de chocolate no está nivelada.
Gire con cuidado la pata ajustable de
la parte inferior de la BASE hasta que la
unidad se nivele. La mezcla de chocolate
no es lo sucientemente na. Añada una
pequeña cantidad de aceite.
El chocolate cambia a un color más claro. Esto es normal
No se logra el efecto completo de cascada La proporción chocolate-aceite puede ser
incorrecta. Intente añadiendo más aceite
o chocolate.
La fuente de chocolate se detiene
repentinamente
Gire la PERILLA DE CONTROL a la posición
OFF, desconecte la unidad, revise que
no haya obstrucciones y quítelas si las
encuentra, deje enfriar la unidad (5
minutos), vuelva a conectarla y gire la
PERILLA DE CONTROL a START.
RECETAS
Ideas divertidas para su fuente de chocolate
La fuente de chocolate Oster™ le dará horas de entretenimiento y divertirá a sus invitados
sin importar la edad. Puede sumergir virtualmente cualquier alimento en la fuente de
chocolate. Para mejores resultados, no se recomiendan los pasteles pues pueden romperse
en migajas fácilmente.
Sea creativo con los elementos que escoja para que sus invitados prueben:
• Pretzels
• Fruits - fresas, plátanos, piñas, manzanas, naranjas, frambuesas, cerezas, uvas ¡e incluso
frutas secas!
• Galletas - de mantequilla de maní, azúcar, chispas de chocolate.
• Biscottis
• Nueces
Sugerencias para una esta pensada en invitados más jóvenes:
• Galletas de animalitos
• Galletas Graham
• Regaliz
• Bombones (marshmellows)
• Caramelos
• Frutas
NOTA: Se requiere una vigilancia estricta cuando este producto se use cerca de los niños.
NOTA: La fuente de chocolate Oster™ está equipada con una cubierta de seguridad para
evitar que la comida o las brochetas que se caigan queden atoradas en el tornillo sin n y
obstruyan la máquina.
FPSTCF7500-IB.indd 20-21 5/22/09 5:19:24 PM

www.oster.com
22
www.oster.com
23
Biscottis de cereza y pistachos
Para esta receta se puede usar cualquier tipo de fruto seco y de fruta deshidratada.
Sin embargo, el rojo de las cerezas o los arándanos deshidratados con el verde de
los pistaches le dan a estas galletas un toque navideño que es perfecto para la
Fuente de chocolate.
1 taza de mantequilla, fría 1 1/2 tazas de azúca
1 1/2 tazas de azúcar morena clara 4 huevos
3 cucharadas de vainilla 6 tazas de harina
3 cucharitas de polvo de hornear 1/2 cucharita de sal
2 cucharitas de canela 1 cucharita de nuez moscada
2 tazas de cerezas deshidratadas 3 tazas de pistachos
Precaliente el horno a 350°F (170°C). Prepare 4 bandejas para hornear forrándolas con
papel encerado. Combine la mantequilla y los azúcares en una licuadora y bata hasta que
la mezcla esté cremosa y ligera. Bata los huevos, uno a la vez; agregue la vainilla y licue
bien. Añada el resto de los ingredientes hasta que se incorporen. No mezcle de más. Retire
la masa, colóquela en una supercie bien cubierta de harina y amase hasta que se mezcle.
Forme con la masa cuatro hogazas de 12 pulgadas, use más harina si es necesario. Coloque
cada hogaza en su propia bandeja para hornear. Hornee 2 hogazas a la vez, volteando la
bandeja para hornear 1/2 vuelta durante el tiempo de horneado. Hornee durante unos 35
minutos. Retire los moldes del horno. Hornee las dos hogazas restantes.
Baje la temperatura del horno a 300°F (170°C). Con un cuchillo serrado, corte las hogazas
en rebanadas de 1/4 a 1/2 pulgada de ancho a lo largo. Hornee de 10 a 12 minutos. Luego
gire los biscottis y hornéelos durante 5 minutos más. Repita el proceso con el resto de la
masa. Cuando se hayan enfriado, los biscottis se pueden congelar o guardar durante
12 semanas en una bolsa sellada al vacío.
Sirve para 6 docenas de biscottis.
Galletas de la fortuna
1 taza de mantequilla, fría 1 1/2 tazas de azúcar
10 cucharadas de mantequilla derretida 8 claras de huevo grandes
2 tazas de azúcar superna 2 tazas de harina cernida
1/8 cucharita de sal 6 cucharadas de crema espesa
1 cucharadita de vainilla
Precaliente el horno a 400°F (205°C). Cubra 2 bandejas para hornear con un molde de
silicón o papel pergamino. Rocíe con aceite antiadherente en aerosol para galletas. Bata los
huevos y el azúcar a velocidad media en una batidora eléctrica durante unos 30 segundos.
Añada el resto de los ingredientes y bátalos hasta que se incorporen. Vierta una cucharada
de mezcla pastelera en la mitad izquierda de la bandeja para hornear. Extienda la mezcla
pastelera con la parte posterior de una cuchara para crear un círculo delgado de unas 5
pulgadas (12 cm) de ancho. Repita el proceso en la mitad derecha de la bandeja para
hornear. Hornee unos 8 minutos, revise para asegurarse que las galletas no se están
cocinando demasiado rápido en las orillas. Ajuste la temperatura del horno si es necesario.
Use una espátula para levantar con cuidado la galleta. Déles forma con cuidado
doblándolas a la mitad y luego, con el dedo pulgar y el índice, doble los extremos y únalos.
Repita el proceso con la masa restante.
Cuando las galletas están frías, inserte dentro papeles resistentes con mensajes sobre
la fortuna.
Sirve para 24 galletas.
FPSTCF7500-IB.indd 22-23 5/22/09 5:19:25 PM

www.oster.com
24
www.oster.com
25
Galletas clásicas de vainilla
1 3/4 tazas de harina todo propósito 1/2 cucharita de sal
2 1/2 cucharadas de vainilla 1/4 de barra de mantequilla sin sal
1 1/4 tazas de azúcar glas temperatura ambiente
1 yema de huevo grande Una pizca de sal
1 huevo grande, separado
Precaliente el horno a 300°F (170°C). Corte el papel pergamino para ajustarlo en un cuadro
de 8x8 o en una bandeja para pastel de 9 pulgadas (23 cm). Combine la harina, la sal y la
vainilla en un tazón. Mezcle con una batidora la crema a base de mantequilla, el azúcar y la
yema de huevo hasta que se incorporen y adquieran una consistencia ligera. Añada la
mezcla de harina y licue. Quite la masa y presiónela en la bandeja cubierta con papel
pergamino. Para alisar la masa, use un frasco o una lata. Bata la clara de huevo con sal y
aplique una capa ligera de la mezcla con una brocha. Corte con cuidado la masa para
formar triángulos uniformes y perfórelos con un tenedor. Hornee aproximadamente 15
minutos hasta que la masa adquiera un leve tono café dorado. Deje enfriar, retire de la
bandeja y corte en rebanadas.
Sirve para aproximadamente 8 triángulos grandes.
Pirouettes tuile
Esta galleta clásica se puede hacer en diversas formas como un cono para helado. Sólo
coloque la pirueta en un cartón para huevo y deje enfriar. O ate una pirueta enrollada con
un listón delgado para una esta de graduación.
10 cucharas de mantequilla derretida 8 claras de huevo grandes
2 tazas de azúcar superna 2 tazas de harina, cernida
1/8 cucharita de sal 6 cucharas de crema espesa
1 cucharita de vainilla
Precaliente el horno a 400°F (205°C). Cubra 2 capas de masa para galletas con un molde de
silicón o papel pergamino. Rocíe con aceite antiadherente en aerosol para galletas. Bata los
huevos y el azúcar a velocidad media en una batidora eléctrica durante unos 30 segundos.
Añada el resto de los ingredientes y bátalos hasta que se incorporen. Vierta una cuchara de
mantequilla en la mitad izquierda de la bandeja para hornear. Extienda la mezcla pastelera
con la parte posterior de una cuchara para crear un círculo delgado de unas 5 pulgadas de
ancho. Repita en la mitad derecha de la bandeja para hornear. Hornee unos 8 minutos,
revise para asegurarse que las galletas no se están cocinando demasiado rápido en las
orillas. Ajuste la temperatura del horno si es necesario.
Use una espátula para levantar con cuidado la galleta y déle forma rápidamente
enrollándola en un lápiz. Repita el proceso con el resto de la mezcla pastelera.
Sirve para 24 galletas.
Galletas de crema de maní
Esta clásica combinación de crema de maní y chocolate sobresale cuando se usa para
remojarla en la fuente de chocolate. Añada 1/2 taza de cacahuates picados o chispas de
crema de maní crujientes para obtener un sabor más intenso a crema de maní.
1 1/4 tazas de harina 1/2 cucharadita de bicarbonato de sodio
1/2 cucharadita de sal kosher 1 barra de mantequilla sin sal
1 taza de azúcar morena clara a temperatura ambiente
1/4 de taza de crema de maní crujiente 1 huevo
Precaliente el horno a 350°F (170°C). Engrase 2 bandejas para hornear. Cierna juntas la
harina, el bicarbonato de sodio y la sal, guárdelas por separado. Bata la mantequilla y el
azúcar en una batidora eléctrica hasta que obtenga una consistencia ligera. Bata el huevo
en la mezcla de mantequilla y azúcar. Añada la crema de maní (y las chispas o cacahuates).
Licue los ingredientes secos hasta que se combinen. Refrigere durante unos 30 minutos
para que adquieran una consistencia rme.
Use una cucharita para formar bolitas con la masa. Coloque las bolitas en las bandejas para
hornear engrasadas. Con los dientes de los tenedores, marque un patrón entrecruzado en
cada bolita. Hornee durante unos 12 a 15 minutos.
Sirve para 24 galletas.
Galletas de azúcar
1 barra de mantequilla sin sal (o 1/2 barra 1 taza de azúcar adicional
de mantequilla, 1/2 taza de grasa vegetal), para aplicar una capa en las galletas
derretida y enfriada 2 tazas de harina todo propósito
1 huevo grande 2 cucharaditas de bicarbonato de sodio
1 cucharadita de vainilla 1/8 cucharadita de sal
Precaliente el horno a 375°F (190°C). Engrase ligeramente 2 bandejas para hornear. Con una
batidora eléctrica, bata juntas la mantequilla y la taza de azúcar hasta que adquieran una
consistencia ligera. Añada el huevo y la vainilla y bátalos hasta que estén bien combinados.
Cierna juntas la harina, el bicarbonato de sodio y la sal. Añada la mezcla de la harina en la
mezcla pastelera hasta que forme una masa. Coloque la masa en una bolsa con sello y
refrigérela hasta que adquiera una consistencia rme.
Tome una cucharadita de masa y forme bolitas. Ruede las bolitas en el azúcar y colóquelas
separadas 3 pulgadas en una bandeja para hornear. Aplaste las bolitas con la parte inferior
de un vaso cubierta con el azúcar (las orillas se romperán un poco) y hornee las galletas
durante 8 a 12 minutos.
Sirve para unas 32 galletas.
FPSTCF7500-IB.indd 24-25 5/22/09 5:19:26 PM

www.oster.com
26
www.oster.com
27
NOTAS
_________________________________________________________________________________________
_________________________________________________________________________________________
_________________________________________________________________________________________
_________________________________________________________________________________________
_________________________________________________________________________________________
_________________________________________________________________________________________
_________________________________________________________________________________________
_________________________________________________________________________________________
_________________________________________________________________________________________
_________________________________________________________________________________________
_________________________________________________________________________________________
_________________________________________________________________________________________
_________________________________________________________________________________________
_________________________________________________________________________________________
_________________________________________________________________________________________
_________________________________________________________________________________________
_________________________________________________________________________________________
_________________________________________________________________________________________
_________________________________________________________________________________________
_________________________________________________________________________________________
_________________________________________________________________________________________
_________________________________________________________________________________________
_________________________________________________________________________________________
_________________________________________________________________________________________
_________________________________________________________________________________________
_________________________________________________________________________________________
_________________________________________________________________________________________
_________________________________________________________________________________________
_________________________________________________________________________________________
_________________________________________________________________________________________
_________________________________________________________________________________________
_________________________________________________________________________________________
_________________________________________________________________________________________
Garantía Limitada de 1 Año
Sunbeam Products, Inc. operando bajo el nombre de Jarden Consumer Solutions, o en Canadá, Sunbeam
Corporation (Canada) Limited operando bajo el nombre de Jarden Consumer Solutions, (en forma conjunta,
“JCS”), garantiza que por un período de un año a partir de la fecha de compra, este producto estará libre de
defectos de materiales y mano de obra. JCS, a su elección, reparará o reemplazará este producto o cualquier
componente del mismo que presente defectos durante el período de garantía. El reemplazo se realizará por
un producto o componente nuevo o reparado. Si el producto ya no estuviera disponible, se lo reemplazará
por un producto similar de valor igual o superior. Ésta es su garantía exclusiva. No intente reparar o ajustar
ninguna función eléctrica o mecánica de este producto. Al hacerlo elimínará ésta garantía.
La garantía es válida para el comprador minorista original a partir de la fecha de compra inicial y la
misma no es transferible. Conserve el recibo de compra original. Para solicitar servicio en garantía se
requiere presentar un recibo de compra. Los agentes y centros de servicio de JCS o las tiendas minoristas
que venden productos de JCS no tienen derecho a alterar, modicar ni cambiar de ningún otro modo los
términos y las condiciones de esta garantía.
Esta garantía no cubre el desgaste normal de las piezas ni los daños que se produzcan como resultado de
uso negligente o mal uso del producto, uso de voltaje incorrecto o corriente inapropiada, uso contrario
a las instrucciones operativas, y desarme, reparación o alteración por parte de un tercero ajeno a JCS o
a un Centro de Servicio autorizado por JCS. Asimismo, la garantía no cubre actos fortuitos tales como
incendios, inundaciones, huracanes y tornados.
¿Cuál es el límite de responsabilidad de JCS?
JCS no será responsable de daños incidentales o emergentes causados por el incumplimiento de alguna
garantía o condición expresa, implícita o legal.
Excepto en la medida en que lo prohíba la ley aplicable, cualquier garantía o condición implícita de
comerciabilidad o aptitud para un n determinado se limita, en cuanto a su duración, al plazo de la
garantía antes mencionada.
JCS queda exenta de toda otra garantías, condiciones o manifestaciones, expresa, implícita, legal o de
cualquier otra naturaleza.
JCS no será responsable de ningún tipo de daño que resulte de la compra, uso o mal uso del producto,
o por la imposibilidad de usar el producto, incluidos los daños incidentales, especiales, emergentes o
similares, o la pérdida de ganancias, ni de ningún incumplimiento contractual, sea de una obligación
esencial o de otra naturaleza, ni de ningún reclamo iniciado contra el comprador por un tercero.
Algunas provincias, estados o jurisdicciones no permiten la exclusión o limitación de los daños
incidentales o emergentes ni las limitaciones a la duración de las garantías implícitas, de modo que es
posible que la exclusión o las limitaciones antes mencionadas no se apliquen en su caso.
Esta garantía le otorga derechos legales especícos y es posible que usted tenga otros derechos que
varían de un estado, provincia o jurisdicción a otro.
Cómo solicitar el servicio en garantía
En los Estados Unidos
Si tiene alguna pregunta sobre esta garantía o desea recibir servicio de garantía, llame al
1-800-334-0759 y podrá obtener la dirección del centro de servicio que le resulte más conveniente.
En Canadá
Si tiene alguna pregunta sobre esta garantía o desea recibir servicio de garantía, llame al
1-800-667-8623 y podrá obtener la dirección del centro de servicio que le resulte más conveniente.
En los Estados Unidos, esta garantía es ofrecida por Sunbeam Products, Inc. operando bajo el nombre de
Jarden Consumer Solutions, Boca Ratón, Florida 33431. En Canadá, esta garantía es ofrecida por Sunbeam
Corporation (Canada) Limited operando bajo el nombre de Jarden Consumer Solutions, 20 B Hereford
Street, Brampton, Ontario L6Y 0M1. Si usted tiene otro problema o reclamo en conexión con este producto,
por favor escriba al Departamento de Servicio al Consumidor. POR FAVOR NO DEVUELVA ESTE
POR FAVOR NO DEVUELVA ESTE PRODUCTO A NINGUNA DE
ESTAS DIRECCIONES NI AL LUGAR DE COMPRA.
FPSTCF7500-IB.indd 26-27 5/22/09 5:19:27 PM
-
 1
1
-
 2
2
-
 3
3
-
 4
4
-
 5
5
-
 6
6
-
 7
7
-
 8
8
-
 9
9
-
 10
10
-
 11
11
-
 12
12
-
 13
13
-
 14
14


Oster Fondue Maker FPSTCF7500 User manual
- Type
- User manual
- This manual is also suitable for
Ask a question and I''ll find the answer in the document
Finding information in a document is now easier with AI
in other languages
Related papers
-
Oster FPSTCF7500WM-NP Owner's manual
-
-
-
-
-
-
-
-
Oster 4-Slice Belgian Waffle Maker User manual
-
Other documents
-
Rival CFF5-Z User manual
-
-
Bellini BECF40 User manual
-
Sunbeam Bedding SBCF01 User manual
-
 Koolatron TCCSF-02 User manual
-
 Koolatron TCCSF-02 Owner's manual
-
Sunbeam FPSBCP941 - User manual
-
Logik L1CHOC10 User manual
-
Andrew James Chocolate Fountain Owner's manual
-
Pyle PKFNMK16 User manual

