BLACK BOX
®
Reduce noise and improve productivity
in your office with QuietCab soundproof
data cabinets.
Product Group Title
™
Order toll-free in the U.S.: Call 877-877-BBOX (outside U.S. call 724-746-5500)
FREE technical support 24 hours a day, 7 days a week: Call 724-746-5500 or fax
724-746-0746 • Mailing address: Black Box Corporation, 1000 Park Drive, Lawrence,
PA 15055-1018 • Web site: www.blackbox.com • E-mail: info@blackbox.com
Customer
Support
Information
March 2009
codes codes
codes codes
codes codes
BLACK BOX
®
QuietCab
™
12U, 24U, and 42U User Manual
QC12UBE QC24UBE QC42UBE
QC12UWA QC24UWA QC42UWA
QC12ULG QC24ULG QC42ULG

Page 2
724-746-5500 | blackbox.com
Trademarks Used in this Manual
Trademarks Used in this Manual
Black Box and the Double Diamond logo are registered trademarks, and
QuietCab is a trademark, of BB Technologies, Inc.
UL is a registered trademark of Underwriters’ Laboratories.
Any other trademarks mentioned in this manual are acknowledged to be
the property of the trademark owners.

Page 3
724-746-5500 | blackbox.com
FCC and IC RFI Statements and NOM Statement
FEDERAL COMMUNICATIONS COMMISSION AND
INDUSTRY CANADA RADIO FREQUENCY INTERFERENCE STATEMENTS
This equipment generates, uses, and can radiate radio-frequency energy,
and if not installed and used properly, that is, in strict accordance with the
manufacturer’s instructions, may cause inter ference to radio communication.
It has been tested and found to comply with the limits for a Class A computing
device in accordance with the specifications in Subpart B of Part 15 of FCC rules,
which are designed to provide reasonable protection against such interference
when the equipment is operated in a commercial environment. Operation of
this equipment in a residential area is likely to cause interference, in which case
the user at his own expense will be required to take whatever measures may be
necessary to correct the interference.
Changes or modifications not expressly approved by the party responsible
for compliance could void the user’s authority to operate the equipment.
This digital apparatus does not exceed the Class A limits for radio noise
emis sion from digital apparatus set out in the Radio Interference Regulation
of Industry Canada.
Le présent appareil numérique n’émet pas de bruits radioélectriques dépassant les
limites applicables aux appareils numériques de la classe A prescrites dans le
Règlement sur le brouillage radioélectrique publié par Industrie Canada.
Normas Oficiales Mexicanas (NOM)
Electrical Safety Statement
INSTRUCCIONES DE SEGURIDAD
1. Todas las instrucciones de seguridad y operación deberán ser leídas antes de que
el aparato eléctrico sea operado.
2. Las instrucciones de seguridad y operación deberán ser guardadas para referencia
futura.
3. Todas las advertencias en el aparato eléctrico y en sus instrucciones de operación
deben ser respetadas.

Page 4
724-746-5500 | blackbox.com
NOM Statement
4. Todas las instrucciones de operación y uso deben ser seguidas.
5. El aparato eléctrico no deberá ser usado cerca del agua—por ejemplo,
cerca de la tina de baño, lavabo, sótano mojado o cerca de una alberca,
etc.
6. El aparato eléctrico debe ser usado únicamente con carritos o pedestales
que sean recomendados por el fabricante.
7. El aparato eléctrico debe ser montado a la pared o al techo sólo como sea
recomendado por el fabricante.
8. Servicio—El usuario no debe intentar dar servicio al equipo eléctrico más allá
lo descrito en las instrucciones de operación. Todo otro servicio deberá ser
referido a personal de servicio calificado.
9. El aparato eléctrico debe ser situado de tal manera que su posición no
interfiera su uso. La colocación del aparato eléctrico sobre una cama, sofá,
alfombra o superficie similar puede bloquea la ventilación, no se debe
colocar en libreros o gabinetes que impidan el flujo de aire por los orificios
de ventilación.
10. El equipo eléctrico deber ser situado fuera del alcance de fuentes de calor
como radiadores, registros de calor, estufas u otros aparatos (incluyendo
amplificadores) que producen calor.
11. El aparato eléctrico deberá ser connectado a una fuente de poder sólo del
tipo descrito en el instructivo de operación, o como se indique en el
aparato.
12. Precaución debe ser tomada de tal manera que la tierra fisica y la
polarización del equipo no sea eliminada.
13. Los cables de la fuente de poder deben ser guiados de tal manera que no
sean pisados ni pellizcados por objetos colocados sobre o contra ellos,
poniendo particular atención a los contactos y receptáculos donde salen
del aparato.
14. El equipo eléctrico debe ser limpiado únicamente de acuerdo a las
recomendaciones del fabricante.
15. En caso de existir, una antena externa deberá ser localizada lejos de las
lineas de energia.
16. El cable de corriente deberá ser desconectado del cuando el equipo no sea
usado por un largo periodo de tiempo.

Page 5
724-746-5500 | blackbox.com
NOM Statement
17. Cuidado debe ser tomado de tal manera que objectos liquidos no sean
derramados sobre la cubierta u orificios de ventilación.
18. Servicio por personal calificado deberá ser provisto cuando:
A: El cable de poder o el contacto ha sido dañado; u
B: Objectos han caído o líquido ha sido derramado dentro del aparato; o
C: El aparato ha sido expuesto a la lluvia; o
D: El aparato parece no operar normalmente o muestra un cambio en su
desempeño; o
E: El aparato ha sido tirado o su cubierta ha sido dañada.

Page 6
724-746-5500 | blackbox.com
Table of Contents
Table of Contents
1. Specifications ..............................................................................................7
2. Overview ................................................................................................... 11
2.1 Introduction .................................................................................... 11
2.2 Features .......................................................................................... 11
2.3 What’s Included .............................................................................. 11
2.4 Accessories ..................................................................................... 13
2.5 Hardware Description ..................................................................... 14
3. Preparing the Cabinet for Installation........................................................16
3.1 Handling ......................................................................................... 16
3.2 Tools You Will Need .......................................................................16
3.3 Adjusting the Doors ........................................................................ 16
4. Cable Management .................................................................................. 17
4.1 Top Panel Cable Entry ..................................................................... 17
4.2 Bottom Cable Entry ........................................................................18
5. Installing Equipment in the Cabinet .......................................................... 19
5.1 Leveling the Cabinet ....................................................................... 19
5.2 Adjusting the Vertical Mounting Rails ............................................. 19
6. Additional Accessories .............................................................................. 21
6.1 Vertical and Horizontal Cable Managers.........................................22
6.2 Filter Package ..................................................................................24

Page 7
724-746-5500 | blackbox.com
Chapter 1: Specifications
1. Specifications
Cable Knockout Size — (2) 2.4" (6.1 cm) diameter sliding grommet on top rear
of cabinet;
(1) 2.4" x 13.7" (6.1 x 34.8 cm) brush grommet on bottom rear of cabinet
Fans — QC12UBE, QC12UWA, QC12ULG: (1) 3-fan single-speed panel,
115-V, 60-Hz, 2750 RPM;
Total Maximum Airflow: 276 CFM;
Total Maximum Power Consumption: 36 W;
QC24UBE, QC24UWA, QC24ULG: (2) 3-fan single-speed panels,
115-V, 60-Hz, 2750 RPM;
Total Maximum Airflow: 552 CFM;
Total Maximum Power Consumption: 72 W;
QC42UBE, QC42UWA, QC42ULG: (3) 3-fan single-speed panels,
115-V, 60-Hz, 2750 RPM;
Total Maximum Airflow: 828 CFM;
Total Maximum Power Consumption: 108 W
Light — 8 W T5 fluorescent (F8T5/D)
Maximum Heat Load — QC12UBE, QC12UWA, QC12ULG: 1.2 kW;
QC24UBE, QC24UWA, QC24ULG: 2.4 kW;
QC42UBE, QC42UWA, QC42ULG: 3.6 kW
Weight Capacity — QC12UBE, QC12UWA, QC12ULG: 1100 lb. (499 kg);
QC24UBE, QC24UWA, QC24ULG, QC42UBE, QC42UWA, QC42ULG:
1760 lb. (798 kg)
Noise Reduction — Up to 15 dB
Rack Units — 12U, 24U, or 42U
RoHS — Yes
Size — QC12UBE, QC12UWA, QC12ULG:
External: 27.7"H x 29.5"W x 44.6"D (70.4 x 75 x 113.2 cm),
Internal: 21.8"H x 22.4"W x 40"D (55.4 x 56.9 x 101.6 cm)
QC24UBE, QC24UWA, QC24ULG:
External: 48.7"H x 29.5"W x 44.6"D (123.8 x 75 x 113.2 cm);
Internal: 43.8"H x 22.4"W x 40"D (111.2 x 56.9 x 101.6 cm);
QC42UBE, QC42UWA, QC42ULG:
External: 81"H x 29.5"W x 44.6"D (203.8 x 75 x 113.2 cm);
Internal: 74"H x 22.5"W x 40.5"D (187.9 x 57.2 x 102.8 cm)

Page 8
724-746-5500 | blackbox.com
Chapter 1: Specifications
Weight — QC12UBE, QC12UWA, QC12ULG: 185 lb. (84.1 kg);
QC24UBE, QC24UWA, QC24ULG: 327 lb. (148.6 kg);
QC42UBE, QC42UWA, QC42ULG: 510 lb. (231.8 kg)
NOTE: Figures 1-1 through 1-3 show the QuietCab dimensions.
29.5in (750mm)
27.7in (704mm)
44.6in (1132mm)
D
C
B
A
A
B
C
D
1
2
3
4
5
6
7
8
8
7
6
5
4
3
2
1
Figure 1-1. 12U QuietCab.

Page 9
724-746-5500 | blackbox.com
Chapter 1: Specifications
29.5in (750mm)
44.6in (1132mm)
48.7in (1238 mm)
D
C
B
A
B
C
D
4
5
6
7
8
8
7
6
5
4
3
2
1
3
2
1
A
Figure 1-2. 24U QuietCab.

Page 10
724-746-5500 | blackbox.com
Chapter 1: Specifications
29.5in (750mm)
81.0in (2057mm)
44.6in (1132mm)
Figure 1-3. 42U QuietCab.

Page 11
724-746-5500 | blackbox.com
Chapter 2: Overview
2. Overview
2.1 Introduction
QuietCab cabinets are specialized enclosures with integrated cooling, noise damp-
ening, and power distribution for server and network applications in office envi-
ronments. The enclosures provide storage for industry-standard (EIA-310), 19-inch
rackmount hardware, which includes servers, voice, data, networking, internet-
working, and power protection equipment.
Use the QuietCab in environments where you need to store network
equipment near workers, such as offices, schools, medical offices, retail
establishments, and more.
NOTE: The cabinet arrives fully assembled, with doors, leveling legs, casters, cage
nuts, and a power strip installed. Horizontal cable managers and filter
inserts are also installed. Keys, cage nuts, screws, and this user manual will
ship inside the cabinet.
2.2 Features
• Cabinet is fully assembled.
• Physical rack capacity is fully EIA compliant—EIA 1
3
⁄4"/4.5-cm rack spaces.
• Maximum rack depth is 30.25" (76.8 cm). Minimum rack depth is 22.5"
(57.2 cm ) .
• Electrical systems are RoHS, RU, and CE compliant.
• Veneer finish, Choose from three colors to blend with your office environment:
beech, walnut, and light gray.
• Acoustic foam lining reduces audible server and hardware noise by 15 dB to
normal office background levels.
• Lockable doors (keys included).
• Rear access for simple hardware installation.
• Plug-and-play deployment.
• Fluorescent light (8 W).
2.3 What’s Included
Your package should include the following items. If anything is missing
or damaged, contact Black Box Technical Support at 724-746-5500
or info@blackbox.com.

Page 12
724-746-5500 | blackbox.com
Chapter 2: Overview
12U QuietCab (QC12UBE, QC12UWA, QC12ULG):
• (1) 12U QuietCab fully assembled
• (1) 6-outlet power strip, part number PS163A-R2 (installed)
• (2) horizontal cable managers (installed)
• (3) sets of keys
• (1) set of filter inserts (installed)
• (30) cage nuts and screws
• (1) power cord for fan module
• This user’s manual
24U QuietCab (QC24UBE, QC24UWA, QC24ULG):
• (1) 24U QuietCab fully assembled
• (1) 6-outlet power strip, part number PS163A-R2 (installed)
• (2) horizontal cable managers (installed)
• (4) sets of keys
• (1) set of filter inserts (installed)
• (50) cage nuts and screws
• (2) power cords for fan modules
• This user’s manual
42U QuietCab (QC42UBE, QC42UWA, QC42ULG):
• (1) 42U QuietCab fully assembled
• (1) 6-outlet power strip, part number PS163A-R2 (installed)
• (2) horizontal cable managers (installed)
• (5) sets of keys
• (1) set of filter inserts (installed)
• (50) cage nuts and screws
• (3) power cords for fan modules
• This user’s manual

Page 13
724-746-5500 | blackbox.com
Chapter 2: Overview
2.4 Accessories
The accessories described in Table 2-1 can be ordered separately:
Part Number Accessory Works with this Quiet Cab
QCCMV-12U-A 12U Vertical Cable Manager, Angled QC12UBE, QC12UWA, QC12ULG
QCCMV-24U-A 24U Vertical Cable Manager, Angled QC24UBE, QC24UWA, QC24ULG
QCCMV- 42U-A 42U Vertical Cable Manager, Angled QC42UBE, QC42UWA, QC42ULG
QCCMV-12U-S 12U Vertical Cable Manager, Straight QC12UBE, QC12UWA, QC12ULG
QCCMV-24U-S 24U Vertical Cable Manager, Straight QC24UBE, QC24UWA, QC24ULG
QCCMV- 42U-S 42U Vertical Cable Manager, Straight QC42UBE, QC42UWA, QC42ULG
QCCM-FB Horizontal Cable Manager
QC12UBE, QC12UWA, QC12ULG,
QC24UBE, QC24UWA, QC24ULG,
QC42UBE, QC42UWA, QC42ULG
QCFK Filter package
QC12UBE, QC12UWA, QC12ULG,
QC24UBE, QC24UWA, QC24ULG,
QC42UBE, QC42UWA, QC42ULG
Table 2-1. Accessories that work with the QuietCab.

Page 14
724-746-5500 | blackbox.com
Chapter 2: Overview
2.5 Hardware Description
Figure 2-1 shows the QuietCab components. Table 2-2 describes these
components.
NOTE: The Cabinet is shipped fully assembled.
1
D
C
B
A
B
C
D
4
5
6
7
8
8
7
6
5
4
3
2
1
3
2
1
A
9
2
4
5
6
8
7
11
11
13
10
14
3
8
12
15
7
7
12
16
Figure 2-1. 24U QuietCab.

Page 15
724-746-5500 | blackbox.com
Chapter 2: Overview
Number in Figure 2-1 Component
1 Front door
2 Back door
3 Side panel
4 Caster and leveling feet
5 Top cable access port
6 Bottom cable access port
7 Lock
8 Airflow opening—Inlet
9 Airflow opening—Outlet
10 (1), (2), or (3) 3-fan single-speed panels*
11 6-Outlet power strip with NEMA 5-15R outlets (PS163A-R2)
12 Inlet air filters
13 Vertical mounting rails
14 Vertical cable managers
15 Horizontal cable managers
16
Light with on/off switch (mounted inside the door, on the
underside of top).
Table 2-2. 12U, 24U, and 42U QuietCabs’ components.
NOTE: Keys, cage nuts, and screws are not installed and can be found inside the
enclosure, along with this user manual.
*NOTE: Each fan panel has three single-speed fans. The 12U QuietCab units have
(1) 3-fan panel, the 24U QuietCab units have (2) 3-fan panels, and the
42U QuietCab units have (3) 3-fan panels.

Page 16
724-746-5500 | blackbox.com
Chapter 3: Preparing the Cabinet for Installation
3. Preparing the Cabinet for Installation
Follow these simple recommendations for best performance from your new
enclosure.
3.1 Handling
NOTE: For palletized cabinets, see the unpacking instruction sheet before
attempting to remove the cabinet from the pallet.
To achieve the level of acoustic performance and industrial needs of a high-quality
19” enclosure, the composition of cabinet parts means that the QuietCab
cabinets are very heavy. When moving the cabinet, we recommend that a
minimum of two people carry out this task.
3.2 Tools You Will Need
• 10-mm ratchet and socket
• Phillips screwdriver
• Utility knife
• Level
• Cage nut tool
3.3 Adjusting the Doors
The QuietCab cabinet’s doors are aligned before they leave the factory. But in
case they need adjustment, follow these instructions.
Side-to-side adjustment
Turning the front screw on the hinge counterclockwise will move the door closer
to the corresponding side panel. Turning the screw clockwise will move the door
toward the opposite side panel.
Front-to-back adjustment
Loosening the back screw will allow the hinge to be adjusted frontward or
backward. Tighten the screw after adjustment.

Page 17
724-746-5500 | blackbox.com
Chapter 4: Cable Management
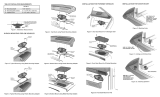
4. Cable Management
There are two ways to route cable in and out of the cabinet: through the top
panel or through the bottom rear entry panel.'
4.1 Top Panel Cable Entry
The top panel (see Figure 4-1) has two plastic cable entry grommets, which are
lined with foam to prevent airflow and sound from escaping the cabinet. You can
route cable through these grommets.
Bottom cable access
Thumbscrews
Thumbscrews
Top cable access
Figure 4-1. Top and bottom cable access (24U version shown).

Page 18
724-746-5500 | blackbox.com
Chapter 4: Cable Management
4.2 Bottom Cable Entry
The cabinet has a cable access opening (see Figure 4-1 on the previous page) at
the bottom of the enclosure. The cabinet is lined with foam on the top, bottom,
and sides to prevent airflow and sound from escaping.
The cable port is large enough to accommodate several hundred Ethernet cables
and has a removable top cover. To route the cable out of the cabinet, follow these
steps:
1. Loosen the two thumbscrews and remove the rear cable access port top cover.
2. Bring the cable into the cabinet.
3. Put the cover back in place and fasten the two thumbscrews.

Page 19
724-746-5500 | blackbox.com
Chapter 5: Installing Equipment in the Cabinet
5. Installing Equipment in the Cabinet
5.1 Leveling the Cabinet
Level the enclosure before installing equipment. The leveling feet at the corners
provide a stable base if the floor is uneven, but they cannot compensate for a
badly sloped surface.
1. Move the enclosure to a level location.
2. For each leveling foot, turn the leveling foot clockwise until it makes firm
contact with the floor.
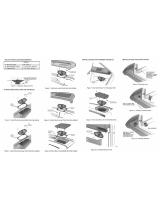
5.2 Adjusting the Vertical Mounting Rails
Vertical mounting rails are factory installed on the enclosure (see Figure 5-1) in the
proper position to use with rackmountable equipment. The front mounting rails
are adjustable towards the front or the rear of the enclosure to accommodate
different rails or equipment with other depths. You can adjust the rails to be as
close as 22.5" (57.2 cm) or as far as 30.25" (76.8 cm) apart.
D
C
B
A
A
B
C
D
1
2
3
4
5
6
7
8
8
7
6
5
4
3
2
1
Adjustable front
vertical rails
Fixed rear
vertical rails
Figure 5-1. Vertical mounting rails installed in the cabinet.

Page 20
724-746-5500 | blackbox.com
Chapter 5: Installing Equipment in the Cabinet
Adjusting the vertical mounting rails on the side braces
WARNING: To avoid personal injury or damage to the enclosure, perform this
procedure without any equipment installed on the mounting rails.
1. Use a 10-mm socket (not included) to loosen—but not remove—the bolts in
the vertical mounting rails. See Figure 5-2.
D
C
B
A
A
B
C
D
1
2
3
4
5
6
7
8
8
7
6
5
4
3
2
1
Front
vertical rail
Adjustment
bolt
Adjustment
slots
Figure 5-2. Loosen the bolts on the rails.
2. Move the vertical mounting rail to the desired location and tighten the bolts.
Page is loading ...
Page is loading ...
Page is loading ...
Page is loading ...
Page is loading ...
Page is loading ...
Page is loading ...
Page is loading ...
/