Canon MultiPASS L6000 User manual
- Category
- Print & Scan
- Type
- User manual
This manual is also suitable for

Congratulations on your purchase of the
Canon MultiPASS™ L6000 Laser Printer -
Fax - Copier - Scanner.
This Quick Start Guide describes
the steps you follow to unpack
and set up your new
multi-talented printer.
Quick Start Guide
Laser Printer
Fax Copier Scanner
TM
TM
See What We Mean.
™
Important! You must follow the steps
described in this Quick Start Guide.
©1997 Canon Computer Systems, Inc. CST-4445-000 Printed in U.S.A.
Quick Start Guide
Laser Printer
Fax Copier Scanner

1
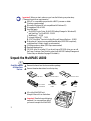
Carefully remove
all items from
the box.
Remove the items from the documentation package.
Remove these hardware items from the top tray:
2
Important! Before you start, make sure you have the following computer setup.
(These are the minimum requirements.)
IBM
®
PC or compatible computer with a 486 PC processor or better
(Pentium
®
recommended)
Microsoft
®
Windows
®
95 (not compatible with Windows 3.1)
16 megabytes (MB) of RAM
Hard disk space:
MultiPASS Printer Driver, MultiPASS Desktop Manager for Windows 95,
and ScanGear™ for MultiPASS – 25 MB
WebRecord™ – 8 MB
Internet Utilities 97™ – 7 MB
AT&T WorldNet
SM
Service including Microsoft Internet Explorer – 36 MB
Bi-directional, Centronics
®
-compatible parallel cable (IEEE 1284-compliant);
a cable less than 6.6 feet in length is recommended
14.4 Kbps modem or faster (28.2 Kbps recommended)
Standard telephone line
CD ROM drive (2x or better) (If you do not have a CD ROM drive, you can call
the Canon Customer Care Center to order the MultiPASS Desktop Manager and
Printer Setup on diskettes. See page 23 for details.)
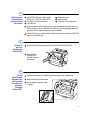
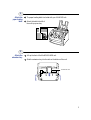
Lift out the MultiPASS unit.
Always lift the unit from the bottom.
PAPER REST
TELEPHONE
LINE
POWER
CORD
SUPPORT TRAYS
FX-3 TONER
CARTRIDGE
Important! Save the box and shipping
materials. You may need them later if
you have to transport the MultiPASS.
Unpack the MultiPASS L6000
PAPER LOADING
LABEL
EXTENSION TRAY

3
Make sure your
documentation
package includes
these items.
2
MultiPASS L6000 and Creative Web
Solutions CD (INSTALL ME FIRST)
Quick Start Guide (this booklet)
User's Manaul
Important! Save your sales receipt for proof of purchase in case your MultiPASS
requires warranty service.
Registration card
Warranty card
Customer Care rolodex card
Be sure to register electronically or fill out your Registration card and send it to
Canon. After you set up the MultiPASS L6000, you can fax the Registration card
directly to Canon (see the Registration card for details).
Remove all
pieces of
shipping tape
from the unit.
3
Remove all pieces of shipping tape from the outside of the MultiPASS.
Note that tape
may not be in
the exact locations
shown here.
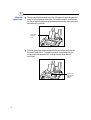
Lift the
operator panel
and remove the
soft styrofoam
from the unit's
Automatic
Document
Feeder (ADF).
4
Use both hands to grip the operator panel, and gently pull it toward you.
Remove the soft styrofoam sheet.
Gently press the operator panel
to close it.

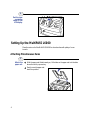
Setting Up the MultiPASS L6000
5
Peel the clear
protective
sheet off the
LCD display.
4
With the paper rest tilted toward you, fit the tabs on the paper rest into the slots
above the multi-purpose tray.
Place the main unit of the MultiPASS L6000 on a level surface with plenty of room
to work.
1
Attach the
paper rest.
Attaching Miscellaneous Items
Gently move the paper rest
back into position.

5
Attach the
extension tray.
3
Lift up the front of the MultiPASS L6000 unit.
Slide the extension tray into the rails on the bottom of the unit.
The paper loading label is included with your MultiPASS unit.
Attach the label to the left of
the multi-purpose tray.
2
Attach the
paper loading
label.
EXTENSION TRAY

6
Attach the
support trays.
4
There are two identical support trays. One of the support trays holds paper as it
comes out of the facedown delivery slot. To install this support, insert the tabs
into the corresponding slots above the facedown delivery slot, making sure that
the smaller tab is on the left.
FACEDOWN
DELIVERY
SLOT
The other support tray holds documents as they are fed into the Automatic
Document Feeder (ADF). To install this support, insert the tabs into the
corresponding slots above the ADF, making sure that the smaller tab
is on the left.
AUTOMATIC
DOCUMENT
FEEDER
(ADF)

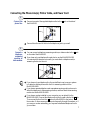
7
Connect one end of the supplied telephone line to the jack on the side of
the MultiPASS.
1
Connect the
phone line.
Connecting the Phone Line(s), Printer Cable, and Power Cord
L
Connect the other end of the line to the telephone jack in your wall.
You can connect a telephone, answering machine, or data modem to the jack
on the side of the MultiPASS.
2
Connect a
telephone,
answering
machine, or
data modem.
If you have only one telephone line, the most efficient way to use your system
is to attach a cordless phone with a built-in answering machine to the
MultiPASS L6000.
If you have a separate telephone and a separate answering machine, be sure to
attach the telephone to the answering machine, and then attach the answering
machine to the MultiPASS L6000.
If you have a modem installed in your computer, you can attach it to the
MultiPASS L6000. Connect the telephone line from the wall outlet to the jack.
Then connect the line from the jack on the MultiPASS to the jack on
the modem. If others access your computer frequently through the modem, or if
you use your modem extensively, you may want a dedicated telephone line for
your modem.
L
HINTS
!
If you have only one telephone line and plan to use the MultiPASS L6000
for receiving both faxes and voice calls, you must attach a telephone and/or
answering machine to the unit.

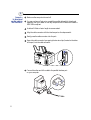
Connect a
bi-directional
parallel cable to
the MultiPASS.
3
Make sure the computer is turned off.
You can purchase a Centronics-compatible, parallel cable with bi-directional
capability from your dealer or from any computer store. Make sure the cable is
IEEE 1284-compliant.
A cable of 6.6 feet or less in length is recommended.
Align the cable connector with the interface port so the shapes match.
Gently press the cable connector into the port.
Secure the cable connector by snapping the two wire clips (located on the sides
of the port) into the cable connector.
Connect the other end of the cable to the parallel interface port
on your computer.
8

9
Plug the power cord connector into the back of the unit.
4
Attach the
power cord.
Plug the other end of the power cord into a properly grounded AC outlet
(three-pronged outlet).
The MultiPASS L6000 is equipped with a 3-prong, grounding-type plug
(the third pin is a grounding pin). This plug will only fit into a grounding-type
outlet. This is a safety feature. If you are unable to insert the plug into your
outlet, contact an electrician to replace your outlet (do not use a 3-to-2 adapter).
Do not defeat the safety purpose of the grounding-type plug.
Do not plug the MultiPASS L6000 into the same outlet as your computer or
into an outlet shared with an appliance such as an air conditioner, electric
typewriter, or copier. These devices generate electrical noise that may interfere
with the operation of the MultiPASS L6000.
The MultiPASS L6000 has no power switch. The power is on as long as the system is
plugged in.
As the MultiPASS warms up, it displays the
PLEASE WAIT message in the LCD.
Caution
PLEASE WAIT
CHECK COVER/CART
Because the toner cartridge is not installed yet, you will also see this message:

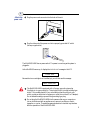
10
Open the
front cover.
1
Press the release latches on the sides of the unit and gently pull the cover forward.
Installing the FX-3 Toner Cartridge
Spilled toner can stain any surface. Open the FX-3 Toner Cartridge very carefully.
See your User's Manual for complete details on toner cartridge maintenance.
Caution
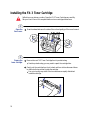
2
Prepare the
toner cartridge.
Remove the new FX-3 Toner Cartridge from its protective bag.
Save the protective bag; you may need to repack the cartridge later.
Gently rock the cartridge from front to back and from side to side several times
to distribute the toner evenly inside the cartridge.
Poor print quality may result if the toner becomes unequally distributed
inside the cartridge.

11
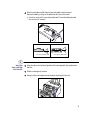
3
Insert the
toner cartridge
into the unit.
Place the cartridge on a flat clean surface, and steady it with one hand.
Remove the seal by pulling on the plastic tab with your other hand.
Use a firm, even pull to remove the plastic seal. To avoid breaking the seal,
do not jerk on it unevenly.
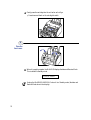
Align the rails on the left and right sides of the cartridge with the guides inside
the unit.
Slide the cartridge into position.
Always hold the cartridge by its handle when inserting it in the unit.
SIDE VIEW TOP VIEW
PULL IN THIS DIRECTION PULL IN THIS DIRECTION

12
Close the
front cover.
4
Gently press the cartridge into the unit as far as it will go.
Press down and back on the cartridge's handle.
When it is ready to operate, the MultiPASS displays the date and Receive Mode.
This is called the Standby mode.
11/22/97 FaxTel
Unplug the MultiPASS L6000 ONLY when it is in Standby mode (the date and
Receive Mode show in the display).

13
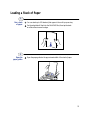
Loading a Stack of Paper
Fan a stack
of paper.
1
Fan the edge that will feed into the MultiPASS first; then tap the stack
on a flat surface to even its edges.
2
Open the
paper guides.
Open the paper guides to the approximate width of the stack of paper.
You can stack up to 100 sheets of plain paper in the multi-purpose tray.

14
Insert the stack
of paper.
3
Adjust the
paper guides to
the width of
the paper.
4
Make sure there is no space between the paper guides and the stack of paper.
Your MultiPASS L6000 is now ready to print.
Avoid mixing new paper with paper remaining in the tray. Either let the paper
run out before you refill the multi-purpose tray, or re-stack the paper when
you want to add more sheets.
Make sure the side you will be printing on faces you and insert the top edge into
the multi-purpose tray first.
Insert the stack until it stops, but do not force it.

15
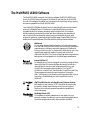
The MultiPASS L6000 Software
The MultiPASS L6000 comes with the following software: MultiPASS L6000 Printer
Driver, MultiPASS Desktop Manager for Windows 95, and ScanGear for MultiPASS.
Once all of this software is installed, you have access to all the printing, faxing, copying,
and scanning capabilities of the MultiPASS L6000.
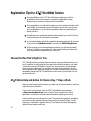
Your MultiPASS L6000 also includes Canon's Creative Web Solutions and the award-
winning TextBridge® Classic OCR software. Creative Web Solutions provide an
integrated solution for accessing, browsing, and printing the Web. It includes an
industry-leading Internet service provider and Internet browser, plus essential and
easy-to-use tools like bookmarking and zip/unzip combined with the most useful
program for gathering, organizing, and printing Web pages. Creative Web Solutions
enable you to harness the power of the Web with this exciting Internet software:
WebRecord
This amazing software takes the hassle out of printing documents
from the Web. With just a few clicks of your mouse, you'll be able to
create attractive, intelligent, and useful page layouts. WebRecord
follows you while you surf (or fetches entire Web sites for you), then
organizes each page with a table of contents and index of all
referenced Web links. Plus, Canon's OpenPage technology enhances
background color and graphics for true Web page representation.
Internet Utilities 97
An essential suite of tools to manage all your daily Internet activities,
Internet Utilities 97 includes intelligent and secure QuickMarks,
InternetMeter to monitor overall progress and efficiency, and
QuickZip file compression/decompression. Plus QuickFTP,
QuickRoute, InternetClock, NewsDecoder, Finger/Whois and Ping.
These programs eliminate the usual frustrations of using the
Web – like losing your bookmarks or putting up with slow Internet
connections. Downloading your files is simple with Internet
Utilities 97.
AT T WorldNet Service including Microsoft Internet Explorer
Both leaders in their industry, AT&T WorldNet Service provides
top-quality, reliable Internet access, while Microsoft Internet
Explorer continually enhances and expands the capabilities of
Internet browsing.
TextBridge Classic OCR
This software provides the easiest way to scan paper into your
personal computer for editing in your word processing applications.
It provides exceptional accuracy and one-button operation.
TM
TM

16
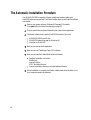
The Automatic Installation Procedure
Your MultiPASS L6000 comes with a Master Installer that makes installing the
MultiPASS software easy and fast. The Master Installer starts up and loads the software
in this order:
Start up your system and start Windows 95. See page 17 for details.
(You must follow the instructions starting on page 17.)
First you see a Welcome screen followed by the Canon license agreement.
The Master Installer then loads the MultiPASS software in this order:
MultiPASS L6000 Printer Driver
MultiPASS Desktop Manager for Windows 95
ScanGear for MultiPASS
Next you can start product registration.
Next you can load TextBridge Classic OCR software.
Next you can load the Creative Web Solutions Software:
Standard installation will install –
WebRecord
Internet Utilities
AT&T WorldNet Services
Custom installation allows you to install selected software.
When installation is complete, the Master Installer determines whether or not
your computer needs to be restarted.

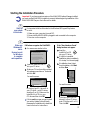
Starting the Installation Procedure
Make sure
Windows 95
starts.
Be sure to wait
for Windows
to complete
each operation.
Insert the Install Me First CD
into your CD drive.
Make sure “Driver from disk provided
by hardware manufacturer” is selected
and click OK.
You see this screen:
2
Start up
your system
in this order.
In this box, type D:\ (where D: is
your CD drive... most CD drives
are either D: or E:). Make sure the
Install Me First CD is in your
CD drive and then click OK.
17
1
Insert the
Install Me First CD
into your CD drive.
If AutoRun is enabled,
installation starts immediately.
(Go to step 3 on the next page.)
If installation doesn’t start,
from the taskbar, click Start
and then Run.
You see this screen:
In this box, type D:\SETUP
(where D: is your CD drive...
most CD drives are D: or E:).
Then click OK.
Important! If you have a previous version of the MultiPASS Desktop Manager installed,
you must use the MultiPASS Uninstaller to remove it before beginning installation of the
MultiPASS L6000. See your User's Manual for details.
It's important to follow this order for the Windows 95 Plug and Play feature
to work:
1. Make sure your computer is turned OFF.
2. Be sure the MultiPASS L6000 is plugged in and connected to the computer.
3. Now turn on the computer.
If Windows recognizes the MultiPASS:
If the "New Hardware Found"
dialog box does not appear:
You see a screen similar to this:
*
*
If this is not the screen you see (instead
you see the Update Device Wizard),
please see the Installation slip sheet that
came in the box for instructions.

18
The Master
Installer starts.
3
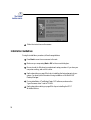
Follow the instructions on the screens.
Installation Guidelines
Press Next to move from one screen to the next.
Make sure you are pressing Next or OK on the current dialog box.
Be sure to wait for Windows to complete each setup procedure. If you hear your
computer working, wait until it is done.
See the description on page 19 for help in installing the faxing elements of your
system. You specify this information during installation of the MultiPASS
Desktop Manager.
During installation of TextBridge Classic OCR software, make sure the
"type of scanner driver" is set to TWAIN.
See the description starting on page 20 for tips on installing the AT&T
WorldNet Service.
During the installation procedure, follow these guidelines:

19
Setting Up Your Faxing System
During the installation of the MultiPASS Desktop Manager, you define the basic faxing
elements of your MultiPASS system, including:
Fax header
Your name and number; this information is then printed on the top of each fax
you send.
In the United States, you are required by FCC regulations to include this
information every time you send a fax. Be sure to fill in this information.
Receive Mode
How you will be receiving faxes. During installation, you will choose one of the
following Receive modes:
Fax Only mode
You must have a separate telephone line for the MultiPASS (called a
dedicated fax line). The MultiPASS will receive fax calls only (no voice calls).
FaxTel mode
You can receive both faxes and voice calls with the same telephone line.
The MultiPASS will determine if the incoming call is a fax or a voice call.
If it is a fax, it will receive the fax without ringing. If it is a voice call,
the MultiPASS will ring to alert you to pick up the telephone. (You must
attach a telephone to the MultiPASS to select this mode.)
Manual mode
The telephone attached to the MultiPASS will ring for both faxes and voice
calls. If the incoming call is a fax, you must press the
START/COPY button
to receive the fax. (You must attach a telephone to the MultiPASS to select
this mode.)
Answer Machine mode
You can attach either a telephone with an answering machine or an
answering machine only to your MultiPASS. When you turn on the
answering machine, the MultiPASS can either receive a fax or record
a voice message.
Page is loading ...
Page is loading ...
Page is loading ...
Page is loading ...
-
 1
1
-
 2
2
-
 3
3
-
 4
4
-
 5
5
-
 6
6
-
 7
7
-
 8
8
-
 9
9
-
 10
10
-
 11
11
-
 12
12
-
 13
13
-
 14
14
-
 15
15
-
 16
16
-
 17
17
-
 18
18
-
 19
19
-
 20
20
-
 21
21
-
 22
22
-
 23
23
-
 24
24


Canon MultiPASS L6000 User manual
- Category
- Print & Scan
- Type
- User manual
- This manual is also suitable for
Ask a question and I''ll find the answer in the document
Finding information in a document is now easier with AI
Related papers
-
Canon L6000 Owner's manual
-
-
-
-
-
-
-
-
-