Haier HWD1000 User manual
- Category
- Washing machines
- Type
- User manual
This manual is also suitable for
Page is loading ...

IMPORTANTSAFETYIN:
Warning- Toreducetheriskof fire,electricshock,or iniurytopersonswhen using
yourepplience,followbesicprecautions,includingthefoflowing.
1. Read all instructions before using the appliance.
2. Use this appliance only for its intended purpose as described in this use and
care guide.
3. Use only detergents or softeners recommended for use in this appliance and
keep them out of the reach of children.
4. This appliance must be properly installed in accordance with the installation
instructions before it is used.
5. Never unplug your appliance by pulling on the power cord. Always grasp the
plug firmly and pull straight out from the outlet.
6. Replace immediately worn power cords, loose plugs/power outlets.
7. Unplug your appliance before cleaning or before making any repairs.
8. If your old appliance is not being used, we recommend that you
remove the door. This will reduce the possibility of danger to children.
9. Do not operate your appliance in the presence of explosive fumes.
10. Do not use this appliance to wash clothes soaked, spotted or washed in
gasoline, dry cleaning solvents or any other explosive or flammable
substances that could ignite and explode.
11. Clothes or rags used to clean flammable or explosive materials should not
be washed in this appliance till all traces of this material has been removed,
to avoid an accident.
12. Do not add or mix any flammable or explosive substances to the wash.
13. Do not try to remove clothes while the tub is moving. Let it come to a
complete stop before use.
14. The appliance loading door must be closed when tub is spinning.
15. Do not operate your appliance when parts are missing or parts are broken.
16. Do not use this appliance for commercial clothes washing.
17. Do not operate this appliance unless all enclosure panels are properly in
place.
18. Do not tamper with controls.
19. To reduce risk of injury do not allow children to play in or on the appliance.
Close supervision of children is necessary when the appliance is used
near children.
20. This appliance must be connected to proper electrical outlet with the correct
electrical supply.
21. Proper grounding must be ensured to reduce the risk of shock and fire. DO
NOT CUT OR REMOVE THE GROUNDING PLUG. If you do not have a

three-prongelectricreceptacleoutletinthewall,haveacertifiedelectrician
installtheproperreceptacle.ThewallreceptacleMUSTbeproperly
grounded.
22.Hydrogengasmaybeproducedifthewaterheaterhasnotbeenusedin
morethan2weeks.Thiscouldbeexplosiveundercertaincircumstances.Jf
thisisthecase,beforeusingthisapplianceturnonallthehotfaucetsandlet
thehotwaterrunforafewminutes.Thiswillletthetrappedhydrogen
escape.Duringthisprocessdonotturnonanelectricappliance,smoke,
lightamatch/lighteroruseaflametoavoidanaccident,ashydrogengasis
flammableandcanexplode.
23.Donotdryarticlesthathavebeenpreviouslycleanedin,washedin,soaked
in,orspottedwithgasoline,dry-cleaningsolvents,orotherflammableor
explosivesubstances,astheygiveoffvaporsthatcouldigniteorexplode.
24.Donotrepairorreplaceanypartoftheapplianceorattemptanyservicing
unlessspecifically recommended in the user-repair instructions that you
understand and have skills to carry out.
25. Do not use heat dry for articles containing foam rubber or similarly textured
rubber-like materials.
26. Clean button trap before and after each load.
27. Do not place items exposed to cooking oils in your dryer, items contaminated
with cooking oils may contribute to a chemical reaction that could cause a
load to catch fire.
28. To reduce the risk or electric shock or fire, do not use extension cords or
adapters to connect the unit to electrical power source.
T I T Ti
ForFutureUse

Risk of child entrapment. Before you throw away your old
appliance, take off the door so that children cannot easily get
trapped inside.
Thank you for purchasing our Haier
product. This easy-to-use manual will
guide you in getting the best use of
your washer & dryer combo unit.
Remember to record the model and
serial number. They are on a label in
back of the unit.
Model number
Serial number
Date of purchase
Staple your receipt to your manual.
You will need it to obtain warranty service.

PAGE
INSTALLATION INSTRUCTIONS ................................................................ 5
Tools and Materials Required ........................................................................ 5
Unpacking Your Unit .................................................................................... 6
Connection of Water Inlet Hose and Washing Machine .................................. 6
Water Drainage Hose .................................................................................... 7
Connection of Power Supply .......................................................................... 7
Grounding Instructions .................................................................................. 7
OPERATING INSTRUCTIONS .................................................................... 8
Parts and Features ...................................................................................... 8-9
Control Panel and Functions .................................................................. 10-12
Operational Functions ................................................................................ 13
Program Selection .................................................................................. 14-15
Washing Methods ........................................................................................ 16
Laundry Loading .......................................................................................... 16
Put Detergent in the Dispencer .................................................................... 16
Washing Program Setting ............................................................................ 16
Additional Jnfo ...................................................................................... 17-18
Tips ............................................................................................................ 17
Normal Operating Sounds .......................................................................... 17
CARE AND CLEANING GUIDE .......................................................... 18-19
Cleaning and Maintenance ........................................................................ 18
Moving and Vacationing and Storage of Your Unit ...................................... 18
Warning Codes .......................................................................................... 19
TROUBLESHOOTING .......................................................................... 20-22
ELECTRICAL CONNECTIONS .................................................................. 23
Grounding Instructions ................................................................................ 23
Power interruptions ...................................................................................... 23

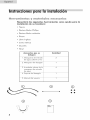
You will need to have following tools to help you in the
installation of your Washer:
• Scissors
• Phillips Screwdriver
• Standard Screwdriver
• Pliers
• Wrench
• Tape Measure
• Gloves
• Level
Accessories Supplied Quantity
1. Hot & Cold wafer inlet 2
hoses
2. Drain Hose 1
3. Flat Water Inlet Hose 4
Washers
4. Drain holder 1
5. User Manual 1
® ®
®
® ®
® •
® ®

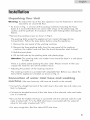
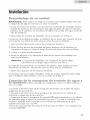
U pocki g Your Unit
Warning: To reduce the risk of fire, this appliance must be fastened or otherwise
secured to an uncovered floor.
• As shown in Fig. 1, remove all the packing materials (including the foam
base), it is normal that there are some water drops on the plastic bag, the
cushion and the porthole, it is because of the water testing before leaving the
factory.
• Remove the packing screws as shown in Fig.2.
The packing bolts protect the appliance from impact damage during
transportation. Follow the steps below before using the appliance.
1. Remove the rear panel of the washing machine.
2. Remove the three packing bolts from the rear panel of the washing
machine, the rubber hose and then the shock absorption steel channel.
3. Refit the back plate.
4. Fill the left holes by the packing bolts with plastic plugs.
Attention: The packing bolts and rubber hose should be kept in a safe place
for later use.
There is a plastic jacket packing the door catch. Please remove it when you
unpack the machine. Do not let children touch.
• Adjusting the position of the washing machine:
The washing machine is provided with adjustable feet. Before use, adjust the
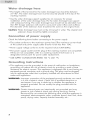
feet until the appliance is leveled, as shown in Fig. 3.
Co ectio of wote i lllllet Bose wosBi g
_OC_i_@ (Use new hose-set, old hose-set should not be reused.)
• Connect the straight terminal of the inlet hose to the water tap and make sure
that it is fastened.
• Connect the bended terminal of the inlet hose to the solenoid valve and make
sure it is fastened.
• Be sure that the COLD inlet hose is connected with the solenoid valve for cold
water (marked with "C"), the HOT inlet hose is connected with the solenoid
valve for hot water (marked with "H").
• For easy recognition, Red line refers HOT inlet hose.

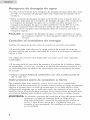
hese
• The height of the terminal for the water drainage hose should be between
31 "-40". The water drainage hose must be securely placed to the clip of the
washing machine.
• Use the water drainage support supplied as an accessory for proper
installation of the water drainage hose. Fix the water drainage hose support
with waterproof string. The water drainage hose should not be extended more
then 98" (longer extension will result in concurrent water inflow and outflow).
The diameter of the extension hose should be the same as the original hose.
Caution: Water drainage hose must not be immersed in water. The original and
extension hoses should be tightly connected.
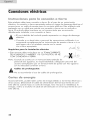
Ce ectie pewe s pplf/y
Check the following items before connecting to the power supply.
• The socket conforms to the maximum power load (The maximum current load
of the socket and power supply cable should not be less then 15A).
• Power supply voltage conforms to the required value (120V/60Hz).
• The power supply socket and the plug of the washing machine are compatible.
Jf they are not compatible, refer to a washing machine technician or a
designated service point for power cable replacement.
• USE SUPPLYCONDUCTORS RATED 105 °C (221 °F).
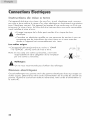
G ou di g i st uctio s
• This appliance must be grounded. In the event of malfunction or breakdown,
grounding will reduce the risk of electric shock by providing a path of least
resistance for electric current. This appliance is equipped with a cord having an
equipped-ground conductor and a ground plug. The plug must be plugged
into an appropriate outlet that is properly installed with accordance to local
codes and regulations.
WARNING"
Improper connection of the equipped-ground conductor can result
in a risk of electric shock. Check with a qualified electrician or
serviceman if you are in doubt as to whether the appliance is
properly grounded. Do not modify the plug provided with the
appliance.
WARNING"
Certain internal parts are intentionally not grounded and may
present a risk of electric shock only during servicing. Service
Personnel-Do not contact the following parts while the appliance is
energized: electromagnetic valve, computer board, door lock, drain
pump, drying motor, capacity bracket assembly, etc...
7

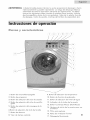
e tu es
7" 8 I0_ 11 12....
17
13
I
2
1. On/Off Button
2. Program Button
3. Dry Cycle Selection Button
4. Spin Cycle Selection Button
5. Load Rinse Selection Button
6. Wash Cycle Selection Button
7. Delay Button
8. Remaining Time Display
9. Temperature Selection Button
10. Prewash Function Button
11. Water Level Selection Button
12. Door Lock Indicator
13. Start/Pause Button
14. See Through Glass Window Door
15. Button Trap
16. Front Adjustable Legs
] 7. Detergent/Softener

z
7
•LJ
4
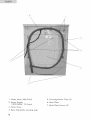
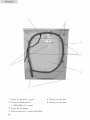
1. Water Inlets (Hot/Cold)
2. Power Supply
(] 20V/6OHz, ] 5 Amps)
3. Drain Hose
4. Rear Adjustable Leveling Legs
5. Drainage Hose Clips (3)
6. Back Plate
7. Back Plate Screws (3)

7 8 9 10 11 12
13
1
WARNING: To reduce the risk of fire, electric shock, or inlury to persons, read
the IMPORTANT SAFETY INSTRUCTIONS before operating this
appliance.
1. Power On/Off
• This button controls On/Off power of the unit.
2. Program
" Touch this button and you can select the washing programs as you wish
from top to bottom in proper order. The backlight is bright while the
program is selected. The machine will carry out the standard program if
there is no program to be selected.
Attention: The machine has the memory function for "Custom" program.
3. Dry
• The sequence of dry program follows each time the button is selected after
the washing program is set:
" Whole auto dry program.
" The standard program for the individual dry.
" At this moment you can select either 60 rain or 30 rain program.
" You can not select dry function while you have already selected the heavy
or delicate program.
10

Attention: The maximum quantity of the laundry is 6 Ibs. if the dry function is
selected.
4. Spin
• The different spinning speeds can be selected by touching this button. For
details please see the program setting guide.
• The spinning speed is 1000 rpm (800 rpm for night washing) if the dry
function is selected.
5. Rinse
• Touch this button to select the rinsing time. The time can be changed when
button is pressed and 6 times are the maximum amount.
6. Wash
• Touch this button to select the washing time. Each time this button is
pressed, washing period will increase. The steps are increments of one
miunute for one press.
7. Delay
Setting the finished time of the scheduled washing by touching this button.
The defaulted time for the scheduled washing is 9 hour. The washing time
can be increased one hour by one touching of the button. If the button is
pressed and held the time can be varied from 1 to 24 hours till the button
is released. If the START/PAUSEbutton is pressed the current setting is
confirmed after the scheduled washing program is ready.
If the time for the washing program is longer than the time of the scheduled
washing then the program will work immediately after the STARTbutton is
pressed.
Attention: There is some difference between the setting time and actual
time because of the water temperature, water pressure and the
distrubution of the laundry in the tube. There is no scheduled
washing function for "Delicate" program.
8. Remaining time: Min (Digital display screen)
• This display is used for providing washing time to the user. It can display the
setting time of scheduled washing and heating temperature. The screen
displays only the hour if the time setting is over 10 hours.
9. Temp (Children lock)
10.
o
• Touch this button to set washing cycle with cold or hot water. The digital
display screen shows "W", "H", "C". The default value is "W"
W-hot and cold water; H-hot water; C-cold water.
Lock buttons on the control panel, including the Power button, by pressing
this button for 3 seconds. These can be unlocked if the button is pressed for
another 3 seconds.
Prewash
The prewash function can be added into the washing program.
11

11.Waterlevel
* The related time and water level in the drum can be selected by pressing
this button according to the laundry quantity. The quantity indicator changes
its position according each time the laundry quantity button is pressed. We
suggest using the first gear when the quantity is less then 2 Ibs.; use the
second gear when the quantity is less then 6 Ibs., and use the last gear
when the quantity more then 6 Ibs. All other program setting indicate the
default values when the laundry quantity is set. For each settings range
please see the program setting for reference. The default program will be
carried out if the function is not selected.
12. Door lock indicator
This indicates that the door is locked and the machine is in the operation
state and the door can not be opened. Jfthe condition for opening the door
is met, press the START/PAUSEbutton. When this ligh is off and the door will
be unlocked and can be opened.
13. Start/Pause
* The set program is carried out while this button is pressed. To pause the
current program, just press this button and the program will not operate at
the moment. Press this button again if you want to resume the operation.
14. See Through Class Window Door
• Physical part that allows user to see what is happening inside.
15. Button Trap
* Physical part that collects lints and other small materials.
16. Front Adjustable Legs
. 2 physical parts that can be adjusted in height for user needs.
17. Detergent/Softener Dispenser
Physical part where user can place detergent or softener.
12

Powersupply
e
Water
supply
Detergent
selection
Laundry
treatment
e
e
120V/60Hz/15Ams.
Turn on the tap and ensure that the water is clear.
Caution: Before starting the washing machine turn on
the water faucet to ensure that the water faucet and the
water inlet hose are connected and do not leak.
The washing result depends on the quality of the
detergent except the function performances of the
washing machine. There are many brands of detergent
in the market. For the best washing result, we suggest
you use the special detergent that produced for the auto
drum washing machines.
For washing wool and the chemical fiber please use
special detergent. Do not use dryclean dissolvent.
Attention: Put only enough detergent for one load of
laundry into cartidge at a time.
Sort out clothes according to type and extent of dirt.
There are three types of clothes: cotton, synthetical and
woolen (silk) fabrics.
Separate white clothes from colors.
Remove all objects from pockets that may cause
damage to the machine, such as keys and coins.
Repair damaged clothing, loose buttons or damaged
zippers before washing.
Bed sheets and table cloths should be loosely loaded
and not folded.
This washing machine is for household use and
designed to mechanically wash clothes.
Type Non-Fade Delicate Woolen Blending
Cotton s fabrics
Max Load I I Ibs. 4.4 Ibs. 2.2 Ibs. 5.5 Ibs.
13

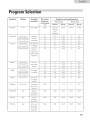
Program
Prewash
Standard
Custom
Quick
Night
Option
N/A
wash/rinse/spin
wash/rinse/spin/dry
wash/rinse/spin/dry
wash/rinse/spin
wash/rinse/spin/dry
wash/rinse/spin/dry
wash/rinse/spin
wash/rinse/spin/dry
wash/rinse/spin/dry
wash/rinse/spin
wash/rinse/spin/dry
wash/rinse/spin/dry
wash/rinse/spin
Suitable
condition
dirty cloth
ordinary
clothes
washing
self defined
washing
program
accord-
ing to the
habit of the
operator
for not
very dirty
clothes
Heavy for thick
or heavy
clothes
Delicate wash/rinse/spin cashmere N/A 6 1-15 2 0-6
and wool
fabrics
Standard dry dry the N/A 120 N/A N/A N/A
ordinary
laundries
60 rain dry dry the N/A 60 N/A N/A N/A
ordinary
laundries
30 rain dry anti-virus N/A 30 N/A N/A N/A
procress
for dried
laundry
14
60 8 5-60 2 0-6
60 6 5-60 2 0-6
60 5 5-60 2 0-6
60 25 5-53 3 0-6
60 20 5-53 3 0-6
60 ]5 5-53 3 0-6
30 40 5-60 3 0-6
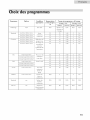
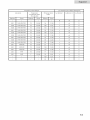
Program and washing time
Wash (min) Rinse (min)
DefauJt Range DefauJt Range
add 12 N/A N/A N/A
minutes
was
washing
25
21
17
25
21
17
5-60 3 0-6
5-60 2 0-6
5-60 2 0-6
5-60 3 0-6
5-60 2 0-6
5-60 2 0-6
for night
washing
ture (max)
oC
N/A
9O
9O
9O
9O
9O
9O

Spin (rpm)
hot/cold water)
Default Range Default Range Default Range
/ / / / / / * * o
800 0-600-800/1000 W C/H/W 56 7-130 4, -k 0
1000 0-600-800/1000 W C/H/W 168 7-251 4, * 0
1000 0-600-800/1000 W C/H/W 103 7-190 4, * 0
800 0-600-800/1000 W C/H/W 59 7-130 4, -k 0
1000 0-600-800/1000 W C/H/W 168 7-251 4, * 0
1000 0-600-800/1000 W C/H/W 103 7-190 4, * 0
800 0-600-800/1000 W C/H/W 32 7-128 4, -k 0
1000 0-600-800/1000 W C/H/W 151 7-249 4, -k 0
1000 0-600-800/1000 W C/H/W 89 7-188 4, * 0
800 0-600-800 W C/H/W 67 7-137 4, -k 0
800 0-600-800 W C/H/W 184 7-259 4, -k 0
800 0-600-800 W C/H/W 118 7-198 4, -k 0
600 0-600 W C/H/W 77 7-139 4, -k 0
600 0-600 C C/H/W 29 3-82 4, -k 0
/ / / / 120 120 4, 4, 4,
/ / / / 60 60 4, 4, 4,
/ / / / 30 30 4, 4, 4,
Program and washing time Methods for using detergent
Temp (selecting Total time (min) Partition 1 Partition 2 Partition 3
15

Be ding
Evenly load the laundry in the washing machine and then tightly close the door
of the unit.
Note: 1.When first using the washing machine, let it run unloaded for one
program to prevent the laundry from being stained by oil or dirty water
from the washing machine.
2.Do not overload the washing machine.
P_t detergent in the dispenser
There are three partitions in the detergent.
Partition 1: It is used for the prewash function.
Partition 2: Put the detergent in this partition no matter whether the prewash
function is selected or not.
Partition 3:
Caution: 1.
2.
3.
Put the softening agent in this partition if the laundry has gone
through the softening process.
Do not add liquid detergent into partition land 2.
For prewashing program, detergent should be added to both
partition 1 and 2; for other programs, do not add detergent to
partition 1.
Do not overuse softening agent as this may damage arfifical fabrics.
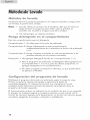
W_s_ing p_eg_m setting
Set the washing program correctly in accordance with the laundry load. First
connect the mains and select the power on/off button. The machine will work on
the default standard program. Select the program selection button for the
required washing program.
The above operation should be under the condition of no power down. The
machine will continue its previous program since the machine has the memory
function after the power down. The memory function can be canceled by turning
off the power and restart it.
16

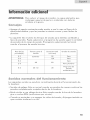
WARNING: To reduce the risk of fire, do not dry items containing
foam rubber or similarly textured rubber-like materials.
• Adding the softener agent can help the laundry to get rid of the static
electricity and make the clothes feel soft and easy to iron.
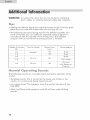
• The following list shows drying time for the different quantity and
kinds of laundry. You can select the expected drying program in
accordance with the quantity of the drying load. The selected
program will be over when the drying process is finished.
Weightof laundry
(lb.)
0-2
2-6
0-2
2-6
Tirne for drying
Standard
Remain tirne
(rnin)
59
120
60 rnin 60
0-6 30 rnin 30
Drying degree
Dried
Dried
Dried
For ironing
Dry and
anti-bacterium
Prograrn
No m lllli Operatisg Sousds
The following sounds are normally heard during the operation of the
washer:
• Tumbling sounds: this is normal as the heavy wet clothes in the
washer are continuously being tossed around.
• Air rushing noise: This happens when the washer tub spins at very
high RPM.
• Wash and Rinse cycles going on and off will also make clicking
sounds.
17

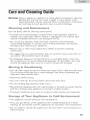
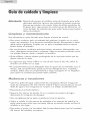
Warning: Always unplug your appliance to avoid electric shock before cleaning.
Ignoring this warning may result in death or injury. Before using
cleaning products, always read and follow manufacturer's instructions
and warnings to avoid personal injury or product damage.
Use only damp cloth for cleaning control panel.
* To avoid any kind of damage to cabinet finish, wipe appliance cabinet as
needed, if you spill liquid softener, bleach or detergent on the cabinet, wipe
cabinet immediately because it can damage the finish.
* Do not use any abrasive, harsh chemicals, ammonia, chlorine bleach,
concentrated detergent or solvents. Some of these chemicals may dissolve,
damage and/or discolor your appliance.
" Remove pins or other sharp objects from clothes to prevent scratching
interior parts.
* We suggest that you check the button trap no more than twice a year. Do not
use washer without button trap in its place.
The Detergent Dispenser Compartment has a removable option. Over time,
this compartment may accumulate dried detergent, dirt and debris. You must
remove the dispenser, then rinse it in a sink to remove dirt if present.
M@vi g & Vacati@ i g
* Turn off water supply faucets and disconnect hoses. Drain water from all hoses.
This will prevent damage due to water leakage if the hoses accidentally get
ruptured or they become loose.
* Disconnect eledrical plug.
* Dry inner wash tub. If moving washer, disconnect drain hose.
* Turn the leveling legs clockwise all the way in.
* Reinstall both shipping bolts and metal brackets in the back to prevent internal
part from shaking when appliance is moving to another location.
* To prevent mold leave door open so moisture inside machine can evaporate.
5re,age Yeur ppl[/ia ¢e in Cellllid
* This appliance must be stored at room temperature.
. If you just got delivery of this appliance when outside temperature is below
freezing, do not operate until this appliance has warmed to room temperature.
. Do not install or operate this appliance in the area where room temperature is
below freezing.
18

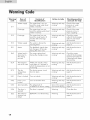
Warning Item of Content of Action to take Checking position
code concern identification and ask for help
Water supply The water level can not Warning and stop Check if the water
reach the reset water level running pressure or water
E11 within 5 minutes supply is low
Drainage The water level can not Warning and stop Check if the water
reach the setting water level running pressure is low or
within 8 mintues stops supplying
E12 Drainage The water level can not Warning and stop Check the water
reach the reset level in 8 running outlet of the drainage,
minutes after drainage adjust it and restart
starting the machine
E13 Water supply The water is above the Warning and stop Ask the technician to
warning level running repair it
E31 Motor The feedback signal does Warning and stop Ask the technician to
not change in 8 minutes running repair it
during the motor runs
EA3 Water level is The water setting level Warning and stop Check the water
abnormal in during the drying process running outlet of the drainage
the drying required and adjust it
process if required and restart
the machine
EC4 The tempera- Within 30 minutes of dry Warning and stop Ask the technician to
ture of air vent cycle there is 5 minutes in running repair it
which the temperature is not
increasing
EC5 The dry The drying sensor circuit Warning and stop Ask the technician to
temperature short or open running repair it
sensor
U01 Door is locked Can not unlock Warning and stop Ask the technician to
running repair it
U02 Door is not Can not lock the door Warning and stop Ask the technician to
locked running repair it
U03 Spin Iopsidely The judgement of Spin at low speed Ask the technician to
un-balance is above 1000g and cancel drying repair it
U04 The door is The door is opened Warning Close the door
opened
E22 The memory EEPROM is not functioning Warning Ask the technician to
function has repair it
failed
19

Washer does not operate:
• Check if unit is plugged in. The plug may have come loose.
• Check if the electrical wall receptacle has proper voltage.
• Check if the circuit breaker needs to be reset or if the fuse needs to be
replaced.
• Check if the unit is in "Off" mode.
• Check if the washer is overloaded: load may need to be re-balanced and
clothes may need to be redistributed.
• Check if the door is open. You may have to close the door properly.
Problems with water:
• Not enough water coming out: Water faucet may need to be turned on fully.
Water hoses may be tangled up or wrinkled up. Straighten up hoses. Check
water level selection, it may need to be readjusted.
• Water Temperature is incorrect: Check your water heater temperature. Hot
water needs to be at a temperature at least 120°F-140°F (49°C - 60°C).
Check to make sure the inlet hoses are properly connected. (e.g. hot to hot &
cold to cold)
• Water leaks: This is due to not improperly installed drain hose or fill hoses.
Your home drain may be clogged. You may need to tighten hoses, check the
plumbing or call a plumber for service.
• Water pumped out before the cycle is completed: It happens if you open the
door in the middle of cycle.
• Water will not drain: This may be because drain hose was not installed
properly. Check the position of the drain hose. In order to drain properly, make
sure that top of drain outlet is less than 4 ft. (] .2 m) above the floor.
2O
Page is loading ...
Page is loading ...
Page is loading ...
Page is loading ...
Page is loading ...
Page is loading ...
Page is loading ...
Page is loading ...
Page is loading ...
Page is loading ...
Page is loading ...
Page is loading ...
Page is loading ...
Page is loading ...
Page is loading ...
Page is loading ...
Page is loading ...
Page is loading ...
Page is loading ...
Page is loading ...
Page is loading ...
Page is loading ...
Page is loading ...
Page is loading ...
Page is loading ...
Page is loading ...
Page is loading ...
Page is loading ...
Page is loading ...
Page is loading ...
Page is loading ...
Page is loading ...
Page is loading ...
Page is loading ...
Page is loading ...
Page is loading ...
Page is loading ...
Page is loading ...
Page is loading ...
Page is loading ...
Page is loading ...
Page is loading ...
Page is loading ...
Page is loading ...
Page is loading ...
Page is loading ...
Page is loading ...
Page is loading ...
Page is loading ...
Page is loading ...
Page is loading ...
Page is loading ...
Page is loading ...
Page is loading ...
Page is loading ...
-
 1
1
-
 2
2
-
 3
3
-
 4
4
-
 5
5
-
 6
6
-
 7
7
-
 8
8
-
 9
9
-
 10
10
-
 11
11
-
 12
12
-
 13
13
-
 14
14
-
 15
15
-
 16
16
-
 17
17
-
 18
18
-
 19
19
-
 20
20
-
 21
21
-
 22
22
-
 23
23
-
 24
24
-
 25
25
-
 26
26
-
 27
27
-
 28
28
-
 29
29
-
 30
30
-
 31
31
-
 32
32
-
 33
33
-
 34
34
-
 35
35
-
 36
36
-
 37
37
-
 38
38
-
 39
39
-
 40
40
-
 41
41
-
 42
42
-
 43
43
-
 44
44
-
 45
45
-
 46
46
-
 47
47
-
 48
48
-
 49
49
-
 50
50
-
 51
51
-
 52
52
-
 53
53
-
 54
54
-
 55
55
-
 56
56
-
 57
57
-
 58
58
-
 59
59
-
 60
60
-
 61
61
-
 62
62
-
 63
63
-
 64
64
-
 65
65
-
 66
66
-
 67
67
-
 68
68
-
 69
69
-
 70
70
-
 71
71
-
 72
72
-
 73
73
-
 74
74
-
 75
75
-
 76
76


Haier HWD1000 User manual
- Category
- Washing machines
- Type
- User manual
- This manual is also suitable for
Ask a question and I''ll find the answer in the document
Finding information in a document is now easier with AI
in other languages
- français: Haier HWD1000 Manuel utilisateur
- español: Haier HWD1000 Manual de usuario
Related papers
-
Haier HWD1000 - 1.7 cu. Ft. Washer/Dryer Combo User manual
-
-
-
-
-
Haier Genesis CRDE200AW User manual
-
-
-
-
Other documents
-
Daewoo DWD-FI2011 Owner's manual
-
BOMANN WA 7170 Operating instructions
-
LG WD-3274RHD Owner's manual
-
Equator EZ4000CV Owner's manual
-
Equator EZ 4400CV +PDL Silver Owner's manual
-
Blomberg WMD24400W User manual
-
-
-
BOMANN WA 7190 Operating instructions
-