Page is loading ...

C5 Spotting Scope - #52291
Instruction Manual

A spotting scope is nothing more than a telescope that is designed to look around
the Earth. Unlike astronomical telescopes, which produce inverted or reverted
images, spotting scopes produce correctly oriented images. Celestron offers
several different models, each of which uses the highest quality optics to produce
the best possible images. All models have rugged, durable housings to give you a
lifetime of pleasure with a minimal amount of maintenance.
Your Celestron spotting scope is designed to give you hours of fun and rewarding
observations. There are, however, a few things to consider before using your
spotting scope that will ensure your safety and protect your equipment.
• Never look directly at the Sun with the naked eye or with your spotting
scope. Permanent and irreversible eye damage may result.
• Never use your spotting scope to project an image of the Sun onto any
surface. Internal heat build-up can damage your spotting scope and/or any
accessories attached to it.
• Never use an eyepiece solar filter or a Herschel wedge. Internal heat build-
up inside your spotting scope can cause these devices to crack or break,
allowing unfiltered sunlight to pass through to the eye.
• Never leave your spotting scope unsupervised, either when children are
present or adults who may not be familiar with the correct operating
procedures of your spotting scope.
• Never point your spotting scope at the Sun unless you have the proper solar
filter. We recommend Celestron solar filters only. Don't take chances -- use
Celestron filters for safety and performance! When using your spotting
scope with the proper solar filter, ALWAYS cover the finderscope. Although
small in aperture, this instrument has enough light gathering power to
possibly cause permanent and irreversible eye damage. In addition, the
image projected by the finder is hot enough to burn skin and clothing.

Assembly
This section covers the correct set up and operating procedures for your Celestron
C5 spotting scope and includes information on visual and photographic
observations. The C5 spotting scope uses a combination of mirrors and lenses to
produce an image. Such an optical system is known as a compound lens. This
particular design, known as a Schmidt-Cassegrain, is one of the most compact
and rugged optical systems on the market today. The C5 (#52219) comes
standard with the following accessories:
· 25mm Plossl Eyepiece 1.25” (48x)
· 6x30 Erect Image Finderscope
· 45° Erect Image Diagonal - 1.25”
· Photo Tripod Adapter block
· Nylon Water Resistant Case
· Lens Cap
The Erect Image Diagonal
The diagonal is a prism that diverts the light at a right angle from the light path of
the spotting scope. The C5 spotting scope comes with an erect image diagonal
that is designed for terrestrial viewing. To attach the diagonal:
1. Turn the thumbscrew on the visual
back until its tip no longer extends
into (i.e., obstructs) the inner
diameter of the visual back.
2. Slide the chrome portion of the
diagonal into the visual back.
3. Tighten the thumbscrew on the
visual back to hold the diagonal in
place.
If you wish to change the orientation of
the diagonal, loosen the thumbscrew on the visual back until the diagonal rotates
freely. Rotate the diagonal to the desired position and tighten the thumbscrew.

The Eyepiece
The eyepiece, or ocular, is the optical element that magnifies the image focused
by the spotting scope. The eyepiece fits into either the visual back directly or the
erect image diagonal. To install an ocular:
1. Loosen the thumbscrew on the star diagonal (or erect image diagonal) so it
does not obstruct the inner diameter of the eyepiece end of the diagonal.
2. Slide the chrome portion of the eyepiece into the star diagonal (or erect
image diagonal).
3. Tighten the thumbscrew to hold the eyepiece in place.
To remove the eyepiece, loosen the thumbscrew on the star diagonal and slide the
eyepiece out.
Eyepieces are commonly referred to by focal length and barrel diameter. The
focal length of each eyepiece is printed on the eyepiece barrel. The longer the
focal length (i.e., the larger the number) the lower the eyepiece power or
magnification; and the shorter the focal length (i.e., the smaller the number) the
higher the magnification. Generally, you will use low-to-moderate power when
viewing. For more information on how to determine power, see the section on
“Calculating Magnification.”
Barrel diameter is the diameter of the barrel that slides into the diagonal or visual
back. The C5 spotting scope use eyepieces with a standard 1-1/4" barrel
diameter.
Finderscope
The C5 spotting scope come standard with a terrestrial (erect image) 6x30 finder.
The purpose of the finder is to locate objects that might otherwise be overlooked
in the narrow, higher power field of view of the spotting scope.
Attaching the Finder to the Bracket
1. Unthread the three screws in the finder bracket. until the ends are flush with
the inner diameter of the bracket ring. Do not thread them in completely
or they will interfere with the placement of the finder.

2. Slide the rubber O-ring onto the back (eyepiece end) of the finder.
3. Position the O-ring on the
main body of the finder so
that it is toward the front
(i.e., objective) end of the
finder.
4. Slide the finder, eyepiece
end first, into the front
ring of the bracket. Push
it back until the O-ring is
snug inside the front ring
of the bracket.
5. Hand tighten the three set
screws until snug.
To align the finder, please see the section on “Aligning the Finder.”
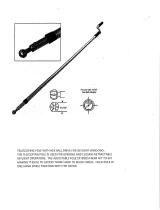
The C5 spotting scope will attach to any photographic tripod with a 1/4x20
threaded screw. The C5 attaches to the tripod via a photo tripod adapter block
that has three 1/4x20 holes. To attach the C5 to a photographic tripod:
1. Place any of the 1/4x20 holes in the photo tripod adapter block over the
1/4x20 screw on your photographic tripod.
2. Tighten the 1/4x20 screw to hold the C5 firmly in place.
If the telescope/spotting scope is not properly balanced, try using one of the
other holes in the photo tripod adapter block. Once mounted on the
photographic tripod, you are ready to use your C5 spotting scope.
Following is pertinent technical information for the Celestron C5 spotting scope
that you may find useful.
• 5" aperture (125mm) f/10
• Focal length — 1250mm (50")
• Schmidt-Cassegrain optical system
Resolution 0.9 arc sec.
• Tube — 11" long
• Weight (with mount) — 6 pounds
Finderscope
Nylon
Adjustment
Screw
Finder Bracket
Rear Cell

The emblem on the end of
the focus knob shows the
correct rotational direction
for focusing your telescope
.
• 6x30 finder
• Highest useful magnification — 300x
• Lowest useful magnification — 23x
• Limiting magnitude (visual) — 13
• Near Focus — Approximately 20'
• Angular field of view with standard eyepiece: 1.04°
• Angular field of view using optional Reducer/Corrector lens: 1.7°
• Lens cover
• Starbright XLT coatings — XLT coating on corrector yield greater light
transmission and provides greater reflectivity on primary and secondary
mirrors
Once your spotting scope is fully assembled, you are ready for your first look.
This section deals with the basics of your spotting scopes operation.
The Celestron C5 spotting scope focusing mechanism controls the position of the
primary mirror which is mounted on a sleeve that slides back and forth on the
primary baffle tube. The focusing knob,
which moves the primary mirror, is on the rear
cell of the C5 to the right of the diagonal and
eyepiece. Turn the focusing knob until the
image is sharp. If the knob will not turn, the
primary mirror has reached the end of its
travel on the focusing mechanism. Turn the
knob in the opposite direction until the image
is sharp. Once an image is in focus, turn the
knob clockwise to focus on a closer object and
counterclockwise for a more distant object. A
single turn of the focusing knob moves the
primary mirror only slightly. Therefore, it
will take many turns (about 40) to go from
close focus (approximately 20 feet) to infinity.
For astronomical viewing, out-of-focus star
images are very diffuse making them difficult,
if not impossible, to see. If you turn the focus
knob too quickly, you can go right through focus without seeing the image. For
best results, your first astronomical target should be a bright object (like the
Moon) so that the image is visible even when out of focus.
The Celestron C5 comes with a 6x30mm finder that helps in aiming at distant
objects that are hard to find in the narrow field of the spotting scope. The first
number used to describe the finder is the power while the second number is the
diameter of the objective lens in millimeters. This means the 6x30 finder is 6

power and has a 30mm objective lens. Incidentally, power is always compared to
the unaided human eye. So an 8 power finder magnifies images eight times more
than the human eye.
To make the alignment process a little easier, you should perform this task in the
daytime when it is easier to locate objects in the spotting scope without the
finder. To align the finder:
1. Choose a conspicuous object that is in excess of one mile away. This will
eliminate any possible parallax effect.
2. Point your spotting scope at the object you selected and center it in the
main optics of the spotting scope.
3. Check the finder to see where your alignment target is located in the
field of view.
4. Adjust the screws on the finder bracket, tightening one while loosening
another, until the cross hairs are centered on the target.
5. Tighten each set screw a quarter of a turn to ensure that they will not come
loose easily.
With the spotting scope fully assembled and all the accessories attached, you are
ready for your first look. Observing can be broken down into two distinct
categories; terrestrial and celestial. Terrestrial observing is generally done in the
daytime as subjects are usually wildlife, birds, or scenic views. Celestial
observing is generally done at night when stars and planets are visible.
Regardless of your preference, your first look should be done in the daytime so
you can see the various parts of your C5 and better familiarize yourself with its
operation.
Before you can use your C5 to look at anything it must first be attached to a
stable mount. For spotting scope owners, this would be a heavy-duty
photographic tripod.
WARNING ! NEVER POINT YOUR SPOTTING SCOPE AT THE SUN
UNLESS YOU HAVE THE PROPER CELESTRON SOLAR FILTER.
PERMANENT AND IRREVERSIBLE EYE DAMAGE MAY RESULT AS
WELL AS DAMAGE TO YOUR SPOTTING SCOPE. ALSO, NEVER
LEAVE YOUR SPOTTING SCOPE UNATTENDED DURING A
DAYTIME OBSERVING SESSION, ESPECIALLY WHEN CHILDREN
ARE PRESENT.

To use your C5 spotting scope visually:
1. Find a distant object that is fairly bright.
2. Insert a low power eyepiece (one with a long focal length — 25 to
30mm) into the spotting scope.
3. Adjust the tripod until the C5 is pointed in the direction of the object
you selected.
4. Locate the object in your finder.
5. Move the C5 until the object is centered in the finder.
6. Look through the main optics and the object will be there (if you aligned
the finder first).
Once you have found the object, you will most likely need to focus. If the object
is moving, leave the adjustment clamps loose so that you can pan easily. Try
using different optional eyepieces to see how the field changes with various
magnifications.
You can change the power of your Celestron C5 spotting scope just by changing
the eyepiece (ocular). To determine the magnification of your Celestron C5,
simply divide the focal length of the spotting scope by the focal length of the
eyepiece used. In equation format, the formula looks like this:
Focal Length of Spotting Scope (mm)
Magnification = ————————————————
Focal Length of Eyepiece (mm)
Let’s say, for example, that you are using a 26mm eyepiece. To determine the
magnification, you simply divide the focal length of your C5 (1250mm) by the
focal length of the eyepiece (26mm). Dividing 1250 by 26 yields a magnification
of 48 power.
Although the power is variable, each instrument — under average skies — has a
limit to the highest useful magnification. The general rule is that 60 power can
be used for every inch of aperture. For example, the C5 is 5" in diameter.
Multiplying 5 by 60 gives a maximum useful magnification of 300 power.
Although this is the maximum useful magnification, most observing is done

between 20 to 35 power for every inch of aperture which is 100 to 175 times for
the C5.
Determining the field of view is important if you want to get an idea of the
angular size of the object you are observing. To calculate the actual field of
view, divide the apparent field of the eyepiece (supplied by the eyepiece
manufacturer) by the magnification. In equation format, the formula looks like
this:
Apparent Field of Eyepiece (in degrees)
True Field = ————————————————
Magnification
As you can see, before determining the field of view, you must first calculate the
magnification. Using the example in the previous section, we can determine the
field of view using the same 26mm eyepiece. The 25mm Plossl eyepiece has an
apparent field of view of 52°. Divide the 52° apparent field by the magnification,
which is 50 power. This yields an actual field of 1.04°.
To convert degrees to feet at 1,000 yards, which is more useful for terrestrial
observing, simply multiply by 52.5. Continuing with our example, multiplying
the angular field 1.04° by 52.5 produces a linear field width of 54.6 feet at a
distance of one thousand yards.
The apparent field of each eyepiece that Celestron manufactures is found in the
Celestron Accessory Catalog (#93685).
When working with any optical instrument, there are a few things to remember to
ensure you get the best possible image.
• Never look through window glass. Glass found in household windows is
optically imperfect and, as a result, may vary in thickness from one part of a
window to the next. This inconsistency can and will affect the ability to focus
your spotting scope. In most cases you will not be able to achieve a truly sharp
image. In some cases, you may actually see a double image.
• Never look across or over objects that are producing heat waves. This includes
asphalt parking lots on hot summer days or building rooftops.
• Hazy skies, fog, and mist can also make it difficult to focus when viewing
terrestrially. The amount of detail seen under these conditions is greatly reduced.
Also, when photographing under these conditions, the processed film may come
out a little grainier than normal with lower contrast.

• When using your C5 as a telephoto lens, the split screen or microprism focuser of
the 35mm SLR camera may “black out.” This is common with all long focal
length lenses. If this happens, use the ground glass portion of your focusing
screen. To achieve a very sharp focus, consider using a focusing magnifier.
(These are readily available from your local camera store.)
• If you wear corrective lenses (specifically glasses), you may want to remove
them when observing with an eyepiece attached to your C5. When using a
camera, however, you should always wear corrective lenses to ensure the
sharpest possible focus. If you have astigmatism, corrective lenses should be
worn at all times.
Your Celestron C5 can be used for both terrestrial and astronomical
photography. Your C5 has a fixed aperture and, as a result, a fixed f/ratio. To
properly expose your subjects photographically, you need to set your shutter
speed accordingly. Most 35mm single lens reflex (SLR) cameras offer
through-the-lens metering that lets you know if your picture is under or
overexposed. This is important for terrestrial photography where exposure
times are measured in fractions of a second.
To reduce vibration when tripping the shutter, use a cable release. Releasing the
shutter manually can cause vibration, something that produces blurred photos. A
cable release allows you to keep your hands clear of the camera and spotting
scope, thus reducing the possibility of shaking the spotting scope. Mechanical
shutter releases can be used, though air-type releases are
& MAINTENANC
While the C5 spotting scope requires little maintenance, there are a few things to
remember that will ensure your spotting scope performs at its best.
Occasionally, dust and/or moisture may build up on the corrector plate of your
C5. Special care should be taken when cleaning any instrument so as not to
damage the optics.
If dust has built up on the corrector plate, remove it with a brush (made of
camel’s hair) or a can of pressurized air. Spray at an angle to the lens for
approximately two to four seconds. Then, use an optical cleaning solution and
white tissue paper to remove any remaining debris. Apply the solution to the
tissue and then apply the tissue paper to the lens. Low pressure strokes should go
from the center of the corrector to the outer portion. Do NOT rub in circles!
You can use a commercially made lens cleaner or mix your own. A good
cleaning solution is isopropyl alcohol mixed with distilled water. The solution

should be 60% isopropyl alcohol and 40% distilled water. Or, liquid dish soap
diluted with water (a couple of drops per one quart of water) can be used.
Occasionally, you may experience dew build-up on the corrector plate of your C5
during an observing session. If you want to continue observing, the dew must be
removed, either with a Celestron Lens Shade / Dew Cap or by pointing the
spotting scope at the ground until the dew has evaporated.
If moisture condenses on the inside of the corrector, place the spotting scope in a
dust-free environment and point it down. Remove the accessories from the rear
cell of the spotting scope to allow the moisture to evaporate from the optical tube.
To minimize the need to clean your spotting scope, replace all lens covers once
you have finished using it. Since the rear cell is NOT sealed, the cover should be
placed over the opening when not in use. This will prevent contaminants from
entering the optical tube.
Internal adjustments and cleaning should be done only by the Celestron repair
department. If your C5 is in need of internal cleaning, please call the factory for
a return authorization number.
Collimation
The optical performance of your telescope is directly related to its collimation, that is the
alignment of its optical system. Your telescope was collimated at the factory after it was
completely assembled. However, if the telescope is dropped or jarred severely during
transport, it may have to be collimated. The only optical element that may need to be
adjusted, or is possible, is the tilt of the secondary mirror.
To check the collimation of your telescope you will
need a light source. A bright star near the zenith is
ideal since there is a minimal amount of
atmospheric distortion. Make sure that tracking is
on so that you won’t have to manually track the
star. Or, if you do not want to power up your
telescope, you can use Polaris. Its position relative
to the celestial pole means that it moves very little
thus eliminating the need to manually track it.
Before you begin the collimation process, be sure
that your telescope is in thermal equilibrium with
the surroundings. Allow 45 minutes for the
telescope to reach equilibrium if you move it
between large temperature extremes.
The three collimation screws are
located on the front of the secondary
mirror housing.

To verify collimation, view a star near the zenith. Use a medium to high power ocular —
12mm to 6mm focal length. It is important to center a star in the center of the field to
judge collimation. Slowly cross in and out of focus and judge the symmetry of the star.
If you see a systematic skewing of the star to one side, then re
-
collimation is needed.
To accomplish this, you need to tighten the secondary collimation screw(s) that move the
star across the field toward the direction of the skewed light. These screws are located in
the secondary mirror holder (see figure 8-1). Make only small 1/6 to 1/8 adjustments to
the collimation screws and re-center the star by moving the scope before making any
improvements or before making further adjustments.
To make collimation a simple procedure, follow these easy steps:
1. While looking through a medium to high power eyepiece, de-focus a bright star
until a ring pattern with a dark shadow appears (see figure 8-2). Center the de-
focused star and notice in which direction the central shadow is skewed.
2. Place your finger along the edge of the front cell of the telescope (be careful not
to touch the corrector plate), pointing towards the collimation screws. The
shadow of your finger should be visible when looking into the eyepiece. Rotate
your finger around the tube edge until its shadow is seen closest to the narrowest
portion of the rings (i.e. the same direction in which the central shadow is
skewed).
3. Locate the collimation screw closest to where your finger is positioned. This will
be the collimation screw you will need to adjust first. (If your finger is
positioned exactly between two of the collimation screws, then you will need to
adjust the screw opposite where your finger is located).
4. Use the hand control buttons to move the de-focused
star image to the edge of the field of view, in the same
direction that the central obstruction of the star image is
skewed.
5. While looking through the eyepiece, use an Allen
wrench to turn the collimation screw you located in step
2 and 3. Usually a tenth of a turn is enough to notice a
change in collimation. If the star image moves out of the
field of view in the direction that the central shadow is
skewed, than you are turning the collimation screw the
wrong way. Turn the screw in the opposite direction, so
that the star image is moving towards the center of the
field of view.
6. If while turning you notice that the screws get very
loose, then simply tighten the other two screws by the same amount.
Even though the star pattern appears the same on both sides of focus, they are asymmetric. The dark
obstruction is skewed off to the left side of the diffraction pattern indicating poor collimation.
A collimated
telescope should
appear symmetrical
with the central
obstruction
centered in the
star's diffraction
pattern.

Conversely, if the collimation screw gets too tight, then loosen the other two
screws by the same amount.
7. Once the star image is in the center of the field of view, check to see if the rings
are concentric. If the central obstruction is still skewed in the same direction,
then continue turning the screw(s) in the same direction. If you find that the ring
pattern
is skewed in a different direction, than simply repeat steps 2 through 6
as described
above for the new direction.
Perfect collimation will yield a star image very symmetrical just inside and outside of
focus. In addition, perfect collimation delivers the optimal optical performance
specifications that your telescope is built to achieve.
If seeing (i.e., air steadiness) is turbulent, collimation is difficult to judge. Wait until a
better night if it is turbulent or aim to a steadier part of the sky. A steadier part of the sky
is judged by steady versus twinkling stars.
NOTE: THE ADJUSTMENT SCREWS ON THE SECONDARY MIRROR
ARE VERY SENSITIVE. USUALLY A TENTH OF A TURN WILL
COMPLETELY CHANGE THE COLLIMATION OF THE SPOTTING
SCOPE. DO NOT FORCE THESE SCREWS IF THEY WILL NOT
TURN. IF TIGHTENING ONE SCREW IN THE DIRECTION YOU
NEED TO GO IS DIFFICULT, SIMPLY LOOSEN THE OTHER TWO
SCREWS BY EQUAL AMOUNTS TO BRING ABOUT THE SAME
CHANGE. DO NOT BE INTIMIDATED BY TOUCHING UP
COLLIMATION AS NEEDED TO ACHIEVE OPTIMAL HIGH-
RESOLUTION VIEWS. IT IS WORTH THE TROUBLE!!!!

The following is a partial list of optional accessories available for your Celestron
C5 spotting scope. You will find that additional accessories enhance your
viewing pleasure and expand the usefulness of your spotting scope.
Barlow Lens - A Barlow lens is a negative lens that increases the focal length of
a telescope. Used with any eyepiece, it doubles the magnification of that
eyepiece. Celestron offers two Barlow lens in the 1-1/4" size for the C5. The 2x
Ultima Barlow (#93506) is a compact triplet design that is fully multicoated for
maximum light transmission and parfocal when used with the Ultima eyepieces.
Model #93507 is a compact achromatic Barlow lens that is under three inches
long and weighs only 4 oz. It works very well with all Celestron eyepieces.
CD-ROM (93700) - Celestron and Software Bisque have joined together to
present this comprehensive CD-ROM called The Sky™ Level 1 - from Celestron.
It features a 10,000 object database, 75 color images, horizontal projection,
custom sky chart printing, zoom capability and more! A fun, useful and
educational product. PC format.
Eyepieces - Like telescopes, eyepieces come in a variety of designs. Each design
has its own advantages and disadvantages. For the 1-1/4" barrel diameter there
are four different eyepiece designs available.
•
OMNI Plöss
l -
Plössl eyepieces have a 4-element lens designed for low-to-high
power observing. The Plössls offer razor sharp views across the entire field, even at
the edges! In the 1-1/4" barrel diameter, they are available in the following focal
lengths: 4mm, 6mm, 9mm, 12.5mm, 15mm, 20mm,
25mm, 32mm and 40mm.
•
X-Cel -
This 6 element design allows each X-Cel
Eyepiece to have 20mm of eye relief, 55° field of
view and more than 25mm of lens aperture (even
with the 2.3mm). In order to maintain razor sharp,
color corrected images across its 55° field of view,
extra-low dispersion glass is used for the most highly
curved optical elements. The excellent refractive
properties of these high grade optical elements, make
the X-Cel line especially well suited for high
magnification planetary viewing where sharp, color-
free views are most appreciated. X-Cel eyepiece
come in the following focal lengths: 2.3mm, 5mm,
8mm, 10mm, 12.5mm, 18mm, 21mm, 25mm.

Night Vision Flashlight - (#93588) - Celestron’s premium model for astronomy,
using two red LEDs to preserve night vision better than red filters or other
devices. Brightness is adjustable. Operates on a single 9 volt battery (included).
Moon Filter (94119-A) - Celestron’s Moon Filter is an economical eyepiece
filter for reducing the brightness of the moon and improving contrast, so greater
detail can be observed on the lunar surface. The clear aperture is 21mm and the
transmission is about 18%.
Photographic Tripod (#93606) - Even at low power, your C5 Spotting Scope
produces too much power to hand hold. For the best results, use a stable platform
like the Celestron Photographic Tripod. This tripod has an oil fluid pan head for
smooth panning. The quick release head allows you to attach and remove the C5
quick and easily. It is extremely lightweight and rigid.
Reducer/Corrector (#94175) - This lens reduces the focal length of the
telescope by 37%, making your spotting scope a 787.5mm f/6.3 instrument. In
addition, this unique lens also corrects inherent aberrations to produce crisp
images all the way across the field when used visually. When used
photographically, there is some vignetting that produces a 26mm circular image
on the processed film.
Sky Map (#93722) - Celestron Sky Maps are the ideal teaching guide for
learning the night sky. You wouldn’t set off on a road trip without a road map,
and you don’t need to try to navigate the night sky without a map either. Even if
you already know your way around the major constellations, these maps can help
you locate all kinds of fascinating objects.
Skylight Filter (#93621) - The Skylight filter is used on the Celestron C5
spotting scope as a dust seal. The filter threads onto the rear cell of your
telescope. All other accessories, both visual and photographic (with the
exception of Barlow lenses), thread onto the skylight filter. The light loss caused
by this filter is minimal.
Star Diagonal (94115-A) - A Star Diagonal lets you view objects that are at a 90
angle from the direction the telescope is pointing, thereby allowing comfortable
viewing when pointed near the zenith (i.e. directly overhead). The resulting
image is right side up, but will be reversed from left to right.
T-Adapter (#93633-A) - T-Adapter (with additional T-Ring) allows you to
attach your 35mm SLR camera to the rear cell of your Celestron C5. This turns

your C5 into a 1250mm telephoto lens perfect for terrestrial photography and
short exposure lunar photography.
T-Ring - The T-Ring couples your 35mm SLR camera body to the T-Adapter,
radial guider, or tele-extender. This accessory is mandatory if you want to do
photography through the telescope. Each camera make (i.e., Minolta, Nikon,
Pentax, etc.) has its own unique mount and therefore, its own T-Ring. Celestron
has 8 different models for 35mm cameras.
Vibration Suppression Pads (#93503) - These pads rest between the ground and
tripod feet. They reduce the amplitude and vibration time of your telescope when
shaken by the wind or an accidental bump. This accessory is a must for long
exposure prime focus photography.
A full description of all Celestron accessories can be found in the Celestron
accessory catalog (#93685).

Celestron
2835 Columbia Street
Torrance, CA 90503 U.S.A.
Tel. (310) 328-9560
Fax. (310) 212-5835
Web site at http//www.celestron.com
Copyright 2006 Celestron
All rights reserved.
(Products or instructions may change
without notice or obligation.)
Item #52291-INST
01-07
$10.00
/