Page is loading ...

Copyright © 2020, Baby Trend, Inc.
Carefully read and understand all instructions and warnings in
this manual. Failure to properly use this Car Seat increases the
risk of SERIOUS INJURY or DEATH in a sudden stop or crash.
KEEP INSTRUCTIONS FOR FUTURE USE.
Store this manual in the pocket provided on the underside of
the seat cover as illustrated on back cover of this manual.
CV89
Cover Me™ 4-in-1 Convertible Car Seat
OWNER’S MANUAL
Para instrucciones en Español, conéctese a
www.babytrend.com o llamar al: 1-800-328-7363.
CV89XXXB_En_092120
WARNING
1-800-328-7363
(8:00am ~ 4:30pm PST)
www.babytrend.com
Baby Trend, Inc.
13048 Valley Blvd.
Fontana CA 92335
Store this manual in the pocket provided
on the underside of the seat cover as
illustrated above.
Scan QR Code
for Cover Me
™
How-To Videos
www.babytrend.com

1 2
Copyright © 2020, Baby Trend, Inc.Copyright © 2020, Baby Trend, Inc.
1.0 General Warnings and Information .............................................. 3
2.0 Use Recommendations ................................................................. 5
2.1 Rear facing seat requirements ......................................................... 5
2.2 Forward facing seat requirements ................................................... 6
3.0 Car Seat Parts ................................................................................ 8
4.0 Selecting a Vehicle Seating Location......................................... 09
4.1 Overall Considerations In Selecting A Location ..............................09
4.2 Proper Use And Requirements ....................................................... 11
4.3 Safe Vehicle Seat Belt Systems..................................................... 12
4.4 Locking Clip Installation ................................................................. 15
4.5 Unsafe Vehicle Seat Belt Systems................................................. 16
4.6 Preparation for Installation in Vehicle............................................. 18
4.7 Installation with LATCH .................................................................. 19
4.8 LATCH - Top Tether Anchor Locations ........................................... 20
5.0 Installation and Use Internal Harness Mode ............................. 21
5.1 Child Placement In Car Seat.......................................................... 22
5.1.1 Installation Diagrams .................................................................... 23
5.2 Rear Facing Lap/Shoulder Belt Installation.................................... 24
5.3 Rear Facing Lap Belt Installation ................................................... 28
5.4 Rear Facing Installation with LATCH Lower Anchor ...................... 32
5.5 Forward Facing Installation with Lap Belt. ..................................... 36
5.6 Forward Facing Installation with Lap Shoulder Belt ....................... 40
5.7 Forward Facing Installation with LATCH. ....................................... 44
5.8 Aircraft Installation ......................................................................... 48
5.9 Child Placement In Car Seat.......................................................... 49
5.10 Harness Shoulder Height Adjustment. ........................................... 53
5.11 Height Adjustment - No Re-thread Positions 3-7. .......................... 54
5.12 Harness Height Adjustment Positions 1-2..................................... 55
5.13 Harness Length Adjustment .......................................................... 56
5.14 Car Seat Shoulder Height Positions ............................................. 58
5.15 Base Recline ................................................................................. 58
5.16 Rear-facing Recline Foot Use ....................................................... 60
5.17 Rear-facing Recline Foot Storage................................................. 60
5.18 Canopy Use .................................................................................. 61
5.19 Canopy Position Change .............................................................. 61
5.20 Independent Sun Side Visors ....................................................... 62
5.21 Canopy Opening and Closing ....................................................... 63
5.22 Harness Center Tension Adjuster ................................................. 63
5.23 LATCH Top Tether and Lower Anchor J-Hook Storage ................. 64
5.24 Changing LATCH Lower Anchor J-Hook use Positions ................ 64
5.25 Crotch Buckle Adjustments ........................................................... 67
5.25.1 Belt Shortening Clip .................................................................... 68
5.26 Low Birthweight Harness Routing ................................................. 70
5.27 Pillow, Insert and Harness Covers Use......................................... 77
5.28 Harness Hip and Buckle Use Positions ........................................ 78
5.29 Cup Holder Removal, Installation and Cleaning ........................... 79
5.30 Seat Fabric / Laundering Seat Fabric Removal ............................ 80
6.0 Installation and Use - Booster Mode .......................................... 81
6.1 Booster Use Requirements ............................................................ 81
6.2 Weight and Height Requirements .................................................. 81
6.3 Booster Seat Use ........................................................................... 81
6.4 Belt Position Booster Warnings .................................................... 82
6.5 Booster Parts ................................................................................. 83
6.6 Preparing Canopy for use in Booster Car Seat Mode.................... 84
6.7 Booster Car Seat Installation without Canopy Use ........................ 85
6.8 Booster Car Seat Installation with Canopy Use ............................. 89
6.9 Harness System Removal for Booster Car Seat Installation ......... 93
7.0 Additional Information................................................................. 95
7.1 Certication .................................................................................... 95
7.2 Aircraft Use .................................................................................... 95
7.3 Vehicle Seat Protection .................................................................. 95
7.4 Instruction Manual Storage ............................................................ 96
7.5 Car Seat Useful Life ....................................................................... 96
7.6 Replacements ................................................................................ 96
7.7 Care and Cleaning ......................................................................... 97
8.0 Registration Information ............................................................. 98
9.0 Warranty ....................................................................................... 99
Table of Contents Table of Contents

3 4
Copyright © 2020, Baby Trend, Inc.Copyright © 2020, Baby Trend, Inc.
• Failure to follow these instructions and car seat labels can result
in injury or death to a child from striking the vehicle’s interior
during a sudden stop or crash.
• Even if the car seat seems easy to use on your own, it is
important to read these instructions and the vehicle owner’s
manual for details you might miss.
• The instructions in this manual and in your vehicle owner’s
manualmustbefollowedcarefully.Ifthereisaconictbetween
the two, the vehicle owner’s manual must be followed if it relates
to the vehicles seat belt, LATCH or airbags.
• Failure to use the vehicle seat belt or to adjust it properly can
result in your child striking the vehicle’s interior during a sudden
stop or crash. Serious injury or death can occur.
• DO NOT allow others (babysitters, friends, grandparents, etc.).
To use this car seat unless they read and understand the
instructions and labels and can demonstrate proper use to your
satisfaction.
• Use only car seat accessories manufactured by Baby Trend
®
.
Accessories can affect your child’s safety in a sudden stop or
crash.
• DO NOT modify or attach any toys, seat fabric, or other items to
thiscarseat.Untestedmodicationscouldresultininjuryina
crash.
DEATH or SERIOUS INJURY can occur:
WARNING!
General W
1.0 General Warnings and Information 1.0 General Warnings and Information
• Secure this car seat with the vehicle seat belt or LATCH Lower anchor
j-hook connectors
at all times (even when there is no child in it). An
unsecured car seat can injure others if a crash occurs.
• Direct sunlight can make car seat surfaces hot enough to burn your
child. Use caution and check the vehicle and car seat on hot, sunny
days.
• NEVER leave child unattended under any circumstance.
• DO NOT use this car seat if it has been in a crash. (There may be
hidden damage and it must be replaced). Your insurance company
may provide some assistance replacing this car seat.
• DO NOT use this car seat if it is damaged in any way or has missing
parts.
• STOP USING THIS car seat AND PROPERLY DISPOSE after the
date on the back of the seat. PROPERLY DISPOSE in a dark trash
bag. DO NOT sell to a thrift or consignment shop, at garage sales or
eamarkets.
• NEVER use this car seat in the home, on boats, in a motor home with
side facing seat, low speed vehicles, golf carts, all terrain or other
noncertieduses.OnlyusethecarseatinVehiclesandAircraft.
• NEVER use this car seat in any vehicle seating position equipped
with an active air bag. Read your vehicle’s owners manual to see
how to turn off your airbag if you have no back seat or a child must
ride in the front seat covers. For side airbags see section
4.1 (Page 11).

5 6
Copyright © 2020, Baby Trend, Inc.Copyright © 2020, Baby Trend, Inc.
2.3 Belt Positioning Booster seat requirements
• Parents are advised that children should use a child restraint with a
built-in harness system until they exceed the weight or height limits
speciedbythemanufacturer.
Weight and Height Requirements:
This car seat, installed a Belt Positioning Booster
is designed for use by children whose:
- Age is 4 years or older, and
- Weight is between 40 and 100 lbs
(18.1 and 45 kg), and
- Height is between 44 and 57 inches (112 and 145 cm).
The American Academy of Pediatrics and Baby Trend recommend
children remain in a rear-facing car seat for as long as possible,
until they reach the highest weight or height allowed by their seat.
2.1 Convertible Rear facing seat requirements
Weight and Height Requirements:
• The car seat, in a rear facing position
(Fig. 5a) is designed for use by
children whose:
- Weight is between 4 and 40 lbs
(1.81 and 18.14 kg), and
- Top of head has NOT reached 1”
from top of seatback (Fig. 5b).
Child MUST meet BOTH of these
requirements to use this car seat
rear facing.
Fig. 5a
Fig. 6a
Fig. 6b
Fig. 5b
Fig. 5b
Top Ears Max Height
Premie Infant
Toddler
- Height is 50 inches (127 cm) or less.
- Age is 1 year old.
- The top of the child’s ears must be at
or below the top of the car seat
(Fig. 6a).
Child MUST meet ALL of these
requirements to use the car seat
forward facing.
2.0 Use Recommendations 2.0 Use Recommendations
2.2 Forward facing seat requirements
with Harness
Weight and Height Requirements:
• This car seat, installed in a forward facing
position, is designed for use by children whose:
- Weight is between 23 and 65 lbs (10.43 kg and
29.48 kg), and
1in. (2.54 cm)

7 8
Copyright © 2020, Baby Trend, Inc.Copyright © 2020, Baby Trend, Inc.
3
4
5
6
7
1
Headrest
Head pillow
Harness
Body insert
Webbing Twist
Indicator Stripe
Seat pad
Harness
Covers
Harness
Slots x 7
Splitter Plate
Flip Foot
Lower Anchor
Storage
Rear Facing
Recline
indicator
Chest clip
5-point harness
buckle
Cup holder
Harness tension
adjuster
Lower anchor
J-hook connectors
Lower anchor
J-hook connectors
Forward
Facing
Belt Path
Rear Facing
Belt Path
3.0 Car Seat Parts 3.0 Car Seat Parts
Canopy
Adjustments
Top Tether
Lower Anchor
Storage
Top Tether
Head pillow
strap
Recline handle

9 10
Copyright © 2020, Baby Trend, Inc.Copyright © 2020, Baby Trend, Inc.
DEATH or SERIOUS INJURY can occur:
• IMPROPER PLACEMENT OF THE CAR SEAT
INCREASES THE RISK OF SERIOUS INJURY OR DEATH.
4.0 Selecting a Vehicle Seating Location 4.0 Selecting a Vehicle Seating Location
WARNING!
• Not every location within an vehicle may be safe for the
installation of this car seat. Car seat must be tightly secured and
remain tightly securedat all time. Some vehicles have no seating
position installation of a car seat. Improper placement or use of
a car seat that is not tightly secured in a vehicle will increase the
risk of death or serious injury.
• Please follow the instructions in this manual and in your
vehicle owner’s manual carefully to ensure proper location and
installation of the car seat. If you are uncertain about the proper
location of the car seat within the vehicle, contact your vehicle
manufacturer directly or through their dealer before using the
car seat. You are also invited to call Baby Trend at
1-800-328-7363 for additional information or assistance.
WARNING!
4.1 Overall Considerations in Selecting a Location
• According to accident statistics, children are safer when properly
restrained in rear vehicle seating positions, rather than front seating
positions.
Whenever possible, this car seat
should be secured in the rear center,
seating position. The rear seat directly
behind the front seats NOT in a third
row rear seat (Fig. 10a).
Fig. 10a
Fig. 10b
Fig. 10c
• ONLY place in a forward-facing vehicle seat.
DO NOT place this car seat in any vehicle
seat that faces to the rear (Fig. 10b).
• DO NOT place this car seat in any vehicle seat
that faces to either side of the vehicle
(Fig. 10c).
• We recommend that you use the center rear
seat position as the safest location for the car
seat. In addition, whenever possible, have an
adult ride in the rear with the child in order to
monitor the child.
NOTE: LATCH system may not be available
in the center rear seat position. Install with a
vehicle seat belt if LATCH is not available.
• If the driver is the only adult in the vehicle and the child requires
constant monitoring, then a vehicle front seating position may be
used if there is no passenger side Active Frontal Air bag and all of
the following requirements are met for this location.

11 12
Copyright © 2020, Baby Trend, Inc.Copyright © 2020, Baby Trend, Inc.
4.0 Selecting a Vehicle Seating Location 4.0 Selecting a Vehicle Seating Location
4.2
Check that the Vehicle Seat Meets the Following Requirements
DO NOT place rear-facing child seat
on front seat with active frontal air
bag. DEATH OR SERIOUS INJURY
can occur. The back seat is the safest
place for children 12 and under.
WARNING!
• NEVER place this car seat in a vehicle seating location that has an
ActiveFrontalAirBag!ActiveAirBagsinatewithgreatforce!An
inatingAirBagcanstrikeacarseatwithenoughforcetocause
death or serious injury to your child. If your vehicle is equipped with
a front passenger side active air bag, please refer to the vehicle’s
owner’s manual for additional information about active air bags and
child car seat installation.
• DO NOT use this car seat in a vehicle that has a vehicle seatback
that does not lock into place. A seatback that folds forward must
havealatchorlockingmechanismtopreventitfromyingforward
and striking the child in a sudden stop or accident.
• Please review your vehicle owner’s manual to determine the best
location for the car seat or to determine if any locations are unsafe
for car seat installation. If you do not have the vehicle owner’s
manual or the owner’s manual does not address child car seat
installation, please contact the vehicle manufacturer to obtain this
information before using this car seat.
VEHICLE SEAT BELT REQUIREMENTS
Even newer vehicles can have seat belts systems that are NOT safe
for use with the car seat. These systems may look safe but their
method of operation precludes their use with the car seat. If you are
unsure if the vehicle seat belt is safe for use with the car seat, check
the vehicle owner’s manual or contact the vehicle manufacturer, or
your vehicle dealer for additional information.
4.3 SAFE Vehicle Seat Belt Systems
The following vehicle seat belt systems CAN BE USED with the
car seat provided that all of the other requirements prescribed in
these instructions, including seat position, secure installation and all
instructions provided by your vehicle owner’s manual, are followed.
DEATH or SERIOUS INJURY can occur:
• THE CAR SEAT MUST BE TIGHTLY SECURED BY THE
VEHICLE SEAT BELT AT ALL TIMES. A VARIETY OF VEHICLE
SEAT BELT SYSTEMS ARE AVAILABLE IN VEHICLES. SOME
OF THESE VEHICLE SEAT BELT SYSTEMS ARE NOT SAFE
FOR USE WITH THE CAR SEAT.
WARNING!

13 14
Copyright © 2020, Baby Trend, Inc.Copyright © 2020, Baby Trend, Inc.
4.0 Selecting a Vehicle Seating Location
Lap Belts (Manually Adjusted) A lap belt
that is manually adjusted and will remain
tightly adjusted around the car seat while
the vehicle is in motion is suitable for use
with the car seat. Pulling the belt through
the buckle after the buckle is fastened
tightens this type of seat belt (Fig.13a).
Lap Belts with Automatic Locking
Retractor (ALR) A lap belt that cannot be
lengthened once it is fastened is suitable
for use with the car seat. These seat
belts often have an automatic locking
retractor (ALR) that will allow the belt to
be lengthened but once fastened, must
be unbuckled and allowed to retract fully
before allowing the belt to be lengthened
again (Fig. 13b).
Combination Lap/Shoulder Belt with
Locking Latch Plate A lap/shoulder
combination seat belt with a latch plate that
locks the lap belt into position is suitable for
use with the car seat (Fig. 13c). Once this
type of seat belt is fastened, the latch plate
prevents the lap belt from loosening. This
combination seat belt does not require a
Locking Clip.
Combination Lap/Shoulder
Belt with Sliding Latch Plate A
combination lap/shoulder belt with
a latch plate that can slide freely
along the belt (Fig. 14a), is suitable
for use with this car seat when the
belt is locked to prevent movement
of the car seat. If the vehicle belt
includes a lockable retractor, the
retractor MUST be locked or a
locking clip MUST be used. If the
vehicle belt does not include a
lockable retractor then a locking clip
(Fig. 14b), MUST always be used.
Please refer to the vehicle owner’s
manual to determine if your
vehicle lap/shoulder belt includes
a lockable retractor and how to
lock it.
Fig. 13a
Fig. 13b
Fig. 13c
Locking clip
Fig. 14a
Fig. 14b
4.0 Selecting a Vehicle Seating Location

15 16
Copyright © 2020, Baby Trend, Inc.Copyright © 2020, Baby Trend, Inc.
4.0 Selecting a Vehicle Seating Location
Fig. 15a
Fig. 16a
Fig. 16b
Fig. 15b
1.25 cm (1/2”)
4.4 Locking Clip Installation
Storage for the Locking Clip is provided on the
backside of the car seat base (Fig. 15a). Contact
Baby Trend
®
1-800-328-7263 to acquire an
approved Locking Clip.
Test installation to make sure car seat is secure. If NOT
secure, additional belt tightening is required. Repeat steps
above until secure.
1. Route the combination lap shoulder belt
through vehicle belt path on car seat and
buckle vehicle seat belt.
2. Tighten the buckled seat belt by pulling
upward on the shoulder belt while pushing
down on the car seat.
3. While maintaining downward pressure on
the car seat, squeeze the vehicle shoulder
belt and lap belt together just above the
buckle to prevent it from moving. Unbuckle
the vehicle seat belt, being careful to
prevent movement of the buckle.
4. Secure the vehicle shoulder belt to the lap
belt by using the Locking Clip 1.25 cm (1/2”)
from the buckle (Fig. 15b).
5. Re-buckle the seat belt and check that the
seat belt is tightly adjusted and stays tight.
Ensure that locking clip is secure on both
belts.
4.5 UNSAFE Vehicle Seat Belt Systems
DO NOT use the following types of seat belt systems with the car seat.
These belt systems will not hold the car seat securely in place at all
times. In addition, a Locking Clip used with this car seat will NOT make
these belt systems safe to use. NEVER USE unsafe vehicle belts
systems!
NOTE: LATCH can be used IN PLACE OF the
following unsafe vehicle seat belts systems if
your vehicle is equipped with LATCH anchorage
system.
Lap Belts with Emergency Locking Retractor
(ELR) DO NOT use a lap belt that stays
loose after installed and locks only in a crash
or sudden stop. These lap belts utilize an
Emergency Locking Retractor (ELR) and are
often found in combination with motorized
shoulder belts. Because these belts will allow
the car seat to move about on the vehicle
seat, the chance of the car seat being out of
the proper position in a crash is very high.
Accordingly, DO NOT use the car seat with
this type of seat belt system. Please see
your vehicle’s dealer or owner’s manual for
information on converting this seat belt system
to one that is acceptable for use with a car
seat (Fig. 16a).
Combination Lap/Shoulder Belt with Retractor
DO NOT use a lap/shoulder belt system if the lap belt and shoulder belt
each have retractors at one end. This type of seat belt system will not
adequately restrain the car seat (Fig. 16b).
4.0 Selecting a Vehicle Seating Location
3
4
5
6
7

17 18
Copyright © 2020, Baby Trend, Inc.Copyright © 2020, Baby Trend, Inc.
4.0 Selecting a Vehicle Seating Location 4.0 Selecting a Vehicle Seating Location
Passive Restraint – Lap or Shoulder
Belt Mounted on Door DO NOT use a
seat belt that is connected to the door in
any way. These types of seat belts are
designed to automatically surround the
occupant when the door is closed. This
type of seat belt will NOT adequately
restrain the car seat (Fig. 17a).
Passive Restraint – Lap Belt with
Motorized Shoulder Belt DO NOT
use a shoulder belt that moves along a
track. These systems typically move to
surround the occupant when the door is
closed. This type of belt system will
NOT adequately restrain the car seat
(Fig. 17b).
Lap Belts Forward of Seat Crease DO
NOT use a seat belt that is anchored
on the seat more than 2 inches forward
of the crease between the seat bottom
and the seatback. This type of seat belt
anchors the car seat too far forward and
the car seat will not be safely restrained
in the vehicle (Fig. 17c).
Fig. 17a
Fig. 17b
Fig. 17c
4.6 Preparation for Installation in Vehicle
When available, LATCH is the recommended method of securing the
car seat in the vehicle.
DEATH or SERIOUS INJURY can occur:
• FAILURE TO PROPERLY SECURE THE CAR SEAT IN YOUR
VEHICLE INCREASES THE RISK OF SERIOUS INJURY OR
DEATH IN THE EVENT OF A SUDDEN STOP, SHARP TURN
OR CRASH.
•NationalHighwayTrafcSafetyAdministration(NHTSA)alerts
vehicle owners that, according to accident statistics, children
under age 13 are safer when properly restrained in the rear
seating positions rather than in front seating positions.
• Use car seats in a vehicle’s rear seat location
whenever possible.
1. Park your vehicle on a level surface so that the Seat Angle Indicator
located on the left side of the car seat will properly indicate the proper
angle of recline of the seat.
2. Make sure you have selected an acceptable location for the car seat
as instructed in Section 4.0 Selecting A Vehicle Seat Location.

19 20
Copyright © 2020, Baby Trend, Inc.Copyright © 2020, Baby Trend, Inc.
4.0 Selecting a Vehicle Seating Location
3. Check again for any active frontal air bags. DO NOT use a location
that has an active frontal air bag or is adjacent to an Active Air bag
such that, when deployed, the Active Air bag may come into contact
with the car seat. Many passenger side frontal air bags are designed
to deploy to protect the passenger side as well as the center front
seating position. Please see the active air bag warnings in your
vehicle owner’s manual to help determine unsafe locations in the
vehicle.
4. If the front seat position is used, slide the vehicle seat as far to the
rear as possible to prevent the car seat from striking the dash in a
crash. If the rear seat position is used, slide the vehicle seat directly
in front of the car seat forward enough to prevent the car seat from
striking the vehicle seatback in a crash.
4.7 Preparation for Installation with LATCH
Consult your vehicle owner’s manual or manufacturer for
location and availability of LATCH anchor points.
NOT all vehicles have the same locations or maximum weight
requirements for LATCH!
4.8 LATCH - Top Tether Anchor Locations
Top Tether Locations are indicated
by the following symbol:
LATCH Top Tether symbol:
Consult your vehicle owner’s manual for your vehicle’s exact
LATCH locations, anchor identication and usage requirements.
Maximum Child Weight for LATCH:
Lower Anchor 45 lbs (20.5 kg),
Top Tether 65 lbs (29.48 kg).
Vehicle LATCH Top Tether locations may vary:
Ceiling mount
Rear Package Shelf
Pick up truck
Vehicle with reinforced seats
Floor Mounts
Lower Anchor
Point Locations
4.0 Selecting a Vehicle Seating Location

21 22
Copyright © 2020, Baby Trend, Inc.Copyright © 2020, Baby Trend, Inc.
5.1 Child Placement in The Car Seat - Internal Harness Mode
5.0 Installation and Use Internal Harness Mode 5.0 Installation and Use Internal Harness Mode
1.Placechildinthecarseatwiththechild’sbackatagainsttheback
of the car seat and the child’s bottom touching the seat.
2. Place harness straps over the child’s shoulders.
NOTE: Check the height of the harness straps at the child’s
shoulders.
3. Place the crotch buckle in appropriate position. See section 5.25
page 69.
4. Insert the buckle tongues into the crotch buckle.
NOTE: Pull up and test buckle tongues to be sure they are secure.
5. Place chest clip at arm pit level. Insert chest clip tab and press
together. Pull outward on chest clip’s ends to be sure it is secure.
6. Pull on harness adjuster to tighten harness straps. A snug strap
should not allow any slack. It lies in a relatively straight line without
sagging. It does not press on to the child’s skin or push the child’s
body into an unnatural position.
The American Academy of Pediatrics and Baby Trend recommend
children remain in a rear-facing car seat as long as possible, until
they reach the highest weight or height allowed by their seat.
DEATH or SERIOUS INJURY can occur:
• Use only in a rear facing position when using the car seat with an
infant weighing less than 22 lbs. (9.97kg).
• Use only with children who weigh between 4 - 65 lbs.
(1.81 - 29.48 kg) and whose height is 50 inches (127 cm) or less.
Forward facing 1 year and 23 - 65 lbs. (10.43 - 29.48 kg).
• Snugly adjust the belts (Harness) provided with the car seat
around your child. Snug means you can not pinch webbing
once buckled.
• Secure the top anchorage strap provided with this car seat.
• Secure this child seat with the vehicle’s child restraint Anchorage
system (LATCH) if available or with a lap/shoulder belt.
• Follow all instructions on the car seat and in the written
instructions located under the cover. Do not use without
instructions. Call 1-800-328-7363 to obtain instructions.
• Use vehicles seat belt (not LATCH) for children weighing more
than 45 lbs (20.4 kg).
• Register your car seat with Baby Trend.
• DO NOT place rear facing child seat in a front seat that has an
active airbag.
• NEVER leave child unattended under any circumstance.
• DO NOT use the lower anchors of the child restraint anchorage
system (LATCH system) to attach this child restraint when
restraining a child weighing more than 45 lbs (20.4 kg).

23 24
Copyright © 2020, Baby Trend, Inc.Copyright © 2020, Baby Trend, Inc.
5.1.1 Installation Diagrams
Lap belt
Lap/Shoulder belt
Lower anchor (LATCH)
Routing paths for Forward Facing installation
Lap belt with
top tether
Lap/Shoulder belt
with top tether
Latch Lower anchor
with top tether
• Never use a Top Tether connector in a
rear facing installation!!
WARNING!
5.2 Rear Facing Lap/Shoulder Belt Installation
See section 2.1 for requirements
• Weight is 4 - 40 lbs (1.81 - 18.14 kg).
• Height 1” from top of seatback.
1.Extendtheipfootintopositionand
ensure lock is engaged. To adjust the
angle of the seat lift the recline handle.
Use positions 1-3 for Rear facing
(Fig 24a).
Angling the car seat will keep the
baby’s head back and airway open.
2. Make sure vehicle is parked on level ground then, place the car seat
in a rear seating position and ensure vehicle is level.
1
2
3
4
5
Lap Shoulder belt
Fig. 24a
1
2
3
4
5
1
2
2
3
4
5
Routing paths for Rear Facing installation
5.0 Installation and Use Internal Harness Mode 5.0 Installation and Use Internal Harness Mode

25 26
Copyright © 2020, Baby Trend, Inc.Copyright © 2020, Baby Trend, Inc.
3. Locate rear facing belt path openings
(Fig. 25a).
4. Remove both cup holders by pressing
the retention tab and set to the side
(Fig. 25b).
5. Pull the seat fabric back and route Lap
Belt through the rear facing belt paths.
NOTE: Remove any twist in webbing to
ensurethewebbingliesatforsecuring
the car seat to the vehicle (Fig. 25c).
6. Insert the lap/shoulder belt buckle tongue
into the buckle. Place your hand in the
seat and push down on the seat while
pulling up the lap/shoulder belt to tighten
(Fig. 25d).
1
2
3
4
Fig. 25a
Fig. 25b
Fig. 25c
Fig. 25d
1
2
3
4
5
7. Pull up on buckle to ensure the
buckle is secure.
NOTE: Refer to the vehicle
owner’s manual to determine if
your vehicle lap/shoulder belt
includes a lockable retractor and
how to lock it.
8. Reinstall the cup holders. Please
note LH or RH on bottom of
cupholder. LH or RH refers to
child’s right and left (Fig. 26a).
9. Pull seat fabric back over each cup
holder (Fig. 26b), and then front of
seat to secure (Fig. 26c).
Fig. 26a
Fig. 26b
Fig. 26c
1
2
3
4
5
1
2
3
4
5
5.0 Installation and Use Internal Harness Mode 5.0 Installation and Use Internal Harness Mode

27 28
Copyright © 2020, Baby Trend, Inc.Copyright © 2020, Baby Trend, Inc.
Fig. 28a
5.3 Rear Facing Lap Belt Installation
See section 2.1 for requirements
• Weight is 4 - 40 lbs (1.81 - 18.14 kg).
• Height 1” from top of seatback.
1.Extendtheipfootintopositionand
ensure lock is engaged. To adjust
the angle of the seat lift the recline
handle. Use positions 1-3 for Rear
facing (Fig. 28a).
Angling the car seat will keep the
baby’s head back and airway open.
Lap belt
2. Make sure vehicle is parked on level ground then, place the car seat
in a rear seating position and ensure vehicle is level.
1
2
3
4
5
1
2
3
4
5
1
2
2
3
4
5
10. Ensure the angle indicator bubble is
centered between the lines for children
4-22 lbs. (1.81 - 9.97 kg) to keep the
child’s airway open. Ensure the angle
indicator line is level with the ground for
children 23-40 lbs (10.43 - 18.14 kg) to
keep the child’s airway open (Fig. 27a).
11. Check for movement of the car seat at
the safety belt path. The car seat should
not move more than 1 inch in any
direction. If the car seat moves more
than 1 inch, repeat all steps until all
safety steps are met (Fig. 27b).
Fig. 27a
L
e
v
e
l
t
h
i
s
l
i
n
e
w
i
t
h
t
h
e
g
r
o
u
n
d
f
o
r
c
h
i
l
d
r
e
n
g
r
e
a
t
e
r
t
h
a
n
2
2
l
b
s
.
(
1
0
k
g
)
Center bubble for
children4
-
22 lbs.
CV0107052419
Fig. 27b
Fig. 27c
Lap Shoulder
belt
12. Place child in seat and secure harness.
Recheckangleindicatortoconrmthe
angle with the appropriate indicator
by weight.
13. Harness Covers, Head Pillow & Body
insert Usage (Fig. 27c).
• DO NOT use head pillow if child’s head
falls forward.
• DO NOT use head pillow above shoulder
position 3.
• ONLY use the body insert with children
who weigh between 4-18 lbs.
• Rear facing use only.
14. Repeat steps if necessary, after securing child.
5.0 Installation and Use Internal Harness Mode 5.0 Installation and Use Internal Harness Mode

29 30
Copyright © 2020, Baby Trend, Inc.Copyright © 2020, Baby Trend, Inc.
3. Locate rear facing belt path openings
(Fig. 29a).
4. Remove cup holder by pressing the
retention tab and set to the side (Fig. 29b).
5. Pull the seat fabric back and route Lap Belt
through the rear facing belt paths.
NOTE: Remove any twist in webbing to
ensurethewebbingliesatforsecuringthe
car seat to the vehicle (Fig. 29c).
6. Insert the lap belt buckle tongue into the
buckle. Place your hand in the seat and
push down on the seat while pulling up the
lap belt to tighten (Fig. 29d).
7. Pull up on buckle to ensure the
buckle is secure.
8. Reinstall cup holder. Please note
LH or RH on bottom of cupholder.
LH or RH refers to child’s right and
left (Fig. 30a).
9. Pull seat fabric back over each cup
holder (Fig. 30b), and then front of
seat to secure (Fig. 30c).
1
2
3
4
5
1
2
3
4
5
1
2
3
4
Fig. 29a
Fig. 29b
Fig. 29c
Fig. 29d
1
2
3
4
5
Fig.30a
Fig. 30b
Fig.30c
5.0 Installation and Use Internal Harness Mode 5.0 Installation and Use Internal Harness Mode

31 32
Copyright © 2020, Baby Trend, Inc.Copyright © 2020, Baby Trend, Inc.
5.4 Rear Facing Installation with LATCH Lower Anchor
Requirements. See section 2.1:
• Weight is 4 - 40 lbs (1.81 - 18.14kg).
• Height 1” from top of seatback.
Place this car seat in a rear seating position designated as LATCH Lower
Anchor compatible. Refer to your vehicle owner’s manual for LATCH locations.
1.Extendtheipfootintopositionandensure
lock is engaged. To adjust the angle of the
seat lift the recline handle. Use positions 1-3
for Rear facing (Fig. 32a).
Angling the car seat will keep the baby’s head
back and airway open.
2. Make sure vehicle is parked on level ground then, place the car seat
in a rear seating position and ensure vehicle is level.
Fig. 32a
10. Ensure the angle indicator bubble is
centered between the lines for children
4-22 lbs. (1.81 - 9.97 kg) to keep the
child’s airway open. Ensure the angle
indicator line is level with the ground for
children 23-40 lbs (10.43 - 18.14 kg) to
keep the child’s airway open (Fig. 31a).
11. Check for movement of the car seat
at the safety belt path. The car seat
should not move more than 1 inch in
any direction. If the car seat moves
more than 1 inch, repeat all steps until
all safety steps are met (Fig. 31b).
12. Place child in seat and secure harness.
Recheckangleindicatortoconrmthe
angle with the appropriate indicator
by weight.
13. Repeat steps if necessary, after
securing child.
Fig. 31a
Fig. 31b
L
e
v
e
l
t
h
i
s
l
i
n
e
w
i
t
h
t
h
e
g
r
o
u
n
d
f
o
r
c
h
i
l
d
r
e
n
g
r
e
a
t
e
r
t
h
a
n
2
2
l
b
s
.
(
1
0
k
g
)
Center bubble for
children4
-
22 lbs.
CV0107052419
LATCH
Lower Anchor
1
2
3
4
5
1
2
2
3
4
5
1
2
3
4
5
Lap Belt
5.0 Installation and Use Internal Harness Mode 5.0 Installation and Use Internal Harness Mode

33 34
Copyright © 2020, Baby Trend, Inc.Copyright © 2020, Baby Trend, Inc.
3. Locate rear facing belt path openings
(Fig. 33a).
4. Remove both cup holders by pressing
the retention tab and set to the side
(Fig. 33b).
5. Pull the seat fabric back and route
LATCH Lower Anchor J-Hook connector
through the rear facing belt paths.
NOTE: Remove any twist in webbing to
ensurethewebbingliesatforsecuring
the car seat to the vehicle (Fig. 33c).
6. Attach the lower J-hook connector to the
vehicle anchor used for LATCH. Place
your hand in the seat and push down
while pulling on the free end of Lower
Anchor J-Hook to tighten (Fig. 33d).
Fig. 33a
Fig. 33b
Fig. 33c
Fig. 33d
1
2
3
4
1
2
3
4
5
7. Pull up on each Lower Anchor J-Hook
connector to ensure the lower anchor
j-hook is securely fastened.
8. Reinstall the cup holders. Please note LH
or RH on bottom of cupholder. LH or RH
refers to child’s right and left (Fig. 34a).
9. Pull seat fabric back over each cup holder
(Fig. 34b), and then front of seat to secure
(Fig. 34c).
1
2
3
4
5
1
2
3
4
5
Fig.34a
Fig. 34b
Fig.34c
5.0 Installation and Use Internal Harness Mode 5.0 Installation and Use Internal Harness Mode

35 36
Copyright © 2020, Baby Trend, Inc.Copyright © 2020, Baby Trend, Inc.
See section 2.2 for requirements
• Weight is 23 - 65 lbs (10.43 - 29.48 kg).
• Height is 50 inches (127 cm) or less.
• Age is 1 year old.
1. Place this car seat in a rear seating
position. Always adjust the base to position
5 or 4 (Fig. 36a) when forward facing.
NEVER use base position 1, 2 or 3 in a
forward-facing position.
DO NOT extendipfootoutwhilein
Forward Facing position.
10. Ensure the angle indicator bubble is
centered between the lines for children
4-22 lbs. (1.81 - 9.97 kg) to keep the
child’s airway open. Ensure the angle
indicator line is level with the ground for
children 23-40 lbs (10.43 - 18.14 kg) to
keep the child’s airway open (Fig. 35a).
11. Check for movement of the car seat
at the safety belt path. The car seat
should not move more than 1 inch in
any direction. If the car seat moves
more than 1 inch, repeat all steps until
all safety steps are met (Fig. 351b).
12. Place child in seat and secure harness.
Recheckangleindicatortoconrmthe
angle with the appropriate indicator
by weight.
13. Repeat steps if necessary, after
securing child.
Fig. 35 a
Fig. 35b
L
e
v
e
l
t
h
i
s
l
i
n
e
w
i
t
h
t
h
e
g
r
o
u
n
d
f
o
r
c
h
i
l
d
r
e
n
g
r
e
a
t
e
r
t
h
a
n
2
2
l
b
s
.
(
1
0
k
g
)
Center bubble for
children4
-
22 lbs.
CV0107052419
5.5 Forward Facing Installation with Lap Belt
2. Make sure vehicle is parked on level ground then, place the car seat
in a rear seating position and ensure vehicle is level.
Lap Belt with
Top tether
5
3
1
2
4
Fig.36a
5.0 Installation and Use Internal Harness Mode 5.0 Installation and Use Internal Harness Mode

37 38
Copyright © 2020, Baby Trend, Inc.Copyright © 2020, Baby Trend, Inc.
3. Remove body insert and head pillow
and store for later rear-facing use
(Fig. 37a).
4. Locate forward facing belt path
openings (Fig. 37b).
5. Loosen harness by pressing the center
Tension adjuster and pulling on harness
(Fig. 37c).
6. Lift seat fabric seat-back to expose the
forward-facing belt path (Fig. 37d).
7. Route Lap Belt through the forward-
facing belt path.
Body Insert Head Pillow
Fig. 37b
Fig. 37c
Fig. 37d
Fig. 37a
NOTE: Remove any twist in webbing to
ensurethewebbingliesatforsecuring
the car seat to the vehicle (Fig. 38a).
8. Insert the lap belt buckle tongue into
the buckle. Place your hand or knee
in the seat and push down on the seat
while pulling up the lap belt to tighten
(Fig. 38b). Pull excess webbing at
buckle tongue to tighten.
9. Pull up on buckle as to ensure the
buckle is secure.
10. Lower seat fabric seat-back and press
into position against the seat back
(Fig. 38c).
Fig.38a
Fig.38b
Fig. 38c
(1)
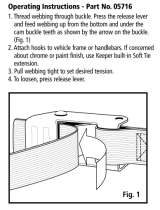
(2)
5.0 Installation and Use Internal Harness Mode 5.0 Installation and Use Internal Harness Mode
/