Bosch MUM 57830 Owner's manual

Category
Blenders
Type
Owner's manual

This manual is also suitable for

MUM57...
Home Professional
de Deutsch . . . . . . . . . . . . . . . . . . . . . . . . . . . . . . . . . . . . . . . . . . . . . . . . . . . . . . . . . . . 3
en English . . . . . . . . . . . . . . . . . . . . . . . . . . . . . . . . . . . . . . . . . . . . . . . . . . . . . . . . . . . .16
fr Français . . . . . . . . . . . . . . . . . . . . . . . . . . . . . . . . . . . . . . . . . . . . . . . . . . . . . . . . . . .29
it Italiano . . . . . . . . . . . . . . . . . . . . . . . . . . . . . . . . . . . . . . . . . . . . . . . . . . . . . . . . . . . . 43
nl Nederlands . . . . . . . . . . . . . . . . . . . . . . . . . . . . . . . . . . . . . . . . . . . . . . . . . . . . . . . . . 56
sv Svenska . . . . . . . . . . . . . . . . . . . . . . . . . . . . . . . . . . . . . . . . . . . . . . . . . . . . . . . . . . . 69
fi Suomi . . . . . . . . . . . . . . . . . . . . . . . . . . . . . . . . . . . . . . . . . . . . . . . . . . . . . . . . . . . . .82
da Dansk . . . . . . . . . . . . . . . . . . . . . . . . . . . . . . . . . . . . . . . . . . . . . . . . . . . . . . . . . . . . .95
no Norsk. . . . . . . . . . . . . . . . . . . . . . . . . . . . . . . . . . . . . . . . . . . . . . . . . . . . . . . . . . . . .108
es Español. . . . . . . . . . . . . . . . . . . . . . . . . . . . . . . . . . . . . . . . . . . . . . . . . . . . . . . . . . . 121
pt Português. . . . . . . . . . . . . . . . . . . . . . . . . . . . . . . . . . . . . . . . . . . . . . . . . . . . . . . . . 136
el ÅëëçíéêÜ . . . . . . . . . . . . . . . . . . . . . . . . . . . . . . . . . . . . . . . . . . . . . . . . . . . . . . . . . . 149
tr Türkçe. . . . . . . . . . . . . . . . . . . . . . . . . . . . . . . . . . . . . . . . . . . . . . . . . . . . . . . . . . . . 165
ru Pºcc®å¼ . . . . . . . . . . . . . . . . . . . . . . . . . . . . . . . . . . . . . . . . . . . . . . . . . . . . . . . . . . 181
. . . . . . . . . . . . . . . . . . . . . . . . . . . . . . . . . . . . . . . . . . . . . . . . . . . .
Robert Bosch Hausgeräte GmbH 3
Inhalt
Zu Ihrer Sicherheit . . . . . . . . . . . . . . . . . . . 3
Auf einen Blick . . . . . . . . . . . . . . . . . . . . . 6
Bedienen . . . . . . . . . . . . . . . . . . . . . . . . . 7
Reinigen und Pflegen . . . . . . . . . . . . . . . . 10
Aufbewahrung . . . . . . . . . . . . . . . . . . . . . 11
Hilfe bei Störungen . . . . . . . . . . . . . . . . . . 11
Anwendungsbeispiele . . . . . . . . . . . . . . . . 12
Entsorgung . . . . . . . . . . . . . . . . . . . . . . . . 13
Garantiebedingungen . . . . . . . . . . . . . . . . 13
Sonderzubehör . . . . . . . . . . . . . . . . . . . . . 14
Zu Ihrer Sicherheit
Lesen Sie diese Anleitung sorgfältig vor dem Gebrauch, um
wichtige Sicherheits- und Bedienhinweise für dieses Gerät zu
erhalten.
Das Nichtbeachten der Anweisungen für die richtige Anwendung des
Gerätes schließt eine Haftung des Herstellers für daraus resultierende
Schäden aus.
Dieses Gerät ist für die Verarbeitung haushaltsüblicher Mengen im Haushalt
oder in haushaltsähnlichen, nicht-gewerblichen Anwendungen bestimmt.
Haushaltsähnliche Anwendungen umfassen z. B. die Verwendung in
Mitarbeiterküchen von Läden, Büros, landwirtschaftlichen und anderen
gewerblichen Betrieben, sowie die Nutzung durch Gäste von Pensionen,
kleinen Hotels und ähnlichen Wohneinrichtungen. Gerät nur für
haushaltsübliche Verarbeitungsmengen und -zeiten benutzen. Zulässige
Höchstmengen (siehe „Anwendungsbeispiele“) nicht überschreiten!
Dieses Gerät ist zum Rühren, Kneten und Schlagen von Lebensmitteln
geeignet. Es darf nicht zur Verarbeitung von anderen Gegenständen bzw.
Substanzen benutzt werden. Bei Verwendung des vom Hersteller
zugelassenem Zubehör sind weitere Anwendungen möglich.
Das Gerät nur mit Originalzubehör benutzen. Bei Gebrauch des Zubehörs
die beigelegten Gebrauchsanleitungen beachten.
Gebrauchsanleitung bitte aufbewahren. Bei Weitergabe des Gerätes
an Dritte Gebrauchsanleitung mitgeben.
, Generelle Sicherheitshinweise
Stromschlag-Gefahr
Dieses Gerät darf von Kindern nicht benutzt werden.
Das Gerät und seine Anschlussleitung ist von Kinder fernzuhalten.
Geräte können von Personen mit reduzierten physischen, sensorischen
oder mentalen Fähigkeiten oder Mangel an Erfahrung und Wissen
benutzt werden, wenn sie beaufsichtigt werden oder bezüglich des
de
eÉêòäáÅÜÉå=däÅâïìåëÅÜ=òìã=h~ìÑ=fÜêÉë=
åÉìÉå=dÉê®íÉë=~ìë=ÇÉã=e~ìëÉ=_lp`eK
a~ãáí=Ü~ÄÉå=páÉ=ëáÅÜ=Ñê=Éáå=ãçÇÉêåÉëI=
ÜçÅÜïÉêíáÖÉë=e~ìëÜ~äíëÖÉê®í=ÉåíëÅÜáÉÇÉåK
tÉáíÉêÉ= fåÑçêã~íáçåÉå= òì= ìåëÉêÉå= mêçÇìâíÉå=
ÑáåÇÉå=páÉ=~ìÑ=ìåëÉêÉê=fåíÉêåÉíëÉáíÉK
10 Robert Bosch Hausgeräte GmbH
Durchlaufschnitzler wie in Bild -8 gezeigt
auf den Antrieb setzen und im Uhrzeigersinn
bis zum Anschlag drehen.
Drehschalter auf empfohlene Stufe stellen.
Zu verarbeitende Lebensmittel in den
Einfüllschacht geben und mit dem Stopfer
nachschieben.
^ÅÜíìåÖ>
báåÉå=oÅâëí~ì=ÇÉë=pÅÜåÉáÇÖìíÉë=áå=ÇÉê=
^ìëä~ëëÑÑåìåÖ=îÉêãÉáÇÉåK
Tipp: Für gleichmäßige Schneidergebnisse
dünnes Schnittgut bundweise verarbeiten.
Hinweis: Sollten zu verarbeitende Lebensmittel
im Durchlaufschnitzler festklemmen, Küchen-
maschine ausschalten, Netzstecker ziehen,
Stillstand des Antriebes abwarten, Deckel des
Durchlaufschnitzlers abnehmen und
Einfüllschacht entleeren.
Nach der Arbeit
Gerät am Drehschalter ausschalten.
Durchlaufschnitzler gegen den Uhrzeigersinn
drehen und abnehmen.
Deckel gegen den Uhrzeigersinn drehen und
abnehmen.
Scheibenträger mit Scheibe entnehmen.
Dazu mit dem Finger von unten gegen die
Antriebswelle drücken (Bild
).
Teile reinigen.
Mixer
^ÅÜíìåÖ>
jáñÉê=â~åå=ÄÉëÅÜ®ÇáÖí=ïÉêÇÉåK=hÉáåÉ=íáÉÑJ
ÖÉÑêçêÉåÉå=wìí~íÉå=E~ìëÖÉåçããÉå=báëïêÑÉäF=
îÉê~êÄÉáíÉåK=jáñÉê=åáÅÜí=äÉÉê=ÄÉíêÉáÄÉåK
Arbeiten mit dem Mixer Bild
Entriegelungsknopf drücken und
Schwenkarm in Position 4 bringen.
Mixerantriebsschutzdeckel abnehmen.
Mixbecher aufsetzen (Markierung am Griff
auf Markierung am Grundgerät) und gegen
den Uhrzeigersinn bis zum Anschlag drehen.
Zutaten einfüllen.
Maximalmenge flüssig = 1,25 Liter;
Maximalmenge schäumende oder heiße
Flüssigkeiten = 0,5 Liter;
optimale Verarbeitungsmenge, fest =
50 bis 100 Gramm;
Deckel aufsetzen und gegen den Uhrzeiger-
sinn bis zum Anschlag in den Mixergriff
drehen. Der Deckel muss eingerastet sein.
Drehschalter auf gewünschte Stufe stellen.
Zutaten nachfüllen (Bild
-8)
Gerät am Drehschalter ausschalten.
Deckel abnehmen und Zutaten einfüllen
oder
Trichter herausnehmen und feste Zutaten
nach und nach in Nachfüllöffnung einfüllen
oder
flüssige Zutaten durch den Trichter einfüllen.
Nach der Arbeit
Gerät am Drehschalter ausschalten.
Mixer im Uhrzeigersinn drehen und
abnehmen.
Tipp: Mixer am besten sofort nach Gebrauch
reinigen.
Reinigen und Pflegen
^ÅÜíìåÖ>
hÉáåÉ ëÅÜÉìÉêåÇÉå=oÉáåáÖìåÖëãáííÉä=îÉêïÉåJ
ÇÉåK=lÄÉêÑä®ÅÜÉå=âååÉå=ÄÉëÅÜ®ÇáÖí=ïÉêÇÉåK=
Grundgerät reinigen
Netzstecker ziehen.
Grundgerät und Antriebsschutzdeckel feucht
abwischen. Bei Bedarf etwas Spülmittel
benutzen.
Gerät anschließend trockenreiben.
de
sÉ êäÉíòìåÖëÖÉÑ~Üê=ÇìêÅÜ=ëÅÜ~êÑÉ=
jÉëëÉêLêçíáÉêÉåÇÉå=^åíêáÉÄ>
káÉ=áå=ÇÉå=~ìÑÖÉëÉíòíÉå=jáñÉê=ÖêÉáÑÉå>=
jáñÉê åìê=ÄÉá=píáääëí~åÇ=ÇÉë=^åíêáÉÄÉë=
~ÄåÉÜãÉåL=~ìÑëÉíòÉå>=aÉå=jáñÉê=åìê=áã=
òìë~ããÉåÖÉëÉíòíÉå=wìëí~åÇ=ìåÇ=ãáí=
~ìÑÖÉëÉíòíÉã=aÉÅâÉä=ÄÉíêÉáÄÉåK
sÉêÄêÜìåÖëÖÉ Ñ~Ü ê>
_Éáã=sÉê~êÄÉáíÉå=îçå=ÜÉáÉã=jáñÖìí=íêáíí=
a~ãéÑ=ÇìêÅÜ=ÇÉå=qêáÅÜíÉê=áã=aÉÅâÉä=~ìëK=
j~ñáã~ä=MIR=iáíÉê=ÜÉáÉ=çÇÉê=ëÅÜ®ìãÉåÇÉ=
ëëáÖâÉáí=ÉáåÑääÉåK
píêçãëÅÜä~ÖJdÉÑ~Üê>
dêìåÇÖÉê®í=åáÉã~äë=áå=t~ëëÉê=í~ìÅÜÉå=ìåÇ=
ìåíÉê=ÑäáÉÉåÇÉë=t~ëëÉê=Ü~äíÉåK
hÉáåÉå=a~ãéÑêÉáåáÖÉê=îÉêïÉåÇÉåK
16 Robert Bosch Hausgeräte GmbH
Contents
For your safety . . . . . . . . . . . . . . . . . . . . . . 16
Overview . . . . . . . . . . . . . . . . . . . . . . . . . . 19
Operating the appliance . . . . . . . . . . . . . . . 20
Cleaning and servicing . . . . . . . . . . . . . . . . 23
Storage . . . . . . . . . . . . . . . . . . . . . . . . . . . 24
Troubleshooting . . . . . . . . . . . . . . . . . . . . . 24
Application examples . . . . . . . . . . . . . . . . . 25
Disposal . . . . . . . . . . . . . . . . . . . . . . . . . . . 26
Warranty conditions . . . . . . . . . . . . . . . . . . 26
Optional accessories . . . . . . . . . . . . . . . . . 27
For your safety
Before use, read these instructions carefully in order to become
familiar with important safety and operating instructions for this
appliance.
If the instructions for correct use of the appliance are not observed,
the manufacturer’s liability for any resulting damage will be excluded.
This appliance is designed for processing normal household quantities in
the home or similar quantities in non-industrial applications.
Non-industrial applications include e.g. use in employee kitchens in shops,
offices, agricultural and other commercial businesses, as well as use by
guests in boarding houses, small hotels and similar dwellings.
Use the appliance for processing normal quantities of food for domestic
use. Do not exceed permitted maximum quantities (see “Application
examples”).
This appliance is suitable for mixing, kneading and beating food. It must not
be used for processing other objects or substances. Other applications are
possible if the accessories approved by the manufacturer are used.
Use the appliance with original accessories only. When using the
accessories, follow the enclosed operating instructions.
Please keep the operating instructions in a safe place. If passing on the
appliance to a third party, always include the operating instructions.
, General safety instructions
Electric shock risk
The appliance must not be used by children.
The appliance and its power cord must be kept away from children.
Appliances can be used by persons with reduced physical, sensory or
mental capabilities or lack of experience and knowledge if they have
been given supervision or instruction concerning use of the appliance in
a safe way and if they understand the hazards involved.
en
`çåÖê~íìä~íáçåë=çå=íÜÉ=éìêÅÜ~ëÉ=çÑ=óçìê=
åÉï=_lp`e=~ééäá~åÅÉK
få=ÇçáåÖ=ëçI=óçì=Ü~îÉ=çéíÉÇ=Ñçê=~=ãçÇÉêåI=
ÜáÖÜJèì~äáíó=ÇçãÉëíáÅ=~ééäá~åÅÉK
vçì=Å~å= ÑáåÇ=ÑìêíÜÉê=á åÑçêã~íáçå=~Äçìí=çì ê=
éêçÇìÅíë=çå=çìê=ïÉÄ=é~ÖÉK
Robert Bosch Hausgeräte GmbH 17
Children shall not play with the appliance.
Connect and operate the appliance only in accordance with the
specifications on the rating plate. Do not use the appliance if the power
cord and/or appliance are damaged.
Always disconnect the appliance from the supply if it is left unattended
and before assembling, disassembling or cleaning.
Do not place the power cord over sharp edges or hot surfaces.
To prevent injury, a damaged power cord must be replaced by the
manufacturer or his customer service or a similarly qualified person.
Only our customer service may repair the appliance.
, Safety instructions for this appliance
Risk of injury
Risk of electric shock!
Do not insert mains plug until all preparations for working with the appliance
are complete.
Never immerse the base unit in liquid or hold under running water.
Do not use a steam cleaner.
Do not adjust the swivel arm while the appliance is switched on.
Wait until the drive has come to a standstill.
Do not change tool/accessory until the drive is at a standstill – when the
appliance is switched off, the drive continues running briefly.
Use only the rotary switch to switch the appliance on or off.
When the appliance is not in use, pull out the mains plug.
Before eliminating a fault, pull out the mains plug.
Risk of injury from the rotating tools!
While the appliance is operating, never place fingers in the mixing bowl.
Attach the cover (12) before operating the appliance!
Do not change tools until the drive has come to a standstill – when the
appliance is switched off, the drive continues running briefly and stops in
the tool change position. Do not move the swivel arm until the tool has
come to a standstill.
For reasons of safety the appliance cannot be operated unless unused
drives are covered with drive guards (5, 8).
Before attaching/removing the continuous-feed shredder, wait until the
drive has come to a standstill and pull out the mains plug. Do not reach into
the feed tube.
en
18 Robert Bosch Hausgeräte GmbH
Risk of injury from sharp blades!
Do not grip the sharp blades or edges of the cutting discs. Take hold of
cutting discs by the edge only.
Do not touch blender blades with bare hands.
Risk of injury from sharp blades/rotating drive!
Never place fingers in the attached blender! Do not remove/attach the
blender until the drive is at a standstill! Operate the assembled blender only
and with the lid attached.
Risk of scalding!
If processing hot liquids, steam escapes through the funnel in the lid.
Add a max. 0.5 litres of hot or frothing liquid.
Important!
Use the appliance with original accessories only. When using the
accessories, follow the enclosed operating instructions.
Use only one tool or accessory at any one time.
, Explanation of the symbols on the appliance or accessory
Follow the instructions in the operating instructions.
Caution! Rotating blades.
Caution! Rotating tools.
Do not place fingers in the feed tube.
Safety systems
Start lock-out
See “Operating positions” table.
The appliance can be switched on in pos. 1
and 3 only:
when the bowl (11) has been inserted and
turned until it locks into place and
the blender drive cover has been attached
(8).
Restart lock-out
If the power is interrupted, the appliance
remains switched on but the motor does not
start running again when the power is restored.
To switch the appliance on again, turn the rotary
switch to 0/off, then switch on.
Overload protection
If the motor switches itself off while the
appliance is being used, the overload protection
feature has been activated. A possible cause
may be that too much food was processed at
one time.
If a safety system is activated, see
“Troubleshooting”.
en
Robert Bosch Hausgeräte GmbH 19
The operating instructions describe several
models, see also overview of models (Fig. ).
The appliance requires no maintenance.
Overview
Please fold out the illustrated
pages. Fig.
Base unit
1 Release button
2Swivel arm
“Easy Armlift” function to support the
upward movement of the arm (see “Work
positions”).
3 Rotary switch
When the appliance has been switched off
(position 0/off), the appliance runs
automatically to the optimum position for
changing the tools.
0/off = Stop
M = Instantaneous switching at maximum
speed, hold switch for required blending
duration.
Settings
1–7
, Operating speed:
1 = low speed – slow,
7 = high speed – fast.
4 Operating indicator
Is lit while the appliance is operating (rotary
switch on M or 1–7).
Flashes if
the appliance has been operated
incorrectly, the electronic fuse has tripped or
the appliance is defective
– see section
“Troubleshooting”.
5Drive cover
To remove the drive cover, press on the rear
area and remove cover.
6 Drive for
– continuous-feed shredder and
– citrus press (optional accessory *).
When not in use, attach the drive cover.
7 Drive for tools (stirrer, whisk, kneading
hook) and mincer (optional accessory *)
8 Blender drive cover
9 Drive for blender (optional accessory *)
When not in use, attach the blender drive
cover.
10 Automatic cord winder
Bowl with accessories
11 Stainless steel stirring bowl
12 Lid
Tools
13 Professional flexi stirring whisk
14 Professional beating whisk
15 Kneading hook with dough deflector
16 Accessories bag
For storage of the tools and cutting discs.
Continuous-feed shredder
17 Pusher
18 Cover with filling shaft
19 Cutting discs
19a Professional Supercut reversible disc
– coarse/fine
19b Reversible shredding disc – coarse/
fine
19c Grating disc – medium-fine
19d Grating disc – coarse *
19e Asian vegetable disc *
20 Disc holder
21 Housing with outlet opening
Blender
*
22 Blender jug
23 Lid
24 Funnel
* If an accessory is not included in the product
package, it can be purchased via the trade or
customer service.
en
20 Robert Bosch Hausgeräte GmbH
Operating positions Fig.
^ííÉåíáçå>
_ÉÑçêÉ=çéÉê~íáåÖ=íÜÉ=~ééäá~åÅÉI=~íí~ÅÜ=íÜÉ=
íççäL~ÅÅÉëëçêó=íç=íÜÉ=ÅçêêÉÅí=ÇêáîÉ=~åÇ=áå=íÜÉ=
ÅçêêÉÅí=éçëáíáçå=~åÇ=éä~ÅÉ=áå=íÜÉ=çéÉê~íáåÖ=
éçëáíáçå=~ÅÅçêÇáåÖ=íç=íÜáë=í~ÄäÉK
qÜÉ=ëïáîÉä=~êã=ãìëí=ÄÉ=ÉåÖ~ÖÉÇ=áå=ÉîÉêó=
çéÉê~íáåÖ=éçëáíáçåK
Selecting the operating position:
Press the Release button and move the
swivel arm.
Support movement with your hand.
Move the swivel arm until it engages in the
required position.
* Insert/remove whisk, stirrer or kneading
hook.
Add large quantities of ingredients.
Operation
^ííÉåíáçå>
aç=åçí=çéÉê~íÉ=íÜÉ=~ééäá~åÅÉ=ïáíÜçìí=~å=
~ÅÅÉëëçêóLíççä=áå=íÜÉ=çéÉê~íáåÖ=éçëáíáçåK
aç=åçí=çéÉê~íÉ=íÜÉ=~ééäá~åÅÉ=ÉãéíóK=
aç=åçí=ÉñéçëÉ=~ééäá~åÅÉ=çê=~ÅÅÉëëçêáÉë=íç=
ÜÉ~í=ëçìêÅÉëK=m~êíë=~êÉ=åçí=ãáÅêçï~îÉJë~ÑÉK
Before operating the appliance and
accessories for the first time, clean
thoroughly; see “Cleaning and servicing”.
Preparation
Place the base unit on a smooth, clean
surface.
Pull out the cord in one go to the required
length (max. 100 cm) and slowly release;
the cord is locked (Fig. ).
Reducing the cord length:
Pull gently on the cord and allow it to roll up
to the required length. Then gently pull the
cord again and slowly release; the cable is
locked.
t~êåáåÖ>
aç=åçí=íïáëí=íÜÉ=ÅçêÇ=ïÜÉå=áåëÉêíáåÖ=áíK=
fÑ=íÜÉ=~ééäá~åÅÉ=ÑÉ~íìêÉë=~å=~ìíçã~íáÅ=ÅçêÇ=
ïáåÇÉêI=Çç=åçí=áåëÉêí=íÜÉ=ÅçêÇ=ã~åì~ääóK=fÑ=íÜÉ=
ÅçêÇ=à~ãëI=éìää=çìí=íÜÉ=ÅçêÇ=~ää=íÜÉ=ï~ó=~åÇ=
íÜÉå=~ääçï=áí=íç=ïáåÇ=ìéK
Insert the mains plug.
en
Note:
The swivel arm features an
“Easy Armlift”
function which supports the upwards
movement of the swivel arm.
Position Drive Tool/
Accessory
Operating speed
1 7
1–5
1–7
1–3
2 7
*
3 6
3–7
3–5
4
957
757
oáëâ=çÑ=áåàìêó>
aç=åçí=áåëÉêí=ã~áåë=éäìÖ=ìåíáä=~ää=éêÉé~ê~íáçåë=
Ñçê=ïçêâáåÖ=ïáíÜ=íÜÉ=~ééäá~åÅÉ=~êÉ=ÅçãéäÉíÉK
Important information
These operating instructions contain a sticker
with reference values for the operating speed
of the appliance when using the tools or
accessories.
We recommend attaching this sticker to the
appliance (
Fig.
).
Robert Bosch Hausgeräte GmbH 21
Bowl and tools
^ííÉåíáçå>
rëÉ=Äçïä=ïáíÜ=íÜáë=~ééäá~åÅÉ=çåäóK
Professional
flexi stirring whisk
(13)
for stirring dough, e.g. cake mixture
Professional beating whisk (14)
for whisking egg whites, cream and light
dough, e.g. sponge mixture
Kneading hook (15)
for kneading heavy dough and mixing-in
ingredients that ought not be cut (e.g.
raisins and chocolate chips)
Important information concerning
the use of the whisk Fig.
The whisk should almost touch the bottom of
the bowl to ensure that the ingredients are
optimally mixed. If not, adjust the height of the
whisk as follows:
Remove mains plug.
Press the Release button and move the
swivel arm to position 2.
Insert the whisk into the drive until the
whisk locks into position.
Hold whisk in place and loosen nut clockwise
using open-ended wrench (size 8).
Set the whisk to the optimum height by
rotating the whisk:
Turn clockwise: Raise
Turn anti-clockwise: Lower
Press the Release button and move
the swivel arm to position 1.
Check the height of the whisk and,
if required, correct.
When the height has been set correctly,
press Release button and move the
swivel arm to position 2.
Hold whisk in place and tighten nut anti-
clockwise using open-ended wrench (size 8).
Working with the bowl
and the tools Fig.
Press the Release button and move the
swivel arm to position 2.
Insert the bowl:
Tilt the bowl forwards and then set it
down.
Turn anti-clockwise until it locks into
place.
Depending on the processing task, insert the
stirrer, whisk or kneading hook until it locks
into position.
Note:
If using the kneading hook, rotate the dough
deflector until the kneading hook can lock
into position (Fig. -4b).
Put the ingredients to be processed into the
bowl.
Press the Release button and move
the swivel arm to position 1.
Attach the cover.
Set the rotary switch to the desired setting.
Our recommendation:
Professional flexi stirring whisk:
First mix at setting 1–2, then setting 3–5 as
required
Professional beating whisk:
setting 7, mix in at setting 1
Kneading hook:
first stir in at setting 1, knead at setting 3
Adding more ingredients
Switch off the appliance with the rotary
switch.
Add more ingredients through the feed tube
in the cover.
or
Remove lid.
Press the Release button and move the
swivel arm to position 2.
Add ingredients.
en
oáëâ=çÑ=áåàìêó=Ñêçã=êçí~íáåÖ=íççäë
tÜáäÉ=íÜÉ=~ééäá~åÅÉ=áë=çéÉê~íáåÖI=åÉîÉê=éä~ÅÉ=
ÑáåÖÉêë=áå=íÜÉ=ãáñáåÖ=ÄçïäK=^íí~ÅÜ=íÜÉ=ÅçîÉê=
ENOF=ÄÉÑçêÉ=çéÉê~íáåÖ=íÜÉ=~ééäá~åÅÉ>
aç=åçí=ÅÜ~åÖÉ=íççäë=ìåíáä=íÜÉ=ÇêáîÉ=Ü~ë=ÅçãÉ=
íç=~=ëí~åÇëíáää=Ó=ïÜÉå=íÜÉ=~ééäá~åÅÉ=áë=
ëïáíÅÜÉÇ=çÑÑI=íÜÉ=ÇêáîÉ=ÅçåíáåìÉë=êìååáåÖ=
ÄêáÉÑäó=~åÇ=ëíçéë=áå=íÜÉ=íççä=ÅÜ~åÖÉ=éçëáíáçåK=
aç=åçí=ãçîÉ=íÜÉ=ëïáîÉä=~êã=ìåíáä=íÜÉ=íççä=Ü~ë=
ÅçãÉ=íç=~=ëí~åÇëíáääK
cçê=êÉ~ëçåë=çÑ=ë~ÑÉíó=íÜÉ=~ééäá~åÅÉ=ã~ó=çåäó=
ÄÉ=çéÉê~íÉÇ=ïÜÉå=ìåìëÉÇ=ÇêáîÉë=Ü~îÉ=ÄÉÉå=
ÅçîÉêÉÇ=ïáíÜ=ÇêáîÉ=Öì~êÇë=ERI=UFK
22 Robert Bosch Hausgeräte GmbH
After using the appliance
Switch off the appliance with the rotary
switch.
Remove mains plug.
Remove lid.
Press the Release button and move the
swivel arm to position 2.
Take the tool out of the drive.
Remove the bowl.
Clean all parts, see “Cleaning and servicing”.
Continuous-feed shredder
t~êåáåÖ>
qÜÉ=ÅçåíáåìçìëJÑÉÉÇ=ëÜêÉÇÇÉê=ãìëí=ÄÉ=
ÅçãéäÉíÉäó=~ëëÉãÄäÉÇ=ÄÉÑçêÉ=ìëÉK=kÉîÉê=
~ëëÉãÄäÉ=íÜÉ=ÅçåíáåìçìëJÑÉÉÇ=ëÜêÉÇÇÉê=çå=
íÜÉ=Ä~ëÉ=ìåáíK
léÉê~íÉ=íÜÉ=ÅçåíáåìçìëJÑÉÉÇ=ëÜêÉÇÇÉê=áå=íÜÉ=
áåÇáÅ~íÉÇ=çéÉê~íáåÖ=éçëáíáçå=çåäóK
Predetermined breaking point Fig.
The built-in predetermined breaking point
protects the drive of the appliance. If an overload
occurs, the drive shaft of the con-tinuous-feed
shredder breaks. However, the drive shaft can
easily be replaced.
A new disc holder with drive shaft is available
from customer service.
Professional Supercut reversible
disc – coarse/fine
for slicing fruit and vegetables. Process at
setting 5.
Designation on the reversible slicing disc: “Grob”
for the coarse cutting side
“Fein” for the fine cutting side
t~êåáåÖ>
qÜÉ=êÉîÉêëáÄäÉ=ëäáÅáåÖ=ÇáëÅ=áë=åçí=ëìáí~ÄäÉ=Ñçê=
ëäáÅáåÖ=Ü~êÇ=ÅÜÉÉëÉI=ÄêÉ~ÇI=êçääë=çê=ÅÜçÅçä~íÉK=
päáÅÉ=ÄçáäÉÇI=ï~ñó=éçí~íçÉë=çåäó=ïÜÉå=íÜÉó=~êÉ=
ÅçäÇK
Reversible shredding disc
– coarse/fine
for shredding vegetables, fruit and cheese,
except for hard cheese (e.g. Parmesan).
Process at setting 3 or 4.
Designation on the reversible shredding disc:
“2” for the coarse shredding side
„4“ for the fine shredding side
t~êåáåÖ>
qÜÉÉîÉêëáÄäÉÜêÉÇÇáåÖáëÅëçíìáí~ÄäÉçê=
ëÜêÉÇÇáåÖ=åìíëK=pÜêÉÇ=ëçÑí=ÅÜÉÉëÉ=ïáíÜ=íÜÉ=
Åç~êëÉ=ëáÇÉ=çåäó=~í=ëÉííáåÖ=TK
Grating disc – medium-fine
for grating raw potatoes, hard cheese
(e.g. Parmesan), cooled chocolate and nuts.
Process at setting 7.
t~êåáåÖ>
É=Öê~íáåÖ=ÇáëÅ=áë=åçí=ëìáíäÉçê=ÖêáåÖ=ëçÑí=
ÅÜÉÉëÉ=~åÇ=ÅÜÉÉëÉ=ëäáÅÉëK
Grating disc – coarse
for grating raw potatoes, e.g. for potato
pancakes or dumplings.
Process at setting 7.
Asian vegetable disc
Slices fruit and vegetables into fine strips
for Asian vegetable dishes.
Process at setting 5.
Working with the continuous-feed
shredder Fig.
Press the Release button and move the
swivel arm to position 2.
Insert the bowl:
Tilt the bowl forwards and then set it
down.
Turn anti-clockwise until it locks into
place.
Press the Release button and move the
swivel arm to position 3.
Remove drive cover from the drive of
the continuous-feed shredder (Fig. -5a).
Hold disc holder at the lower end, ensuring
that the two tips are face up.
Carefully place the required slicing or
shredding disc onto the tips of the disc
holder (Fig. -6a). In the case of reversible
discs, ensure that the required side is face
up.
Grip disc holder at the upper end and insert
into the housing (Fig. -6b).
Attach the cover (note mark) and turn all the
way in a clockwise direction.
en
oáëâ=çÑ=áåàìêó
aç=åçí=Öêáé=íÜÉ=ëÜ~êé=Ää~ÇÉë=çê=ÉÇÖÉë=çÑ=íÜÉ=
ÅìííáåÖ=Ç áëÅëK= q~âÉ= ÜçäÇ= çÑ=ÅìííáåÖ=ÇáëÅë=Äó=íÜÉ=
ÉÇÖÉ=çåäóK
_ÉÑçêÉ=~íí~ÅÜáåÖLêÉãçîáåÖ=íÜÉ=ÅçåíáåìçìëJ
ÑÉÉÇ=ë ÜêÉÇÇÉêI= ï~áí= ìåíáä= íÜÉ=ÇêáîÉ=Ü~ë= Åçã É= íç=
~=ëí~åÇëíáää=~åÇ=éìää=çìí=íÜÉ=ã~áåë=éäìÖK
aç=åçí=êÉ~ÅÜ=áåíç=íÜÉ=ÑÉÉÇ=íìÄÉK
Robert Bosch Hausgeräte GmbH 23
Place continuous-feed shredder on the drive
and rotate all the way in a clockwise
direction, as illustrated in Fig. -8.
Turn rotary switch to recommended setting.
Put food to be processed in the feed tube
and push down with the pusher.
t~êåáåÖ>
mêÉîÉåí=íÜÉ=Åìí=áåÖêÉÇáÉåíë=Ñêçã=ÄìáäÇáåÖ=ìé=áå=
íÜÉ=çìíäÉí=çéÉåáåÖK
Tip: To ensure even cutting results, process thin
ingredients in bunches.
Note: If the food to be processed sticks in the
continuous-feed shredder, switch food
processor off, pull out mains plug, wait until the
drive comes to a standstill, remove cover from
the continuous-feed shredder and empty feed
tube.
After using the appliance
Switch off the appliance with the rotary
switch.
Rotate the continuous-feed shredder in an
anti-clockwise direction and remove.
Rotate the lid in an anti-clockwise direction
and remove.
Remove disc holder with disc. To do this,
press finger from below against the drive
shaft (Fig.
).
Clean parts.
Blender
t~êåáåÖ>
_äÉåÇÉê=ã~ó=ÄÉ=Ç~ã~ÖÉÇK=aç=åçí=éêçÅÉëë=
ÇÉÉéJÑêçòÉå=áåÖêÉÇáÉåíë=EÉñÅÉéí=áÅÉ=ÅìÄÉëFK=
åçí=çéÉê~íÉ=ÄäÉåÇÉê=ïÜÉå=ÉãéíóK
Working with the blender Fig.
Press the release button and move the
swivel arm to position 4.
Remove the blender drive cover.
Attach blender jug (mark on the handle on
mark on the base unit) and turn all the way in
an anti-clockwise direction.
Add ingredients.
Maximum capacity – liquid = 1.25 litres;
maximum capacity frothing or hot liquids
max. 0.5 litres; optimal processing capacity –
solids = 50–100 g;
Attach the cover and turn anti-clockwise all
the way into the blender handle. The cover
must be locked in position.
Set the rotary switch to the desired setting.
Adding more ingredients (Fig. -8)
Switch off the appliance with the rotary
switch.
Remove the lid and add ingredients
or
remove the funnel and gradually add solid
ingredients through the refill opening
or
pour liquid ingredients through the funnel.
After using the appliance
Switch off the appliance with the rotary
switch.
Rotate the blender in a clockwise direction
and remove.
Tip: It is recommended to clean the blender
immediately after use.
Cleaning and servicing
^ííÉåíáçå>
aç=åçí=ìëÉ=~Äê~ëáîÉ=ÅäÉ~åáåÖ=~ÖÉåíëK=pìêÑ~ÅÉë=
ã~ó=ÄÉ=Ç~ã~ÖÉÇK=
Cleaning the base unit
Remove mains plug.
Wipe the base unit and drive cover with a
damp cloth. If required, use a little detergent.
Then dry the base unit.
en
oáëâ=çÑ=áåàìêó=Ñêçã=ëÜ~êé=Ää~ÇÉëL
êçí~íáåÖ=ÇêáîÉ>
kÉîÉê=éä~ÅÉ=ÑáåÖÉêë=áå=íÜÉ=~íí~ÅÜÉÇ=ÄäÉåÇÉê>=
aç=åçí=êÉãçîÉL~íí~ÅÜ=íÜÉ=ÄäÉåÇÉê=ìåíáä=íÜÉ=
ÇêáîÉ=áë=~í=~=ëí~åÇëíáää>=léÉê~íÉ=íÜÉ=~ëëÉãÄäÉÇ=
ÄäÉåÇÉê=çåäó=~åÇ=ïáíÜ=íÜÉ=äáÇ=~íí~ÅÜÉÇK
oáëâ=çÑ=ëÅ~äÇáåÖ >
fÑ=éêçÅÉëëáåÖ=Üçí=äáèìáÇëI=ëíÉ~ã=ÉëÅ~éÉë=
íÜêçìÖÜ=íÜÉ=ÑìååÉä=áå=íÜÉ=äáÇK=^ÇÇ=~=ã~ñK=
MKR äáíêÉë=çÑ=Üçí=çê=ÑêçíÜáåÖ=äáèìáÇK
oáëâ=çÑ=ÉäÉÅíêáÅ=ëÜçÅâ>
kÉîÉê=áããÉêëÉ= íÜÉ= Ä~ëÉ=ì åáí=áå= ï~íÉê= çê=éä~ÅÉ=
ìåÇÉê=êìååáåÖ=ï~íÉêK
aç=åçí=ìëÉ=~=ëíÉ~ã=ÅäÉ~åÉêK
24 Robert Bosch Hausgeräte GmbH
Cleaning the bowl and tools
The bowl and tools are dishwasher-proof.
Do not wedge plastic parts in the dishwasher, as
they could be permanently deformed during the
washing process!
Cleaning the continuous-feed shredder
All parts of the continuous-feed shredder are
dishwasher-proof.
Tip: To remove the red film after processing e.g.
carrots, pour a little cooking oil on a cloth and
rub the film off the continuous-feed shredder
(not the cutting discs). Then rinse the
continuous-feed shredder.
Cleaning the blender
The blender jug, lid and funnel are dishwasher-
proof.
Tip: After processing liquids, it is often sufficient
to clean the blender without removing it from the
appliance. Pour a little water and washing-up
liquid into the attached blender. Switch on the
blender for several seconds (setting M). Pour out
the water and rinse out the blender with clear
water.
Storage
Fig.
Store tools and cutting discs in the
accessories bag.
Keep accessories bag in the bowl.
Troubleshooting
The swivel arm must be engaged in every
operating position.
Initially try to eliminate the problem which has
occurred with the help of the following
information.
Troubleshooting
Appliance does not start.
Remedial action
Check the power supply.
Check the mains plug.
Check swivel arm. Correct position?
Engaged?
Screw on blender or bowl as far as possible.
Attach the blender cover and screw on as far
as possible.
Attach drive cover to unused drives.
The safety lock is active.
Switch appliance to
0/off and then back to the required setting.
Troubleshooting
Appliance switches off during use. The overload
protection feature has been activated. Too much
food was processed at one time.
Remedial action
Switch off the appliance.
Reduce processing quantity. Do not exceed
permitted maximum quantities (see
“Application examples”).
en
oáëâ=çÑ=áåàìêó=Ñêçã=ëÜ~êé=Ää~ÇÉë>
aç=åçí=íçìÅÜ=ÄäÉåÇÉê=Ää~ÇÉë=ïáíÜ=Ä~êÉ=Ü~åÇëK
Important information
If required, clean accessories bag. Follow care
instructions in the bag.
oáëâ=çÑ=áåàìêó>
tÜÉå=íÜÉ=~ééäá~åÅÉ=áë=åçí=áå=ìëÉI=éìää=çìí=íÜÉ=
ã~áåë=éäìÖK
oáëâ=çÑ=áåàìêó>
_ÉÑçêÉ=Éäáãáå~íáåÖ=~=Ñ~ìäíI=éìää=çìí=íÜÉ=ã~áåë=
éäìÖK
Note:
The Operating indicator flashes if the appliance
has been operated incorrectly or the electronic
fuse has tripped or the appliance is defective.
Robert Bosch Hausgeräte GmbH 25
Troubleshooting
While the drive was running, the release button
was inadvertently pressed. The swivel arm
moves up. The drive switches off, but does not
stop in the tool change position.
Remedial action
Set the rotary switch to 0/off.
Move swivel arm to position 1.
Switch on appliance (setting 1).
Switch off appliance again.
Tool stops in tool change position.
Troubleshooting
Blender does not start working or stops during
use, the drive is “humming”. Blade is blocked.
Remedial action
Switch off the appliance and pull out the
mains plug.
Detach the blender and remove the
obstruction.
Re-attach the blender.
Switch on the appliance.
Application examples
Whipped cream
100 g–600 g
Whip cream with the whisk for 1½ to
4 minutes at setting 7 – depending on the
quantity and properties of the cream.
Egg white
1 to 8 egg whites
Beat egg white with the whisk for 4 to
6 minutes at setting 7.
Sponge mixture
_~ëáÅ=êÉÅáéÉ
2 eggs
2–3 tbs. hot water
100 g sugar
1 packet of vanilla sugar
70 g flour
70 g cornflour
Baking powder if required
Beat the ingredients (except flour and
cornflour) with the whisk for approx. 4–6
minutes at setting 7 until frothy.
Rotate switch to setting 1 and spoon in the
sifted flour and cornflour within approx. ½ to
1 minute.
Maximum quantity: 2 x basic recipe
Cake mixture
_~ëáÅ=êÉÅáéÉ
3–4 eggs
200–250 g sugar
1 pinch of salt
1 packet of vanilla sugar or peel from ½ lemon
200–250 g butter or margarine (room
temperature)
500 g flour
1 packet of baking powder
125 ml milk
Mix all ingredients with the stirrer for approx.
½ minute at setting 1, then for approx. 3–4
minutes at setting 5.
Maximum quantity: 1.5 x basic recipe
Short pastry
_~ëáÅ=êÉÅáéÉ
125 g butter (room temperature)
100–125 g sugar
1 egg
1 pinch of salt
A little lemon peel or vanilla sugar
250 g flour
Baking powder if required
Mix all ingredients with the stirrer for approx.
½ minute at setting 1, then for approx. 2–3
minutes at setting 3.
From 500 g flour:
Knead the ingredients with the kneading
hook for approx. ½ minute at setting 1, then
for approx. 3–4 minutes at setting 3.
Maximum quantity: 2 x basic recipe
Yeast dough
_~ëáÅ=êÉÅáéÉ
500 g flour
1 egg
80 g fat (room temperature)
80 g sugar
200–250 ml lukewarm milk
25 g fresh yeast or 1 packet of dried yeast
Peel of ½ lemon
1 pinch of salt
en
Important information
If the fault cannot be eliminated, please contact
customer service.
26 Robert Bosch Hausgeräte GmbH
Mix all ingredients with the kneading hook for
approx. ½ minute at setting 1, then for
approx. 3–6 minutes at setting 3.
Maximum quantity: 1.5 x basic recipe
Pasta dough
_~ëáÅ=êÉÅáéÉ
300 g flour
3 eggs
1–2 tbs. (10–20 g) cold water as required
Process all ingredients for approx. 3–5
minutes at setting 3 until a dough forms.
Maximum quantity: 1.5 x basic recipe
Bread dough
_~ëáÅ=êÉÅáéÉ
750 g flour
2 packets of dry yeast
2 tsp. salt
450–500 ml warm water
Mix all ingredients with the kneading hook for
approx. ½ minute at setting 1, then for approx.
4–5 minutes at setting 3.
Mayonnaise
2 eggs
2 tsp. mustard
¼loil
2 tbs. lemon juice or vinegar
1 pinch of salt
1 pinch of sugar
Ingredients must be at the same temperature.
Process the ingredients (except the oil) in the
blender for several seconds at setting 3 or 4.
Switch the blender to setting 7 and slowly
pour the oil through the funnel and mix until
the mayonnaise emulsifies.
Eat the mayonnaise immediately, do not
store.
Honey bread spread
30 g butter (from refrigerator, 7 °C)
190 g honey (from refrigerator, 7 °C)
Cut butter into small pieces and put into the
blender.
Add honey and blend for 15 seconds at
setting 7.
Disposal
This appliance has been identified in
accordance with the European
directive 2012/19/EG on Waste
Electrical and Electronic Equipment –
WEEE.
The Directive paves the way for effective
EU-wide withdrawal and utilization of waste
appliances.
Please ask your dealer or inquire at your local
authority about current means of disposal.
Warranty conditions
The guarantee conditions for this appliance
are as defined by our representative in the
country in which it is sold. Details regarding
these conditions can be obtained from the
dealer from whom the appliance was
purchased.
The bill of sale or receipt must be produced
when making any claim under the terms of this
guarantee.
en
Robert Bosch Hausgeräte GmbH 27
Optional accessories
MUZ5ZP1
Citrus press
For squeezing oranges, lemons and grapefruits.
MUZ5CC1
Dicer
For cutting fruit and vegetables into equally sized cubes
MUZ5FW1
Mincer
For cutting fresh meat for steak tartare or meat loaf.
MUZ45LS1
Perforated disc set
fine
(3 mm), coarse (6 mm)
For the mincer MUZ5FW1.
Fine disc for pasties and spreads, coarse disc for
sausages and bacon.
MUZ45SV1
Viennese whirl
attachment
For the mincer MUZ5FW1.
With metal template for 4 different pastry moulds.
MUZ45RV1
Grater attachment
For the mincer MUZ5FW1.
For grating nuts, almonds, chocolate and dried bread
rolls.
MUZ45FV1
Juicer attachment
For the mincer MUZ5FW1.
For pressing soft fruit, except raspberries, tomatoes and
rose hips, to a pulp. At the same time e.g. currants are
automatically stemmed and pitted.
MUZ45PS1
Chipper disc
For the continuous-feed shredder MUZ5DS1.
For slicing raw potatoes for chips.
MUZ45AG1
Asian vegetable disc
For the continuous-feed shredder MUZ5DS1.
Slices fruit and vegetables into fine strips for Asian
vegetable dishes.
en
28 Robert Bosch Hausgeräte GmbH
If an accessory is not included in the product package, it can be purchased via the trade or from
customer service.
MUZ45RS1
Grating disc coarse
For the continuous-feed shredder MUZ5DS1.
For grating raw potatoes, e.g. for potato pancakes or
dumplings.
MUZ45KP1
Potato fritter disc
For the continuous-feed shredder MUZ5DS1.
For grating raw potatoes for rostis and potato fritters,
for cutting fruit and vegetables into thick slices.
MUZ5ER2
Stainless steel stirring
bowl
Up to 750 g of flour plus ingredients can be processed in
the bowl.
MUZ5KR1
Plastic mixing bowl
Up to 750 g of flour plus ingredients can be processed in
the bowl.
MUZ5MX1
Plastic blender
attachment
For blending drinks, for pureeing fruit and vegetables, for
preparing mayonnaise, for cutting fruit, nuts, for crushing
ice cubes.
MUZ5MM1
Multi-mixer
For chopping herbs, vegetables, apples and meat, for
shredding carrots, radishes and cheese, for grating nuts
and cooled chocolate.
en
Subject to change withou
Robert Bosch Hausgeräte GmbH 33
Positions de travail Figure
^ííÉåíáçå=>
kÉ=Ñ~áíÉë=ÑçåÅíáçååÉê=äÛ~éé~êÉáä=èìÉ=ëá=äÉë=
~ÅÅÉëëçáêÉë=ëÉ=íêçìîÉåí=ëìê=äÛÉåíê~åÉãÉåí=
ÅçêêÉÅíI=ëìê=ä~=éçëáíáçå=ÅçêêÉÅíÉ=Éí=Éå=éçëáíáçå=
ÇÉ=íê~î~áäK
iÉ=Äê~ë=éáîçí~åí=Ççáí=ÉåÅê~åíÉê=Ç~åë=ÅÜ~èìÉ=
éçëáíáçå=ÇÉ=íê~î~áäK
Réglage de la position de travail :
Appuyez sur la touche de déverrouillage puis
faites tourner le bras pivotant.
Aidez le mouvement d’une main.
Amenez le bras pivotant sur la position
voulue jusqu’à ce qu’il encrante.
* Mise en place / enlèvement du fouet batteur,
du fouet mélangeur et du crochet pétrisseur ;
Ajout de fortes quantités d
aliments.
Utilisation
^ííÉåíáçå=>
kÉ=Ñ~áíÉë=ÑçåÅíáçååÉê=äÛ~éé~êÉáä=èìÛ~îÉÅ=äÉë=
~ÅÅÉëëçáêÉë=L=çìíáäë=Éå=éçëáíáçå=ÇÉ=íê~î~áäK
kÉ=Ñ~áíÉë=é~ë=ÑçåÅíáçååÉê=äÛ~éé~êÉáä=¶=îáÇÉK=
kÛÉñéçëÉò=é~ë=äÛ~éé~êÉáä=Éí=ëÉë=~ÅÅÉëëçáêÉë=
ÇÉë=ëçìêÅÉë=ÇÉ=ÅÜ~äÉìêK=iÉë=éáÅÉë=åÉ=îçåí=
é~ë=~ì=Ñçìê=¶=ãáÅêçJçåÇÉëK
Avant de les utiliser pour la première fois,
nettoyez soigneusement l’appareil et ses
accessoires, voir le chapitre intitulé
« Nettoyage et entretien ».
Préparatifs
Posez l’appareil de base sur une surface lisse
et propre.
Tirez continuellement le cordon jusqu’à sortir
la longueur voulue (1,00 mètre maxi.) puis
relâchez-le lentement. Le cordon
s’immobilise sur la longueur voulue
(figure ).
Pour réduire la longueur du cordon :
Tirez légèrement sur le cordon, puis laissez-
en la longueur voulue s’enrouler. Ensuite,
tirez à nouveau légèrement sur le cordon,
puis relâchez-le lentement. Le cordon
s’immobilise sur la longueur voulue.
^ííÉåíáçå=>
kÉ=íçêÇÉò=é~ë=äÉ=ÅçêÇçåI=äçêëèìÉ=îçìë=äÉ=
êÉåíêÉòK=
pìê=äÉë=ãçÇäÉë=¶=ÉåêçìäÉìê=~ìíçã~íáèìÉI=åÉ=
êÉåíêÉò~ë=äÉçêÇçå~~áåK=páÉçêÇçåÉ=
ÅçáåÅÉ=Éå=êçìíÉI=ëçêíÉòJÉå=ä~=äçåÖìÉìê=
ã~ñáãìãìáë~áëëÉòJäÉçìîÉ~ìÛÉåêçìäÉêK
Introduire la fiche dans la prise de courant.
fr
Remarque :
Le bras pivotant est doté de la fonction
« Easy
Armlift »
qui assiste le mouvement montant du
bras pivotant.
Position Entraîne-
ment
Outils /
Accessoires
Vitesse de travail
1 7
1–5
1–7
1–3
2 7
*
3 6
3–7
3–5
4
957
757
oáëèìÉ=ÇÉ=ÄäÉëëìêÉë=>
kÉ=Äê~åÅÜÉò=ä~=ÑáÅÜÉ=ãßäÉ=Ç~åë=ä~=éêáëÉ=ÇÉ=
Åçìê~åí=èìÛìåÉ=Ñçáë=íçìë=äÉë=éê¨é~ê~íáÑë=ëìê=
äÛ~éé~êÉáä=~ÅÜÉî¨ëK
Remarque importante
Dans cette notice d’utilisation se trouve un
autocollant mentionnant des valeurs indicatives
pour la vitesse de travail de l’appareil lorsque
vous utilisez les différents outils ou accessoires.
Nous recommandons de fixer cet autocollant
sur l’appareil (
figure
).
34 Robert Bosch Hausgeräte GmbH
Bol et accessoires
^ííÉåíáçå=>
ríáäáëÉò=äÉ=Äçä=ìåáèìÉãÉåí=Éå=ÑçåÅíáçååÉãÉåí=
ëìê=ÅÉí=~éé~êÉáäK
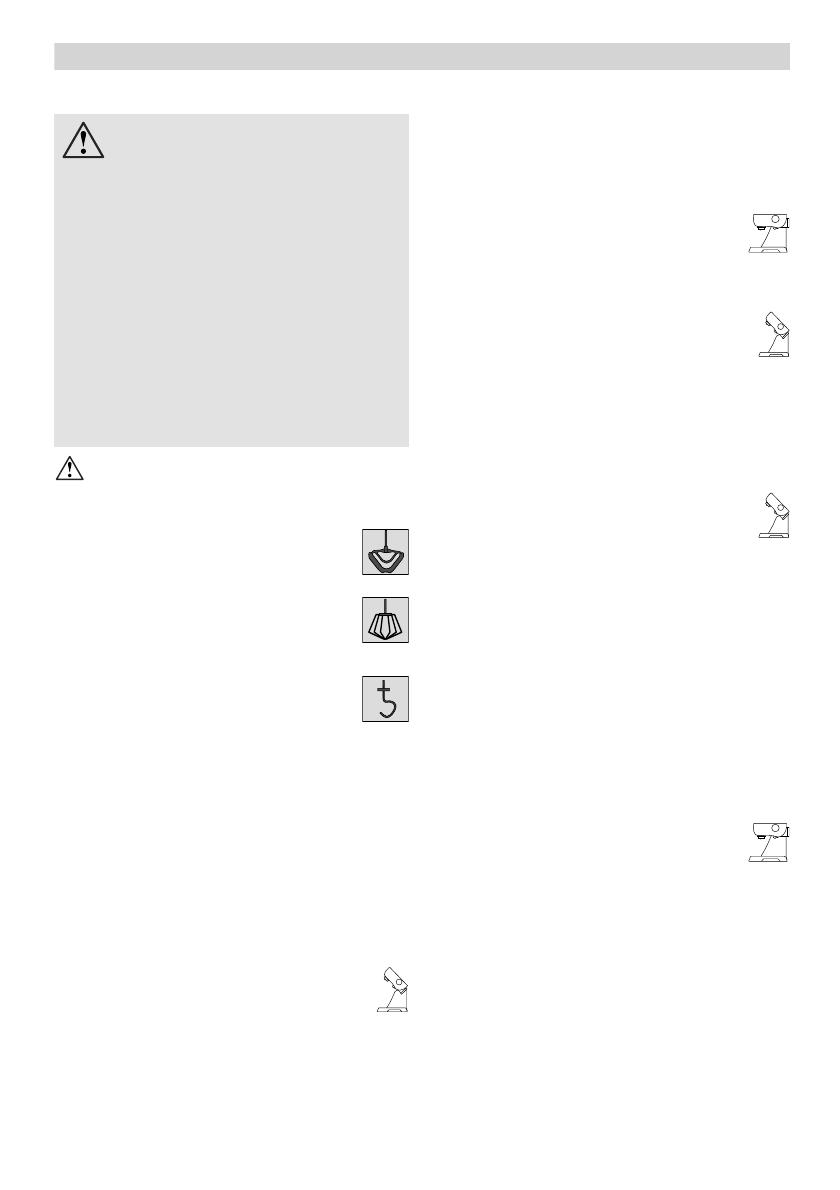
Fouet mixeur « Profi Flexi » (13)
Pour pétrir les pâtes, par exemple de la
pâte levée
Fouet batteur « Profi » (14)
pour monter les œufs en neige, battre la
crème et les pâtes liquides, par exemple
la pâte à biscuits.
Crochet pétrisseur (15)
pour pétrir les pâtes épaisses et
incorporer des ingrédients qu’il ne faut
pas broyer (par exemple les raisins secs, les
plaquettes de chocolat)
Information importante sur l’utilisation
du fouet batteur Figure
Le fouet batteur devrait presque toucher le fond
du bol afin que les ingrédients soient
parfaitement mélangés. Si ça n’est pas le cas,
réglez la hauteur du fouet batteur de la manière
suivante :
Débranchez la fiche mâle de la prise de
courant.
Appuyez sur la touche de
déverrouillage et amenez le bras
pivotant sur la position 2.
Enfoncez le fouet batteur jusqu’à ce qu’il
encrante dans l’entraînement.
Retenez le fouet batteur et desserrez l’écrou
avec la clé à fourche (calibre 8) en tournant
dans le sens des aiguilles d’une montre.
Réglez la hauteur du fouet batteur en
tournant ce dernier jusqu’à parvenir sur une
hauteur optimale.
Tournez dans le sens des aiguilles d’une
montre : Soulever
Tournez dans le sens inverse des
aiguilles d’une montre : Abaisser
Appuyez sur la touche de
déverrouillage et amenez le bras
pivotant sur la position 1.
Vérifiez la hauteur du fouet batteur et
corrigez-la si nécessaire.
Une fois la hauteur correctement réglée,
appuyez sur la touche de
déverrouillage et amenez le bras
pivotant sur la position 2.
Retenez le fouet batteur et serrez l’écrou
avec la clés à fourche (calibre 8) en tournant
en sens inverse des aiguilles d’une montre.
Travailler avec le bol
et les outils Figure
Appuyez sur la touche de
déverrouillage et amenez le bras
pivotant sur la position 2.
Mise en place du bol :
Présentez le bol incliné vers l’avant puis
posez-le.
Tournez en sens inverse des aiguilles
d’une montre jusqu’à l’encrantement.
Suivant besoins, enfoncez le fouet
mélangeur, le fouet batteur ou le crochet
pétrisseur jusqu’à ce qu’il encrante dans
l’entraînement.
Remarque :
Si vous choisissez le crochet pétrisseur
tournez le déflecteur de pâte jusqu’à ce que
le crochet encrante (figure -4b).
Versez les ingrédients à préparer dans le bol.
Appuyez sur la touche de
déverrouillage et amenez le bras
pivotant sur la position 1.
Mettez le couvercle en place.
Réglez l’interrupteur rotatif sur la position
voulue.
Un conseil :
Fouet mixeur « Profi Flexi » :
commencez par mélanger au niveau 1–2
puis au niveau 3–5 suivant besoin
Fouet batteur « Profi » :
vitesse 7, incorporation d’ingrédients à la
vitesse 1
fr
oáëèìÉ=ÇÉ=ÄäÉëëìêÉ=~îÉÅ=äÉë=éáÅÉë=
Éå=êçí~íáçå=>
mÉåÇ~åí=äÉ=ÑçåÅíáçååÉãÉåíI=åÛáåíêçÇìáëÉò=
à~ã~áë=äÉë=ÇçáÖíë=Ç~åë=äÉ=Äçä=ã¨ä~åÖÉìêK=
ríáäáëÉòJäÉ=ìåáèìÉãÉåí=~îÉÅ=äÉ=ÅçìîÉêÅäÉ=ENOF=
Éå=éä~ÅÉ=>
`Ü~åÖÉò=äÉë=~ÅÅÉëëçáêÉë=ìåáèìÉãÉåí=äçêëèìÉ=
äÛ~éé~êÉáä=Éëí=~ì=êÉéçë=Ó=ìåÉ=Ñçáë=äÛ~éé~êÉáä=
¨íÉáåíI=äÉ=ã¨Å~åáëãÉ=ÇÛÉåíê~åÉãÉåí=ÅçåíáåìÉ=
ÇÉ=íçìêåÉê=ìå=ÅÉêí~áå=íÉãéë=éìáë=ëÛáããçÄáäáëÉ=
ëìê=ä~=éçëáíáçå=ÇÉ=ÅÜ~åÖÉãÉåí=ÇÉë=~ÅÅÉëJ
ëçáêÉëK=qçìêåÉò=äÉ=Äê~ë=éáîçí~åí=ëÉìäÉãÉåí=
~éêë=èìÉ=äÛ~éé~êÉáä=ëÛÉëí=áããçÄáäáë¨K
mçìê=ÇÉë=ê~áëçåë=ÇÉ=ë¨Åìêáí¨I=äÛ~éé~êÉáä=åÉ=
éçìêê~=ÆíêÉ=ìíáäáë¨=èìÉ=ëá=äÉë=ÅçìîÉêÅäÉë=ÇÉ=
éêçíÉÅíáçå=ERI=UF=êÉÅçìîêÉåí=äÉë=Éåíê~åÉãÉåíë=
èìá=åÉ=ëÉêîÉåí=é~ëK
Robert Bosch Hausgeräte GmbH 35
–Crochet pétrisseur :
commencez par incorporer les ingrédients
à la vitesse 1, puis malaxez à la vitesse 3.
Rajouter des ingrédients
Éteignez l’appareil par l’interrupteur rotatif.
Rajoutez les ingrédients par l’ouverture pour
ajout ménagée dans le couvercle.
ou
Enlevez le couvercle.
Appuyez sur la touche de
déverrouillage et amenez le bras
pivotant sur la position 2.
Ajoutez des ingrédients.
Après le travail
Éteignez l’appareil par l’interrupteur rotatif.
Débranchez la fiche mâle de la prise de
courant.
Enlevez le couvercle.
Appuyez sur la touche de
déverrouillage et amenez le bras
pivotant sur la position 2.
Détachez l’accessoire de l’entraînement.
Retirez le bol.
Nettoyez toutes les pièces, voir « Nettoyage
et entretien ».
Accessoire râpeur/éminceur
^ííÉåíáçå=>
kÛìíáäáëÉò=äÛ~ÅÅÉëëçáêÉ=êßéÉìê=L=¨ãáåÅÉìê=
èìÛÉåíáêÉãÉåí=~ëëÉãÄä¨K=
kÛ~ëëÉãÄäÉò=à~ã~áë=äÛ~ÅÅÉëëçáêÉ=êßéÉìê=L=
¨ãáåÅÉìê=ëìê=äÛ~éé~êÉáä=ÇÉ=Ä~ëÉK
kDìíáäáëÉò=äÛ~ÅÅÉëëçáêÉ=êßéÉìêL¨ãáåÅÉìê=èìÉ=
Ç~åë=ä~=éçëáíáçå=ÇÉ=ëÉêîáÅÉ=áåÇáèì¨ÉK
Protection contre la surcharge Figure
Pour empêcher un endommagement important
de votre appareil en cas de surcharge de
l’accessoire râpeur/éminceur, l’arbre
d’entraînement de ce dernier comporte une
entaille (zone de rupture programmée).
En cas de surcharge, l’arbre d’entraînement
casse à cet endroit.
Un nouveau porte-disques à arbre
d’entraînement est disponible auprès du service
après-vente.
Disque réversible « Profi Supercut »
– grossier/fin
pour émincer les fruits et légumes. Travaillez les
aliments sur la position 5.
Marquage sur le disque à râper réversible :
« Grob » (grossier) pour le côté de coupe
grossier
« Fein » (fin) pour le côté de coupe fin
^ííÉåíáçå=>
iÉ=ÇáëèìÉ=¶=ê¨ÇìáêÉ=ê¨îÉêëáÄäÉ=åÉ=ÅçåîáÉåí=é~ë=
éçìêçìéÉê=äÉêçã~ÖÉìêIÉ=é~áåIÉëÉíáíëJ
é~áåë=Éí=äÉ=ÅÜçÅçä~íK=kÉ=ÅçìéÉò=äÉë=éçããÉë=
ÇÉ=íÉêêÉ=ÅìáíÉë=ÑÉêãÉë=èìÛ~éêë=èìÛÉääÉë=çåí=
êÉÑêçáÇáK
Disque à râper réversible –
épais / fin
pour râper des fruits, des légumes et du
fromage (sauf le fromage dur, le parmesan par
exemple). Travaillez sur la position 3 ou 4.
Chiffre « 2 » sur le disque à râper réversible, pour
désigner le côté servant à râper épais,
„4» pour le côté servant à râper fin
^ííÉåíáçå=>
iÉ=ÇáëèìÉ=¶=êßéÉê=ê¨îÉêëáÄäÉ=åÉ=ÅçåîáÉåí=é~ë=
éçìê=êßéÉê=äÉë=åçáñK=kÉ=êßéÉò=äÉ=Ñêçã~ÖÉ=ãçì=
èìÛ~îÉÅ=äÉ=Åí¨=¨é~áë=ëìê=ä~=éçëáíáçå=TK
Disque à râper – mi-fin
pour râper les pommes de terre crues,
le fromage dur (par exemple le parmesan),
le chocolat réfrigéré et les noix.
Travaillez les aliments sur la position 7.
^ííÉåíáçå=>
iÉ=ÇáëèìÉ=¶=êßéÉê=åÉ=ÅçåîáÉåí=é~ë=éçìê=êßéÉê=
äÉ=Ñêçã~ÖÉ=ãçì=çì=éê¨Ç¨Åçìé¨=Éå=íê~åÅÜÉëK
Disque à râper –
épais
pour râper des pommes de terre crues,
par exemple pour faire des râpées de pomme
de terre ou des boulettes.
Travaillez les aliments sur la position 7.
Disque à légumes asiatiques
Découpe les fruits et légumes en fines
lanières pour préparer des plats asiatiques.
Travaillez les aliments sur la position 5.
fr
oáëèìÉ=ÇÉ=ÄäÉëëìêÉ
kÛ~ééêçÅÜÉò=é~ë=äÉë=ÇçáÖíë=ÇÉë=ä~ãÉë=Éí=ÇÉë=
~êÆíÉëI=íê~åÅÜ~åíÉëI=ÇÉë=ÇáëèìÉë=¶=ê¨ÇìáêÉK=
ë~áëáëëÉò=äÉë=ÇáëèìÉë=¶=ê¨ÇìáêÉ=èìÉ=é~ê=
äÉìêë=ÄçêÇë=>
kÉ=éçëÉòLêÉíáêÉò=äÛ~ÅÅÉëëçáêÉ=êßéÉìê=L=
¨ãáåÅÉìê=èìÛ~éêë=~îçáê=¨íÉáåí=äÉ=ãçíÉìê=Éí=
ǨÄê~åÅܨ=ä~=ÑáÅÜÉ=ãßäÉ=ÇÉ=ä~=éêáëÉ=ÇÉ=
Åçìê~åíK=kÛáåíêçÇìáëÉò=é~ë=äÉë=ÇçáÖíë=Ç~åë=
äÛçìîÉêíìêÉ=ÇÛ~àçìíK
  • Page 1 1
  • Page 2 2
  • Page 3 3
  • Page 4 4
  • Page 5 5
  • Page 6 6
  • Page 7 7
  • Page 8 8
  • Page 9 9
  • Page 10 10
  • Page 11 11
  • Page 12 12
  • Page 13 13
  • Page 14 14
  • Page 15 15
  • Page 16 16
  • Page 17 17
  • Page 18 18
  • Page 19 19
  • Page 20 20
  • Page 21 21
  • Page 22 22
  • Page 23 23
  • Page 24 24
  • Page 25 25
  • Page 26 26
  • Page 27 27
  • Page 28 28
  • Page 29 29
  • Page 30 30
  • Page 31 31
  • Page 32 32
  • Page 33 33
  • Page 34 34
  • Page 35 35
  • Page 36 36
  • Page 37 37
  • Page 38 38
  • Page 39 39
  • Page 40 40
  • Page 41 41
  • Page 42 42
  • Page 43 43
  • Page 44 44
  • Page 45 45
  • Page 46 46
  • Page 47 47
  • Page 48 48
  • Page 49 49
  • Page 50 50
  • Page 51 51
  • Page 52 52
  • Page 53 53
  • Page 54 54
  • Page 55 55
  • Page 56 56
  • Page 57 57
  • Page 58 58
  • Page 59 59
  • Page 60 60
  • Page 61 61
  • Page 62 62
  • Page 63 63
  • Page 64 64
  • Page 65 65
  • Page 66 66
  • Page 67 67
  • Page 68 68
  • Page 69 69
  • Page 70 70
  • Page 71 71
  • Page 72 72
  • Page 73 73
  • Page 74 74
  • Page 75 75
  • Page 76 76
  • Page 77 77
  • Page 78 78
  • Page 79 79
  • Page 80 80
  • Page 81 81
  • Page 82 82
  • Page 83 83
  • Page 84 84
  • Page 85 85
  • Page 86 86
  • Page 87 87
  • Page 88 88
  • Page 89 89
  • Page 90 90
  • Page 91 91
  • Page 92 92
  • Page 93 93
  • Page 94 94
  • Page 95 95
  • Page 96 96
  • Page 97 97
  • Page 98 98
  • Page 99 99
  • Page 100 100
  • Page 101 101
  • Page 102 102
  • Page 103 103
  • Page 104 104
  • Page 105 105
  • Page 106 106
  • Page 107 107
  • Page 108 108
  • Page 109 109
  • Page 110 110
  • Page 111 111
  • Page 112 112
  • Page 113 113
  • Page 114 114
  • Page 115 115
  • Page 116 116
  • Page 117 117
  • Page 118 118
  • Page 119 119
  • Page 120 120
  • Page 121 121
  • Page 122 122
  • Page 123 123
  • Page 124 124
  • Page 125 125
  • Page 126 126
  • Page 127 127
  • Page 128 128
  • Page 129 129
  • Page 130 130
  • Page 131 131
  • Page 132 132
  • Page 133 133
  • Page 134 134
  • Page 135 135
  • Page 136 136
  • Page 137 137
  • Page 138 138
  • Page 139 139
  • Page 140 140
  • Page 141 141
  • Page 142 142
  • Page 143 143
  • Page 144 144
  • Page 145 145
  • Page 146 146
  • Page 147 147
  • Page 148 148
  • Page 149 149
  • Page 150 150
  • Page 151 151
  • Page 152 152
  • Page 153 153
  • Page 154 154
  • Page 155 155
  • Page 156 156
  • Page 157 157
  • Page 158 158
  • Page 159 159
  • Page 160 160
  • Page 161 161
  • Page 162 162
  • Page 163 163
  • Page 164 164
  • Page 165 165
  • Page 166 166
  • Page 167 167
  • Page 168 168
  • Page 169 169
  • Page 170 170
  • Page 171 171
  • Page 172 172
  • Page 173 173
  • Page 174 174
  • Page 175 175
  • Page 176 176
  • Page 177 177
  • Page 178 178
  • Page 179 179
  • Page 180 180
  • Page 181 181
  • Page 182 182
  • Page 183 183
  • Page 184 184
  • Page 185 185
  • Page 186 186
  • Page 187 187
  • Page 188 188
  • Page 189 189
  • Page 190 190
  • Page 191 191
  • Page 192 192
  • Page 193 193
  • Page 194 194
  • Page 195 195
  • Page 196 196
  • Page 197 197
  • Page 198 198
  • Page 199 199
  • Page 200 200
  • Page 201 201
  • Page 202 202
  • Page 203 203
  • Page 204 204
  • Page 205 205
  • Page 206 206
  • Page 207 207
  • Page 208 208

Bosch MUM 57830 Owner's manual

Category
Blenders
Type
Owner's manual
This manual is also suitable for

Ask a question and I''ll find the answer in the document

Finding information in a document is now easier with AI