Alpha CD Easy-Flue Series Installation Instructions Manual

Type
Installation Instructions Manual

Alpha CD Easy-Flue Series is a concentric flue system designed for use with Alpha condensing boilers. It is suitable for straight horizontal flues, with a maximum length of 12 meters for CD boilers and 3 meters for HE boilers. The system includes a 90° bend, flue sealing collars, and a flue terminal with plume management capabilities. The plume management feature allows for the adjustment of the exhaust flue gas/plume direction to minimize nuisance caused by the emissions.

Alpha CD Easy-Flue Series is a concentric flue system designed for use with Alpha condensing boilers. It is suitable for straight horizontal flues, with a maximum length of 12 meters for CD boilers and 3 meters for HE boilers. The system includes a 90° bend, flue sealing collars, and a flue terminal with plume management capabilities. The plume management feature allows for the adjustment of the exhaust flue gas/plume direction to minimize nuisance caused by the emissions.

Nepicar House, London Road,
Wrotham Heath, Sevenoaks,
Kent TN15 7RS
For Technical help or for Service call ...
ALPHA HELPLINE Tel: 0844 8718764
website:www.alpha-innovation.co.uk
Installation Instructions
Alpha CD Easy-Flue
(with Plume Management Facility)
CD Easy-Flue 500 mm Part No. 6.2000510
CD Easy-Flue 1000 mm Part No. 6.2001010
60/100 concentric flue for use with
Alpha CD range of condensing boilers
EN 14471
2
KIT CONTENTS
1. GENERAL
Note: These flues MUST ONLY be used with the Alpha Condensing boilers.
a. The Alpha Easy-Flue is suitable for straight horizontal flues only and can be extended up to the maximum lengths
given in Section 4.
b. The Alpha CD Easy-Flue is suitable for providing two options for management of the exhaust flue gas/plume emitted
from the terminal. They are:-
i. Divert the plume by altering the terminal of the the Easy-Flue.
ii. Extend the inner flue duct by using Plume Management accessories to re-locate the terminal to an area where the
plume will not cause a nuisance. Note: When fitting plume management accessories, ensure there is always a
slope towards the Easy-Flue assembly in the wall by a minimum of 25-30 mm per metre and there is no part of the
pipework where condensate/rain will collect.
Refer to Section 5 for full details.
c. The Easy-Flue includes a 90° bend, (no separate 90° bend is required).
d. Ensure the Easy-Flue outer duct is installed horizontally (please note that the Easy-Flue inner duct already has a
pre-determined slope towards the boiler for condensate to run back towards the boiler). When extending the flue
with flue extensions, these flue extensions must be installed with a slope downwards towards the boiler by a
minimum of 25-30 mm per metre.
e. The flue system must be installed in accordance with BS 5440:1.
f. The boiler must be installed in accordance with the installation instructions supplied with the Alpha condensing boiler.
g. The CD Easy-Flues are suitable for use in the flue length ranges shown in the tables below.
Note: Where the length is less than the minimum or more than the maximum, refer to Section 4.
Fig. 1 - Rear Flue
CD50 Boiler
CD Easy-Flue
500 mm
1000 mm
B (mm)
Max
430
875
Min
205
665
HE Boiler
CD Easy-Flue
500 mm
1000 mm
B (mm)
Max
500
945
Min
275
735
CDR Boiler
CD Easy-Flue
500 mm
1000 mm
13R/18R
505
950
24R
535
980
13R/18R
280
740
24R
310
770
B Max (mm) B Min (mm)
* With Premier pack
CD C/X/S Boiler
CD Easy-Flue
500 mm
1000 mm
*500 mm
*1000 mm
B (mm)
Max
525
970
*480
*925
Min
300
760
*255
*715
Flue sealing collars
Inside (white), outside (black)
Sealing tape
90° bend
Clamp and seal
(two screws)
Clamp (three screws)
Flue terminal
supplied fitted
Easy-Flue
(B)
Rear Flue
3
2. INSTALL THE BOILER
a. Fit the boiler in accordance with the installation instructions supplied with the Alpha condensing boiler - Sections 4.1 to 4.5.
b. Use the template (supplied with the boiler) to mark the flue position and cut a 110 mm diameter flue hole (or use a
107 mm core drill).
Notes: i. Ensure the hole is cut horizontally.
ii. If the Easy-Flue is being fitted internally, cut a 130 mm diameter flue hole (or use a 127 mm core drill).
Refer to Section 3, paragraph (c) or Section 4.
3. FIT THE FLUE
The following procedure applies to fitting an Alpha CD Easy-Flue to both rear or side exit flue - horizontally only.
Note: If extending the Easy-Flue refer to Section 4.
a. Determine the overall length (L) of flue required, (see Fig. 3) as follows:-
Rear flue L = wall thickness (B) + *60 mm (CD C/X/S) or 85 mm (CD13/18R) or 55 mm (CD24R) or 160 mm (CD50)
or 90 mm (HE)
* Add 45 mm when Premier Pack is used
Side flue L = wall thickness (B) + distance between boiler and wall (C) + 145 mm (CD C/X/S) or 120 mm (CDR) or
150 mm (HE)
Side flue (CD50) L = wall thickness (B) + distance between boiler and wall (C) + X
(L/H side X = 105 mm, R/H side X = 345 mm)
b. Adjust the telescopic section of the flue to the distance 'L', ensuring that the two labels marked 'TOP' are aligned,
then seal and secure the joint between the ducts with the sealing tape supplied.
Note: Always ensure that there is a minimum overlap of 25 mm when fully extending the telescopic section.
c. Pass the flue assembly through the wall (from inside or outside).
Note: Internal fitting - If there is no access to make good the outside wall, locate the outside (black) flue sealing collar onto
the outer duct of the flue immediately before the terminal grille onto the location provided. Push the flue assembly through the
130 mm flue hole, so that the collar completely passes through the wall. Then pull the flue assembly back into the correct
position. Visually check that the collar is sealing the outside wall and that it is not restricting any of the openings of the flue
terminal.
Fig. 4 - Fitting the flue from inside
Fig. 2 - Side Flue
Check collar is sealing
the wall and it is not
restricting any openings
of the flue terminal
130 mm
CD C/X/S Boiler
CD Easy-Flue
500 mm
1000 mm
Max
440
885
Min
215
675
B + C (mm)
CD50 Boiler
CD Easy-Flue
500 mm L/H flue
500 mm R/H flue
1000 mm L/H flue
1000 mm R/H flue
Max
480
240
925
685
Min
255
15
715
475
B + C (mm)HE Boiler
CD Easy-Flue
500 mm
1000 mm
Max
435
880
Min
210
670
B + C (mm)
CDR Boiler
CD Easy-Flue
500 mm
1000 mm
Max
465
910
Min
240
700
B + C (mm)
Fig. 3
(B + C)
Side Flue
Seal Joint with Tape
L
4
d. Position the clamp (two screws) supplied, over the bend. Fit the bend to the boiler and rotate to the correct position.
Secure in position using the clamp. Ensure the clamp is located centrally over both the bend and boiler adaptor.
e. Fit the inside (white) flue sealing collar over the Easy-Flue. If it was not previously fitted, fit the outside (black) flue
sealing collar onto the flue immediately before the terminal grille onto the location provided.
f. Slide the clamp (three screws) over the outer duct and pull the flue assembly towards the bend, locating the inner
duct into the seal joint on the bend. Ensure the labels marked 'TOP' are positioned at the top before securing the flue
assembly to the bend with the clamp (three screws) located centrally over the joint.
Note: Check the flue terminal protrudes 120 mm out of the wall and the inner duct of the terminal is positioned
correctly (see Fig. 5).
g. Make good the inside wall by pushing the inside flue sealing collar up to the wall.
4b. EXTENDING THE FLUE - Fig. 7
Note: The flue assembly length must not exceed the maximum length stated, including the equivalent lengths of any
extensions, bends etc, used for plume management components. CD boilers must not exceed the maximumum of an
equivalent horizontal flue length of 12 m and HE boilers must not exceed 3 m.
a. When the flue length required is more than the maximum stated in Section 1, paragraph (g), refer to the table below
and Figs 1 and 2.
Fig. 5 - Rear flue
4a. REDUCING THE FLUE - Fig. 6
When the flue length required is less than the minimum stated in Section 1, paragraph (g), refer to Fig. 6 below.
Discard the first telescopic section (not the section with the terminal) of the Easy-Flue 1000 mm or 500 mm and cut to the
required length.
Note: Ensure that all cuts are square and free from burrs.
Once assembled with the components pushed home, the flue is fully sealed.
120
Outer duct clamp
Inner duct
Elbow seal joint
90° bend
Clamp and
seal
Terminal
Flue sealing collar
Note: Ensure the outer flue duct is horizontal
Side of boiler
CD Easy-Flue
Ensure the inner duct within
the terminal is at the top.
The inner duct must
be positioned to slope towards
the boiler
Note:
HE
CD13R/18R
CD24R
CD50
CD C/X/S
165 mm
160 mm
130 mm
235 mm
140 mm*
Note: * Add 45 mm when Premier Pack is used
20
65
HE
CD13R/18R
CD24R
CD50
CD C/X/S
70 mm
65 mm
35 mm
140 mm
40 mm*
Inner duct seal
Allow 20 mm 30 mm
Do not cut past this point
Fig. 6
Model
CD C/S/X
CD13R/18R
CD24R
CD50
HE
Rear Flue length (B)
Up to maximum:-
11.885 m
11.873 m
11.9 m
11.795 m
2.865 m
Side Flue length (B + C)
Up to maximum:-
11.805 m
11.83 m
11.83 m
LHS 11.845 m
RHS 11.605 m
2.8 m
Comments
Alpha CD 750 mm flue extension (Part No. 6.2000750)
or 1000 mm extension (Part No. 6.2001050)
is required to extend the range of telescopic flue.
Refer to Section 4b for instructions on how to extend
the flue.
Note: A 130 mm flue hole (127 mm core drill) may be
required in the wall. This is when the extended flue is
passed through the wall.
* Subtract 45 mm if
Premier Pack is used
*
Additional support brackets are required when extending the flue. These are available from Alpha, Part no. 6.1000355.
5
b. Use the template (supplied with the boiler) to mark the required flue position, ensuring there is the correct slope
towards the boiler.
c. Determine the overall flue length as described in Section 3, paragraph (a) to determine the number of Alpha CD 750
or 1000 mm flue extensions required.
d. Assemble the flue extensions together by locating the inner duct into the seal joint and secure each extension
together with the clamps supplied (three screws). Ensure that the clamps are positioned centrally over the joints.
Note: If it is required to cut an extension, DO NOT cut the end of the inner duct that incorporates the seal joint.
Ensure the inner duct end without the seal joint is cut so that it is 20 mm longer than the outer duct.
Ensure that all cuts are square and free from burrs.
Once assembled with the components pushed home, the flue is fully sealed.
e. Adjust the telescopic section of the Easy-Flue to the required length and secure the Easy-Flue with the sealing tape
supplied. Fit the Easy-Flue to the extensions by locating the inner duct into the seal joint and secure with the clamp
(three screws), ensuring it is located centrally over the joint.
f. Mark the end of the flue assembly 'TOP' where it is connected to the boiler, so that the 'TOP' of the flue terminal is
aligned with the 'TOP' at the boiler end of the flue assembly.
g. Pass the complete flue assembly through the wall.
h. Position the clamp and seal (two screws) supplied, over the bend. Fit the bend to the boiler and rotate to the correct
position and secure in position. Ensure the seal is located centrally over both the bend and boiler adaptor.
If the inside sealing collar (white) is being used to make good the inside wall, then it will need to be fitted before
assembling the flue.
i. Slide the clamp (three screws) over the outer duct and pull the flue assembly towards the bend, locating the inner
duct into the seal joint on the bend.
j. Secure the flue assembly to the bend with the clamp (three screws) ensuring it is positioned centrally over the joint,
ensuring the 'TOP' marked on the outer duct is positioned at the top.
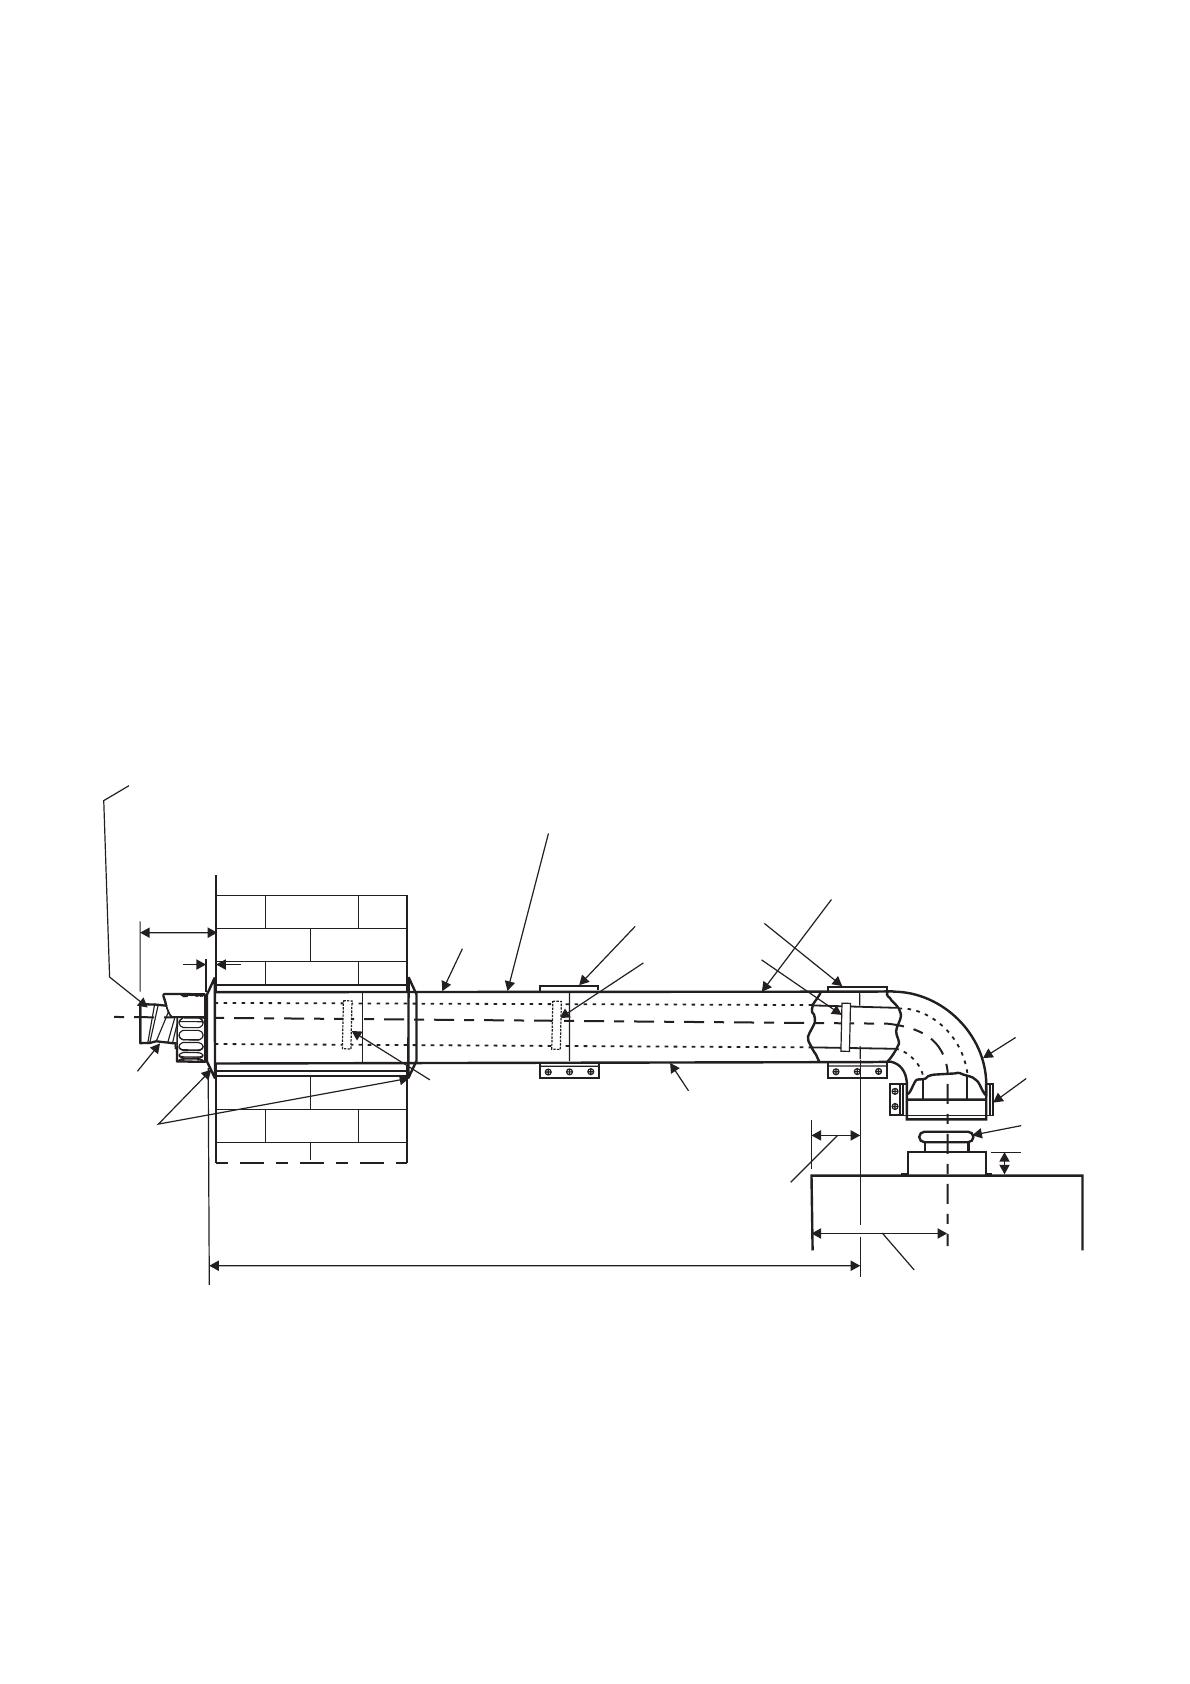
Note: Check the flue terminal protrudes 120 mm out of the wall and that the inner duct of the terminal is positioned
correctly, i.e. the inner duct within the terminal is at the top. See Fig. 7.
k. Make good the outside wall by fitting the outside sealing collar (black) onto the location provided immediately behind
the flue terminal grille. Make good the inside wall using the inside sealing collar (white) if required.
HE
CDR
CD50 LHS
CD50 RHS
CD C/S/X
225 mm
195 mm
180 mm
420 mm
220 mm
HE
CDR
CD50 LHS
CD50 RHS
CD C/S/X
130 mm
100 mm
85 mm
325 mm
125 mm
45 (25 for CD50)
Front of boiler
Outer duct clamp
Inner seal joint
Inner seal joint
Flue length (L)
Clamp
and seal
90° bend
Seal joint
CD Easy-Flue
Ensure outer flue duct of Easy-Flue is horizontal
Ensure the flue extension slopes
downwards towards the boiler by a
minimum of 25 - 30 mm per metre
CD Flue extension
Flue sealing
collar
Ensure the inner duct within
the terminal is at the top.
The inner duct must
be positioned to slope towards
the boiler
Note:
120
Terminal
20
Fig. 7 - Side flue
5. FIT PLUME MANAGEMENT COMPONENTS - (OPTIONAL)
The following procedures detail the options for management of the exhaust flue gas/plume emitted from the terminal.
a. The terminal supplied with the Easy-Flue can be altered to divert exhaust flue gas/plume at an angle.
This can be achieved by simply turning the end section of the terminal to the desired angle.
Fig. 8
b. The CD Easy-Flue can be converted to allow the inner flue duct to be extended so as to position the terminal in an
area where the exhaust flue gas/plume will not cause a nuisance. This can be done before or after installation of the
flue, providing there is access to the terminal from outside.
i. Remove the screws (1 in Fig. 8) securing the terminal and remove the terminal by pulling it from the flue
assembly. Remove the screw (2 in Fig. 8) securing the terminal end section and remove the end section from the
terminal.
ii. Locate a 93° Plume Management bend into the flue assembly and rotate it to the direction required.
iii. Connect to the 93° bend the required Plume Management components as detailed and refer to Fig. 9.
Notes:
1. The wall support brackets must be used to secure the Plume Management pipework to the wall and
prevent disconnection of the 93° bend from the flue assembly or any other component.
2. Each joint must be secured with one of the screws provided to prevent accidental disconnection.
3. Ensure there is always a slight slope towards the flue assembly fitted in the wall and there is no part of
the plume management pipework where condensate/rain will collect and cause a blockage or any
restriction.
iv. Terminate the Plume Management pipework by fitting the terminal end section (push-fit) previously removed. Refer
to Fig. 9.
v. The Plume Management components available for extending the inner flue duct are as follows:-
Plume Management 93° bend 60 mm dia. (each 93° bend equivalent to 1.3 m flue length)
Plume Management 45° bend 60 mm dia. (each 45° bend equivalent to 0.9 m flue length)
Plume Management 1000 mm extension 60 mm dia. (equivalent to 1 m flue length)
60 mm dia. wall bracket
1
1
2
PM length = C + (1 x 93° bend = 1.3 m) + (2 x 45° bends = 1.8 m)
C
Min.
400 mm
CD Easy-Flue
Flue sealing collar
Terminal end section
from CD Easy-Flue
PM length = C + (2 x 93° bend = 2.6 m) + (2 x 45° bends = 1.8 m)
C
Terminal end section
from CD Easy-Flue
PM length = C + (4 x 93° bend = 5.2 m)
C
Terminal end section
from CD Easy-Flue
Ensure there is a slope of approximately
3° back towards the Easy-Flue
Fig. 9
Note: The equivalent horizontal flue assembly length + the equivalent plume management length (PM length) must not
exceed the maximum flue length stated for each boiler, i.e.
Alpha CD boiler maximum equivalent flue length must not exceed 12 metres.
Alpha HE boiler maximum equivalent flue length must not exceed 3 metres.
Note:
1. Ensure each joint is
secured with the screw
supplied.
2. Ensure there is always
a slight slope towards
the CD Easy-Flue so
that there is no part of
the pipework where
condensate will collect.
Manual compiled and designed by Publications 2000 - Tel: (01670) 356211 02/10/D240
These instructions have been carefully prepared but we reserve the right to
alter the specification at any time in the interest of product improvement.
© Alpha Therm Limited 2010.
Alpha Therm Limited.
Nepicar House, London Road, Wrotham Heath,
Sevenoaks, Kent TN15 7RS
Tel: 0844 8718764
website:www.alpha-innovation.co.uk
  • Page 1 1
  • Page 2 2
  • Page 3 3
  • Page 4 4
  • Page 5 5
  • Page 6 6
  • Page 7 7
  • Page 8 8

Alpha CD Easy-Flue Series Installation Instructions Manual

Type
Installation Instructions Manual

Alpha CD Easy-Flue Series is a concentric flue system designed for use with Alpha condensing boilers. It is suitable for straight horizontal flues, with a maximum length of 12 meters for CD boilers and 3 meters for HE boilers. The system includes a 90° bend, flue sealing collars, and a flue terminal with plume management capabilities. The plume management feature allows for the adjustment of the exhaust flue gas/plume direction to minimize nuisance caused by the emissions.

Ask a question and I''ll find the answer in the document

Finding information in a document is now easier with AI