Page is loading ...

Encoder Installation Manual
ELECTRICAL CONNECTIONS
* Index (Z) optional. See Ordering Information
NorthStar
™
brand
NexGen SLIM Tach HT55 Encoder
Key Features
SPECIFICATIONS
Common
B
A
Z*
No Connection
Vcc (5-26 VDC)
B
A
Z*
Shield
1
2
3
4
5
6
7
8
9
10
Black
Green
Blue
Violet
—
Red
Yellow
Gray
Orange
Braid
Signal Connector Pin Pigtail Cable MS 3102E18-IT#
F
B
A
C
E
D
I
H
J
G
_
_
_
CONTENTS
Specifications ........................Pg 1
Important ................................Pg 2
Mechanical Installation .........Pg 4
Electrical Installation .............Pg 9
Dimensions ..........................Pg 10
Ordering Information ...........Pg 10
• Hollowshaft Design Mounts Easily to Large
Motor Shafts, up to 2.875” in Diameter
• Single or Dual Isolated Outputs Available
with Field-Serviceable Connector
• Expanded Resolution up to 4096PPR
• Redesigned Circuitry for On-Board
Diagnostics with LED
• Multiple Bore Sizes Available
• Stainless Steel and Aluminum
Construction
STANDARD OPERATING CHARACTERISTICS
Code: Incremental, Magnetic
Pulses per Revolution: 256-4096PPR
Phasing Sense: A leads B for CW shaft rotation
viewing the shaft clamp end of the encoder
Quadrature Phasing: 90° ± 45°
Symmetry: 50% ±15%
Number of Output Modules:
Single or Dual
ELECTRICAL
Input Power Requirements: 5-26VDC, 120mA
typical per sensor module, plus line driver load
Output Signals: IC-WE Differential Line Driver:
150mA, sink or source
Frequency Response: 0 - 180kHz Data & Index
Noise Immunity: Tested to EN61326-1
Electrical Immunity: Reverse polarity and short
circuit protected
ELECTRICAL (Cont.)
Connector: 10 pin industrial duty latching, sealed
NEMA 4 &12, IP65. Optional MS3102 10 pin,
Pigtail Cable, or Latching connector on cable
extension
Page 1
MECHANICAL
Bore Size: 1/2” to 2-7/8”
Mounting Configuration: Hollow Shaft mount
with Anti-Rotation Tether
Max. Shaft Speed:
Shaft Size ≤ 1.250 = 5000 RPM,
Shaft Size > 1.250 = 3600 RPM
Torque:
Shaft Size ≤ 1.250: Typical 6 oz-in
Shaft Size > 1.250: Typical 15 oz-in
Shaft Length Required: 1.60” Minimum
Acceleration Rate: 3,600 rpm/sec max
Housing Material: Hard Anodized Aluminum,
W/Stainless Steel Shaft.
Weight: 5 lbs.
ENVIRONMENTAL
Operating Temperature Range: -40°C to +85°C
Storage Temperature Range: -40°C to +120°C
Shock: 100 G’s Min.
Vibration: 20 G’s @ 5-2000 Hz spectrum
Humidity: Up to 98% (non-condensing)

Page 2
IMPORTANT INSTALLATION INFORMATION
FEATURES
All encoders have the following electrical features:
• Power (+DC)
• Common
• Output Signal(s)
Power (also referred to as supply, power source, and
power +V/VCC) is always +DC for encoders. There-
fore, power should always be connected to the
positive (+) side of DC power. In addition, encoder
power should be regulated to within ±5% at the en-
coder and should be free of induced transients. Com-
mon (also referred to as Com, supply common, and
ground) is generally a black wire (verify via Electrical
Connections table). Common should always be con-
nected to the negative (-) side of DC power.
All encoders have at least one output signal (A); how-
ever, it is common for encoders to have three signals
A, B, Z (may also be referred to as C, X, or index).
The outputs should each be connected to the receiv-
ing device at the appropriate terminal. NOTE: Never
connect A, B, or Z to the + or - side of DC power.
ELECTRICAL CONNECTIONS
Cable - The use of shielded cable is recommended
for all encoder installations. When a Dynapar brand
encoder is ordered, the type of termination is gener-
ally defined (usually the last selectable code in Order-
ing Information). If a code for a cable was indicated,
the encoder was manufactured to include a shielded
cable. If any other type of termination was selected or
if selection of termi-nation type was not requested, a
cable assembly must be ordered. (The cable assem-
bly easily hooks onto the encoder’s connector making
it ready for wiring).
To determine which cable assembly to order, refer
to the Electrical Connections table (in the encoder’s
manual).
GENERAL GUIDELINES
Encoders provide quality measurements and long
life when common sense, care, and accurate align-
ments are provided during installation. The following
general guide-lines will help to ensure a trouble-free
installation.
Mounting the Encoder
Wiring the Encoder
• Never connect or disconnect the encoder con-
nector or wiring while power is ON. Doing so may
damage the encoder.
• Power should always be connected to the + side
of DC power.
• Common should always be connected to the -
side of DC power.
• Never connect A, B, or Z to the + or - side of DC
power.
In some cases, there may be more than one table or
the table may be broken into sections due to different
output types. If so, refer to the information listed for
the output type selected for the encoder (in Ordering
Information).
Wiring should be run through dedicated conduits or
harnesses (not shared with any other wiring) which
are spaced at least 12 inches apart. This protects the
cable from physical damage while providing a degree
of electrical isolation. Also, do not run cable in close
proximity to other conductors which carry current to
heavy loads such as motors, motor starters, contac-
tors, or solenoids. Doing so could result in electrical
transients in the encoder cable which cause unde-
sired signal pulses.
NOTE: Never connect or disconnect the encoder
connector or wiring while power is ON. Doing so
may damage the encoder.
Grounding - DO NOT ground the encoder through
both the machine and the cable wiring. Connect the
shield at the input device only. NOTE: If the shield
is connected at both ends, grounding problems
that degrade system performance may result.
For European-based applications requiring CE com-
pliance, cable length must not exceed 30m. Connect
the shield to building ground on either the Encoder
or Controls end. CE compliant products are tested to
EN61326 EMC.
ELECTRICAL CONNECTIONS (cont.)
Do not shock the encoder. Do not subject the encoder to
axial or radial shaft stresses.
Do not tool the encoder
or its shaft.
Do not use makeshift techniques
to mount the encoder.
Do not use a rigid coupling.Do not disassemble the encoder.

Page 3
CONNECTIONS
Obviously not all receiving devices are the same.
However, connecting your encoder to one, no
matter what type or brand it may be, is not difficult. As
discussed in the previous section, all encoders have
certain electrical features. Each of these features/
functions are identified in the encoder’s Electrical
Connections table along with its corresponding pin
and wire color. Each wire specified in the table must
be connected to the receiving device.
Determining where to connect each wire is as easy as
following the Electrical Connections table and match-
ing each wire to the proper terminal on the receiving
device. In general, no matter what type of receiving
device you are using, the terminal strip is marked,
indicating the proper location for each function/wire.
These markings may either be numbers or text labels
identifying functions. If they are numbers, the receiv-
ing device’s manual should define what function
corresponds to each number.
Since receiving devices are made by various manu-
facturers, not all text labels/references are the same.
There are various ways to identify each function.
Following are a few examples:
LED STATUS LIGHT:
A multicolor LED Status light will indicate to the user
the overall condition of the encoder. The LED is built
into the encoder and does not require any additional
wiring or power to activate it. There are 4 basic status
conditions for the light:
1) LED off: No power to Encoder, Low supply voltage
(<3.0VDC), Total Failure of Encoder
2) LED Green: Correct Power to Encoder, Ready to
operate, No wheel movement Detected
3) LED Flashing: Unit operating, Unit sending pulses
out
4) LED Flashing Red: Low power to encoder
(<4.5VDC), Line Driver Failure, Line Driver Over-
Temperature (generally caused by external short
circuit), Line Driver Logic Failure
FREQUENTLY ASKED QUESTIONS
There are additional colored wires which are not
referred to in the Electrical Specifications table.
What do I do with them?
Do not connect them to the receiving device. Any
unused encoder signal wires must be individually
insulated and tied back. They should NEVER be
in contact with common, power sources, or other
output signal lines.
The encoder is correctly connected to the
receiving device per the Electrical Specifications
table and the receiving device’s terminal strip
label; however, it’s counting in the wrong
direction. What’s wrong?
In order to reverse the counting direction, the output
signal connections must be switched. If the encoder
has a single ended output, swap A and B. If the
encoder has a differential line driver, swap A and
–
A.
I’ve connected the encoder and it doesn’t work (
No Outputs). What can I do?
Many encoders have internal protection circuits
which shut down the encoder to prevent damage
if the input power is not correct or the outputs are
overloaded. Check the following: Input Voltage (is
it too high?); Input Polarity (is it reversed?); and
Output Wiring (are they wired properly?).
I’ve read and followed the technical manual and
these guidelines and the encoder still doesn’t
work properly. Help!?
Calm down - help is at your fingertips! Simply pick
up the phone and dial our Applications Engineering
Department at 1-800-234-8731 (US & Canada) or
847-662-2666 from 8:00 AM to 4:45 PM (Central
time) Monday - Friday. One of our engineers will
gladly help you solve the problem.
Typical
Encoder
Power
Common
Signal A
Signal B
Index
Referred to as:
Vcc; + Power
DC Power
12VDC
Referred to as:
Comm
– Power
– DC
Referred to as:
Input A
A+
Sig. A
Referred to as:
Input B
B+
Sig. B
Referred to as:
Marker
Z
Sig. C
Note: Encoders that
feature differential
outputs will also have
complementary outputs
referenced as
A, B, Z (A-not, B-not,
Z-not).
_ _ _
FEATURES (cont.)
When encoders have a differential line driver, there
are two signals for each of the outputs. Each signal
(A, B and Z) has a compliment or inverse (A, B and Z
referred to as A not, B not, and Z not). The signal and
its compliment (i.e. A and
A) are separate outputs.
Connect each output to a separate input.
NOTE: Never connect these signals together or to
the + or - side of DC power. Never connect
differential signals to the same input.
_ _ _
_
IMPORTANT INSTALLATION INFORMATION

Page 4
A. GENERAL OVERVIEW
The following instructions are meant to assist in proper installation of
Dynapar brand, Series HT55 hollowshaft encoders. The encoder is a
speed and position transducer that when mounted to a rotating shaft,
produces output pulses that are directly proportional to the shaft speed
and direction. The hollowshaft encoder is attached to the motor shaft
by using a clamp down collar. The HT55 can accommodate several
machine shaft diameters by selecting the appropriate bore size. During
installation, certain physical properties associated with the mechani-
cal coupling must be observed to ensure a long operation life of the
encoder.
B. SHAFT EXTENSION
Solid shaft preferred, keyway allowed; flatted shaft must not be used.
The minimum shaft engagement length that will allow support to encod-
er housing is 1.60”. Installations that employ a press-fit or screwed-on
stub shaft adapter should align the stub shaft to 0.002” TIR or less with
a dial indicator
C. TETHER POINT
For general industrial machinery and C-face motor installations, locate
the tether hole at the nominal bolt circle location. The tether holes are
slightly elongated, to allow for hole location tolerance and arcing of the
tether, if the hole location is not flush with the tether surface.
MECHANICAL INSTALLATION
HOLE LOCATION BOLT SIZE
2.94”(75 mm) 3/8”(9.5 mm)
3.63” (92 mm) 1/2” (12 mm)
2.5”-3.25” (63-82mm) 1/4” (6 mm)
BOLT SIZE RECOMMENDED
TORQUE
1/4”(6mm)
5/16”(8mm
3/8”(9.5mm)
1/2”(12mm)
50-60 in-lbs
70-80in-lbs
100-125 in-lbs
125-150 in-lbs
STEP 1: PREPARATION AND RECOMMENDED TOOLS
Disconnect power from equipment and encoder cable. Ensure that
you have the proper tools. Typical tools that may be needed depend-
ing on the options chosen are:
#2 Phillips Screwdriver; 3mm Hex Wrench; Caliper Gauge; Dial
Indicator Gauge; 3/8”, 1/2” or 1/4” T- handle Wrenches (tether op-
tions); Dynapar M100 encoder tester.
STEP 2: CHECK AND CLEAN THE MATING SHAFT STEEL
Ensure that the mating shaft is within proper tolerances.
Recommended mating shaft diameter tolerances should be nominal
+0.0000”/-0.0005” [0.00 to -0.013mm] and shaft runout TIR should
be under 0.002”.
Clean the mating shaft of any burrs and check that mating shaft
engagement is at least 1.60” inside the encoder shaft. Using a dial
indicator gauge verify that the motor shaft Total Indicated Reading
(TIR) is less than 0.002” [ 0.05 mm].
STEP 4: INSTALL THE TETHER ON ENCODER
Rotate the tether to the required orientation and tighten the tether
arm to the encoder body using the four screws provided .The hollow-
shaft series encoder tethers can be rotated in 15 degree increments
so that connector or cable exit can be conveniently located.
STEP 5: INSTALL WASHERS ON TETHER
Slide the flat nylon washer on the side away from the bend and the
flanged nylon washer on the side of the bend and press them to-
gether until they are fully seated in the tether hole. One steel washer
is to be used on each side of the nylon washer.

Page 5
STEP 6: SLIDE ENCODER ON SHAFT
Carefully slide the encoder all the way down until the tether rests on
the motor face without any stress on the tether. Do not tighten the
shaft clamp on the encoder yet
STEP 7A: SECURE TETHER TO MOUNTING FACE (MOTOR
MOUNT)
Rotate the tether arm until it is at the correct orientation and is aligned
with the mounting holes on the the motor or equipment. Install one
steel washer on both sides of the nylon washer. Fasten the tether arm
to the motor or machine housing using the supplied 3/8” bolt (4.5” C-
face applications) or 1/2” bolt (8.5” C-face applications). Ensure that
there is no stress or flexing of the tether arm when secured.
STEP 7B: SECURE TETHER TO MOUNTING FACE (FAN COVER
MOUNT)
Slide and insert the T-bolt as shown in the figure into the fan cover.
Use the supplied insulating hardware and washers as shown. Tighten
the jamnut to firmly secure the tether.
STEP 8: TIGHTEN ENCODER CLAMP ONTO MATING SHAFT
Check to make sure that the tether is still in its “unstressed” condi-
tion. Adjust position of encoder on shaft if necessary and then tighten
the shaft clamp on the encoder. Tighten clamp to stated torque value
provided on encoder datasheet (50-55 in-lbs.).
NOTE: ENCODER MODELS WITH SPLIT CLAMPS HAVE TWO SCREWS
TO TIGHTEN DOWN. PLEASE ENSURE THAT BOTH SCREWS ON THE
CLAMP ARE TIGHTENED DOWN SECURELY. YOU MAY HAVE TO RO-
TATE THE SHAFT TO TIGHTEN BOTH SCREWS DOWN.
STEP 9: GOOD INSTALLATION CHECK POINT
Follow the 3 step installation check to ensure a good installation thus
far. Refer to figure above for key reference dimensions
A. Check clearances from mounting face. Ensure you have a
minimum clearance of 1/16” between the encoder shaft and any non-
rotating surface closest to the encoder shaft
B. Check tether installation. Make sure that the tether is unstressed.
There should be no visible bending or deflection on any surface of the
tether. Visible tether deflections should be corrected immediately. If
the tether is bent or distorted, DO NOT USE, and call the factory for a
replacement tether. Tether installation is critical to the long life of the
bearings and improper tether installation will lead to excessive bear-
ing loads and encoder failure.
C. Check wobble of encoder housing. Turn the shaft by hand and
make sure that the shaft turns freely and does not produce excessive
runout/wobble of the encoder. Most encoder installations will have
wobble arising from shaft tolerances. Measure the wobble on the
visible back face of the encoder. A wobble of less than 0.007” TIR will
not have any adverse effect on encoder performance. In general, the
lower the TIR of runout, the better.
"C"SIZE
TOLERANCES UNLESS
INDICATED:
C D.T.C.
TITLE
DRAWING NUMBER
UL
RoHS
REACH
CE
CSA
TUV
ATEX
TM
27-DEC-2019
HT55_MOUNT
1 OF 2
-
RELEASED: DATE:
/ / SHEET REV
CHECKED: DATE:
APPLICATION:
27-DEC-2019 PRO/E MODEL: HT55_MOUNT
.005 .01 1/4
DRAWN: DATE:
X X
FINISH:
HT55_MOUNT
1:4
.XXX .XX ANGLES
FILE NAME: SCALE:
COMPLIANCE REQUIRED
MATERIAL:
UNITS: INCH
REV ECN DATE APPROVED
MOUNTING HOLE
FLAT STEEL WASHER
FLAT NYLON WASHER
FLANGED NYLON WASHER
FLAT STEEL WASHER
HEX BOLT
MOUNTING FACE OF MOTOR
TETHER

Page 6
Components for Mounting on NEMA C-face motor.
MOUNTING TO A NEMA 4.5” OR 8.5 C-FACE MOTOR WITH ROD TETHER
"C"SIZE
TOLERANCES UNLESS
INDICATED:
C D.T.C.
TITLE
DRAWING NUMBER
UL
RoHS
REACH
CE
CSA
TUV
ATEX
TM
22-JAN-2020
ROD_TETHER
1 OF 1
-
RELEASED: DATE:
/ / SHEET REV
CHECKED: DATE:
APPLICATION:
22-JAN-2020 PRO/E MODEL: ROD_TETHER
.005 .01 1/4
DRAWN: DATE:
X X
FINISH:
ROD_TETHER
1:4
.XXX .XX ANGLES
FILE NAME: SCALE:
COMPLIANCE REQUIRED
MATERIAL:
UNITS: INCH
REV ECN DATE APPROVED
SEE DETAIL B
C-FACE MOTOR
MODIFIED 1/2-13 X 1" FOR 8.5" C-FACE
MODIFIED 3/8-16 X 3/4" FOR 4.5" C-FACE
2X 10-32 SQUARE NUT
2X 10-32 STUDDED ROD END
10-32 X 4" THREADED ROD
10-32 X 2.5" THREADED ROD
(CUT TO LENGTH AS REQUIRED)
1. Assemble rod end turnbuckle assembly per image above.
2. Locate rod end mounting hole on the HT55, mount rod end assembly to one of four holes on the HT55. Tighten to 40 in-lbs.
3. Insert the appropriate bolt (3/8”-16 UNC or ½”-13 UNC pending on C-Face size) into one of four threaded holes on motor C-Face. Tighten
3/8”-16 UNC to 200 in-lbs. Tighten 1/2”-13 UNC to 500 in-lbs.
4. Slide the HT55 over the motor shaft. After positioning the encoder to the best angular orientation, adjust rod arm length, (thread rod may be
cut to length if necessary, for proper fit). While installing the encoder, engage the remaining end of the torque arm to the mounting bolt. Tighten
to 40 in-lbs.
5. Attach the remaining end of the anti-rotation arm to the mounting bolt. Add a removable threaded locker and tighten the turnbuckle locking
nuts.
6. Without the encoder being completely tightened, set the axial alignment so that no part of the torque arm assembly touches the motor, but is
perpendicular to the encoder body. Position should be as close to C-face as possible but not flush with motor.
7. Tighten clamp screws holding the encoder on the shaft with the hex wrench provided.
NOTE: Verify installation by checking clearance between the torque arm assembly and motor C-face.
NOTE: Verify installation by checking clearance between the torque arm assembly and motor C-face. The minimum motor shaft length
required should be approximately 1.6”.

Page 7
MOUNTING TO A MOTOR WITH A FAN SHROUD WITH ROD TETHER
NOTE: If only the opposite drive end of the motor is available and has a fan shroud, you must use the special anchor
bolt and bracket on the end of the torque arm. Figure below shows the bracket and bolt attached to the fan shroud.
Components for Mounting on Fan Shroud Motor.
Cutaway, Side View of the Bracket and Bolt Attachment.
"C"SIZE
TOLERANCES UNLESS
INDICATED:
C D.T.C.
TITLE
DRAWING NUMBER
UL
RoHS
REACH
CE
CSA
TUV
ATEX
TM
23-JAN-2020
ROD_TETHER
1 OF 1
-
RELEASED: DATE:
/ / SHEET REV
CHECKED: DATE:
APPLICATION:
23-JAN-2020 PRO/E MODEL: ROD_TETHER
.005 .01 1/4
DRAWN: DATE:
X X
FINISH:
ROD_TETHER
1:4
.XXX .XX ANGLES
FILE NAME: SCALE:
COMPLIANCE REQUIRED
MATERIAL:
UNITS: INCH
REV ECN DATE APPROVED
BRACKET
TYPICAL MOTOR
W/ FAN SHROUD
ANCHOR BOLT
HEX NUT
2X 10-32 SQUARE NUT
ROD ARM ASSEMBLY
ANCHOR BOLT
TYPICAL MOTOR
W/ FAN SHROUD
BRACKET
10-32 SQUARE NUT
ROD ARM ASSEMBLY
HEX NUT

Page 8
1. Locate the torque arm mounting hole on the motor side of the encoder. Insert the 10-32 bolt through the rod end of the torque arm.
Tighten the 10-32 bolt to 40 in-lbs.
2. Arrange the anchor bolt (1/4 bolt) and lug. Slide the anchor bolt head into the fan shroud through an available vent slot.
3. Rotate the bolt 90° so that the anchor bolt catches to the inside of the fan shroud. Align lug to form a straight line from shaft to anchor.
Once positioned, tighten the hex nut with approximately 25in-lbs torque.
4. Slide the HT55, with the split shaft collar and torque arm loosely attached, over the motor shaft. While installing the encoder, engage the
torque arm by inserting the 10-32 x 1/2” hex bolt into the tapped hole in the bracket. Tighten to 40 in-lbs.
5. Without the encoder being completely tightened, set the axial alignment so that no part of the torque arm assembly touches the motor,
but is perpendicular to the encoder body. Position should be as close to C-face as possible but not flush with motor.
6. Tighten 10-32 x 1/2” bolt, in bracket to 40 in-lbs.
7. Tighten socket head cap screws, in split shaft collar, to 50 in-lbs. (Try maintaining the split in the shaft collar with notches in the motor
mounting sleeve on the HT55.)
NOTE: Verify installation by checking clearance between the torque arm assembly and motor C-face. The minimum motor shaft length
required should be approximately 1.6 ”.
MOUNTING TO A MOTOR WITH A FAN SHROUD (CONT.)

Page 9
1.2 ELECTRICAL INSTALLATION
IT IS VERY IMPORTANT that the mating connector
and the encoder body be isolated from electrical
ground in the wiring and conduit to prevent motor or
machine shaft eddy currents from going to ground
through the encoder bearings, as this will damage the
bearings over time. To insure that this is being done,
it is suggested that a plastic wiring/conduit adaptor or
non-conductive conduit is used to isolate the connector
from any metallic surface or conductive conduit. Please
see special note under table 1, for proper encoder
connector shielding. Also, to allow for proper encoder
grounding, the motor must be wired and grounded per
your local NEC Requirements.
Electrical connections are made to the sensor
module through a standard 1/2 inch NPT liquid tight
flexible conduit. The nipple length may be changed
to extend the outlet box if desired. Interconnection
cable recommendations are as follows: stranded
copper, 22 through 16 gage, braided or foil with drain
wire shielding 0.05 F maximum total mutual or direct
capacitance, outer sheath insulated. Shrink tubing may
be placed over any wires without insulation. For lengths
over 100 feet, use 18 gage or larger, to a maximum
of 1000 feet. If shielded twisted pair wire is used, do
not cross channels. Keep each pair of complementary
channel outputs together in a single twisted pair (e.g.,
A and A).
IMPORTANT: Reversing power and common will
not damage the unit. However, applying power to
any of the sensor outputs may cause damage.
Grounding: For applications with high ground
potential differences, DO NOT ground the encoder
through both machine and controls end. Connect
the shield at the controls end only. NOTE: If the
shield is connected at both ends, grounding
problems that degrade system performance can
result.
CE Grounding Measures – For best EMC
immunity the cable screen must be grounded on
both encoder and controls end. For cable lengths
longer than 30m or outdoor applications, additional
measures must be implemented to comply with
CE requirements. Connection of the encoder
to DC power supply network is prohibited if CE
compliance is required. CE-compliant products are
tested to EN61326-1 EMC.
In all cases, system CE compliance is ultimately the
responsibility of the manufacturer integrating the
encoder.
1.3 QUICK RELEASE CONNECTOR HOOD WIRING
To install the Quick Release Connector, perform the
following steps.
1.Remove the four screws from the mating connector
housing that hold the terminal block in place. Re-
move terminal block from housing.
2.Insert wiring through liquid tight flexible seal and
mating connector housing. Leave enough wire ex-
posed to comfortably reach the terminal block. Wire
to terminal block according to wire code in Table 1.
A similar wiring list is attached to enclosure.
3.Tighten Liquid Tight fitting on housing. OPTIONAL:
In some hostile environments, seal between con-
nector body and Sensor Module can be improved
by smearing a sealant (silicone grease, etc.) on the
neoprene seal of the connector.
4. Mate connector into place on sensor mount and
snap the two latches into place. If only one sensor is
being installed, ensure cover plate is installed over
other sensor hole.
Table 1. Signal Coding Table
* Index (Z) optional. See Ordering Information
Common
B
A
Z*
No Connection
Vcc (5-26 VDC)
B
A
Z*
Shield
1
2
3
4
5
6
7
8
9
10
Black
Green
Blue
Violet
N/A
Red
Yellow
Gray
Orange
Braid
Signal Connector Pin Pigtail Cable MS 3102E18-IT#
F
B
A
C
E
D
I
H
J
G
Quick Release Connector Hood Wiring
To install the Quick Release Connector, perform the following steps:
1. Remove the four screws that hold the terminal block in place from mating connector hood. Remove the terminal block from the
hood.
2. Insert wiring through the liquid tight flexible seal and the mating connector hood. Enough wire should be left exposed to
comfortably reach the terminal block.
3. Wire to terminal block according to the wire code in Table 1. A similar wiring list is attached to the enclosure.
4. Replace the terminal block in the connector hood. Insert and tighten the four mounting screws.
5. Tighten the liquid tight fitting on the housing.
6. OPTIONAL: In some hostile environments, seal between connector body and sensor module can be improved by applying a
Figure 7: Industrial Latching Connector
Uninstalling the Encoder
1. Loosen the 10-32 socket head cap screws in split shaft collar. Loosen 10-32 x • hex bolt attached to the bracket or bolt on
the motor. Carefully remove the encoder and torque arm assembly.
2. Perform the installation steps in reverse order.
Returning Equipment to Dynapar
If it is necessar
y to return the unit for repair or replacement, a Return Goods Authorization (RGA) number must be obtained from a
factory representative before returning the equipment to our service department. When returning an instrument for service, the
following information must be provided before we can attempt any repair.
1. Instrument model and serial number.
2. User’s name, company, address, and phone number.
3. Malfunction symptoms.
4. Description of system.
5. Returned Goods Authorization number.
Please consult the factory for shipping instructions.

NorthStar
™
brand
INCREMENTAL ENCODERS
Code 3: Index
L
Z With Differential
Index
SERIES HT55
Ordering Information
To order, complete the model number with code numbers from the table below:
Code 5: Termination
C Latching Industrial
Connector with
1/2” NPT
M 10 Pin MS Connector
P 18” Pigtail Cable
Q Latching Industrial
Connector on 18”
Pigtail Cable
Code 2: PPR
Code 1: Model
HT5 Hollow
Shaft
Mount
0256
0512
1024
2048
4096
Code 4: Wheel Bore
JO3 1/2”
JO4 5/8”
J24 3/4”
J05 7/8”
J06 1.000”
J07 1.125”
J08 1.250”
J09 1.375”
J10 1.500’
J11 1.625”
J12 1.750”
J13 1.875”
J14 2.000”
J15 2.125”
J16 2.250”
J17 2.375”
J18 2.500”
J20 2.625”
J19 2.875”
Code 6: Electrical
V 5-26V in, 5-26V
Line Driver
(IC-WE) out
5 5-26V in, 5V out
Line Driver
(IC-WE)
Code 7: Output
1 Single
2 Dual (Isolated)
Differential ,
bidirectional
signals
(A, A, B, B)
For additional bore sizes
available, please consult
factory.
M12 12mm
M14 14mm
M15 15mm
M16 16mm
M18 18mm
M20 20mm
M25 25mm
M45 45mm
M50 50mm
M55 55mm
Code 8: Fixing
Stamped Metal
Available when
shaft is 1.25” or
smaller
1 4.5” C-Face
Tether
2 8.5” C-Face
Tether
3 Slotted Tether
Swivel Rod
A Rod Tether
Ordering Information
Code 3: Index
L No Index
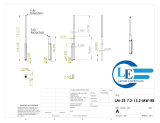
DIMENSIONS
inches
"C"SIZE
TOLERANCES UNLESS
INDICATED:
C D.T.C.
TITLE
DRAWING NUMBER
UL
RoHS
REACH
CE
CSA
TUV
ATEX
TM
4.71
[119,6]
8.29
[210,6]
1.16
[29,5]
1.75
[44,5]
1.98
[50,2]
2.50
[63,5]
5.80
[147,4]
2.35
[59,8]
3.38
[85,8]
5.80
[147,4]
3.38
[85,8]
2.35
[59,8]
4X 30
120°
45°
4X 90
5.70
[144,8]
3.75
[95,3]
2.25
[57,2]
MPW 07-JUN-2019
HT55_FINAL_SMALL_BORE
1 OF 1
-
RELEASED: DATE:
/ / SHEET REV
2019
CHECKED: DATE:
APPLICATION: HT55
MPW 07-JUN-2019 PRO/E MODEL: HT55_FINAL_SMALL_BORE
.005 .01 1/4
DRAWN: DATE:
X X
FINISH:
HT55_FINAL_SMALL_BORE
1:2
.XXX .XX ANGLES
FILE NAME: SCALE:
COMPLIANCE REQUIRED
MATERIAL:
HT55 SMALL BORE
UNITS: INCH
REV ECN DATE APPROVED
4X 10-32 UNC
ON 5.000 [127.00] B.C.
4X M5X.08
ON 3.000 [76.20] B.C.
4X M5X.08 X .24
ON 3.000 [76.20] B.C.
4X 10-32 UNC X .50
ON 5.000 [127.00] B.C.
1.25” BORE AND BELOW

by
INCREMENTAL ENCODERS
SERIES HT55
DIMENSIONS
inches
114574-0001 Slotted Tether Kit
2.30
[58.42]
.53 [13.46]
4.50
[114.3]
Ø3.50 [89]
Ø2.506
[63.65]
1.25 [31.75]
2.50
[63.5]
.500 [12.7]
.63 [16]
24X Ø
ON A Ø3.000 [76.2] B.C.D
.200 [5.08]
(24X)
15˚
(2X) 45˚ X
.125
[3.17]
90.0˚
114573-0001 Tether Kit
.530 [13.46]
Ø
3.500
[88.9]
Ø
2.506
[63.65]
Ø
.53 [13.46]
2.94
[74.68]
Ø
.82 [20.83]
1.25 [31.75]
(24X)
ON 3.000 [76.2] B.C.D
Ø
.20
[.51]
(24X)
15˚
2.350
[59.7]
90.0˚
.530
[13.46]
Ø
3.500
[88.9]
Ø
2.510
[63.75]
3.525
[89.54]
ON 3.000 B.C
[76.2]
(24X)
Ø
.20
[5.08]
(24X)
15°
.25 [6.35]
1.25 [31.75]
.75
[19.05]
2.14
[54.36]
.625
[15.88]
90.0°
4.5" C-Face Tether
Slotted Tether
8.5" C-Face Tether

NorthStar
™
brand
INCREMENTAL ENCODERS
NorthStar™ brand is a trademark of DYNAPAR. All rights reserved.
Specifications subject to change without notice.
Document No. 703292-0001, Rev. A ©2020 DYNAPAR
European Sales Representitive
Hengstler GmbH
Uhlandstrasse 49, 78554 Aldingen
Germany
www.hengstler.com
Customer Service:
Tel.: +1.800.873.8731
Fax: +1.847.662.4150
WWW.DYNAPAR.COM
Headquarters: 1675 Delany Road • Gurnee, IL 60031-1282 • USA
INNOVATION - CUSTOMIZATION - DELIVERY
Worldwide Brands: NorthStar
TM
• Dynapar
TM
• Hengstler
TM
• Harowe
TM
Technical Support
Tel.: +1.800.234.8731
Fax: +1.847.662.4150
"C"SIZE
TOLERANCES UNLESS
INDICATED:
C D.T.C.
TITLE
DRAWING NUMBER
UL
RoHS
TUVCECSA
FCC
VCCI ATEX
TM
8.29
[210,6]
4.71
[119,6]
1.75
[44,5]
1.95
[49,5]
2.50
[63,5]
1.16
[29,5]
4.00
[101,6]
4.20
[106,7]
5.80
[147,4]
3.38
[85,8]
2.35
[59,8]
120°
4X 30
5.70
[144,8]
RELEASED: DATE:
REV
CHECKED: DATE:
APPLICATION:
PRO/E MODEL:
.005 .01 1/4
DRAWN: DATE:
FINISH:
.XXX .XX ANGLES
FILE NAME: SCALE:
COMPLIANCE REQUIRED
MATERIAL:
UNITS: INCH
REV ECN DATE APPROVED
4X 10-32 UNC X .50 DEEP
ON
5.000 [127.00] B.C.
USED FOR ROD TETHER
SERIES HT55
DIMENSIONS
inches
BORES ABOVE 1.25”
/