Nostalgia SP240 Series User manual
- Category
- Popcorn poppers
- Type
- User manual
This manual is also suitable for

All products are trademarks of Nostalgia Products LLC.
Worldwide design & utility patented or patents pending.
© 2018 Nostalgia Products LLC.
www.nostalgiaproducts.com
(rev. 02/05/18 NW)

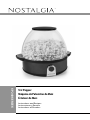
SP240SERIES
Stir Popper
Máquina de Palomitas de Maíz
Éclateur de Maïs
Instructions and Recipes
Instrucciones y Recetas
Instructions et Recettes


ENGLISH
2
Make every day a party!
Visit www.nostalgiaproducts.com for more fun products.
CONTENTS
SAFETY . . . . . . . . . . . . . . . . . . . . . . . . . . . . . . . . . . . . . . . . . 2
IMPORTANT SAFEGUARDS . . . . . . . . . . . . . . . . . . . . . . . . . . . . . 3
ADDITIONAL IMPORTANT SAFEGUARDS . . . . . . . . . . . . . . . . . . . . 3
INTRODUCTION . . . . . . . . . . . . . . . . . . . . . . . . . . . . . . . . . . . . 4
PARTS & ASSEMBLY . . . . . . . . . . . . . . . . . . . . . . . . . . . . . . . . . . 5
HOW TO OPERATE . . . . . . . . . . . . . . . . . . . . . . . . . . . . . . . . . . 6
HELPFUL TIPS . . . . . . . . . . . . . . . . . . . . . . . . . . . . . . . . . . . . . 7
CLEANING & MAINTENANCE . . . . . . . . . . . . . . . . . . . . . . . . . . . 7
RECIPES . . . . . . . . . . . . . . . . . . . . . . . . . . . . . . . . . . . . . . . . . 8
RETURNS & WARRANTY . . . . . . . . . . . . . . . . . . . . . . . . . . . . . . . 10
SAFETY
Appliance Specications:
120 Volts, 60 Hz
600 Watts
THIS PRODUCT IS FOR USE IN 120V AC OUTLET ONLY.
Refer to www.nostalgiaproducts.com/user-manuals/ for the most updated manual.
Your safety and the safety of others is very important.
We have provided many important safety messages in this manual and
on your appliance. Always read and obey all safety messages.
This is the safety alert symbol.
This symbol alerts you to potential hazards that can
cause serious injury to you and others.
All safety messages will follow the safety alert symbol.
All safety messages will tell you what the potential hazard is, tell you how to reduce the
chance of injury, and tell you what can happen if the instructions are not followed.

ENGLISH
3
IMPORTANT SAFEGUARDS
A person who has not read and understood all operating and safety instructions
is not qualied to operate this appliance. All users of this appliance must read and
understand this Instruction Manual before operating or cleaning this appliance.
When using electrical appliances, basic safety precautions
should always be followed, including:
1. Read all instructions before operating this appliance.
2. DO NOT TOUCH the hot surfaces. Use handles or knobs.
3. This appliance is NOT A TOY.
4. Unsupervised young children and cognitively challenged
individuals should never operate this appliance.
5. Close supervision is necessary when any appliance is used by or near children.
6. To protect against electrical shock do not immerse cord, plug
or any part of this unit in water or other liquids.
7. Unplug from outlet when not in use, before removing parts and before cleaning.
Allow to cool before putting on or taking o any parts, and before cleaning.
8. DO NOT operate any appliance with a damaged cord or plug, or after the appliance
malfunctions, or if the appliance has been damaged in any manner. Return the
appliance to the nearest repair shop for examination, repair or adjustment.
9. The manufacturer does not recommend the use of accessory attachments other than
what is provided by the manufacturer. Use of attachments may cause injuries.
10. DO NOT use the appliance for other than its intended use.
11. DO NOT use outdoors. FOR HOUSEHOLD USE ONLY.
12. DO NOT place on or near a hot gas or electric burner, or in a heated oven.
13. DO NOT let cord hang over edge of table or counter, or touch hot surfaces.
14. NEVER leave unit unattended while in use or when plugged into an outlet.
15. Extreme caution must be used when moving an appliance containing hot food.
16. Always attach plug to appliance rst, then plug cord in the wall outlet. To
disconnect, turn any control to "o," then remove plug from wall outlet.
ADDITIONAL IMPORTANT SAFEGUARDS
Operating Safety Precautions
1. DO NOT touch cooking plate and keep bowl on main unit closed while
operating. Cooking plate gets VERY HOT during operation.
2. Ensure the cooking plate is properly attached to the base before operating.
3. Check cooking plate and heating element for presence of foreign objects prior to use.
4. DO NOT place butter, seasonings, or anything other than popcorn kernels and oil onto the
cooking plate. Use of these substances may cause hazards and may damage the unit.
5. DO NOT operate unit without oil as the popcorn kernels may burn or smoke.
6. DO NOT leave motor running once popping has ceased.
7. Exercise caution when emptying popcorn. Use handles or knobs
to empty popcorn, and make sure the unit is over a countertop so
that residual hot oil running out will not cause burns.

ENGLISH
4
Instructions for the Electrical Cord and Plug
1. ELECTRICAL SHOCK HAZARD: Failure to follow these instructions
can result in death, re, or electrical shock.
• Plug into a grounded 3 prong outlet.
• DO NOT remove ground prong.
• DO NOT use an adapter.
• DO NOT use an extension cord.
2. This unit MUST be grounded. In the event of an electrical short circuit, grounding
reduces the risk of electric shock by providing an escape wire for the electric current.
This unit is equipped with a cord having a grounding wire with a grounding plug.
The plug must be plugged into an outlet that is properly installed and grounded.
3. WARNING: Improper use of the grounding plug can result in a risk of electric
shock. If the plug does not t fully into the outlet, contact a qualied
electrician. Do not attempt to modify the plug in any way.
4. A short power supply cord is provided to reduce the risk resulting
from becoming entangled or tripping over a long cord.
5. The manufacturer does not recommend using this machine in countries that do not
support 120V AC even if a voltage adapter, transformer, or converter is in use.
SAVE THESE INSTRUCTIONS!
INTRODUCTION
Thank you for purchasing the STIR POPPER from Nostalgia™! This unique popper is a
popcorn maker and serving bowl in one! Simply add kernels and ip the switch. In about
ve minutes, replace the lid, turn unit upside-down and you'll have a bowl full of delicious
popcorn. The included measuring spoon allows you to add the perfect amount of kernels
for each batch, while the stirrer inside helps prevent popcorn from burning. Add oil, butter
or salt to enhance the avor. Also works great for making kettle corn or roasting nuts.
Visit www.nostalgiaproducts.com to nd out which kits
and accessories are available for this product!

ENGLISH
5
PARTS & ASSEMBLY
Parts
Kernel Measuring
Cup (¼ cup = 2 oz.)
Oil Measuring
Spoon (1 Tbsp.)
Bowl
Non-Stick
Cooking Plate
Base
Lid
ON/OFF
Button

ENGLISH
6
HOW TO OPERATE
Before rst use, follow the directions under CLEANING &
MAINTENANCE to clean your STIR POPPER.
1. To make popcorn, begin by nding a at surface near an electrical
outlet before starting. Make sure your cord is away from any water
source. It is acceptable to use an extension cord if needed.
2. Gather your popcorn making supplies: popcorn, seasonings,
cooking oil, and measuring spoon for oil.
3. Measure 2 tablespoons of oil and add to the Cooking Plate (oil may also be
added through ventilation slots while corn kernels are popping).
4. Add up to 6 ounces (3/4 cup) of corn kernels. DO NOT exceed 6 ounces total of popcorn
kernels.
5. For every Measuring Cap full of kernels (2 oz.), add 1 tablespoons of oil. For best
results, soft-shelled popping corn and coconut or vegetable oil is recommended.
6. Always remove the Lid while kernels are popping. This
will allow steam to vent through the top.
7. Place the Bowl onto the Cooking Plate and plug in the
appliance while switch is ipped to OFF position.
8. Turn appliance ON by ipping the switch on the Base. Soon you will hear the popping begin!
9. Once popping has stopped, turn the unit OFF and unplug from the electrical outlet.
10. Secure the Lid to the top of the Bowl.
11. While wearing oven mitts, ip over the Bowl and Cooking Plate, then remove
the Cooking Plate. If desired, add popcorn seasons to your popcorn. Use the
Cooking Plate to shake and evenly coat your popcorn with seasonings.

ENGLISH
7
HELPFUL TIPS
NEVER leave the unit unattended while operating.
SMOKING
If your STIR POPPER begins to smoke during cooking, it may be due to grease build up. In
order to reduce smoking, make sure that you clean the inside of the Kettle between uses.
POPCORN
The STIR POPPER is designed for all regular and premium brands of
popping corn. Yellow corn generally pops better than white corn, while
some brands of kernels have a harder outer shell and may result in fewer
popped kernels. Try dierent brands to nd which you like best.
If you notice you are experiencing a lot of unpopped kernels, try adding
more oil to the Kettle. More oil may help pop more kernels.
Always use fresh popcorn. Dried out, stale, or old popcorn pops poorly
as it has lost its moisture content and may scorch. We recommend
storing popcorn in an airtight container in a cool place.
Occasionally popcorn does not pop. This is usually the result of environmental factors
such as freshness and moisture content of the popcorn, or variances of popcorn
type. Unpopped kernels do not necessarily indicate a defect in the appliance.
When lling the Kernel Measuring Cup, make sure to not ll above the marked line.
Underlling can cause less kernels to pop and more unpopped kernels to come out of the
unit. Overlling can cause popped corn to burn and smoke, as it will overll the Kettle.
SEASONING
For more buttery popcorn or when adding seasonings, a spritz of olive oil,
water or butter will allow the seasonings to better stick to the popcorn.
CLEANING & MAINTENANCE
1. Make sure appliance is unplugged and completely cooled before cleaning.
2. Remove the Cooking Plate by lifting up on the handles.
3. Wash the Cooking Plate and Bowl and Lid in warm, soapy water with a non-abrasive cloth or
sponge. Rinse thoroughly and dry with a non-abrasive towel.
NOTE: The Cooking Plate and Bowl may also be placed in the dishwasher.
4. Clean the exterior of the Base with a non-abrasive, damp and soapy cloth.
Wipe surface until fully clean and then dry with a dry, non-abrasive cloth.
NEVER use scouring pad or abrasive cleaners on the Base, as scratching may occur.

ENGLISH
8
RECIPES
The STIR POPPER makes hot, fresh popcorn anytime! Enjoy
your freshly popped corn in a variety of ways:
• Add nuts to corn kernels to create a crunchy snack.
• Add sugar, cinnamon and salt to popcorn for a sweet kettle corn taste.
• Flavored popcorn – add seasoning from any gourmet popcorn seasoning kit.
• Try some of these fun recipes:
1 Gallon = 16 Cups
PARMESAN POPCORN
• 1 Gallon of
Popped Corn
• 1 Tsp. Garlic Powder
• 3 Green Onions,
finely chopped
• ½ Tsp. Cracked
Pepper
• 1 Tsp. Sea Salt
• 1 Cup Parmesan
Cheese, grated (more
or less to taste)
• 3 Tbsp. Olive
Oil, heated
Pop corn kernels using the STIR POPPER as
directed in the HOW TO OPERATE section.
Combine garlic powder, green onions, cracked
pepper, sea salt and parmesan cheese. Set aside.
In a large mixing bowl, drizzle hot olive oil over popcorn.
Toss until well coated.
Slowly add in dry ingredients while continuously
stirring popcorn until well coated.
You may also shake the dry ingredients over
popcorn in a large paper or muslin bag.
TRADITIONAL POPCORN BALLS
• ½ Cup Popcorn,
unpopped
• ½ Cup Corn Syrup
• ½ Cup Granulated
Sugar
• ½ Tsp. Salt
• 1 Stick of Butter,
softened
Pop corn kernels using the STIR POPPER as
directed in the HOW TO OPERATE section.
Mix corn syrup, sugar and salt together in pot and
dissolve over medium heat for about 3 minutes.
Add popcorn to pot, stirring and tossing consistently
until popcorn is evenly coated at low heat.
Remove from heat.
Use softened butter to form balls while
popcorn mixture is still warm.
Wrap individual balls in plastic wrap, tie
and store at room temperature.

ENGLISH
9
CHUNKY MONKEY
• 1 Gallon of
Popped Corn
• 1 (12-oz.) Bag
Semi-Sweet
Chocolate Chips
• 1 (12-oz.) Bag Peanut
Butter Morsels
• 1 (4.2-oz) Bag Banana
Chips, broken into
small pieces
• 1 (11-oz.) Bag Peanuts
Pop corn kernels using the STIR POPPER as
directed in the HOW TO OPERATE section.
Melt chocolate chips and peanut butter morsels
over stove, as packaging recommends.
Line cookie sheet with wax paper.
Toss together popcorn and banana chips.
Spread popcorn and banana chip mixture
evenly over cookie sheet.
Drizzle melted chocolate and peanut butter
mixture over popcorn and banana chips.
Sprinkle peanuts over chocolate and peanut butter mixture.
Allow to cool.
When chocolate and peanut butter has hardened,
break up the Chunky Monkey into pieces.
Can be stored in plastic freezer bags.
POPCORN PEPPERMINT BARK
• 1 Gallon of
Popped Corn
• 1 (12-oz.) Bag
Semi-Sweet or Dark
Chocolate Chips
• 1¼ Cup Peppermint
Sticks, crushed
Pop corn kernels using the STIR POPPER as
directed in the HOW TO OPERATE section.
Melt chocolate chips over stove, as packaging recommends.
Line cookie sheet with wax paper.
Spread popcorn evenly over cookie sheet.
Drizzle melted chocolate over popcorn.
Sprinkle crushed peppermints over chocolate.
Allow to cool.
When chocolate has hardened, break up
Popcorn Peppermint Bark into pieces.
Can be stored in plastic freezer bags.

ENGLISH
10
RETURNS & WARRANTY
SHOULD YOUR UNIT NOT WORK OR IF DAMAGED WHEN YOU FIRST TAKE IT OUT OF
THE BOX, PLEASE RETURN IT TO THE PLACE OF PURCHASE IMMEDIATELY.
STIR POPPER / SP240SERIES
Should you have any questions, please contact us via email or at the customer service number listed
below between the hours of 8:00 AM and 5:00 PM, Monday through Friday, Central Standard Time.
Distributed by:
Nostalgia Products LLC
1471 Partnership Dr.
Green Bay, WI 54304-5685
Customer Service
Phone: (920) 347-9122
Web: www.nostalgiaproducts.com
Customer Service Inquiry
To submit a Customer Service inquiry, go to www.nostalgiaproducts.com and ll
out the Customer Service Inquiry form and click the Submit button.
A representative will contact you as soon as possible.
Product Warranty Terms
Nostalgia Products LLC (the “Company”) hereby warrants that for a period of one (1) year from the
date of original purchase, this product will be free of defects in material and workmanship under
normal home use, provided that the product is operated and maintained in accordance with the
operating instructions. As the sole and exclusive remedy under this warranty, the Company will
at its discretion either repair or replace the product found to be defective, or issue a refund on the
product during the warranty period. This warranty is only available to the original retail purchaser of
the product from the date of initial retail purchase, and is only valid with the original sales receipt, as
proof of purchase date is required to obtain warranty benets. All warranty claims must be brought
to the attention of the Company within the warranty period and no later than 30 days of the failure
to perform. This warranty does not cover normal wear or damage caused by shipping, mishandling,
misuse, accident, alteration, improper replacement parts, or other than ordinary household use.
You may be required to return the product (with shipping prepaid by you) for inspection and
evaluation. Return shipping costs are not refundable. The Company is not responsible for returns
damaged or lost in transit. Unless otherwise specically permitted by the operating instructions, this
warranty applies to indoor household use only. In order to obtain service under this warranty, please
contact the Company at the telephone number listed above or by lling out the Customer Service
Inquiry Form located at www.nostalgiaproducts.com. Warranty valid only in USA and Canada.
This warranty is in lieu of all other warranties, expressed or implied, including warranties of
merchantability and tness for a particular purpose, which are hereby excluded to the extent
permitted by law. In no event shall the Company be liable for any indirect, incidental, consequential,
or special damages arising out of or in connection with this product or the use thereof. Some
states, provinces or jurisdictions do not permit the exclusion or limitation of incidental or
consequential damages, so the foregoing exclusion or limitation may not apply to you.
This warranty does not apply to re-manufactured merchandise.
Please read the operating instructions carefully. Failure to comply
with the operating instructions will void this warranty.
For more information, visit us online at www.nostalgiaproducts.com.
Like us on Facebook at www.facebook.com/NostalgiaElectrics.
Follow our boards on Pinterest at www.pinterest.com/nostalgiaelctrx.
Tweet along with us on Twitter at www.twitter.com/NostalgiaElctrx.

11
ESPAÑOL
11
¡Convierta todos los días en una etsa!
Visite www.nostalgiaproducts.com para
ver más productos divertidos.
CONTENIDO
SEGURIDAD . . . . . . . . . . . . . . . . . . . . . . . . . . . . . . . . . . . . . . 11
SALVAGUARDIAS IMPORTANTES . . . . . . . . . . . . . . . . . . . . . . . . . . 12
SALVAGUARDIAS IMPORTANTES ADICIONALES . . . . . . . . . . . . . . . .12
INTRODUCCIÓN . . . . . . . . . . . . . . . . . . . . . . . . . . . . . . . . . . . . 13
PIEZAS Y ENSAMBLAJE . . . . . . . . . . . . . . . . . . . . . . . . . . . . . . . . 14
CÓMO FUNCIONA . . . . . . . . . . . . . . . . . . . . . . . . . . . . . . . . . . 15
CONSEJOS ÚTILES . . . . . . . . . . . . . . . . . . . . . . . . . . . . . . . . . . 16
LIMPIEZA Y MANTENIMIENTO . . . . . . . . . . . . . . . . . . . . . . . . . . . 16
RECETAS . . . . . . . . . . . . . . . . . . . . . . . . . . . . . . . . . . . . . . . . . 17
DEVOLUCIONES Y GARANTÍA . . . . . . . . . . . . . . . . . . . . . . . . . . . 19
SEGURIDAD
Especicaciones del electrodoméstico:
120 Volts, 60 Hz
600 Watts
ESTE PRODUCTO SÓLO DEBE USARSE CON UN TOMACORRIENTE DE 120V AC.
Visite www.nostalgiaproducts.com/user-manuals/ para ver el manual más actualizado.
Su seguridad y la de otras personas es muy importante.
Hemos proporcionado numerosos mensajes de seguridad importantes en este manual
y en su electrodoméstico. Siempre lea y obedezca todos los mensajes de seguridad.
Este es el símbolo de alerta de seguridad.
Este símbolo le avisa de los peligros potenciales
que pueden matar o herir a otros.
Todos los mensajes de seguridad estarán antecedidos por el símbolo de alerta.
Todos los mensajes de seguridad le dirán de qué peligro potencial se trata, cómo reducir
la posibilidad de lesiones y qué puede ocurrir si no se obedecen las instrucciones.

12
ESPAÑOL
12
SALVAGUARDIAS IMPORTANTES
Una persona que no haya leído y comprendido todas las instrucciones
de uso y seguridad no está calicada para utilizar este aparato. Todos
los usuarios de este dispositivo deben leer y comprender este Manual
de instrucciones antes de utilizar o limpiar este aparato.
Cuando utiliza aparatos eléctricos, siempre se deben seguir algunas
medidas básicas de seguridad que incluyen las siguientes:
1. Lea todas las instrucciones antes de utilizar este aparato.
2. NO TOQUE las supercies calientes. Use agarraderas o mangos.
3. Este aparato NO ES UN JUGUETE.
4. Los niños pequeños sin supervisión y las personas con limitación
cognitiva nunca deben utilizar este aparato.
5. Una supervisión estricta se requiere cuando un aparato se use por niños o cerca de ellos.
6. Como medida de protección contra el riesgo de descarga eléctrica, no sumerja el
cable, los enchufes ni ninguna otra parte de la unidad en agua ni en otros líquidos.
7. Desconéctelo del tomacorriente cuando no esté en uso, antes de
retirar piezas y antes de la limpieza. Déjelo enfriar antes de colocar
o retirar cualquiera de las piezas, y antes de la limpieza.
8. NO utilice ningún aparato con el cable o el enchufe dañados, ni si el aparato
tiene desperfectos o SI se ha dañado de cualquier manera. Devolver el
aparato al taller de reparación más cercano para su reparación o ajuste.
9. El fabricante no recomienda el uso de otros aditamentos o accesorios diferentes a los
proporcionados por el fabricante. El uso de accesorios puede provocar lesiones.
10. NO utilice el aparato para otros usos que no haya sido diseñado.
11. NO utilice el aparato al aire libre. SOLO PARA USO DOMÉSTICO.
12. NO lo coloque sobre o cerca de una hornilla eléctrica o gas caliente, o en un horno caliente.
13. NO permita que el cable cuelgue sobre el borde de la mesa o
del mostrador, ni que toque supercies calientes.
14. NUNCA deje la unidad desatendida mientras esté en uso o
cuando esté enchufada a una toma de corriente.
15. Debe ser extremadamente cuidadoso al mover cualquier aparato con comida caliente.
16. Siempre conecte primero el enchufe al aparato, luego enchufe el cable
a la toma de corriente. Para desconectar, mueva todos los controles
a “apagar” y luego retire el enchufe del tomacorriente.
SALVAGUARDIAS IMPORTANTES ADICIONALES
Precauciones de seguridad operativa
1. NO toque el plato de cocina y mantenga la recipiente de la unidad principal cerrada
mientras funciona. El plato de cocina se vuelve MUY CALIENTE durante el funcionamiento.
2. Asegúrese de que el plato de cocina esté correctamente
conectado a la base antes de utilizarlo.
3. Revise el elemento de calefacción para ver si tiene objetos extraños antes del uso.
4. NO coloque mantequilla, condimentos, o cualquier cosa aparte de pepitas de palomitas de
maíz en el plato de cocina. El uso de estas sustancias puede ser peligroso y dañar la unidad.
5. NO use la unidad sin aceite ya que las pepitas de palomitas
de maíz pueden provocar quemaduras o humo.
6. NO deje el motor del caldero encendido cuando hayan terminado las explosiones.

13
ESPAÑOL
13
7. Tenga cuidado al vaciar las palomitas de maíz. Siempre use las agarraderas o
mangos para vaciar las palomitas de mazí y asegúrese de que la unidad esté en una
encimera para que el aceite caliente residual que sale no cause quemaduras.
Instrucciones para el cable eléctrico y el enchufe
1. RIESGO DE DESCARGA ELÉCTRICA: El incumplimiento de estas instrucciones
puede resultar en la muerte, incendio o descarga eléctrica.
• Enchufe en un tomacorrientes de 3 patas con conexión a tierra.
• NO retire la patilla de conexión de tierra.
• NO utilice un adaptador.
• NO utilice un cable de extensión.
2. La unidad DEBE conectarse a tierra. En caso de un corto circuito, la conexión
a tierra reduce el riesgo de descarga eléctrica al proporcionar un cable de
escape para la corriente eléctrica. Esta unidad está provista de un cable
que tiene un cable a tierra con un enchufe a tierra. Se debe enchufar en un
tomacorriente de pared instalado apropiadamente y conectado a tierra.
3. ADVERTENCIA: El uso incorrecto de la toma de tierra puede resultar en riesgo de sufrir
una descarga eléctrica. Si el enchufe no entra completo en el tomacorriente, contacte
a un electricista calicado. No trate de modicar el enchufe de ninguna manera.
4. Se provee un cable de alimentación corto para reducir el riesgo
resultante de enredarse o tropezar con un cable largo.
El fabricante no recomienda el uso de esta máquina en países que no admiten 120V
CA incluso si se está usando un adaptador, transformador o convertidor de voltaje.
¡CONSERVE ESTAS INSTRUCCIONES!
INTRODUCCIÓN
Gracias por adquirir la MÁQUINA DE PALOMITAS DE MAÍZ de Nostalgia™! Esta exclusiva
máquina de hacer palomitas de maíz es una máquina de hacer palomitas de maíz
y un recipiente todo en uno! Simplemente coloque los granos, gire el interruptor
y en alrededor de cinco minutos invierta la unidad y tendrá una cubeta de estilo
de cine llena de deliciosas palomitas de maíz. Agregue aceite, manteca o sal para
mejorar el sabor. También es ideal para hacer palomitas azucaradas o asar nueces.
¡Visite www.nostalgiaproducts.com para averiguar qué paquetes
y accesorios están disponibles para este producto!

14
ESPAÑOL
14
PIEZAS Y ENSAMBLAJE
Montaje
Taza Medidora de
Granos (¼ cup = 2 oz.)
Cuchara Medidora
de Aceite (1 Tbsp.)
Recipiente
Plato de cocina
antiadherente
Base
Tapa
Boton de encendido
/ apagado

15
ESPAÑOL
15
CÓMO FUNCIONA
Antes del primer uso, siga las instrucciones en LIMPIEZA Y MANTENIMIENTO
para limpiar su MÁQUINA DE PALOMITAS DE MAÍZ.
1. Para hacer palomitas, comience por encontrar una supercie plana cerca de un
tomacorriente eléctrico antes de comenzar. Asegúrese de que el cable esté lejos de
una fuente de agua. Es aceptable usar un cable de extensión si es necesario.
2. Recopile los suministros para hacer las palomitas: maíz para palomitas,
condimentos, aceite de cocina y la cuchara medidora para el aceite.
3. Mida 2 cucharadas de aceite y añádalas a la Placa de cocción (el aceite también puede
añadirse a través de las ranuras de ventilación mientras explotan los granos de maíz).
4. Añada hasta 6 onzas (3-4 tazas o 170 g) de granos de maíz. NO exceda las 6 onzas (170 g) de
granos de palomitas de maíz.
5. Por cada 2 onzas de granos (57 g), agregue 1 cucharada de aceite.
Para obtener mejores resultados, se recomienda usar maíz de
cáscara blanda para palomitas y aceite de coco o vegetal.
6. Siempre mantenga retirada la tapa mientras estén explotando los
granos. Eso posibilita que el vapor salga por la parte superior.
7. Coloque el recipiente sobre la Placa de cocción y conecte el
aparato con el interruptor en la posición de Apagado.
8. Encienda el aparato al mover el interruptor en la base. ¡Pronto
escuchará que comienzan las explosiones!
9. Cuando se detengan las explosiones, apague la unidad y desconéctela del tomacorriente.
10. Asegure la Tapa a la parte superior del Recipiente.
11. Usando guantes para hornos, voltee el Recipiente y Placa de cocción, después retire la
Placa de cocción. Si desea, añada condimentos para palomitas a sus palomitas. Use la
Placa de cocción para agitar y cubrir uniformemente las palomitas con los condimentos.

16
ESPAÑOL
16
CONSEJOS ÚTILES
FUMAR
Si el MÁQUINA DE PALOMITAS DE MAĺZ comienza a producir humo al cocinar,
puede deberse a acumulación de grasa. Con el n de reducir la producción
de humo, asegúrese de limpiar el interior del caldero entre usos.
PALOMITA DE MAÍZ
El MÁQUINA DE PALOMITAS DE MAĺZ está diseñado para todas las marcas premium y
regulares de maíz para explotar. El maíz amarillo generalmente explota mejor que el maíz
blanco, mientras que algunas marcas de pepitas tienen una cáscara dura y pueden resultar
en menos granos explotados. Pruebe marcas diferentes para encontrar la que más le gusta.
Si nota que se están produciendo un montón de pepitas sin explotar, intente añadir
más aceite al caldero. Más de aceite puede ayudar a explotar más pepitas.
Siempre utilice palomitas de maíz frescas. Palomitas de maíz secas,
rancias o viejas no explotan bien ya que han perdido su contenido de
humedad y se pueden quemar. Recomendamos guardar las palomitas
de maíz en un recipiente hermético en un lugar fresco.
Ocasionalmente, las palomitas de maíz no explotan. Este suele ser el resultado
de factores medioambientales tales como frescura y el contenido de humedad
de las palomitas de maíz, o las variaciones del tipo de palomitas de maíz. Las
pepitas no explotadas no necesariamente indican un defecto en el aparato.
Al llenar la taza medidora de pepitas, asegúrese de no sobrellenar sobre la línea
marcada. El sobrellenado puede producir menos pepitas explotadas y más
pepitas no explotadas que salen de la unidad. El sobrellenado puede producir
humo y palomitas de maíz quemadas, ya que sobrellenará el caldero.
CONDIMENTOS
Para obtener más palomitas de maíz con mantequilla o al agregar
condimentos, un poco de aceite de oliva, agua o mantequilla permitirá
que los condimentos se adhieran mejor a las palomitas de maíz.
LIMPIEZA Y MANTENIMIENTO
1. Asegúrese de que el aparato esté desenchufado y se haya
enfriado completamente antes de limpiarlo.
2. Retire la Placa de cocción levantando las manijas.
3. Lave la placa de cocción, el recipiente y la tapa en agua tibia jabonosa con un paño o
esponja no abrasivos. Enjuague y seque completamente con un paño no abrasivo.
NOTA: La Placa de cocción y el Recipiente también pueden colocarse en el lavavajillas.
4. Limpie el exterior de la base con un paño no abrasivo, húmedo
y jabonoso. Frote la supercie hasta que esté completamente
limpia y luego séquela con un paño seco y no abrasivo.
NUNCA utilice estropajos ni productos abrasivos en la base, ya que podría rallarla.

17
ESPAÑOL
17
RECETAS
¡La MÁQUINA DE PALOMITAS DE MAÍZ prepara palomitas de maíz
calientes y frescas en cualquier momento! Disfrute de sus palomitas
de maíz recién preparadas en una variedad de formas:
• Agregue nueces a los granos de maíz para crear un bocadillo crocante.
• Agregue azúcar, canela y sal a las palomitas de maíz para obtener un sabor dulce.
• Palomitas de maíz saborizadas – agregue aderezos de un kit
gourmet para la preparación de palomitas de maíz.
• Pruebe algunas de estas divertidas recetas:
1 Galón = 16 Tazas
PALOMITAS DE MAÍZ CON QUESO PARMESANO
• 1 Galón de
palomitas de maíz
• 1 cdita. de ajo
en polvo
• 3 cebollas verdes,
namente picadas
• ½ Cda. de pimienta
molida
• 1 Cda. de sal marina
• 1 Taza de queso
parmesano,
rallado (más o
menos a gusto)
• 3 Cdas de aceite
de oliva, caliente
Prepare las palomitas de maíz usando la MÁQUINA DE
PALOMITAS DE MAÍZ como se indica en CÓMO FUNCIONA.
Combine el ajo en polvo, cebollas verdes, pimienta molida,
sal marina y queso parmesano. Póngalas a un lado.
En un contenedor, vierta el aceite de oliva
caliente sobre las palomitas de maíz.
Revuelva hasta que quede bien recubierto.
Agregue lentamente los ingredientes secos
mientras mezcla continuamente las palomitas
de maíz hasta que queden bien recubiertas.
También puede sacudir los ingredientes secos sobre
las palomitas de maíz en una bolsa de papel grande.
BOLAS TRADICIONALES DE PALOMITAS DE MAÍZ
• ½ taza de palomitas
de maíz
• ½ taza de jarabe
de maíz
• ½ taza de azúcar
impalpable
• ½ taza de sal
• 1 pan de manteca,
ablandada
Prepare las palomitas de maíz usando la MÁQUINA DE
PALOMITAS DE MAÍZ como se indica en CÓMO FUNCIONA.
Mezcle el jarabe de maíz, azúcar y sal en una olla y disuelva
a temperatura media por alrededor de 3 minutos.
Agregue las palomitas de maíz a la olla, revolviendo
de forma consistente hasta que las palomitas de maíz
queden recubiertas a baja temperatura. Retire del calor.
Use la manteca ablandada para formar bolas mientras
la mezcla de palomitas de maíz aún está tibia.
Envuelva las bolas individuales en plástico,
cierre y conserve a temperatura ambiente.

18
ESPAÑOL
18
BOCADILLOS GOLOSOS
• 1 galón de
palomitas de maíz
• 1 bolsa de 12
onzas de chispas
de cholocate
semi-amargo
• 1 bolsa de 12 onzas
de chispas de
mantequilla de maní
• Bolsa de 4,2 onzas de
galletas de banana,
en trozos pequeños
• Bolsa de 11 onzas
de maníes
Prepare las palomitas de maíz usando la MÁQUINA DE
PALOMITAS DE MAÍZ como se indica en CÓMO FUNCIONA.
Derrita las chispas de chocolate y de mantequilla de maní
en al fuego, según las recomendaciones del envase.
Coloque un papel encerado sobre la placa para horno.
Mezcle las palomitas de maíz y los
trozos de galletas de banana.
Vierta la mezcla de palomitas de maíz y galletas de banana
en trozos de forma uniforme sobre la placa para horno.
Vierta la mezcla de chocolate y mantequilla
de maní derretida sobre la preparación de
palomitas de maíz y galletas de banana.
Rocíe maníes sobre la mezcla de
chocolate y mantequilla de maní.
Deje enfriar.
Cuando la mezcla de chocolate y maní se ha
endurecido, corte los Bocadillos Golosos en trozos.
Se pueden conservar en bolsas plásticas para congelador.
PALOMITAS DE MAÍZ A LA MENTA
• 1 galón de
palomitas de maíz
• 1 bolsa de 12
onzas de chips de
chocolate semi
amargo o amargo
• 1¼ taza de barras
de menta, molidas
Prepare las palomitas de maíz usando la MÁQUINA DE
PALOMITAS DE MAÍZ como se indica en CÓMO FUNCIONA.
Derrita las chispas de chocolate en la cocina
según las recomendaciones del paquete.
Coloque un papel encerado sobre la placa para horno.
Distribuya las palomitas de maíz de forma
uniforme en la placa para horno.
Vierta el chocolate derretido sobre las palomitas de maíz.
Rocíe las mentas molidas sobre el chocolate.
Deje enfriar.
Una vez que el chocolate se ha endurecido, corte
las Palomitas de Maíz a la Menta en trozos.
Se puede conservar en bolsas plásticas para congelador.
Page is loading ...
Page is loading ...
Page is loading ...
Page is loading ...
Page is loading ...
Page is loading ...
Page is loading ...
Page is loading ...
Page is loading ...
Page is loading ...
Page is loading ...
-
 1
1
-
 2
2
-
 3
3
-
 4
4
-
 5
5
-
 6
6
-
 7
7
-
 8
8
-
 9
9
-
 10
10
-
 11
11
-
 12
12
-
 13
13
-
 14
14
-
 15
15
-
 16
16
-
 17
17
-
 18
18
-
 19
19
-
 20
20
-
 21
21
-
 22
22
-
 23
23
-
 24
24
-
 25
25
-
 26
26
-
 27
27
-
 28
28
-
 29
29
-
 30
30
-
 31
31


Nostalgia SP240 Series User manual
- Category
- Popcorn poppers
- Type
- User manual
- This manual is also suitable for
Ask a question and I''ll find the answer in the document
Finding information in a document is now easier with AI
in other languages
Related papers
-
Nostalgia SP660SS User manual
-
Nostalgia HCPO12BK User guide
-
Nostalgia NKPWLTT25RD User manual
-
-
-
Nostalgia Electrics NKPCRT8RD User manual
-
Nostalgia KPM200CART User guide
-
-
-
Nostalgia OFP501COKE User manual
Other documents
-
 Traditional Shake & Pop 27100DS Operating instructions
-
AmeriHome QTPOP User guide
-
-
Toastmaster TMPC4 User manual
-
West Bend Popcorn on Demand 82700 User manual
-
-
-
Buffalo STPOP Owner's manual
-
 VKP VKP1163 User manual
-

