

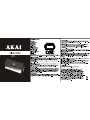
ASEZAREA BUTOANELOR DE CONTROL
1.Difuzor
2.Cablu de alimentare
3.Comutator de functii
4.Buton reglaj minute
5.Buton reglaj ora
6.Buton Sleep
7.Buton Snooze
8.Setare timp
9.Setare alarma
10.Compartiment baterie
11.Comutator banda AM/FM
12.Reglaj volum
13.Antena FM
14.Reglaj frecventa radio
15.Ecran LED cu oglinda
16.Reglaj scala
17.Reglaj lumina
ALIMENTARE
Verificati daca alimentarea este aceeasi cu cea din instructiunile de pe eticheta aparatului
si introduceti cablul de alimentare in priza. Un semnal luminos va aparea indicand timpul.
ASCULTARE LA RADIO
Puneti comutatorul de functii in pozitia ON si rotiti de butonul pentru volum ca sa ascultati
la radio. Reglati volumul la intensitatea dorita si selectati postul dumneavoastra favorit de
la butonul pentru frecventa radio si de la butonul pentru selectarea benzii radio. Pentru
a opri radioul, puneti comutatorul de functii in pozitia OFF.
Intindeti cablul de antena si reglati directia pentru a prinde cea mai buna receptie daca
radioul nu poate prinde un semnal clar.
SETAREA TIMPULUI
Tineti apasat butonul de setare timp si apasati butonul ora si minut pentru reglarea timpului.
Va rugam sa fit siguri ca timpul setat este AM sau PM (Un punct luminos va aparea in coltul
din stanga sus indicand ca timpul este PM daca tipul de ora setat este de 12 ore).
TREZIREA CU MUZICA
Apasati butonul de alarma si apasati butonul ora si minut pentru a seta timpul de trezire.
Dati drumul butonului de alarma pentru a arata timpul curent. Repetati acest pas “Ascultare
la radio” pentru postul dorit si nivelul de sunet. Comutati butonul de functii in pozitia AUTO.
Indicatorul de alarma va aparea. Radioul va reda postul de radio dorit si nivelul de sunet
automat la timpul la care a fost setata alarma.Comutati in pozitia OFF pentru a opri
alarma radio.
TREZIREA CU ALARMA BUZZER
Aceeasi operatie ca la “TREZIREA CU MUZICA” pentru reglarea alarmei, apoi rotiti butonul
de volum invers fata de acele de ceas pana cand un sunet va fi auzit. Veti fi trezit de alarma
buzzer.
Comutati in pozitia OFF pentru a opri alarma buzzer.
FUNCTIA SNOOZE
Cand mai doriti cateva minute de somn dupa ce alarma a sunat, apasati butonul SNOOZE,
muzica sau alarma buzzer vor fi oprite si se vor activa din nou in aproximativ 9 minute.
Comutati in pozitia OFF pentur a opri functia SNOOZE.
i
FUNCTIA ADORMIRE (SLEEP) PE MUZICA
1.Puneti butonul de functii in pozitia OFF sau AUTO. Apasati butonul Sleep o data si veti
avea 59 de minute de ascultare la radio (timp implicit).
2.Daca doriti sa mariti sau sa reduceti timpul de oprire, tineti apasat pe butonul Sleep si
apasati butoanele ora si minut pentru reglare. Timpul maxim este de 1 ora si 59 de minute.
ADORMIRE SI TREZIRE PE MUZICA
Repetati pasii de la “FUNCTIA ADORMIRE (SLEEP) PE MUZICA”, apasati butonul Sleep
pentru setarea timpului dorit de redare a radioului inainte de adormire. Radioul se va opri
dupa timpul setat si va incepe din nou la timpul setat pentru trezire.
BATERIE DE REZERVA
Introduceti o baterie de 9V in compartimentul bateriei. Daca va exista o oprire de curent,
ceasul va continua sa functioneze. Nu veti vedea aceasta deoarece bateria nu ilumineaza
ecranul. Cand curentul va reveni, ecranul va indica timpul corect. Pentru claritate, alarma
nu va functiona pe baterie. Inlocuiti bateria o data pe an.
ATENTIONARI
- Ventilatia nu trebuie impiedicata acoperind deschiderile cu obiecte ca ziare, fete de masa,
perdea,etc.
- Pe aparat nu trebuie asezate surse cu flacara, cum ar fi lumanarile.
- Nu trebuie expus la apa si nici un obiect umplut cu apa , cum ar fi vaze, nu trebuiesc asezate
pe aparat.
- Nu puneti aparatul in biblioteci inchise sau rafturi fara ventilatie buna.
- In cazul in care cablul de alimentare este utilizat ca dispozitiv deconectat, aparatul trebuie sa
ramana usor operabil.
SPECIFICATII
Alimentare: AC 230V-50Hz, 4W
Acoperirea benzii radio: AM: 540-1600KHz; FM: 88-108MHz.
Reciclarea ecipamentelor electrice si electronice uzate
Acest simbol prezent pe produs sau pe ambalaj semnifica faptul ca produsul
respectiv nu trebuie tratat ca un deseu menajer obisnuit .Nu aruncati aparatul
la gunoiul menajer la sfarsitul duratei de functionare ,ci duceti-l la un centru
de colectare autorizat pentru reciclare .In acest fel veti ajuta la protejarea
mediului inconjurator si veti putea impidica eventualele consecinte negative
pe care le-ar avea asupra mediului si sanatatii umane.
Pentru a afla adresa celui mai apropiat centru de colectare :
-Contactati autoritatile locale ;
-Accesati pagina de internet :www.mmediu.ro
-Solicitati informatii suplimentare de la magazinul de unde ati achizitionat
produsul.
-Pentru informatii suplimentare vizitati : www.akai.com.ro
15
14
13
1211
10
98
7
6
5
4
3
2
1
16
17
4 4 5 . 5 0 m m
1 4 8 . 5 0 m m
2 1 0 . 0 0 m m

LOCATION OF CONTROLS
1. Speaker
2. Power Cord
3. Function Switch
4. Minute Button
5. Hour Button
6. Sleep Button
7. Snooze Button
8. Time Setting
9. Alarm Setting
10. Battery Compartment
11. AM/FM Band Switch
12. Volume Control
13. FM Antenna
14. Tuning Control
15. LED Display with Mirror
16. Tuning Scale
17.Hi-low Dimmer
POWER SUPPLY
Check the AC current is same as the instruction show on rating label of your unit and plugs
the power cord into the AC outlet. A blinking signal will appear indicating the time.
LISTEN TO THE RADIO
Slide the Function Switch to ON position and rotate the Volume Control to turn on the radio.
Adjust the Volume Control to the desired listening level and select your favorite station with
the Tuning Control and Band Selector. To turn off the radio, slide the Function Switch to
OFF position.
Loose the cable antenna and adjust the direction to get the best reception if the radio could
not get a clear station.
TIME SETTING
Press and hold the Time Set Button and then press the Hour or Minute Button for hour and
minute adjustment of the time. Please make sure setting time is AM or PM has indication (A
dot will light in the left upper corner indicating that the time is the PM range if your unit is 12
hour version type.)
WAKE TO MUSIC
Press and hold the Alarm Set Button and then press Hour or Minute button to set the
desired wake up time. Release the Alarm Set Button to show the current time. Repeat the
steps of “LISTEN TO RADIO” to your desired station and listening level. Slide the Function
Switch to AUTO position. The Alarm Indicator will on. The radio will play your desired station
and listening level automatically at the preset alarm time. Push the Function Switch to OFF

position to turn off the radio alarm.
WAKE TO BUZZER
Same operation as “WAKE TO MUSIC” to adjust the alarm time, and then rotate the Volume
Control clockwise until a clicking sound is heard. Your will be awakened by the buzzer
alarm.
Push the Function Switch to OFF position to turn off the buzzer alarm.
SNOOZE FUNCTION
When you want a few extra minutes of sleep after the alarm wakes you, press the Snooze
Button, the music or buzzer alarm will be off and turn on again in approximately 9 minute.
Push the Function Switch to OFF to turn off the snooze function.
SLEEP TO MUSIC
1. Slide the Function Switch to the position either OFF or AUTO. Press the Sleep Button
once and you will have 59 minutes listen to the radio (the default setting).
2. If you want to increase or reduce the automatic shut off time, hold down the Sleep
button and press Hour or Minute to adjust as required. The maximum sleep time is 1
hour and 59 minutes.
TO GO TO SLEEP AND WAKE TO MUSIC
Repeat the steps of “WAKE TO MUSIC”, press Sleep Button to set for desired time of radio
playing before sleep. The radio will stop as your setting of sleep time automatically and will
play again at your preset wake up time.
BATTERY BACKUP
Insert a 9 Volt battery in the battery compartment. Should there be a power failure, the clock
will continue to function. Your will not see this however because the battery does not
illuminate the clock display. When the electric power turns on again, the display will indicate
the correct time. For clarity alarm clock does not work on battery. Replace the battery once
a year.
WARNINGS
- The ventilation should not be impeded by covering the ventilation openings with items,
such as newspapers, table-cloths, curtains, etc;
- No naked flame sources, such as lighted candles, should be placed on the apparatus;
- It shall not be exposed to dripping or splashing and that no objects filled with liquids,
such as vases, shall be placed on the apparatus;
- Do not place the product in closed bookcases or racks without proper ventilation.
- Where the mains plug is used as the disconnect device, the disconnect device shall
remain readily operable.
SPECIFICATION
Power Source : AC 230V~, 50Hz, 4W or
Radio Band Coverage : AM 530 –1700kHz ; FM 88 -108MHz
-
 1
1
-
 2
2
-
 3
3
-
 4
4


