Native Trails DR560-MB Installation guide
- Type
- Installation guide

BEFORE YOU BEGIN
• Observe all local plumbing and building codes.
• Turn o water supply to sink.
ASSEMBLE THE TRAP
1. Install drain (not included) in sink according to
manufacturer’s instructions.
2. Remove Inlet Nut and Washer from Trap.
3. With threads facing down, slide Inlet Nut and
Washer onto tailpiece of installed drain. For 1.25”
drains, use supplied Reducing Washer.
4. Slide tailpiece of installed drain into top of Trap. Note:
to ensure a proper compression t, tailpiece must
be inserted at least 1” (2.5cm) inside Trap. Then
hand-tighten Inlet Nut until nut is tight against Trap.
CONNECT TO THE STUB-OUT
5. Slide Flange onto long side of Outlet Tube.
6. Place Outlet Tube onto Trap and in to stubout. If Outlet
Tube is too long, use a hacksaw to cut it to appropriate
length.
7. Attach Outlet Tube to Trap by tightening Outlet Nut and
Washer.
8. Attach Outlet Tube to drain stub-out with seal
and nut (not provided). Hand tighten nut to drain
stub-out. Push Flange against nished wall.
9. Ensure all nuts in assembly are tightened properly.
10. Turn on main water supply, run water through
drain and check for leaks.
INSTALLATION INSTRUCTIONS
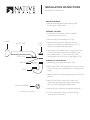
DECORATIVE P-TRAP DR560
OUTLET TUBE
FLANGE
WASHER
INLET
NUT
TRAP
OUTLET NUT
REDUCING WASHER
For use with 1.25” drains
-
 1
1

Native Trails DR560-MB Installation guide
- Type
- Installation guide
Ask a question and I''ll find the answer in the document
Finding information in a document is now easier with AI