Page is loading ...

1
User Guide
B2 Bomber ADC and
B2 Bomber DAC
Burl Audio
March 2015
www.burlaudio.com
© 2015 Burl Audio. All rights reserved
MADE IN USA
with

2
About Burl Audio:
Founded in 2006, BURL Audio is a pro audio gear engineering and manufacturing company based in Santa Cruz, Califor-
nia. Based out of Paradise Recording and spearheaded by Rich Williams, BURL Audio’s gear is designed in a commer-
cial recording studio, by professional recording engineers, for recording engineers.
The philosophy of BURL Audio is to provide the best possible recording devices, in modular, outboard units, to all levels
of recording engineers at a reasonable price. All BURL Audio products are designed to improve your recording, mix-
down, and mastering signicantly. BURL Audio’s products are designed to be a life-long asset to your studio.
BURL Audio is dedicated to bringing you ground breaking studio gear that will change your life. Burl Audio has redened
recording in the digital age with its revolutionary converter design, and now Burl Audio has adopted the audio-over-IP
format which has become the de-facto industry standard for pro audio, lm and broadcast.
Dante is a high channel count, low latency, fully networkable audio-over Ethernet technology, which allows any number
of interfaces and computers to speak to one another via a standard Gigabit Ethernet network. Until now digital audio
routing has been limited by point-to-point digital connectivity, which was either proprietary, or based on outdated stan-
dards with limited run lengths.
Simply put, the B2 Bombers have redened digital recording. For anyone who has felt that digital recording has been
lacking soul, warmth and musicality, the B2 Bombers and B80 Mothership are the answer. The B2’s were forged from
BURL AUDIO’S deep dedication to analog class-A circuitry. The result is not only heard, it is felt. The B2 Bombers stand
out from every other interface on the market not because they are colored, but because they do not sterilize the source.
Burl is the root of the word burly. Webster denes burly as follows:
Main Entry: bur·ly
Function: adjective
Inected Form(s): bur·li·er; -est
Etymology: Middle English
: strongly and heavily built : HUSKY <a burly man>
– bur·li·ly - adverb
– bur·li·ness - noun
Burl is also dened as a tough, yet beautifully knotty base of 2000 year old redwood tree trunks. Burly is the heavy
surf and fog that descends without warning over Santa Cruz, California. Burly is the dual rectied guitar and kick drum
recorded through a BURL Audio B2 Bomber ADC and B1 Mic Pre. Burly is the toughness and heavy build quality of a
BURL Audio unit. BURL is a creative state of mind. BURL is about music, grace, and power.

3
B2 BOMBER ADC
IN THE BOX:
B2 ADC FEATURES:
• 44.1 kHz to 192 kHz, 24 bit, 2 channel ADC
• Proprietary, high denition, BURL AUDIO BX1 transformer input
• All class A, discrete transistors signal path with zero feedback, zero caps
• Audiophile quality 6 position attenuator with standard headroom settings
• High denition metering with simultaneous RMS and peak indication
• Dante, 2 AES, SPDIF and Toslink output, dual wire at 176.4kHz and 192kHz (Dual Wire mode, Left is on AES1, Right is on AES2.)
• BNC word clock input, two outputs of extremely low jitter clock
• Frequency response: 48kHz = 12Hz to 22kHz, +/- 0.1dB; 96kHz = 15Hz to 46kHz, +/- 0.1dB;
192kHz = 18Hz to 94kHz, +/- 0.1dB
• 120dB Dynamic Range (A- weighted), 117dB (no weighting),
• -100dB THD+N (+4dBU = -18dBFS). -94dB THD+N (+21dBU = -1dBFs)
B2 BOMBER DAC
IN THE BOX:
B2 DAC FEATURES:
• 44.1kHz to 192kHz, 24 bit, 2 channel DAC
• Proprietary custom design BOPA1, all discrete op-amps
• Passive lters
• All class-A, discrete transistor signal path with zero signal path capacitors
• Audiophile quality 6 position attenuator with standard headroom settings
• High denition metering with simultaneous RMS and peak indication
• Dante, 2 AES, SPDIF and Toslink input
• BNC word clock input with two outputs of extremely low jitter clock
• Frequency response: 48kHz = 10Hz to 22kHz, +/- 0.1dB; 96kHz = 10Hz to 30kHz, +/- 0.1dB, -0.3 dB @ 40kHz;
192kHz = 10Hz to 30kHz, +/- 0.1dB, -1.5 dB @ 90kHz
• 115dB Dynamic Range, -96dB THD+N, full scale output = +22dBU
• B2 BOMBER ADC
• IEC Power Cable
• 4 Rack Screws with Washers
• B2 BOMBER DAC
• IEC Power Cable
• 4 Rack Screws with Washers

4
B2 ADC FRONT PANEL CONTROLLS:
1. Input Level Attenuator- ***POST TRANSFORMER*** Allows quick selection between analog +4dBu =
-12, -14, -16, -18, -20, -22 dBfs digital headroom.
2. Dual Wire- Sends LEFT to AES1, RIGHT to AES2 at 176.4kHz and 192kHz only. With Dual Wire o, L and R
are sent over both AES1 and AES2. Make sure Dual Wire is off for all sample rates other than 192/176.4 kHz.
3. High Resolution Meter- 30 segment meter shows RMS level and Peak simultaneously.
4. Lock- Red “LOCK” indicates unit is clocking correctly. When not lit, unit is not locked to external clock.
Lock is always lit when on internal clock. When lock is lost, unit automatically switches to Internal.
5. Peak Reset- Clears the peak light.
6. Clock Source- Select Internal Clock, External clock (Word Clock), or DANTE.
7. Sample Rate Select- (For internal clock) Manually select sample rate to 44.1, 48, 88.2, 96, 176.4, 192 kHz.
Figure 3 1234 5 6 7
B2 DAC FRONT PANEL CONTROLLS:
12345 6 7
Figure 4
1. Output Level Attenuator - Allows quick selection between analog +4dBu =
-18, -16, -14, -12, -10, and -8 dBfs digital headroom.
2. Input Source - Selects input between AES1, AES2, Dante (optional), SPDIF, or TOS.
3. High Resolution Meter - 30 segment meter shows RMS level and Peak simultaneously.
4. Lock - Red “LOCK” indicates unit is clocking correctly. When not lit, unit is not locked to external clock.
Lock is always lit when on internal clock. When lock is lost, unit automatically switches to Internal.
5. Peak Reset - Clears the peak light.
6. Clock Source - Select Internal Clock, External clock (Word Clock), or DANTE.
7. Sample Rate Select - (For iternal clock) Manually select sample rate to 44.1, 48, 88.2, 96, 176.4, 192 kHz.

5
1. DANTE Ethernet Output. For units with a Dante “Brooklyn II” card installed.
(See page 8 for Dante cong.)
2. AES 1- Digital Output for Ch. L & R (with dual wire “o”), Ch. 1 (with dual wire “on” for 192kHz and 176kHz).
3. AES 2- Digital Output for Ch. L & R (with dual wire “o”), Ch. 2 (with dual wire “on” for 192kHz and 176kHzt).
4. TOSLINK- Digital Output for Ch. L & R.
5. S/PDIF- Digital output for Ch. L & R.
6. Word Clock Output- Sends word clock out to other units.
7. Word Clock Input- Clock input for an external clock.
8. Analog Input Trim- For ne tuning input levels.
9. Analog Input- Standard XLR input.
B2 ADC REAR UNIT CONNECTIONS:
1
1
2
2
3
3
4
4
5
5
6
6
7
7
8
8
9
9
Figure 5
B2 DAC REAR UNIT CONNECTIONS:
1. DANTE Ethernet Input - For units with a Dante “Brooklyn II” card installed.
(See page 8 for Dante cong.)
2. AES 1 - Digital Input for Ch. L & R (No Dual Wire support)
3. AES 2 - Digital Input for Ch. L & R (No Dual Wire support)
4. TOSLINK - Digital Optical S/PDIF Input for Ch. L & R.
5. S/PDIF - Digital S/PDIF Input for Ch. L & R.
6. Word Clock Output - Sends word clock out to other units.
7. Word Clock Input - Clock input for an external clock.
8. Analog Output Trim - For ne tuning output levels.
9. Analog Output - Standard XLR output.
Figure 6

6
Getting Started:
1. Connect XLR cables to analog input.
2. Connect desired digital output (Dante, AES, SPDIF or Optical).
3. Connect Word Clock cables if clocking via Word Clock (clocking via Dante, SPDIF or AES is also possible).
4. Set clock to Int. or Ext. (Internal recommended whenever possible).
5. Set sample rate on front panel, when clock master.
6. Select Dual Wire On or O.
7. Set input level. We recommend starting at -18 dbfs.
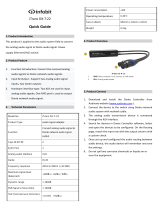
B2 Bomber ADC Signal Path
INPUT
BX1 Input
Transformer Input Level
PIN 1
PIN 3
PIN 2
ADC
Figure 1
B2 BOMBER ADC
Getting Started:
1. Connect XLR cables to (analog) output.
2. Connect desired digital Input Source (Dante, AES, SPDIF or Optical).
3. Connect Word Clock cables if clocking via Word Clock
(clocking via Dante, SPDIF or AES is also possible).
Select Input Source.
4. Set clock to Int., Ext. or Digital In (Internal clock recommended whenever possible).
5. Set sample rate on front panel, when clock master.
6. Set Output Level.
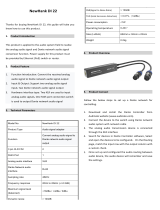
Figure 2
B2 BOMBER DAC
B2 Bomber DAC Signal Path
OUTPUT
Attenuator
PIN 1
- PIN 3
+ PIN 2
DAC
BOPA1
BOPA1

7
About
Imagine the possibilities when all audio devices can be networked. Large facilities with multiple control rooms
and studios can have easy access to each other. Imagine one control room runs out of outboard gear for a
mix. No problem, route audio to the AD/DA in the next control room, utilizing its outboard gear. Need to use
two studio main rooms with one control room? Easy, one DAW has total access to the other studio’s AD/DA.
The band wants to monitor in the lounge? Again, that is no problem, all over standard CAT5e or CAT6 through
a gigabit switch. How about simple 2 channel monitoring of a mix-down on a laptop? With Dante’s virtual
sound card and an Ethernet jack, also not a problem.
Dante is what makes this all possible and now Burl Audio has embraced this technology. The B80
Mothership, the B2 Bomber ADC and the B2 Bomber DAC are now all Dante compatible.
Now you can run multiple B2 Bombers or a B80 Mothership from a laptop or any computer with just an
Ethernet jack. Not only that, but any digital gear, including mixing consoles with Dante, can now directly
interface with the B80 Mothership and the B2 Bombers.
For more information please visit www.burlaudio.com/burl-audio-with-dante
About Dante Vitrual Soundcard:
The Dante Virtual Soundcard is a software application that turns your PC or Mac into a Dante-enabled
device, allowing Dante audio trafc to be transmitted and received using the standard Ethernet port. No
additional hardware is required.
The latest version of the Dante Virtual Soundcard supports the Core Audio (Mac OS X), Steinberg ASIO
(Windows), and WDM (Windows) audio interfaces, and can be used with any supporting audio application.
Once you install the Dante Virtual Soundcard on a PC or Mac and connect it to the Dante network, you
can:
• View and change the current audio sample rate
• Customize the receive latency (latency a receiving device should use before play out)
• View and set your Ethernet network interface, and view network interface details
• Start and stop the Dante Virtual Soundcard
• Select the number of audio channels available in the Dante Virtual Soundcard (CoreAudio and ASIO
only)
• On Windows, you can also:
- Select ASIO or WDM mode
- View and set ASIO- specic parameters
FOR MORE INFORMATION ABOUT DANTE SOUNDCARD PLEASE VISIT
https://www.audinate.com/resources/technical-documentation

8
About Dante Controller:
Dante Controller is a software application provided by Audinate which allows users to congure and route
audio around Dante networks. It is available for PCs running Windows 7 (SP1 and above), 8 and 8.1, and
Apple Macs running OS X 10.7.5, 10.8.5 and 10.9.
Once you install Dante Controller on your PC or Mac and connect it to a Dante network, you can use Dante
Controller to:
• View all Dante-enabled audio devices and their channels on the network
• View Dante-enabled device clock and network settings
• Route audio on these devices, and view the state of existing audio routes
• Change the labels of audio channels from numbers to names that suit you
• Customize the receive latency (latency before play out)
• Save audio routing presets
• Apply previously saved presets
• Edit presets oine, and apply as congurations for new network deployments
• View and set per device conguration options including:
- Changing the device name
- Changing sample rate and clock settings
- Viewing detailed network information
- Access the device web page to upgrade rmware and license information (where supported)
- Identify a device for example by ashing LEDs (where supported)
• View network status information, including:
- Multicast bandwidth across the network
- Transmit and receive bandwidth for each device
• View device performance information, including latency statistics and packet errors
• View clock status information for each device, including frequency oset history and clock event logs
FOR MORE INFORMATION ABOUT DANTE CONTROLLER PLEASE VISIT
https://www.audinate.com/resources/technical-documentation

9
1. Download and install “Dante Controller” and purchase “Dante Virtual Soundcard,” or
Dante PCIe Card.
Dante Virtual Soundcard: -Go to www.audinate.com/products/software
Dante PCIe Card: -Focusrite Rednet PCIe card recommended
2. Using Cat6 Ethernet cable, connect the B2 Bomber to a gigabit switch. Connect your
DAW computer to the same switch with CAT6 cable. For best results, start by removing
all other connections to the switch. Dante should be on it’s own network.
3. Start by setting the B2 to Internal Clock, and desired sample rate (we recommend 96k).
4. Open “Dante Virtual Soundcard” (Figure 7)
- Click START to turn on Dante Virtual Soundcard.
5. Open “Dante Controller”
6. Click on ROUTING tab (Figure 8, page 9)
Click on the corresponding coordinates to enable device, as per Figure 8.
Note: Transmitters refers to signal coming from ADC to Dante card.
Receivers refers to Dante card sending signal to DAC.
DANTE QUICK START:
Figure 7

10
7. Click on DEVICE INFO, double click on B2 Bomber ADC/DAC (Figure 9, below)
Figure 8: Example with 2 ADCs and 1 DAC
Figure 9: Example shows Device Info, with 2 ADCs and 1 DAC. e number aer “B2-ADC” is the
network MAC address

11
8. Click on DEVICE CONFIG. and select sample rate, select lowest latency.
(Figure 10, below).
Note: you will have to set sample rate for each device!
Figure 10: Example shows Device Cong for rst ADC.
NOTE: With multiple units, sample rate needs to be set for each unit, including the DAW.

12
DANTE CLOCKING:
There are 3 ways to clock the B2 Bomber ADC/DAC with Dante:
1. B2 ADC/DAC set to Internal. BKII card set to External (Recommended)
2. B2 ADC/DAC set to External Clock, BKII card set to External
3. B2 ADC/DAC set to Dante, BKII card set to Internal
CLOCKING B2 BOMBER ADC/DAC TO INTERNAL WORD CLOCK:
1. Set B2 front panel to INT
2. Open Dante Controller, select DEVICE INFO
3. Double Click on device “B2-xxxxxx”
4. Click on CLOCK STATUS. (Fig. 11, below)
5. Set B2 Bomber to “Preferred Master”, and “Enable to sync to External
6. Make sure each device including host DAW is set to correct sample rate in
Device Cong (as per step 8, page 9)
Fig. 11: shows B2 ADC on Internal clock. Dante card is synced to B2 clock. (Recommended)
NOTE: PREFERRED MASTER REFERS TO DANTE NETWORK, NOT B2 FRONT PANEL!
SEE FIGURE 12 (NEXT PAGE) FOR B2 INTERNAL CLOCKING DIAGRAM:

13
B2 ADC #1 INTERNAL
Dante Controller:
“Preferred Master”
“Enable Sync to External”
W.C. IN
W.C. IN
W.C. OUT
W.C. OUT
B2 Control
MASTER
DANTE
W
B2 INT CLOCK
B2 ADC #2 EXTERNAL
Dante Controller:
“Slave”
W.C. IN
W.C. IN
W.C. OUT
W.C. OUT
B2 Control DANTE
B2 INT CLOCK
WORD CLOCK
WORD CLOCK
CAT 6 ETHERNET
ETHERNET 2
ETHERNET 1
CAT 6 ETHER NET
GIGABIT SWITCH
CAT 6 ETHERNET
B2 DAC #1 EXTERNAL
Dante Controller:
“Slave”
W.C. IN
W.C. IN
W.C. OUT
W.C. OUT
B2 Control DANTE
B2 INT CLOCK
SLAVE SLAVE
CLOCK
CLOCK
CLOCK
INTERNET / NETWORK
INTERNAL CLOCKING EXAMPLE
Figure 12

14
1. Set B2 to EXT
2. Open Dante Controller, select DEVICE INFO
3. Double Click on device “B2-xxxxxx”
4. Click on CLOCK STATUS. (Fig. 13, below)
5. Deselect B2 Bomber as “Preferred Master”, select “Enable to sync to External”
6. Make sure each device including host DAW is set to correct sample rate in
Device Cong (as per step 8, page 9)
*B2 DAC Dante Input Only*
Fig. 13: shows B2 ADC on External clock. Dante card is also synced to External clock.
SEE FIGURE 14 (NEXT PAGE) FOR B2 EXTERNAL WORD CLOCK CLOCKING DIAGRAM:
CLOCKING B2 BOMBER ADC/DAC TO EXTERNAL WORD CLOCK:

15
B2 ADC #1 EXTERNAL
Dante Controller:
“Preferred Master”
“Enable Sync To External”
W.C. IN
W.C. IN
W.C. OUT
W.C. OUT
B2 Control
MASTER
DANTE
W
B2 INT CLOCK
B2 ADC #2 EXTERNAL
Dante Controller:
“Slave”
W.C. IN
W.C. IN
W.C. OUT
W.C. OUT
B2 Control DANTE
B2 INT CLOCK
WORD CLOCK
WORD CLOCK
CAT 6 ETHERNET
ETHERNET 2
ETHERNET 1
CAT 6 ETHER NET
GIGABIT SWITCH
CAT 6 ETHERNET
B2 DAC #1 EXTERNAL
Dante Controller:
“Slave”
W.C. IN
W.C. IN
W.C. OUT
W.C. OUT
B2 Control DANTE
B2 INT CLOCK
SLAVE SLAVE
CLOCK
CLOCK
CLOCK
EXTERNAL
MASTER
CLOCK
INTERNET / NETWORK
EXTERNAL CLOCKING EXAMPLE
Figure 14

16
Fig. 15: shows B2 ADC on Dante clock., Dante card is Master clock.
1. Set B2 to DANTE
2. Open Dante Controller, select DEVICE INFO
3. Double Click on device “B2-xxxxxx”
4. Click on CLOCK STATUS.(Fig. 15, below)
5. Select B2 Bomber as “Preferred Master”, Deselect “Enable to sync to
External”
6. Make sure each device including host DAW is set to correct sample rate
in Device Cong (as per step 8, page 9)
CLOCKING B2 BOMBER ADC/DAC TO DANTE
SEE FIGURE 16 (NEXT PAGE) FOR B2 DANTE CLOCKING DIAGRAM:

17
B2 ADC #1 DANTE
Dante Controller:
“Preferred Master”
W.C. IN W.C. IN
W.C. IN
W.C. OUT
W.C. OUT
B2 Control
MASTER
DANTE
B2 INT CLOCK
B2 ADC #2 DANTE
Dante Controller:
“Slave”
W.C. IN
W.C. OUT
W.C. OUT
B2 Control DANTE
B2 INT CLOCK
CAT 6 ETHERNET
ETHERNET 2
ETHERNET 1 INTERNET / NETWORK
CAT 6 ETHERNET
GIGABIT SWITCH
CAT 6 ETHERNET
B2 DAC #1 DANTE
Dante Controller:
“Slave”
W.C. IN
W.C. IN
W.C. OUT
W.C. OUT
B2 Control DANTE
B2 INT CLOCK
SLAVE SLAVE
CLOCK
CLOCK
CLOCK
ALL DANTE CLOCKING EXAMPLE
Figure 16
/