Lumber Jack WB1520D4 Solid Wood Bench User manual
- Type
- User manual

WB1520D4
Safety & Operating Manual
Solid Wood Bench
WB1520D4

TABLE OF CONTENTS
Welcome to Lumberjack!
Dear Customer, Congratulations on your purchase. Before using the
product for the first time please be sure to read these instructions for use.
They provide you with all information necessary for using the product safely and to
ensure its long service life.
Closely observe all safety information in these instructions!
General Tool Safety Warnings
&
Specification................................. 01
Parts List..... ........ ...... ..... ..... ............ ........ .............................................02
-
03
Assembly
I
nstructions .....................................................................0
4
-
0
7
Forestry
C
ertification.............................................................................
08

GENERAL TOOL SAFETY WARNINGS
&
S
P
E
C
IFI
C
ATION
WARNING Read all safety warnings and
all instructions. Failure to follow the warnings
and instructions may result in serious injury.
Save all warnings and instructions for
future reference.
a) Do not exceed weight capacities for the
Workbench shelves and drawers. Be aware of
dynamic loading! Sudden load movement may
briefly create excess load causing product
failure.
b) Use only on flat, level and hard surfaces
capable of supporting the Workbench and any
item(s) placed on Workbench. Evenly distribute
load on Table to avoid tipping.
c) Use as intended only. Do not use Workbench
to perform task for which it was not designed.
d) For indoor use only.
e) Assemble only according to these instructions.
Improper assembly can create hazards.
f) Wear ANSI-approved safety goggles and
heavy-duty work gloves during assembly and
use.
g) Keep assembly area clean and well lit.
h) Keep bystanders out of the area during
assembly.
i) Do not assemble when tired or when under
the influence of drugs or medication.
j) This product is not a toy. Do not allow children
to play with, on or near Workbench.
k) Inspect before every use; do not use if parts
are loose or damaged.
Specifications:
Vice Capacity: 7" Inch
Top Shelf Weight Capacity: 113kg
Drawer Weight Capacity: 11kg
Bottom Shelf Capacity: 90kg
Dimensions (Including Vice):
L) 1520mm x W) 620mm x H) 820mm
Drawer Inside Dimensions (x4):
L) 365mm x W) 420mm x H) 70mm

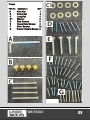
Parts List
WB1520D4

A Allen Key 1
B Dowel Nut 4
C Long Bolt 4
C1 Washer 8
D Blue Screws 8
E Heavy Duty Screws 4
F Silver Screws 32
G Drawer Handle Screws 8
Fixings
Part No Description QTY

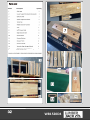
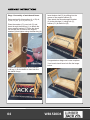
Stage 1 Assembly of work bench frame.
Parts required for this section: A) x1, B) x4,
C) x4, C1) x4, 1) x2, 2) x2 & 3) x1
Place the washer (C1) over bolt (C) and
insert through the side leg (1) to attach the
lower support bracket (2). Place the dowel
nut into the pre cut hole on the support
bracket (2) and tighten using the allen key (A)
Insert bottom shelf (3) by sliding into the
recess of the support bracket (2).
Then attach the second support bracket
(2) to the side legs (1) using bolt (C),
washer (C1) & dowel nut (B)
Repeat this process again for the second
side leg (1) for the bench to then look like
the below image.
Congratulations stage one is now complete.
Your bench should now look like the image
below.
WB1520D4
04

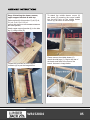
To attach the middle drawer runner (6)
use screw (D) ensuring the screw locates
into the pilot hole on the middle drawer
runner (6) as shown in below image.
Stage 2 Attaching the drawer runners,
upper support brackets & table top.
Parts required for this section: D) x8, E) x4,
C1) x4, 4) x2, 5) x1 & 6) x1.
(You will also require a cross headed screwdriver
& a 13mm spanner)
Attach upper support bracket (4) to the side
leg (1) using screw (D)
Repeat this process for both support
brackets (4) as per the image below.
Please ensure the middle drawer (6)
match the side legs (1). Gap to the rear of
the bench and flush to the front of the
bench. As seen in image below.
WB1520D4 05

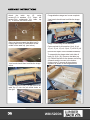
Attach the table top (5), using
screws (E) & washers (C1). Insert the
screws from underneath the table top
(5) to secure the bench frame.
Once you have secured the table top (5)
Lastley add screw (D) underneath at the
middle of the table top. (see below)
Your bench should then look like the image
below.
Finally, attach the vice (7) to the front of the
table top (5) into the pre drilled holes on
the right.
Congratulations stage two is now complete.
Your bench should now look like the image
below.
Stage 3 Assembly of the drawers.
Parts required for this section: 8) x4, 9) x4,
10) x4, 11) x4, 12) x4, 13) x4, F) x32 & G) x8
(You will also require a cross headed screwdriver)
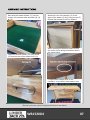
To assemble the drawer take both sides &
back (8), (9) & (10). Place on the table top
(5). Ensure the rails for the drawer are facing
outwards and the recess to the bottom.
Using screw (F) secure all three pieces
together as shown in the images below.
WB1520D4

Next slide the drawer bottom (11) into the
recess of the drawer sides and back (8), (9)
& (10).
Attach the drawer handle (13) using screw
(G) from the rear of the drawer front (12)
Attach the front of the drawer (12) to the
sides of the drawer (8) & (9) using screws (F)
Repeat this process for all four drawers.
When inserting the drawers please ensure
the runner clip is facing forwards as seen in
the image below.
Congratulations stage three is now
complete. Your bench is now ready to use.
We wish you many years of enjoyment with your new bench.
WB1520D4 07


-
 1
1
-
 2
2
-
 3
3
-
 4
4
-
 5
5
-
 6
6
-
 7
7
-
 8
8
-
 9
9
-
 10
10
-
 11
11


Lumber Jack WB1520D4 Solid Wood Bench User manual
- Type
- User manual
Ask a question and I''ll find the answer in the document
Finding information in a document is now easier with AI