20
DE
Verwenden Sie bitte nur Spezialprodukte für
Geschirrspüler. Verwenden Sie bitte kein Kochsalz oder
Industriesalz.
Bitte befolgen Sie die auf der Verpackung befindlichen
Anweisungen.
Sollten Sie ein Multifunktionsprodukt verwenden,
empfehlen wir dennoch den Zusatz von Regeneriersalz,
besonders bei hartem oder sehr hartem Wasser.
(Bitte
befolgen Sie die auf der Verpackung befindlichen Anweisungen).
Da weder Salz noch Klarspüler eingefüllt wird, ist es ganz
normal, dass die Kontrollleuchten der SALZNACHFÜLLANZEIGE*
und der KLARSPÜLERNACHFÜLLANZEIGE* weiterhin leuchten.
Einfüllen des Regeneriersalzes
MitderVerwendungvonSalzwerdenKALKABLAGERUNGEN
auf dem Geschirr und den funktionalen Komponenten des
Geschirrspülers verhindert.
•Wichtigist,dassderSalzbehälternieleerbleibt.
•Wichtigist,dieEinstellungderWasserhärtevorzunehmen.
Der Salzbehälter befindet sich im Geschirrspülerboden
(siehe
Beschreibung)
und muss aufgefüllt werden:
•wennaufderBedienblendedieKontrollleuchtederSALZNAC
HFÜLLANZEIGE*aufleuchtet;
•wenndergrüneSchwimmer* auf dem Salzstöpsel nicht mehr
sichtbar ist.
•sieheAutonomieinderTabellederWasserhärte.
1. ZiehenSieden Unterkorb heraus und
schrauben Sie den Salzbehälterdeckel gegen
den Uhrzeigersinn ab.
2. Nur bei erstmaliger Inbetriebnahme: Füllen
SiedenBehälterbiszumRandmitWasser.
3. Setzen Sie den Trichter auf
(siehe
Abbildung)
undfüllenSie den Behälter bis
zum Rand mit Salz (ca. 1 kg), es ist normal,
wenn etwas Wasser ausläuft.
4.DenTrichterabnehmenunddieSalzrestevomÖffnungsrand
entfernen;denDeckelunterfließendemWasserabspülen,bevor
er wieder aufgeschraubt wird.
Es wird empfohlen, diesen Vorgang bei jedem Nachfüllen von
Salz zu wiederholen.
Schrauben Sie den Deckel fest auf, damit während des
Spülgangs keine Spüllauge eintreten kann. (Diese könnte den
Enthärter dauerhaft beschädigen).
Wenn Salz nachgefüllt werden muss, sollte dies vor dem Start
des Spülgangs erfolgen.
Einstellen der Wasserhärte
Für eine perfekte Funktion des Wasserenthärters muss die
tatsächliche Wasserhärte eingestellt werden. Diesen Wert können
Sie bei Ihrem Wasserwerk erfragen. Der voreingestellte Wert
entspricht einer mittleren Wasserhärte.
•DieGeschirrspülmaschinemitderTasteON/OFFeinschalten
•MitderTasteON/OFFausschalten
•DieTasteSTART/PAUSE 5 Sekunden lang gedrückt halten,
bis ein Signalton zu hören ist.
•MitderTasteON/OFFausschalten
• DieNummerder aktuell ausgewählten Stufeunddie
Salznachfüllanzeige blinken.
•DieTasteP zur Auswahl der gewünschten Wasserhärte drücken
(siehe Tabelle der Wasserhärte).
•MitderTasteON/OFFausschalten
•DieEinstellungistabgeschlossen!
Regeneriersalz
und Klarspüler
(°dH = Grad deutsche Härte - °fH = Grad französische Härte -
mmol/l=Millimol/Liter)
Einfüllen des Klarspülers
Der Klarspüler fördert das Trocknen des Geschirrs. Der
Klarspülerbehälter muss aufgefüllt werden:
• wenn aufderBedienblende/Display die Kontrollleuchte/
SymbolderKLARSPÜLERNACHFÜLLANZEIGE*aufleuchtet
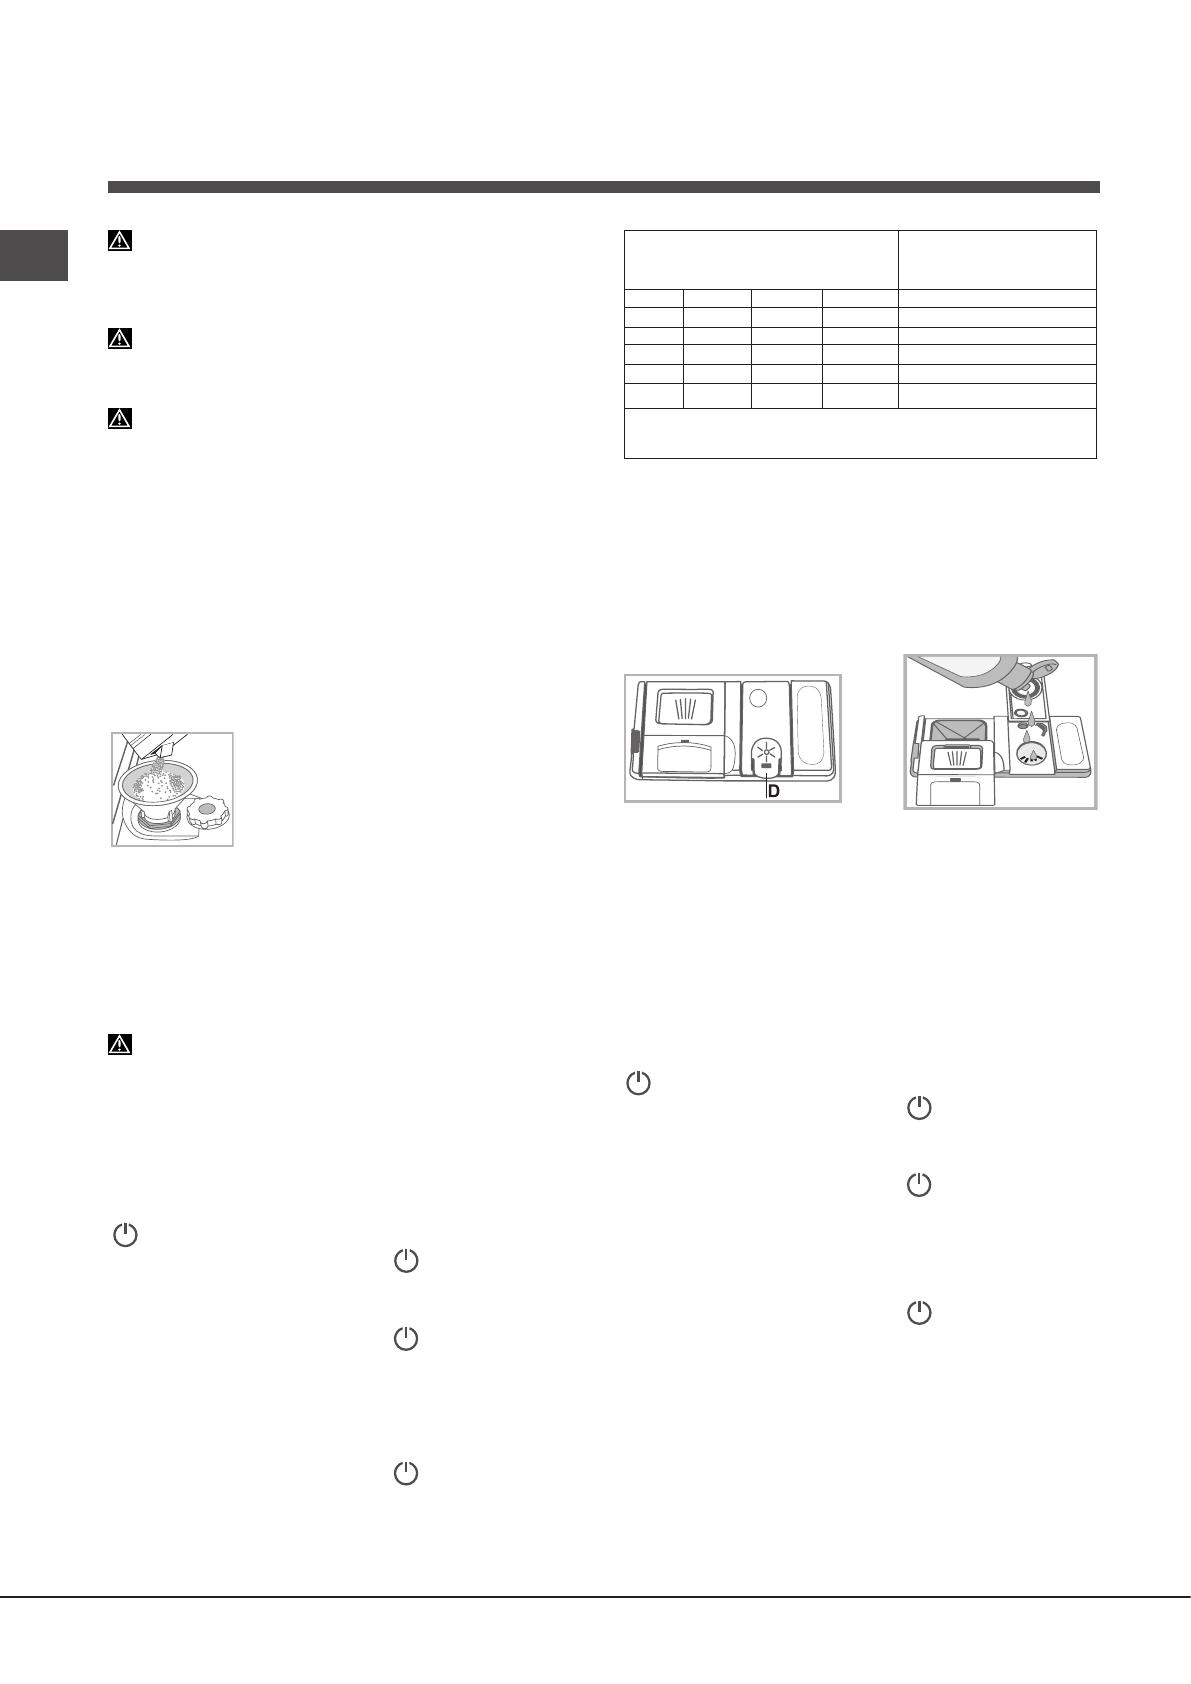
• wenndieoptischeAnzeige*aufderBehälterklappe“D” von
vorher dunkel transparent wird.
1.DenBehälter
“D”
durchDrückenundAnhebenderZungeam
Deckelöffnen;
2. Den Klarspüler vorsichtig bis zur maximalen Füllstandsmarkierung
an der Füllöffnung einfüllen und ein Überlaufen vermeiden.
Andernfalls sofort mit einem trockenen Tuch abwischen.
3.DenDeckelschließenbisereinrastet.
Füllen Sie den Klarspüler NIEMALS direkt ins Innere des
Geschirrspülers.
Klarspülerdosierung
Sollte das Trockenergebnis unzufrieden stellend sein, kann die
Klarspülerdosierung neu eingestellt werden.
•DieGeschirrspülmaschinemitderTasteON/OFFeinschalten
•MitderTasteON/OFFausschalten
•3MaldieTasteSTART/PAUSE drücken, es wird ein Signalton
zu hören sein.
•MitderTasteON/OFFausschalten
•DieNummerderaktuellenAuswahlStufeunddie
Klarspülernachfüllanzeige blinken.
•DieTasteP zur Auswahl der gewünschten Klarspülermenge
drücken.
•MitderTasteON/OFFausschalten
•DieEinstellungistabgeschlossen!
Die Klarspülerstufe kann auf NULL eingestellt werden. In diesem
Fall wird kein Klarspüler ausgegeben und die Kontrollleuchte
zur Anzeige des fehlenden Klarspülers leuchtet nicht mehr auf.
Je nachGerätemodellkönnen bis max. 4Stufeneingestellt
werden. Der voreingestellte Wert entspricht einer mittleren Stufe.
• wenndasGeschirrbläulicheStreifenaufweist,eineniedrigere
Nummer einstellen (1-2).
• befindensichWassertropfenoderKalkfleckendarauf,eine
höhereNummereinstellen(3-4).
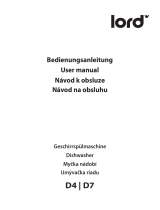
Tabelle zur Wasserhärte
Mittlere Autonomie
Salzbehälter bei 1
Spülzyklus pro Tag
Stufe °dH °fH mmol/l Monate
1 0 - 6 0 - 10 0 - 1 7 Monate
2 6 - 11 11 - 20 1,1 - 2 5 Monate
3 12 - 17 21 - 30 2,1 - 3 3 Monate
4 17 - 34 31 - 60 3,1 - 6 2 Monate
5 34 - 50 61 - 90 6,1 - 9 2-3 Wochen
Von 0°f bis 10°f wird empfohlen, kein Salz zu verwenden.
Mit der Einstellung 5 kann sich die Haltbarkeit verlängern.
* Nur bei einigen Modellen.