IKEA IBS550P Owner's manual

Category
Cookers
Type
Owner's manual

This manual is also suitable for

fop
||E_ ®
by
WHIRLPOOL
CORPORATION
STANDARDCLEANING BUILT-INELECTRIC
CONVECTION OVEN
For questions about features, operation/performance, parts, accessories or service, call: 1-800-253-1301
or visit our website at www.ikea.com
In Canada, call for assistance, installation or service, call: 1-800-807-6777
or visit our website at www.ikea.ca
FOURI_LECT.RIQUEENCASTRI_A CONVECTION ET
A NETTOYAGESTANDARD
Au Canada, pour assistance, installation ou service composer le 1-800-807-6777
ou visitez notre site Web &www.ikea.ca
Table of Contents/Table des matieres ....................................... 2
Models/Mod_les IBS324P VS
IBS324P VW
501961002007A
TABLEOF CONTENTS
OVEN SAFETY ................................................................................ 3
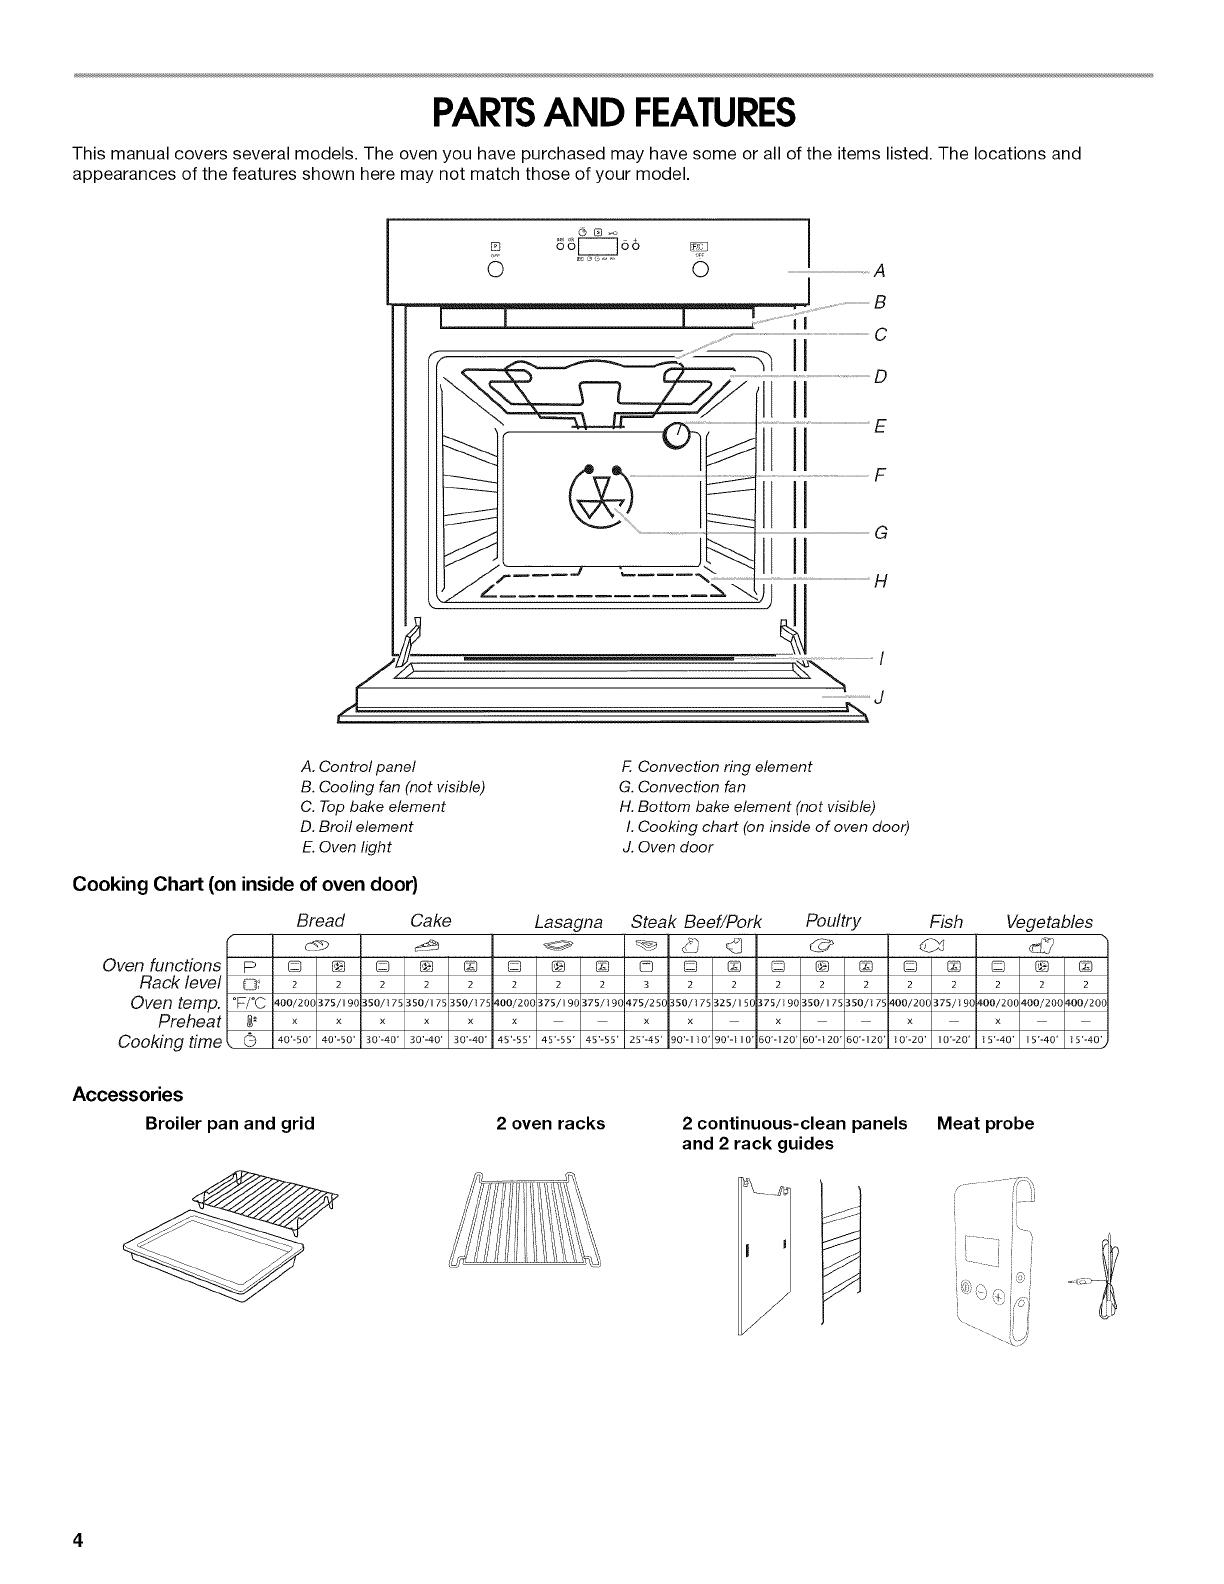
PARTS AND FEATURES ................................................................ 4
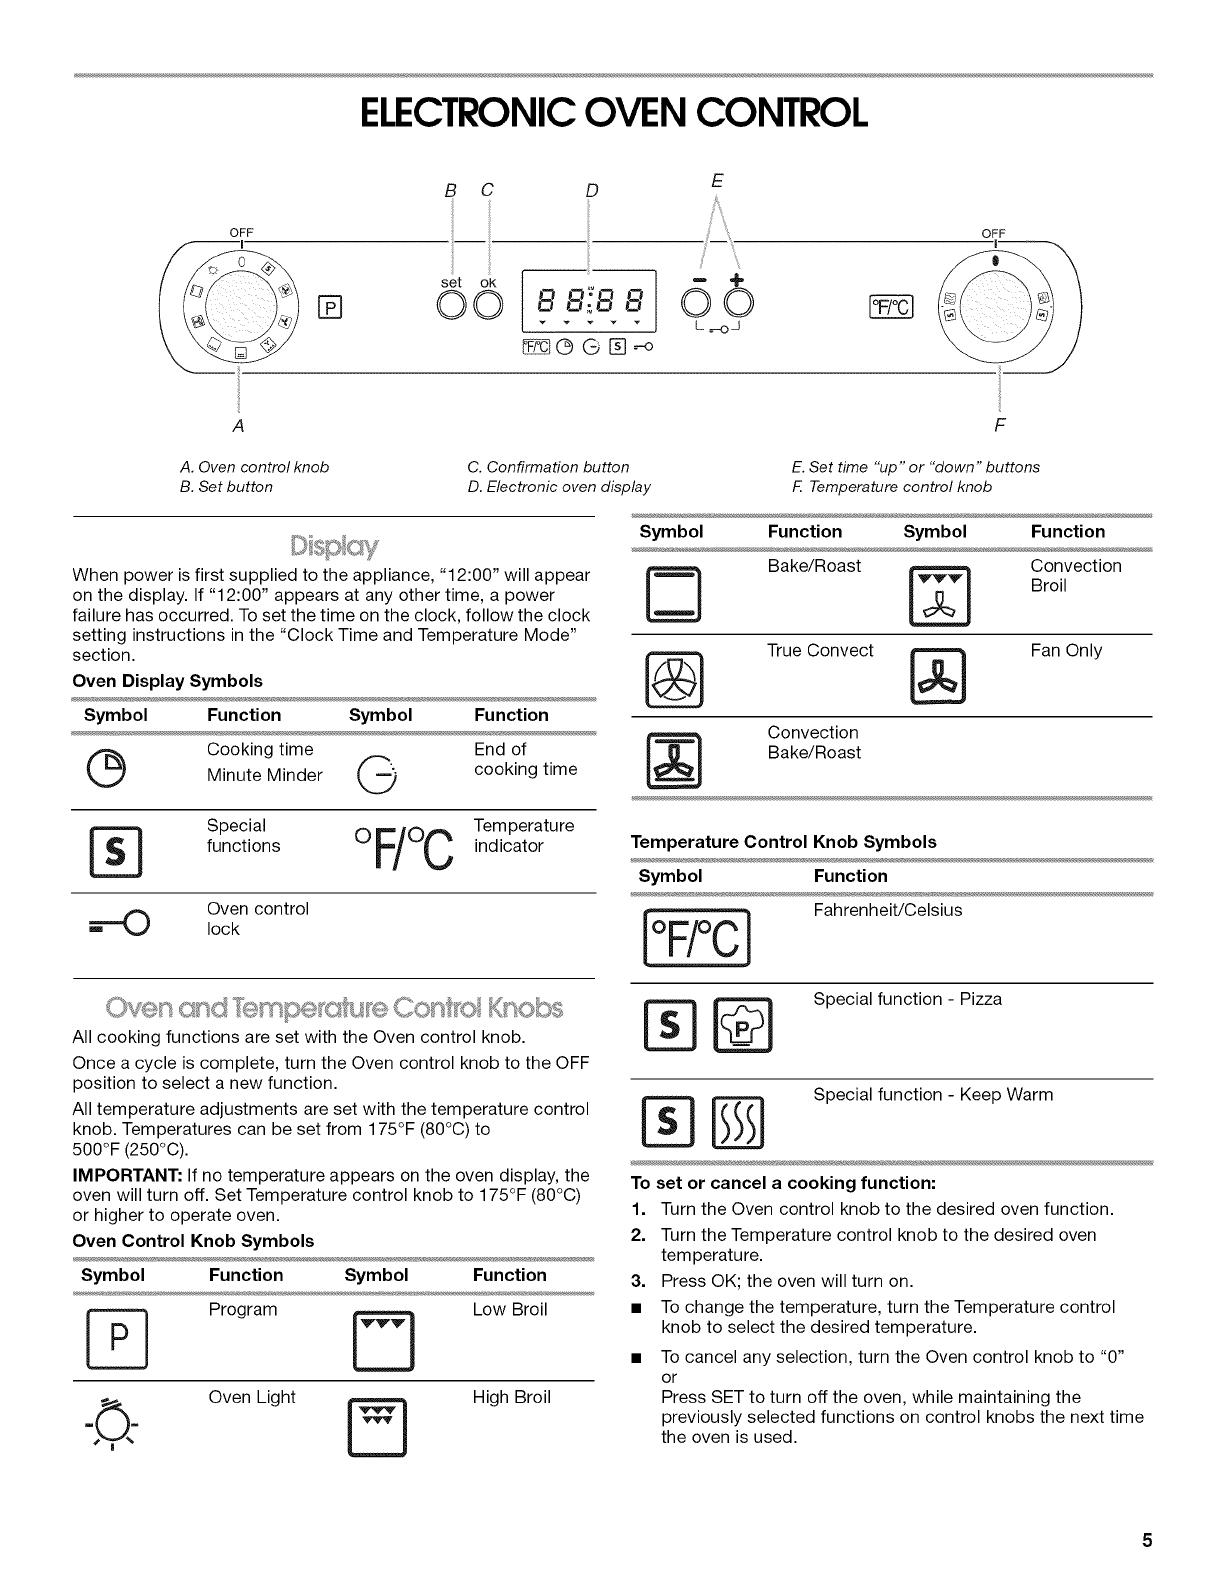
ELECTRONIC OVEN CONTROL ................................................... 5
Display .......................................................................................... 5
Oven and Temperature Control Knobs ........................................ 5
Clock Time and Temperature Mode ............................................ 6
Minute Minder .............................................................................. 6
Oven Control Lock ....................................................................... 6
OVEN USE ....................................................................................... 6
Aluminum Foil............................................................................... 6
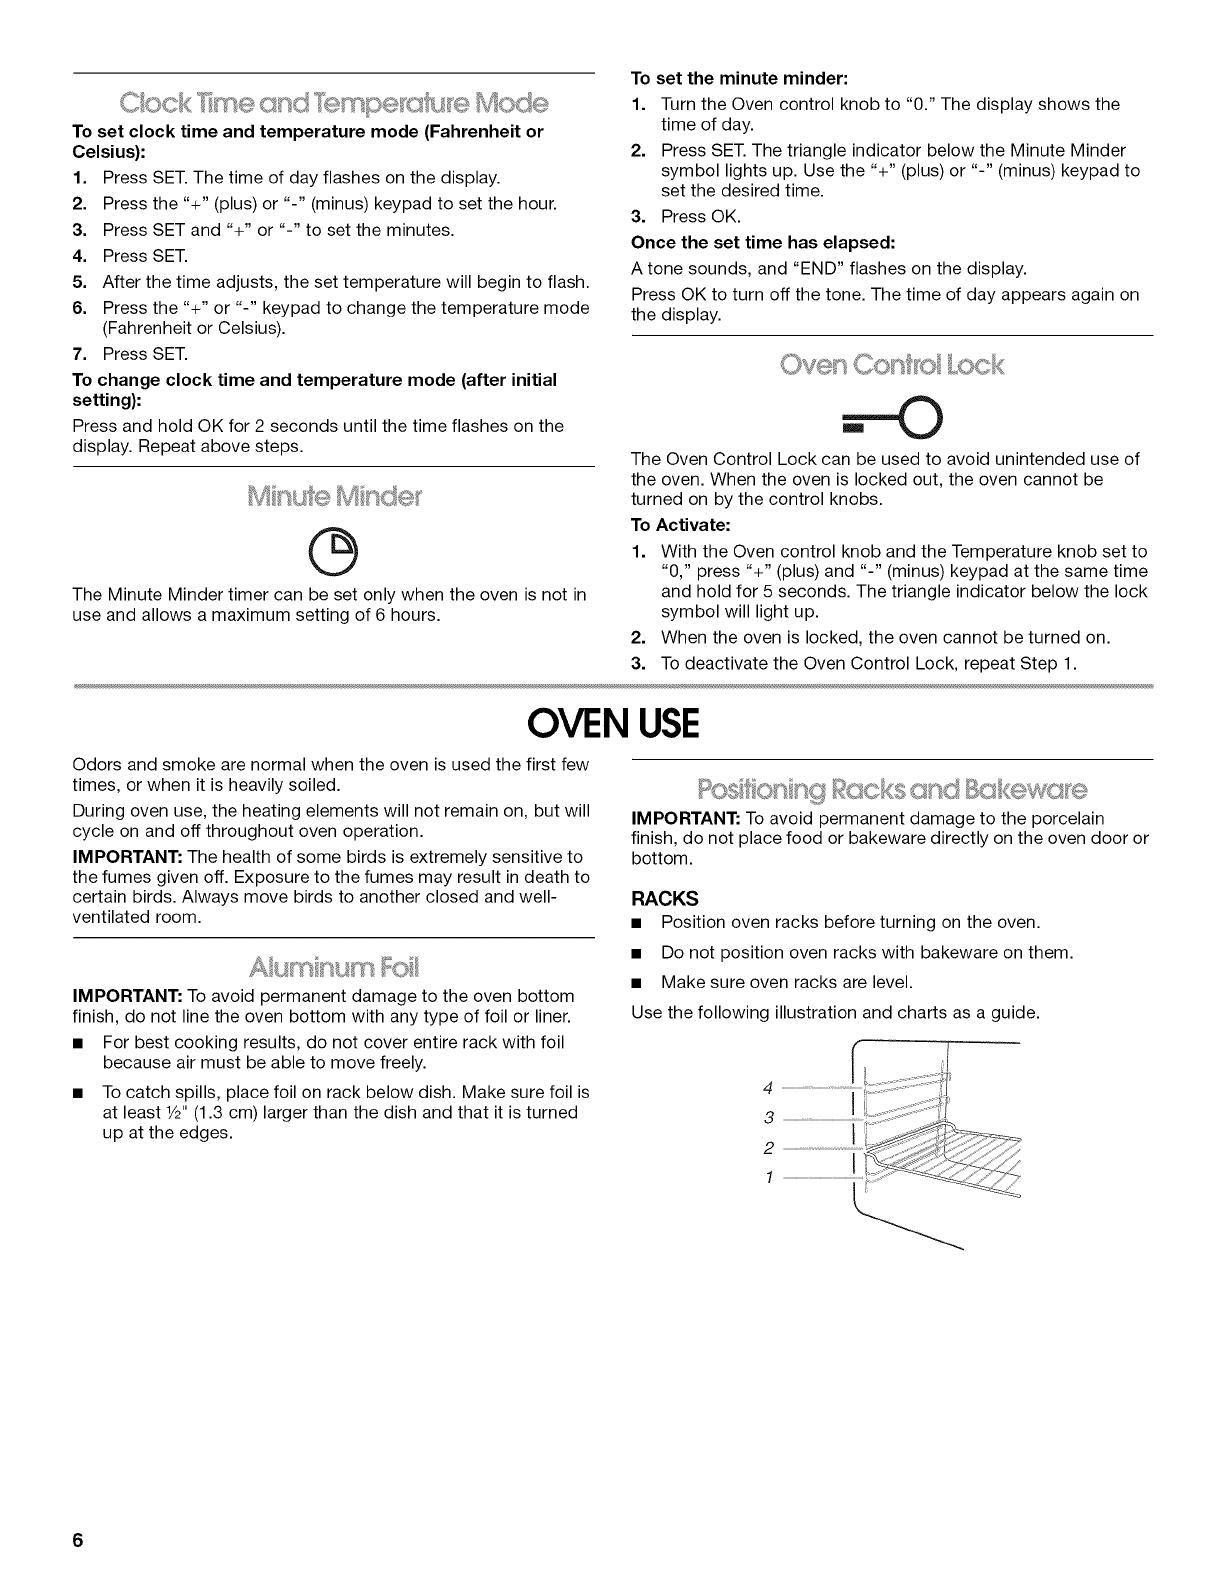
Positioning Racks and Bakeware ................................................ 6
Bakeware ...................................................................................... 7
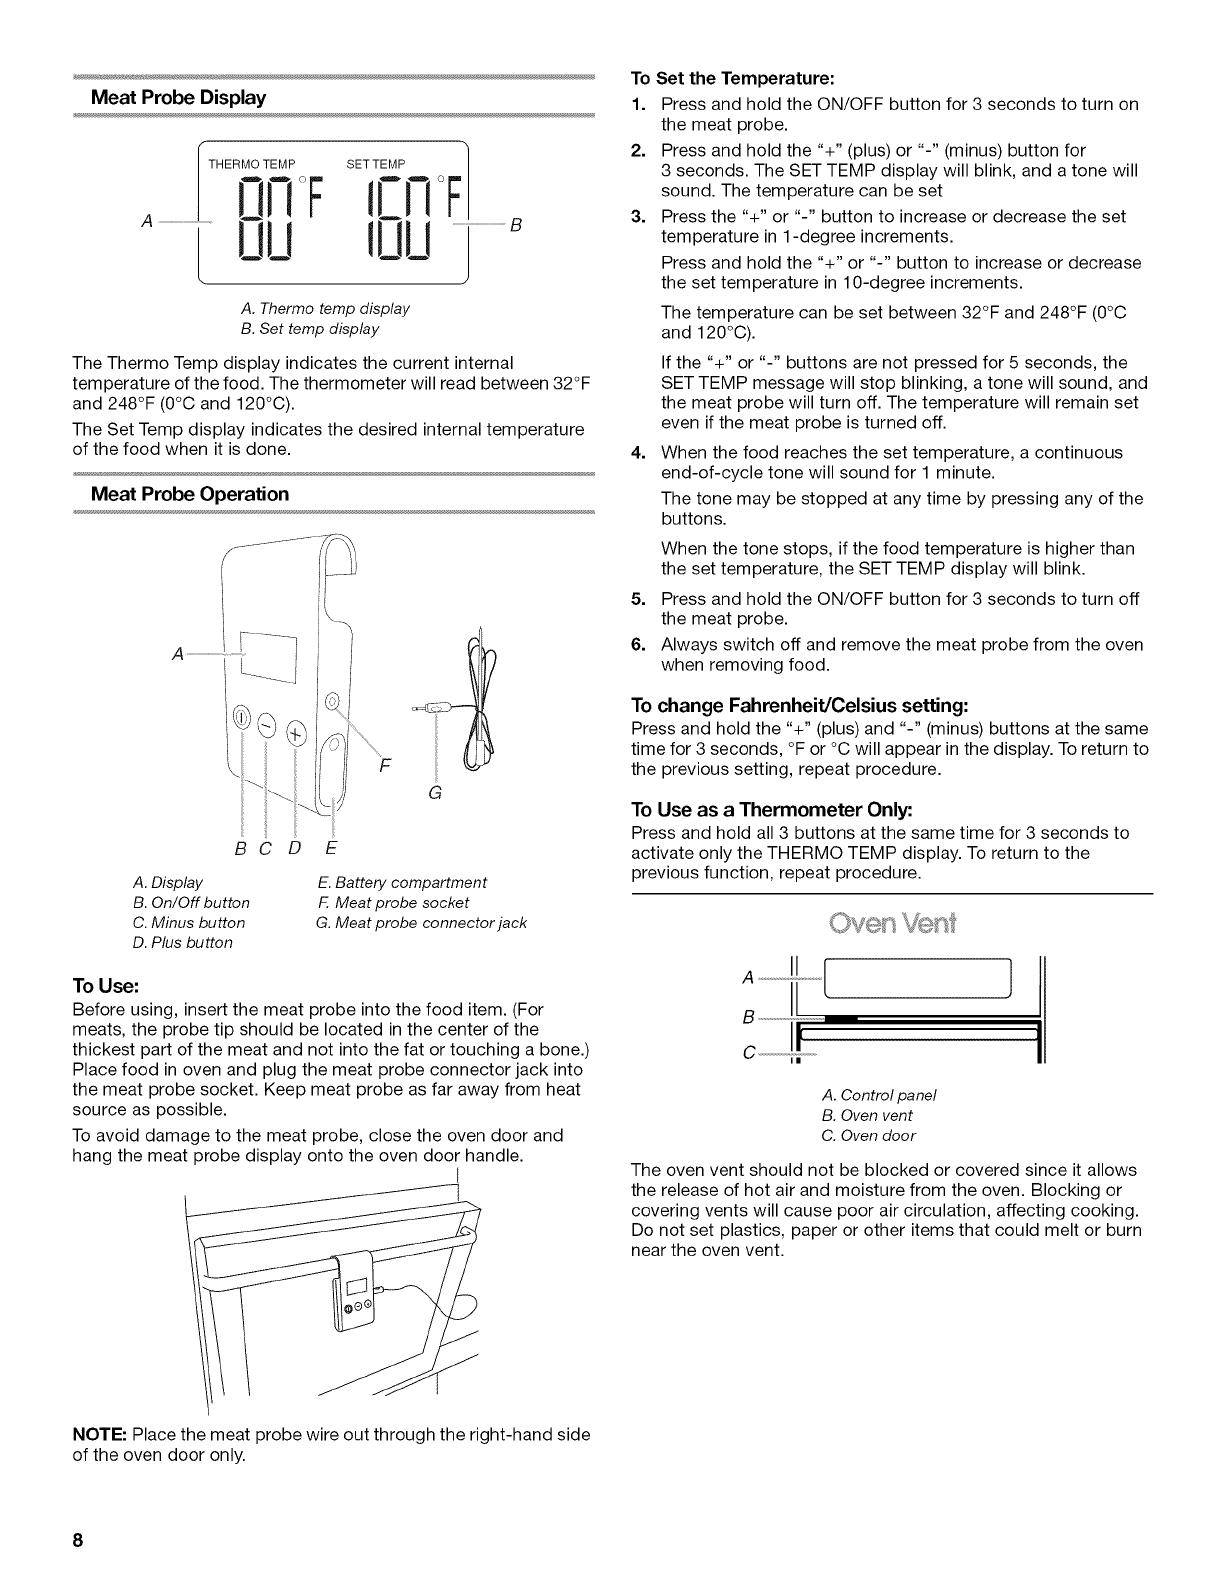
Meat Probe ................................................................................... 7
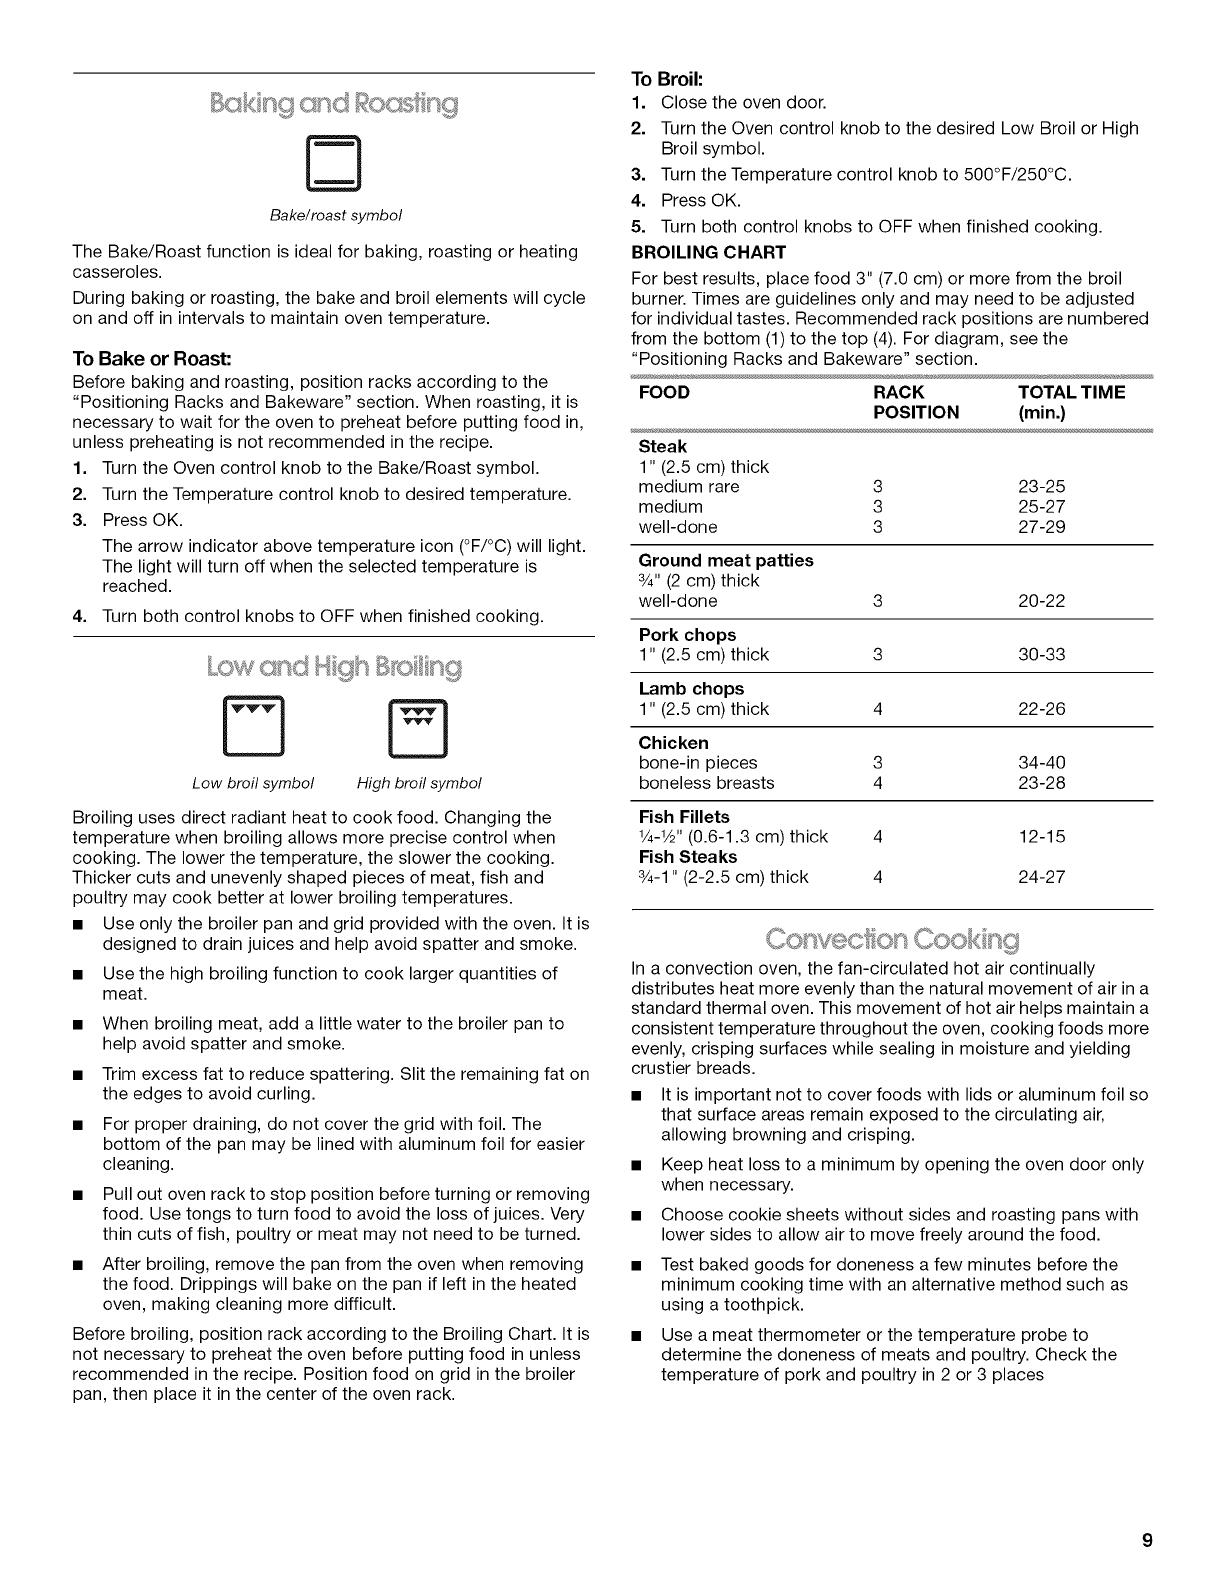
Oven Vent ..................................................................................... 8
Baking and Roasting .................................................................... 9
Low and High Broiling .................................................................. 9
Convection Cooking ..................................................................... 9
True Convect .............................................................................. 10
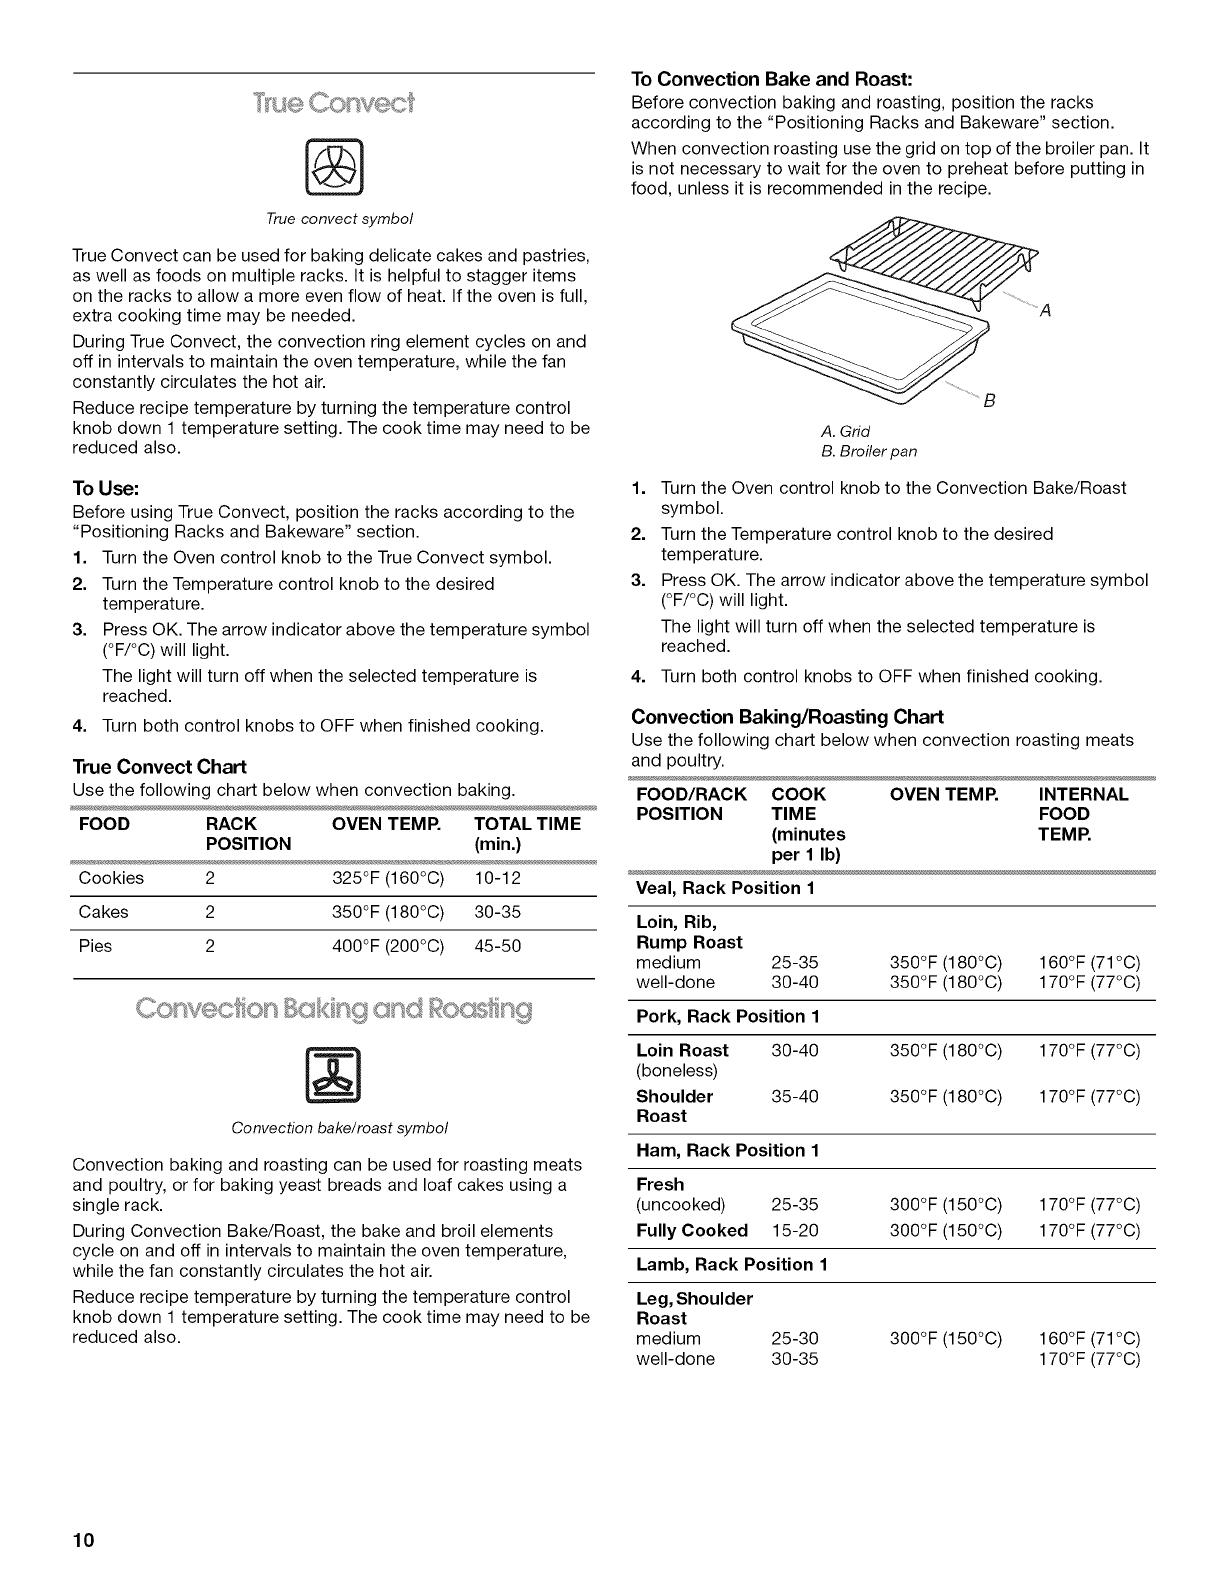
Convection Baking and Roasting .............................................. 10
Convection Broiling .................................................................... 11
Special Functions ....................................................................... 11
Fan Only ..................................................................................... 12
Timed Cooking ........................................................................... 12
OVEN CARE .................................................................................. 13
General Cleaning ........................................................................ 13
Oven Lights ................................................................................ 13
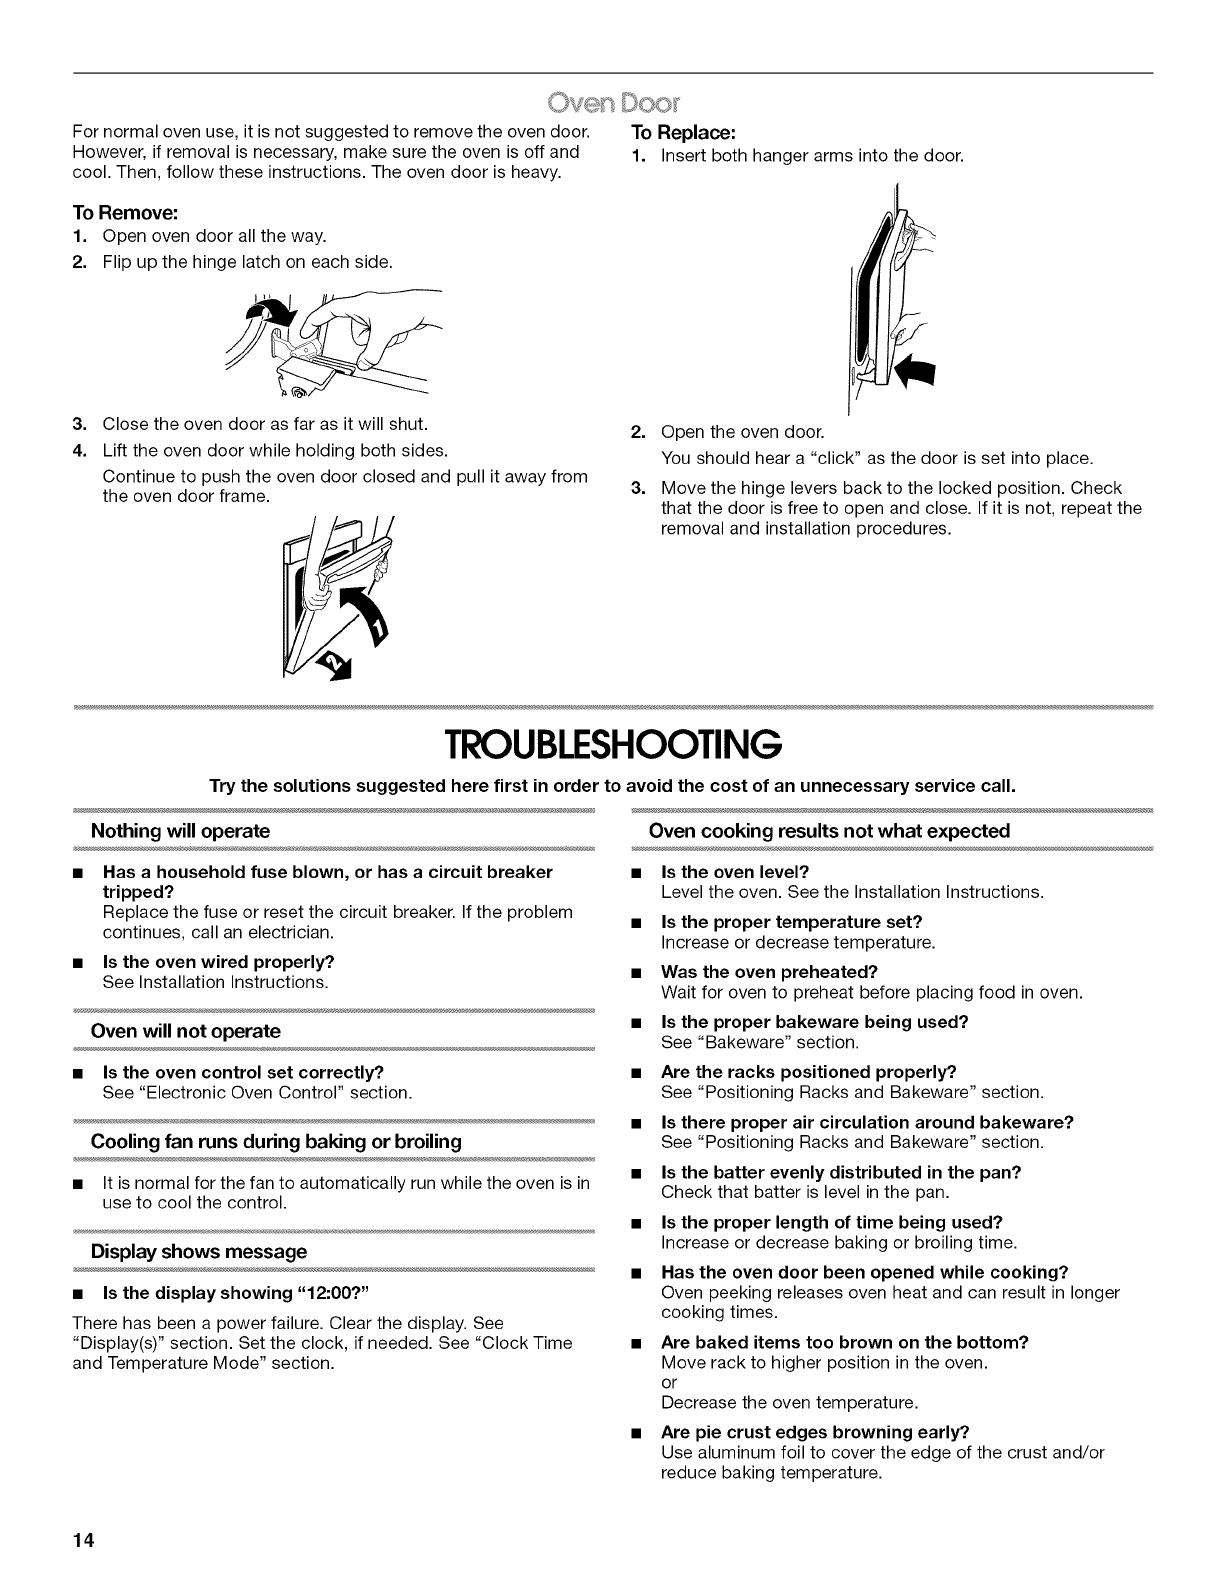
Oven Door .................................................................................. 14
TROUBLESHOOTING .................................................................. 14
ASSISTANCE OR SERVICE ......................................................... 15
In the U.S.A................................................................................ 15
Accessories ................................................................................ 15
In Canada ................................................................................... 15
WAR RANTY .................................................................................. 16
TABLEDESMATIERES
SI_CURITI_ DU FOUR ................................................................... 17
PIF:CES El" CARACTI_RISTIQUES .............................................. 18
COMMANDE I_LECTRONIQUE DU FOUR ................................. 19
Affichage ..................................................................................... 19
Boutons de commande du four et
de la temperature ....................................................................... 19
Mode Horloge et Temperature ................................................... 20
Minuterie ..................................................................................... 20
Verrouillage des commandes du four ........................................ 20
UTILISATION DU FOUR ............................................................... 20
Papier d'aluminium ..................................................................... 20
Positionnement des grilles et des ustensiles
de cuisson .................................................................................. 20
Ustensiles de cuisson ................................................................ 21
Sonde de cuisson ....................................................................... 22
12ventdu four .............................................................................. 23
Cuisson au four et r6tissage ...................................................... 23
Cuisson au gril basse temperature et
haute temperature ...................................................................... 23
Cuisson par convection ............................................................. 24
Convection veritable ................................................................... 24
Cuisson au four et r6tissage par convection ............................. 25
Cuisson au gril par convection ................................................... 26
Fonctions speciales .................................................................... 26
Ventilateur seulement ................................................................. 27
Cuisson minutee ......................................................................... 27
ENTRETIEN DU FOUR ................................................................. 28
Nettoyage gen6ral ...................................................................... 28
Lampes du four .......................................................................... 29
Porte du four ............................................................................... 29
DI_PANNAGE ................................................................................. 30
ASSISTANCE OU SERVICE ......................................................... 30
GARANTIE .................................................................................... 31
2
OVEN SAFETY
Your safety and the safety of others are very important.
We have provided many important safety messages in this manual and on your appliance. Always read and obey all safety
messages.
This is the safety alert symbol.
This symbol alerts you to potential hazards that can kill or hurtyou and others.
All safety messages will follow the safety alert symbol and either the word "DANGER" or "WARNING."
These words mean:
You can be killed or seriously injured if you don't immediately
follow instructions.
You can be killed or seriously injured if you don't follow
instructions.
All safety messages willtell you what the potential hazard is, tell you how to reduce the chance of injury, and tell you what can
happen if the instructions are not followed.
IMPORTANT SAFETY INSTRUCTIONS
WARNING: To reduce the risk of fire, electrical shock,
injury to persons, or damage when using the oven, follow
basic precautions, including the following:
[] Proper Installation - Be sure the oven is properly installed
and grounded by a qualified technician.
[] Never Use the Oven for Warming or Heating the Room.
[] Do Not Leave Children Alone - Children should not be left
alone or unattended in area where oven is in use. They
should never be allowed to sit or stand on any part of the
oven.
[] Wear Proper Apparel- Loose-fitting or hanging garments
should never be worn while using the oven.
[] User Servicing - Do not repair or replace any part of the
oven unless specifically recommended in the manual. All
other servicing should be referred to a qualified technician.
[] Storage in Oven - Flammable materials should not be
stored in an oven.
[] Do Not Use Water on Grease Fires - Smother fire or flame
or use dry chemical or foam-type extinguisher.
[] Use Only Dry Potholders - Moist or damp potholders on
hot surfaces may result in burns from steam. Do not let
potholder touch hot heating elements. Do not use a towel
or other bulky cloth.
[] Use Care When Opening Door - Let hot air or steam
escape before removing or replacing food.
[] Do Not Heat Unopened Food Containers - Build-up of
pressure may cause container to burst and result in injury.
SAVE THESE
[] Keep Oven Vent Ducts Unobstructed.
[] Placement of Oven Racks - Always place oven racks in
desired location while oven is cool. If rack must be moved
while oven is hot, do not let potholder contact hot heating
element in oven.
[] DO NOT TOUCH HEATING ELEMENTS OR INTERIOR
SURFACES OF OVEN - Heating elements may be hot
even though they are dark in color. Interior surfaces of an
oven become hot enough to cause burns. During and after
use, do not touch, or let clothing or other flammable
materials contact heating elements or interior surfaces of
oven until they have had sufficient time to cool. Other
surfaces of the oven may become hot enough to cause
burns - among these surfaces are oven vent openings and
surfaces near these openings, oven doors, and windows of
oven doors.
For self-cleaning ovens:
[] Do Not Clean Door Gasket - The door gasket is essential
for a good seal. Care should be taken not to rub, damage,
or move the gasket.
[] Do Not Use Oven Cleaners - No commercial oven cleaner
or oven liner protective coating of any kind should be used
in or around any part of the oven.
[] Clean Only Parts Listed in Manual.
[] Before Self-Cleaning the Oven - Remove broiler pan and
other utensils.
INSTRUCTIONS
PARTSAND FEATURES
This manual covers several models. The oven you have purchased may have some or all of the items listed. The locations and
appearances of the features shown here may not match those of your model.
/
A. Control panel
B. Coofing fan (not visible)
C. Top bake element
D. Broil element
E. Oven light
F. Convection ring element
G. Convection fan
H. Bottom bake element (not visible)
I. Cooking chart (on inside of oven door)
J. Oven door
Cooking Chart (on inside of oven door)
Oven functions p
Rack level ©_
Oven temp. °F/°C
Preheat
Cooking time
Bread Cake Lasagna Steak Beef/Pork Poultry Fish Vegetables
83 _ © @ @ 83 @ @ © 83 @ 83 _ @ © @ © _ @
2 2 2 2 2 2 2 2 3 2 2 2 2 2 2 2 2 2 2
_00/200 375/19C 350/175 350/175 350/17! _IO0/20Q 375/19( 375/190 475/25C 150/175 325/15C 375/190 350/175 350/17! 1,00/200 375/19( 100/200 400/20( 400/200
x x x x x x x x x x x
40'-50' 40'-50' 30'-40' 30'-40' 30'-40' 45'-55' 45'-55' 45'-55' 25'-45' )0'-110' 90'-110' 60'-120' 60'-120' 60'-120 10'-20' 10'-20' 15'-40' 15'-40' 15'-40'_
Accessories
Broiler pan and grid 2 oven racks 2 continuous-clean panels Meat probe
and 2 rack guides
/
ii.....
ELECTRONICOVEN CONTROL
B C D
E
OFF
A
@
r-------
set OK
O0 ,-,
G %--o
ii!ii i%,
66
L=-oJ
OFF
F
A. Oven control knob
B. Set button
C. Confirmation button
D. Electronic oven display
E. Set time "up" or "down" buttons
F. Temperature control knob
When power is first supplied to the appliance, "12:00" will appear
on the display. If "12:00" appears at any other time, a power
failure has occurred. To set the time on the clock, follow the clock
setting instructions in the "Clock Time and Temperature Mode"
section.
Oven Display Symbols
Symbol Function Symbol Function
@ Cooking time G Endof
Minute Minder cooking time
Symbol Function Symbol Function
Bake/Roast Convection
[_ Broil
_ True Convect [_ Fan Only
Convection
Bake/Roast
[_ Special FlOG Temperature
functions O indicator
Oven control
lock
Temperature Control Knob Symbols
Symbol Function
[OF/OC1 Fahrenheit/Celsius
o Knobs
All cooking functions are set with the Oven control knob.
Once a cycle is complete, turn the Oven control knob to the OFF
position to select a new function.
All temperature adjustments are set with the temperature control
knob. Temperatures can be set from 175°F (80°C) to
500°F (250°C).
IMPORTANT: If no temperature appears on the oven display, the
oven will turn off. Set Temperature control knob to 175°F (80°C)
or higher to operate oven.
Oven Control Knob Symbols
Symbol Function Symbol Function
_ Program [_ Low Broil
Oven Light _ High Broil
-.0:
D
Special function - Pizza
function - Warm
[_ Special Keep
To set or cancel a cooking function:
1. Turn the Oven control knob to the desired oven function.
2. Turn the Temperature control knob to the desired oven
temperature.
3. Press OK; the oven will turn on.
To change the temperature, turn the Temperature control
knob to select the desired temperature.
To cancel any selection, turn the Oven control knob to "0"
or
Press SET to turn off the oven, while maintaining the
previously selected functions on control knobs the next time
the oven is used.
To set clock time and temperature mode (Fahrenheit or
Celsius):
1. Press SET. The time of day flashes on the display.
2. Press the "+" (plus) or "-" (minus) keypad to set the hour.
3. Press SET and "+" or "-" to set the minutes.
4. Press SET.
5. After the time adjusts, the set temperature will begin to flash.
6. Press the "+" or "-" keypad to change the temperature mode
(Fahrenheit or Celsius).
7. Press SET.
To change clock time and temperature mode (after initial
setting):
Press and hold OK for 2 seconds until the time flashes on the
display. Repeat above steps.
®
The Minute Minder timer can be set only when the oven is not in
use and allows a maximum setting of 6 hours.
To set the minute minder:
1. Turn the Oven control knob to "0." The display shows the
time of day.
2. Press SET. The triangle indicator below the Minute Minder
symbol lights up. Use the "+" (plus) or "-" (minus) keypad to
set the desired time.
3. Press OK.
Once the set time has elapsed:
A tone sounds, and "END" flashes on the display.
Press OK to turn off the tone. The time of day appears again on
the display.
The Oven Control Lock can be used to avoid unintended use of
the oven. When the oven is locked out, the oven cannot be
turned on by the control knobs.
To Activate:
1. With the Oven control knob and the Temperature knob set to
"0," press "+" (plus) and "-" (minus) keypad at the same time
and hold for 5 seconds. The triangle indicator below the lock
symbol will light up.
2. When the oven is locked, the oven cannot be turned on.
3. To deactivate the Oven Control Lock, repeat Step 1.
OVEN USE
Odors and smoke are normal when the oven is used the first few
times, or when it is heavily soiled.
During oven use, the heating elements will not remain on, but will
cycle on and off throughout oven operation.
IMPORTANT: The health of some birds is extremely sensitive to
the fumes given off. Exposure to the fumes may result in death to
certain birds. Always move birds to another closed and well-
ventilated room.
Aura sum Fo
IMPORTANT: To avoid permanent damage to the oven bottom
finish, do not line the oven bottom with any type of foil or liner.
For best cooking results, do not cover entire rack with foil
because air must be able to move freely.
To catch spills, place foil on rack below dish. Make sure foil is
at least _/2"(1.3 cm) larger than the dish and that it is turned
up at the edges.
IMPORTANT: To avoid permanent damage to the porcelain
finish, do not place food or bakeware directly on the oven door or
bottom.
RACKS
Position oven racks before turning on the oven.
Do not position oven racks with bakeware on them.
Make sure oven racks are level.
Use the following illustration and charts as a guide.
4
3 I
I
2
I
1
6
TraditionalCooking
FOOD RACK POSITION
Large roasts, turkeys (max. 11 Ibs 1 or 2
[5 kg]), angel food, bundt cakes, quick
breads, pies
Yeast breads, casseroles, meat and
poultry
Cookies, biscuits, muffins, cakes 2
Convection Cooking
FUNCTION NUMBER RACK
OF RACKS POSITION(S)
Convection baking or 1 2
roasting
Convection baking 2 1 and 3
BAKEWARE
To cook food evenly, hot air must be able to circulate. Allow
2" (5 cm) of space around bakeware and oven walls. Use the
following chart as a guide.
NUMBER POSITION ON RACK
OF PANS
1 Center of rack.
2 or 4 Opposite corners on each rack. Make sure that
no bakeware piece is directly over another.
The bakeware material affects cooking results. Follow
manufacturer's recommendations and use the bakeware size
recommended in the recipe. Use the following chart as a guide.
BAKEWARE/ RECOMMENDATIONS
RESULTS
Light colored Use temperature and time
aluminum recommended in recipe.
Light golden crusts
Even browning
Dark aluminum and
other bakeware with
dark, dull and/or
nonstick finish
Brown, crisp
crusts
May need to reduce baking
temperatures.
Use suggested baking time.
For pies, breads and casseroles,
use temperature recommended in
recipe.
Place rack in center of oven.
Insulated cookie
sheets or baking
pans
Little or no bottom
browning
Place in the bottom third of oven.
May need to increase baking time.
BAKEWARE/ RECOMMENDATIONS
RESULTS
Stainless steel May need to increase baking time.
Light, golden
crusts
Uneven browning
Stoneware/Baking
stone
Crisp crusts
Follow manufacturer's instructions.
Ovenproof May need to reduce baking
glassware, ceramic temperatures.
glass or ceramic
Brown, crisp
crusts
Burn Hazard
Use an oven mitt to remove meat probe.
Do not touch broil element.
Failure to follow these instructions can result in burns.
The meat probe accurately measures the internal temperature of
meat, poultry and casseroles with liquid and should be used in
determining the doneness of meat and poultry.
This meat probe operates as an independent device and is not
plugged into the oven controls.
Always switch off and remove the probe connector jack from the
oven when removing food.
To avoid damage to the meat probe, do not leave the meat probe
in self-cleaning ovens while the cycle is running.
Insert/Replace Batteries (not included)
To Insert Batteries:
1. Using a Phillips screwdriver, remove the battery compartment
cover.
2. Insert 2 LR03 AAA batteries.
3. Replace the battery compartment cover.
To replace batteries, repeat the above procedure.
Meat Probe Display
I THERMO TEMPo F SET TEMP
/1_3!7 ICN°F]......................................
.........................................[........IJIJ IUU
A. Thermotemp display
B.Set temp display
The Thermo Temp display indicates the current internal
temperature of the food. The thermometer will read between 32°F
and 248°F (0°C and 120°C).
The Set Temp display indicates the desired internal temperature
of the food when it is done.
Meat Probe Operation
BCD
A. Display
B. On/Off button
C. Minus button
D. Plus button
G
E
E. Battery compartment
F. Meat probe socket
G.Meat probe connector jack
To Use:
Before using, insert the meat probe into the food item. (For
meats, the probe tip should be located in the center of the
thickest part of the meat and not into the fat or touching a bone.)
Place food in oven and plug the meat probe connector jack into
the meat probe socket. Keep meat probe as far away from heat
source as possible.
To avoid damage to the meat probe, close the oven door and
hang the meat probe display onto the oven door handle.
{
To Set the Temperature:
1. Press and hold the ON/OFF button for 3 seconds to turn on
the meat probe.
2. Press and hold the "+" (plus) or "-" (minus) button for
3 seconds. The SET TEMP display will blink, and a tone will
sound. The temperature can be set
3. Press the "+" or "-" button to increase or decrease the set
temperature in 1-degree increments.
Press and hold the "+" or "-" button to increase or decrease
the set temperature in 1O-degree increments.
The temperature can be set between 32°F and 248°F (O°C
and 120°C).
If the "+" or "-" buttons are not pressed for 5 seconds, the
SET TEMP message will stop blinking, a tone will sound, and
the meat probe will turn off. The temperature will remain set
even if the meat probe is turned off.
4. When the food reaches the set temperature, a continuous
end-of-cycle tone will sound for 1 minute.
The tone may be stopped at any time by pressing any of the
buttons.
5,
6.
When the tone stops, if the food temperature is higher than
the set temperature, the SET TEMP display will blink.
Press and hold the ON/OFF button for 3 seconds to turn off
the meat probe.
Always switch off and remove the meat probe from the oven
when removing food.
To change Fahrenheit/Celsius setting:
Press and hold the "+" (plus) and "-" (minus) buttons at the same
time for 3 seconds, °F or °C will appear in the display. To return to
the previous setting, repeat procedure.
To Use as a Thermometer Only:
Press and hold all 3 buttons at the same time for 3 seconds to
activate only the THERMO TEMP display. To return to the
previous function, repeat procedure.
A. Control panel
B. Oven vent
C. Oven door
The oven vent should not be blocked or covered since it allows
the release of hot air and moisture from the oven. Blocking or
covering vents will cause poor air circulation, affecting cooking.
Do not set plastics, paper or other items that could melt or burn
near the oven vent.
NOTE: Place the meat probe wire out through the right-hand side
of the oven door only.
8
B(x<ng c nd <:sst
D
Bako/roast symbol
The Bake/Roast function is ideal for baking, roasting or heating
casseroles.
During baking or roasting, the bake and broil elements will cycle
on and off in intervals to maintain oven temperature.
To Bake or Roast:
Before baking and roasting, position racks according to the
"Positioning Racks and Bakeware" section. When roasting, it is
necessary to wait for the oven to preheat before putting food in,
unless preheating is not recommended in the recipe.
1. Turn the Oven control knob to the Bake/Roast symbol.
2. Turn the Temperature control knob to desired temperature.
3. Press OK.
The arrow indicator above temperature icon (°F/°C) will light.
The light will turn off when the selected temperature is
reached.
4. Turn both control knobs to OFF when finished cooking.
D N
Low broil symbol High broil symbol
Broiling uses direct radiant heat to cook food. Changing the
temperature when broiling allows more precise control when
cooking. The lower the temperature, the slower the cooking.
Thicker cuts and unevenly shaped pieces of meat, fish and
poultry may cook better at lower broiling temperatures.
Use only the broiler pan and grid provided with the oven. It is
designed to drain juices and help avoid spatter and smoke.
Use the high broiling function to cook larger quantities of
meat.
When broiling meat, add a little water to the broiler pan to
help avoid spatter and smoke.
Trim excess fat to reduce spattering. Slit the remaining fat on
the edges to avoid curling.
For proper draining, do not cover the grid with foil. The
bottom of the pan may be lined with aluminum foil for easier
cleaning.
Pull out oven rack to stop position before turning or removing
food. Use tongs to turn food to avoid the loss of juices. Very
thin cuts of fish, poultry or meat may not need to be turned.
After broiling, remove the pan from the oven when removing
the food. Drippings will bake on the pan if left in the heated
oven, making cleaning more difficult.
Before broiling, position rack according to the Broiling Chart. It is
not necessary to preheat the oven before putting food in unless
recommended in the recipe. Position food on grid in the broiler
pan, then place it in the center of the oven rack.
To Broil:
1. Close the oven door.
2. Turn the Oven control knob to the desired Low Broil or High
Broil symbol.
3. Turn the Temperature control knob to 500°F/250°C.
4. Press OK.
5. Turn both control knobs to OFF when finished cooking.
BROILING CHART
For best results, place food 3" (7.0 cm) or more from the broil
burner. Times are guidelines only and may need to be adjusted
for individual tastes. Recommended rack positions are numbered
from the bottom (1) to the top (4). For diagram, see the
"Positioning Racks and Bakeware" section.
FOOD RACK TOTAL TIME
POSITION (min.)
Steak
1" (2.5 cm) thick
medium rare 3 23-25
medium 3 25-27
well-done 3 27-29
Ground meat patties
3/4"(2 cm) thick
well-done 3 20-22
Pork chops
1" (2.5 cm) thick 3 30-33
Lamb chops
1" (2.5 cm) thick 4 22-26
Chicken
bone-in pieces 3 34-40
boneless breasts 4 23-28
Fish Fillets
1/4-1/2"(0.6-1.3 cm) thick 4 12-15
Fish Steaks
3/4-1"(2-2.5 cm) thick 4 24-27
In a convection oven, the fan-circulated hot air continually
distributes heat more evenly than the natural movement of air in a
standard thermal oven. This movement of hot air helps maintain a
consistent temperature throughout the oven, cooking foods more
evenly, crisping surfaces while sealing in moisture and yielding
crustier breads.
It is important not to cover foods with lids or aluminum foil so
that surface areas remain exposed to the circulating air,
allowing browning and crisping.
Keep heat loss to a minimum by opening the oven door only
when necessary.
Choose cookie sheets without sides and roasting pans with
lower sides to allow air to move freely around the food.
Test baked goods for doneness a few minutes before the
minimum cooking time with an alternative method such as
using a toothpick.
Use a meat thermometer or the temperature probe to
determine the doneness of meats and poultry. Check the
temperature of pork and poultry in 2 or 3 places
T_te Coy?@,?_c
%
Trueconvect symbol
True Convect can be used for baking delicate cakes and pastries,
as well as foods on multiple racks. It is helpful to stagger items
on the racks to allow a more even flow of heat. If the oven is full,
extra cooking time may be needed.
During True Convect, the convection ring element cycles on and
off in intervals to maintain the oven temperature, while the fan
constantly circulates the hot air.
Reduce recipe temperature by turning the temperature control
knob down 1 temperature setting. The cook time may need to be
reduced also.
To Use:
Before using True Convect, position the racks according to the
"Positioning Racks and Bakeware" section.
1. Turn the Oven control knob to the True Convect symbol.
2. Turn the Temperature control knob to the desired
temperature.
3. Press OK. The arrow indicator above the temperature symbol
(°F/°C) will light.
The light will turn off when the selected temperature is
reached.
4. Turn both control knobs to OFF when finished cooking.
True Convect Chart
Use the following chart below when convection baking.
FOOD RACK OVEN TEMP. TOTAL TIME
POSITION (min.)
Cookies 2 325°F (160°C) 10-12
Cakes 2 350°F (180°C) 30-35
Pies 2 400°F (200°C) 45-50
Iil
Convection bake/roast symbol
Convection baking and roasting can be used for roasting meats
and poultry, or for baking yeast breads and loaf cakes using a
single rack.
During Convection Bake/Roast, the bake and broil elements
cycle on and off in intervals to maintain the oven temperature,
while the fan constantly circulates the hot air.
Reduce recipe temperature by turning the temperature control
knob down 1 temperature setting. The cook time may need to be
reduced also.
To Convection Bake and Roast:
Before convection baking and roasting, position the racks
according to the "Positioning Racks and Bakeware" section.
When convection roasting use the grid on top of the broiler pan. It
is not necessary to wait for the oven to preheat before putting in
food, unless it is recommended in the recipe.
1. Turn the Oven control knob to the Convection Bake/Roast
symbol.
2. Turn the Temperature control knob to the desired
temperature.
3. Press OK. The arrow indicator above the temperature symbol
(°F/°C) will light.
The light will turn off when the selected temperature is
reached.
4. Turn both control knobs to OFF when finished cooking.
Convection Baking/Roasting Chart
Use the following chart below when convection roasting meats
and poultry.
FOOD/RACK COOK OVEN TEMP. INTERNAL
POSITION TIME FOOD
(minutes TEMP.
per 1 Ib)
Veal, Rack Position 1
Loin, Rib,
Rump Roast
medium 25-35 350°F (180°C) 160°F (71°C)
well-done 30-40 350°F (180°C) 170°F (77°C)
Pork, Rack Position 1
Loin Roast 30-40 350°F (180°C) 170°F (77°C)
(boneless)
Shoulder 35-40 350°F (180°C) 170°F (77°C)
Roast
Ham, Rack Position 1
Fresh
(uncooked) 25-35 300°F (150°C) 170°F (77°C)
Fully Cooked 15-20 300°F (150°C) 170°F (77°C)
Lamb, Rack Position 1
Leg, Shoulder
Roast
medium 25-30 300°F (150°C) 160°F (71°C)
well-done 30-35 170°F (77°C)
10
FOOD/RACK COOK OVEN TEMP. INTERNAL
POSITION TIME FOOD
(minutes TEM P.
per 1 Ib)
Beef, Rack Position 1
Rib Roast
rare 20-25
medium 25-30 300°F (150°C)
well-done 30-35
Rib Roast
(boneless)
rare 22-25
medium 27-30 300°F (150°C)
well-done 32-35
Rump, Sirloin
Tip Roast
rare 20-25
medium 25-30 300°F (150°C)
well-done 30-35
Meat Loaf 20-25 325°F (160°C)
140°F (60°C)
160°F (71°C)
170°F (77°C)
140°F (60°C)
160°F (71°C)
170°F (77°C)
140°F (60°C)
160°F (71°C)
170°F (77°C)
170°F (77°C)
Chicken, Rack Position 1"
Whole
3-5 Ibs
(1.5-2.2 kg) 20-25
5-7 Ibs
(2.2-3.1 kg) 15-20 400°F (200°C) 185°F (85°C)
Turkey, Rack Position 1"
13 Ibs and
under (5.85 kg) 10-15 300°F (150°C) 185°F (85°C)
Cornish Game Hens, Rack Position 1"
1-1.5 Ibs
(0.5-0.7 kg) 50-60 325°F (160°C) 185°F (85°C)
*Do not stuff poultry when convection roasting.
400°F (200°C) 185°F (85°C)
C,onvec/ e ' B }ng
Convection broil symbol
During convection broiling the broil elements will cycle on and off
in intervals to maintain oven temperature, while the fan constantly
circulates the hot air.
Cooking times will vary depending on the rack position and
temperature and may need to be adjusted.
The oven door must be kept closed during the cooking cycle.
Before convection broiling, see the "Low and High Broiling"
section for general broiling guidelines and rack positioning.
To Convection Broil:
1. Close the oven door.
2. Turn the Oven control knob to the Convection Broil symbol.
3. Turn the Temperature control knob to the desired
temperature.
4. Press OK.
5. Turn both control knobs to OFF when finished cooking.
Special functions symbol
Special functions available are the Keep Warm and Pizza
functions.
To Use:
1. Turn the oven control knob to the Special Functions symbol.
The arrow indicator directly below the Special Functions
symbol will light up.
2. Turn the temperature control knob to a Special function (see
the following).
KeepWarm
Food Poisoning Hazard
Do not let food sit in oven more than one hour before
or after cooking.
Doing so can result in food poisoning or sickness.
IMPORTANT: The Keep Warm function allows hot cooked foods
to stay warm before serving.
D
Keep warm symbol
The Keep Warm function maintains a constant temperature of
175°F (80°C) in the oven.
To Use:
1. Turn the temperature control knob to the Keep Warm symbol.
2. Press OK to turn oven on.
3. When the temperature reaches 175°F (80°C), the arrow
indicator above the temperature symbol (°F/°C) turns off, a
signal sounds, and an operating time of 5 minutes (preset by
the manufacturer) blinks on the display.
4. Place the food in the oven.
5. Use the "+" (plus) or "-" (minus) buttons to change the preset
time.
6. Press OK. The arrow indicator above the temperature symbol
(°F/°C) will light.
7. Once the set time has elapsed, the oven switches off, a signal
sounds, and "END" appears on the display. The arrow
indicator above the temperature symbol (°F/°C) will turn off.
11
Pizza
@
Pizzasymbol
The Pizza function operates at a fixed temperature of
500°F (250°C) and is ideal for baking handmade (nonfrozen)
pizzas using fresh dough.
During cooking, the bake and broil elements will cycle on and off
in intervals to maintain oven temperature.
To Use:
1. Turn the temperature control knob to the Pizza symbol.
2. Press OK to turn on the oven.
3. When the temperature reaches 500°F (250°C), the arrow
indicator above the temperature symbol (°F/°C) turns off, a
signal sounds, and an operating time of 12 minutes (preset by
the manufacturer) blinks on the display.
4. Place the food in the oven.
5. Use the '%" (plus) or "-" (minus) buttons to change the preset
time.
6. Press OK. The arrow indicator above the temperature symbol
(°F/°C) will light.
7. Once the set time has elapsed, the oven switches off, a signal
sounds, and "END" appears on the display. The arrow
indicator above the temperature symbol (°F/°C) will turn off.
Fan only symbol
The Fan Only function uses the convection fan to circulate room
temperature air only in the oven cavity.
1. Close the oven door.
2. Turn the Oven control knob to the Fan Only symbol.
3. Press OK.
NOTE: A temperature setting of 175°F/80°C will appear in the
display. Disregard this setting as the Fan Only function uses
only room temperature air to defrost.
Food Poisoning Hazard
Do not let food sit in oven more than one hour before
or after cooking.
Doing so can result in food poisoning or sickness.
Timed Cooking (available with any function, except for the
special functions) allows the oven(s) to be set to turn on at a
certain time of day, cook for a set length of time, and/or shut off
automatically. Timed Cooking can be programmed for up to a
maximum of 6 hours.
To Use:
1. Set the function and the temperature. See the "Clock Time
and Temperature Mode" section steps 1-3.
2. Press SET button. The arrow indicator above the Timer
symbol will light up.
3. Use the '%" (plus) or "-" (minus) buttons to select the
desired cooking time. Cooking time must be changed
within 8 minutes.
4. Press OK. The oven switches on, and the display will indicate
the remaining cooking time.
5. To change the temperature setting, turn the Temperature
control knob. After a delay of 5 seconds, the remaining
cooking time will be displayed.
To Set a Delayed Timed Cook
Use this function to preset the cooking time stop time. A stop
time can be programmed out to a maximum of 23 hours and
59 minutes.
Selecting the end of cooking time:
1. Set the function and the temperature. See the "Clock Time
and Temperature Mode" section steps 1-3.
2. Press SET button. The arrow indicator above the Timer
symbol will light up.
3. Use the "+" (plus) or "-" (minus) buttons to select the desired
cooking time. Cooking time must be changed within
8 minutes.
4. Press SET again to set the end of cooking time. The arrow
indicator above the End of cooking time symbol will light up.
5. Set the end of cooking time using the "+" or "-" buttons.
6. Press OK to confirm the cooking time and the end of cooking
time.
The oven will turn on automatically at the end of cooking time
minus cooking time. The arrow indicators above the Cooking
time and End of cooking time symbols will light up.
Appearance of "END" on the display:
Once the set time has elapsed, a signal will sound and "END"
appears on the display. The oven will switch off automatically.
To change the cooking time, use the %" or "-" buttons. See the
"Clock Time and Temperature Mode" section.
1. Turn knob to "0." The time of day appears again on the
display.
2. To increase the cooking time, use the "+" or "-" buttons.
12
OVEN CARE
Geeq C
IMPORTANT: Before cleaning, make sure all controls are off and
the oven is cool. Always follow label instructions on cleaning
products.
Soap, water and a soft cloth or sponge are suggested first unless
otherwise noted.
Do not use water pressure cleaners or steam cleaners.
STAINLESS STEEL (on some models)
Cleaning Method:
To clean the oven cavity surfaces, remove the rack guides
and continuous-clean panels:
Lift the rack guides up to remove from the bottom retaining
holes. The rack guides and continuous-clean panels will drop
down out of the top retaining holes to allow removal.
To avoid damage to stainless steel surfaces, do not use soap-
filled scouring pads, abrasive cleaners, Cooktop Cleaner, steel-
wool pads, gritty washcloths or abrasive paper towels.
Cleaning Method:
Rub in direction of grain to avoid damaging.
Stainless Steel Cleaner and Polish Part Number 31462 (not
included):
See "Assistance or Service" section to order.
Liquid detergent or all-purpose cleaner:
Rinse with clean water and dry with soft, lint-free cloth.
OVEN DOOR EXTERIOR
Slight differences in color on the front of the oven are determined
by the different materials used, such as glass, plastic and metal.
Cleaning Method:
Clean with a damp cloth. If the exterior is heavily soiled, add a
few drops of liquid detergent to the water. Wipe with a dry
cloth.
Do not use corrosive or abrasive cleaners, which dull the
surface. In the event that one of these products comes into
contact with the oven, immediately clean it using a damp
cloth.
OVEN CAVITY
Food spills should be cleaned when oven cools. To avoid
buildup of baked-on food residue, clean the oven cavity after
every use.
With long cooking times or when cooking on different levels,
especially food with a high water content (pizzas, stuffed
vegetables, etc.) moisture may form on the inside of the door
and the seal. When the oven is cool, dry the inside of the door
with a cloth or sponge.
Clean the glass of the door with a suitable liquid detergent.
For easier cleaning, the oven door may be removed.
To clean oven cavity surfaces:
To avoid damage to oven cavity surfaces, do not use soap-filled
scouring pads or abrasive cleaners.
Use oven cleaner and follow product label instructions.
To clean continuous-clean side and rear panels:
IMPORTANT: Do not clean the continuous-clean panels and rear
cavity with abrasive products, rough brushes, scouring pads, or
oven cleaner sprays, as they will lose their cleaning properties.
Cleaning Method:
1. Check that the oven is empty. Remove all cookware,
bakeware and oven racks and any foil from the oven.
2. Heat the oven to 400°F (200°C) and maintain this temperature
for about an hour.
3. When the cycle is complete and the oven has cooled, use a
damp sponge to remove any food residues.
MEAT PROBE (on some models)
Remove the meat probe connector jack from the meat probe
socket and clean with a wet sponge.
If the meat probe is used only occasionally, remove batteries
when not in use.
Overs
The oven light is a 25-watt bulb. It will come on when the oven is
operating in any cooking mode.
To Replace:
Before replacing, make sure the oven is off and cool.
1. Disconnect power.
2. Turn the glass bulb cover in the back of the oven
counterclockwise to remove.
3. Turn bulb counterclockwise to remove from socket.
4. Replace bulb and bulb cover by turning clockwise.
5. Reconnect power.
13
Oven Doo
For normal oven use, it is not suggested to remove the oven door.
However, if removal is necessary, make sure the oven is off and
cool. Then, follow these instructions. The oven door is heavy.
To Replace:
1. Insert both hanger arms into the door.
To Remove:
1. Open oven door all the way.
2. Flip up the hinge latch on each side.
3.
4.
Close the oven door as far as it will shut.
Lift the oven door while holding both sides.
Continue to push the oven door closed and pull it away from
the oven door frame.
2. Open the oven door.
You should hear a "click" as the door is set into place.
3. Move the hinge levers back to the locked position. Check
that the door is free to open and close. If it is not, repeat the
removal and installation procedures.
TROUBLESHOOTING
Try the solutions suggested here first in order to avoid the cost ofan unnecessaryservice call.
Nothing will operate Oven cooking results not what expected
Has a household fuse blown, or has a circuit breaker
tripped?
Replace the fuse or reset the circuit breaker. If the problem
continues, call an electrician.
Is the oven wired properly?
See Installation Instructions.
Oven will not operate
Is the oven control set correctly?
See "Electronic Oven Control" section.
Cooling fan runs during baking or broiling
It is normal for the fan to automatically run while the oven is in
use to cool the control.
Display shows message
Is the display showing "12:00?"
There has been a power failure. Clear the display. See
"Display(s)" section. Set the clock, if needed. See "Clock Time
and Temperature Mode" section.
Is the oven level?
Level the oven. See the Installation Instructions.
Is the proper temperature set?
Increase or decrease temperature.
Was the oven preheated?
Wait for oven to preheat before placing food in oven.
Is the proper bakeware being used?
See "Bakeware" section.
Are the racks positioned properly?
See "Positioning Racks and Bakeware" section.
Is there proper air circulation around bakeware?
See "Positioning Racks and Bakeware" section.
Is the batter evenly distributed in the pan?
Check that batter is level in the pan.
Is the proper length of time being used?
Increase or decrease baking or broiling time.
Has the oven door been opened while cooking?
Oven peeking releases oven heat and can result in longer
cooking times.
Are baked items too brown on the bottom?
Move rack to higher position in the oven.
or
Decrease the oven temperature.
Are pie crust edges browning early?
Use aluminum foil to cover the edge of the crust and/or
reduce baking temperature.
14
ASSISTANCEOR SERVICE
Before calling for assistance or service, please check
"Troubleshooting." It may save you the cost of a service call. If
you still need help, follow the instructions below.
When calling, please know the purchase date and the complete
model and serial number of your appliance. This information will
help us to better respond to your request.
If you need replacement parts
If you need to order replacement parts, we recommend that you
use only factory specified parts. Factory specified parts will fit
right and work right because they are made with the same
precision used to build every new IKEA® appliance.
To locate factory specified parts in your area, call us or your
nearest designated service center.
Call the Whirlpool Customer eXperience Center
toll free: 1-800-253-1301.
Our consultants provide assistance with:
Features and specifications on our full line of appliances.
Installation information.
Use and maintenance procedures.
Accessory and repair parts sales.
Specialized customer assistance (Spanish speaking, hearing
impaired, limited vision, etc.).
Referrals to local dealers, repair parts distributors and service
companies. Whirlpool designated service technicians are
trained to fulfill the product warranty and provide after-
warranty service, anywhere in the United States.
To locate the Whirlpool designated service company in your
area, you can also look in your telephone directory Yellow
Pages.
For further assistance
If you need further assistance, you can write to Whirlpool
Corporation with any questions or concerns at:
Whirlpool Brand Home Appliances
Customer eXperience Center
553 Benson Road
Benton Harbor, MI 49022-2692
Accessories U.S.A.
To order accessories, call the Whirlpool Customer eXperience
Center toll free at 1-800-442-9991 and follow the menu prompts.
Or visit our website at www.whirlpool.com and click on "Parts &
Accessories."
Broiler Pan and Grid
Order Part Number 4396923
Stainless Steel Cleaner and Polish
(stainless steel models)
Order Part Number 31462
All-Purpose Appliance Cleaner
Order Part Number 31682
Call the Whirlpool Canada LP Customer eXperience Centre toll
free: 1-800-807-6777.
Our consultants provide assistance with:
Features and specifications on our full line of appliances.
Use and maintenance procedures.
Accessory and repair parts sales.
Referrals to local dealers, repair parts distributors, and
service companies. Whirlpool Canada LP designated service
technicians are trained to fulfill the product warranty and
provide after-warranty service, anywhere in Canada.
For further assistance
If you need further assistance, you can write to Whirlpool
Canada LP with any questions or concerns at:
Customer eXperience Centre
Whirlpool Canada LP
1901 Minnesota Court
Mississauga, Ontario L5N 3A7
Please include a daytime phone number in your correspondence.
15
WHIRLPOOLCORPORATIONMAJOR APPLIANCEWARRANTY
LIMITED WARRANTY
For one year from the date of purchase, when this major appliance is operated and maintained according to instructions attached to or
furnished with the product, Whirlpool Corporation or Whirlpool Canada LP (hereafter "Whirlpool") will pay for Factory Specified Parts
and repair labor to correct defects in materials or workmanship. Service must be provided by a Whirlpool designated service company.
This limited warranty is valid only in the United States or Canada and applies only when the major appliance is used in the country in
which it was purchased. Outside the 50 United States and Canada, this limited warranty does not apply. Proof of original purchase date
is required to obtain service under this limited warranty.
ITEMS EXCLUDED FROM WARRANTY
This limited warranty does not cover:
1. Service calls to correct the installation of your major appliance, to instruct you on how to use your major appliance, to replace or
repair house fuses, or to correct house wiring or plumbing.
2. Service calls to repair or replace appliance light bulbs, air filters or water filters. Consumable parts are excluded from warranty
coverage.
3. Repairs when your major appliance is used for other than normal, single-family household use or when it is used in a manner that is
contrary to published user or operator instructions and/or installation instructions.
4. Damage resulting from accident, alteration, misuse, abuse, fire, flood, acts of God, improper installation, installation not in
accordance with electrical or plumbing codes, or use of consumables or cleaning products not approved by Whirlpool.
5. Cosmetic damage, including scratches, dents, chips or other damage to the finish of your major appliance, unless such damage
results from defects in materials or workmanship and is reported to Whirlpool within 30 days from the date of purchase.
6. Any food loss due to refrigerator or freezer product failures.
7. Costs associated with the removal from your home of your major appliance for repairs. This major appliance is designed to be
repaired in the home and only in-home service is covered by this warranty.
8. Repairs to parts or systems resulting from unauthorized modifications made to the appliance.
9. Expenses for travel and transportation for product service if your major appliance is located in a remote area where service by an
authorized Whirlpool servicer is not available.
10. The removal and reinstallation of your major appliance if it is installed in an inaccessible location or is not installed in accordance
with published installation instructions.
11. Major appliances with original model/serial numbers that have been removed, altered or cannot be easily determined. This warranty
is void if the factory applied serial number has been altered or removed from your major appliance.
The cost of repair or replacement under these excluded circumstances shall be borne by the customer.
DISCLAIMER OF IMPLIED WARRANTIES; LIMITATION OF REMEDIES
CUSTOMER'S SOLE AND EXCLUSIVE REMEDY UNDER THIS LIMITED WARRANTY SHALL BE PRODUCT REPAIR AS PROVIDED
HEREIN. IMPLIED WARRANTIES, INCLUDING WARRANTIES OF MERCHANTABILITY OR FITNESS FOR A PARTICULAR PURPOSE,
ARE LIMITED TO ONE YEAR OR THE SHORTEST PERIOD ALLOWED BY LAW. WHIRLPOOL SHALL NOT BE LIABLE FOR
INCIDENTAL OR CONSEQUENTIAL DAMAGES. SOME STATES AND PROVINCES DO NOT ALLOW THE EXCLUSION OR LIMITATION
OF INCIDENTAL OR CONSEQUENTIAL DAMAGES, OR LIMITATIONS ON THE DURATION OF IMPLIED WARRANTIES OF
MERCHANTABILITY OR FITNESS, SO THESE EXCLUSIONS OR LIMITATIONS MAY NOT APPLY TO YOU. THIS WARRANTY GIVES
YOU SPECIFIC LEGAL RIGHTS, AND YOU MAY ALSO HAVE OTHER RIGHTS WHICH VARY FROM STATE TO STATE OR PROVINCE
TO PROVINCE.
If outside the 50 United States and Canada, contact your authorized Whirlpool dealer to determine if another warranty applies.
If you need service, first see the "Troubleshooting" section of the Use & Care Guide. After checking "Troubleshooting," you may find
additional help by checking the "Assistance or Service" section or by calling Whirlpool. In the U.S.A., call 1-800-253-1301. In Canada,
call 1-800-807-6777. 9/07
Keep this book and your sales slip together for future
reference. You must provide proof of purchase or installation
date for in-warranty service.
Write down the following information about your major appliance
to better help you obtain assistance or service if you ever need it.
You will need to know your complete model number and serial
number. You can find this information on the model and serial
number label located on the product.
Dealer name
Address
Phone number
Model number
Serial number
Purchase date
16
501961002007A
© 2008.
All rights reserved.
Tous droits reserves.
® IKEA is a registered trademark of Inter-lkea Systems B.V.
® IKEA est une marque deposee de Inter-lkea Systems B.V.
10/08
Printed in Italy
Imprime en Italie
  • Page 1 1
  • Page 2 2
  • Page 3 3
  • Page 4 4
  • Page 5 5
  • Page 6 6
  • Page 7 7
  • Page 8 8
  • Page 9 9
  • Page 10 10
  • Page 11 11
  • Page 12 12
  • Page 13 13
  • Page 14 14
  • Page 15 15
  • Page 16 16
  • Page 17 17
  • Page 18 18
  • Page 19 19
  • Page 20 20
  • Page 21 21
  • Page 22 22
  • Page 23 23
  • Page 24 24
  • Page 25 25
  • Page 26 26
  • Page 27 27
  • Page 28 28
  • Page 29 29
  • Page 30 30
  • Page 31 31
  • Page 32 32

IKEA IBS550P Owner's manual

Category
Cookers
Type
Owner's manual
This manual is also suitable for

Ask a question and I''ll find the answer in the document

Finding information in a document is now easier with AI

in other languages