Page is loading ...

Manuel d’installation et d’utilisation de l’appareil
Manual de intalação e utilização do aparelho
User installation and operation manual
Manual de instalación y uso del aparato
TURBO TIME
TURBO TIME PLUS
CERTIFICAT DE GARANTIE / CERTIFICADO DE GARANTIA
WARRANTY CERTIFICATE / CERTIFICADO DE GARANTIA
Avant d’installer et d’utiliser l’appareil, lisez attentivement le livret d’instructions
Antes de instalar e utilizar o aparelho leia cuidadosamente o manual de instruções
Before installing and use of the appliance please read carefully the instruction book
Antes de instalar y usar el aparato lea cuidadosamente el manual de instrucciones
COD.: kg.
N.:


FRANÇAIS 5
INSTALLATION ET MONTAGE 6 - 11
UTILISATION DE L’APPAREIL ET CONSEILS PRATIQUES 12 - 22
ENTRETIEN ET NETTOYAGE DE L’APPAREIL 23 - 25
SÉCURITÉ ET RÉSOLUTION DE PROBLÈMES 26 - 28
AVERTISSEMENTS CONCERNANT L’ENVIRONNEMENT 29
PORTUGUÊS 31
INSTALAÇÃO E MONTAGEM 32 - 37
UTILIZAÇÃO DA MÁQUINA E CONSELHOS PRÁTICOS 38 - 48
MANUTENÇÃO E LIMPEZA DA MÁQUINA 49 - 51
SEGURANÇA E SOLUÇÃO DE PROBLEMAS 52 - 54
ADVERTÊNCIAS SOBRE O MEIO AMBIENTE 55
ENGLISH 57
INSTALLATION AND ASSEMBLY 58 - 63
HOW TO USE THE MACHINE. PRACTICAL TIPS 64 - 74
MAINTAINING AND CLEANING THE MACHINE 75 - 77
SAFETY AND TROUBLESHOOTING 78 - 80
ENVIRONMENTAL ADVICE 81
ESPAÑOL 83
INSTALACIÓN Y MONTAJE 84 - 89
USO DEL APARATO Y CONSEJOS PRÁCTICOS 90 - 100
MANTENIMIENTO Y LIMPIEZA DEL APARATO 101 - 103
SEGURIDAD Y SOLUCIÓN DE PROBLEMAS 104 - 106
ADVERTENCIAS SOBRE EL MEDIO AMBIENTE 107
INDEX / ÍNDICE / CONTENTS / INDICE


LAVE-LINGE
INSTALLATION ET MONTAGE
1
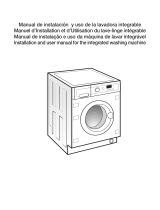
DÉBALLAGE ET DÉBLOCAGE DU LAVE-LINGE
DÉBALLAGE
DÉBLOCAGE
IMPORTANT
a Dévisser les vis qui
fixent les plaques
en plastique à la
parte arrière de la
machine à laver.
b Dévisser les 3 vis
de blocage et reti-
rez-les.
c Couvrez les trous
avec les plaques
en plastique retiré-
es au préalable.
Conserver les vis de blocage en prévision d’un déplacement ultérieur.
a/c
b

Coton/Lin Lavage normal, rinçages,
1 Normal froid Froid couleurs délicates OUI 5/6* absorption automatique d’additifs si
0,15/46 0,15/49
58 0,10/49 50
très peu sale souhaités et essorage final long
Coton/Lin Lavage COURT, rinçages,
2 Rapide 30ºC blano/couleur OUI NON OUI 1.5 absorption automatique d’additifs si
0,20/25 0,20/30
30 0,20/30 30
très peu sale souhaités et essorage final long
Coton/Lin
3 Normal 30ºC couleurs délicates OUI 5/6*
0,35/46 0,40/49
82 0,20/49 52
peu sale
Coton/Lin
4 Normal 40ºC couleurs solides OUI 5/6* Lavage normal, rinçages,
0,60/46 0,65/49
87 0,50/49 57
peu sale absorption automatique
Coton/Lin
d’additifs si souhaités et
5 (*) Normal 60ºC couleurs solides OUI 5/6*
essorage final long
A: 0,95/46
1,02/49
102 1,02/49 70
saleté normale
A
+
: 0,85/46
Coton/Lin
6 Normal 90ºC blanc OUI 5/6*
1,60/51 1,90/55
110 1,90/49 105
très sale
Coton/Lin Prélavage, lavage normal, rinçages,
7 Prélavage 60ºC blanc/couleurs solides OUI 5/6* absorption automatique d’additifs si
1,40/55 1,45/60
110 1,40/49 95
très sale souhaités et essorage final long
PROGRAMME
TEMPÉRATURE
CONSEILLÉE
Rinçage extra
Lavage intensif
Repassage
facile
Sélection
essorage
Élimine
l’essorage
Antifroissage
COMPARTI-
MENT
PRODUITS DE
LAVAGE
TOUCHES DES OPTIONS POSSIBLES
30
30
40
60
90
60
TYPE DE TISSU
DESCRIPTION
DU PROGRAMME
CHARGE
DE
LINGE
MÁX.
(KG)
TURBO TIME
6 Kg
5 Kg
Consommation
totale KWh/litres
Dureé
approx.
(minutes)
Consommation
totale
KWh/litres
Dureé
approx.
(minutes)
TURBO TIMES PLUS

Synthétique/coton mé-
8 Délicat froid Froid langé couleurs délicates OUI 3
0,15/50 0,15/55
50 0,10/49 50
très peu sale
Synthétique/coton mé-
9 Délicat 30ºC langé couleurs délicates OUI 3 Lavage délicat, rinçages,
0,35/50 0,35/55
55 0,20/49 50
peu sale absorption automatique
Synthétique/coton mé-
d’additifs si souhaités et
10 Délicat 40ºC langé couleurs délicates OUI 3
essorage final doux
0,55/50 0,60/55
60 0,40/49 55
saleté normale
Synthétique/coton
11 Délicat 60ºC mélangé blanc/couleurs OUI 3
0,95/50 1,00/55
70 0,90/49 70
solides saleté normale
Laine/laine mélangée
12 Laine froid LAINE froid blanc/couleur OUI NON OUI 1
Lavage de LAINE, rinçages,
0,05/60 0,05/60
30 0,05/52 35
très peu sale
absorption automatique
Laine/laine mélangée
d’additifs si souhaités et
13 Laine 35ºC LAINE 35 blanc/couleur OUI NON OUI 1
essorage final doux
0,45/60 0,50/60
40 0,40/52 45
peu sale
Coton/coton mélangé Rinçages, absorption automatique
14 Rinçages — synthétique/délicat OUI NON OUI 5/6* d’additifs si souhaités et
0,05/25 0,05/30
25 0,05/30 20
laine/laine mélangée essorage final long
Coton/coton mélangé
15 Essorage — synthétique/délicat NON OUI NON 5/6* — Vidange et essorage final long
0,05/0 0,05/0
10 0,05/0 10
laine/laine mélangée
Coton/coton mélangé Vidange et fin du programme.
16 Vidange/Fin — synthétique/délicat NON 5/6* — Amène le programme à la
0,00/0 0,00/0
2 0,00/0 2
laine/laine mélangée la position finale
* Vérifier si le lave-linge est de 5 ou 6 kg de charge maximale sur le bon de garantie qui figure en couverture de cette notice. Vérifier si le lave-linge est Turbo Time ou Turbo Time Plus sur le bandeau de commandes de la machine.
* Programme d'évaluation du lavage et de la consommation d'énergie selon la norme EN60456 en pressant la touche de lavage intensif.
NOTA: Les consommations de KWh et litres, ainsi que la durée des programmes, sont pour les cas de charge maximale et peuvent varier en fonction du type et de la quantité de linge, de la pression de l'eau du réseau, etc.
17
Français
PROGRAMME
TEMPÉRATURE
CONSEILLÉE
TYPE DE TISSU
Rinçage extra
Lavage intensif
Repassage
facile
Sélection
essorage
Élimine
l’essorage
Antifroissage
CHARGE
DE
LINGE
MÁX.
(KG)
COMPARTI-
MENT
PRODUITS DE
LAVAGE
DESCRIPTION
DU PROGRAMME
TOUCHES DES OPTIONS POSSIBLES
60
40
40
30
30
TURBO TIME
6 Kg
5 Kg
Consommation
totale KWh/litres
Dureé
approx.
(minutes)
Consommation
totale
KWh/litres
Dureé
approx.
(minutes)
TURBO TIMES PLUS


MÁQUINA DE LAVAR
INSTALAÇÃO E MONTAGEM
1
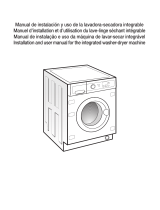
DESEMBALAGEM E DESBLOQUEIO DA MÁQUINA DE LAVAR
DESEMBALAGEM
DESBLOQUEIO
IMPORTANTE
a Solte os parafusos
que sujeitam as
placas de plástico
à parte posterior da
máquina de lavar.
b Solte os 3 parafu-
sos de bloqueio e
retire-os.
c Cubra os orifícios
com as placas de
plástico anterior-
mente retiradas.
Guarde os parafusos de bloqueio para uma eventual mudança.
a/c
b

37
Português
7
LIMPEZA PRÉVIA
6
INSTALAÇÃO DA MÁQUINA DE LAVAR POR BAIXO DA
BANCADA
Agora que já instalou
satisfatoriamente a
máquina de lavar, acon-
selhamos que ponha
em funcionamento o
programa 5 a 60ºC, sem
roupa nem detergente.
Isto serve para com-
provar a instalação, as
conexões e o escoa-
mento, além de limpar
completamente o inte-
rior antes de implemen-
tar um programa de
lavagem na máquina
de lavar.
Também há a possibili-
dade de colocar a
máquina de lavar por
baixo da bancada
Se necessitar mudar o
tampo da máquina de
lavar, peça a chapa de
protecção ao Serviço
de Assistência Técnica,
e siga estes passos:
a Desmonte o tampo
da sua máquina de
lavar soltando os
parafusos laterais e
empurre ligeiramen-
te o tampo para trás
para poder retirá-lo.
b Retire as peças de
sujeição do tampo
soltando os parafu-
sos.
c Coloque e aparafuse
a chapa de pro-
tecção à máquina de
lavar para poder
introduzi-la no lugar
desejado.
Seleccione
o programa 5 a 60ºC
Pulse a tecla de
Ligar /Desligar
a b
c

Algodão/linho
Lavagem normal, enxaguamentos,
1 Normal frio Frio cores delicadas SIM 5/6*
absorção automática de aditivos caso
0,15/46 0,15/49
58 0,10/49 50
sujidade muito leve
desejar e centrifugação final longa
Algodão/linho
Lavagem CURTA, enxaguamentos,
2 Rápido 30ºC branco/cor SIM NÃO SIM 1.5
absorção automática de aditivos caso
0,20/25 0,20/30
30 0,20/30 30
sujidade muito leve
desejar e centrifugação final longa
Algodão/linho
3 Normal 30ºC cores delicadas SIM 5/6*
0,35/46 0,40/49
82 0,20/49 52
sujidade leve
Algodão/linho
4 Normal 40ºC cores sólidas SIM 5/6*
Lavagem normal, enxaguamentos,
0,60/46 0,65/49
87 0,50/49 57
sujidade leve
absorção automática de
Algodão/linho
aditivos caso desejar e
5 (*) Normal 60ºC cores sólidas SIM 5/6*
cetrififugaç o final longa
A: 0,95/46
1,02/49
102 1,02/49 70
sujidade normal
A
+
: 0,85/46
Algodão/linho
6 Normal 90ºC branco SIM 5/6*
1,60/51 1,90/55
110 1,90/49 105
sujidade forte
Algodão/linho
Pré-lavagem, lavagem normal, enxaguamentos,
7
Pré-lavagem 60ºC
branco/cores sólidas SIM 5/6*
absorção automática de aditivos caso
1,40/55 1,45/60
110 1,40/49 95
sujidade forte
desejar e centrifugação final longa
PROGRAMA
TEMPERATURA
ACONSELHADA
TIPO DE TEGIDO
Enxaguamento
extra
Lavagem
intensiva
Fácil
engomagem
Selecção
centrifuga
ção
Elimina
centrifugação
Anti-rrugas
CARGA
DE
ROUPA
MAX.
(KG)
COMPARTI-
MENTO
PRODUTOS
DE LAVAGEM
DESCRIÇÃO
DO PROGRAMA
TECLAS DE OPÇÕES POSSÍVEIS
30
30
40
60
90
60
TURBO TIME
6 Kg
5 Kg
Consumo
total KWh/litros
Dura
çã
o
aprox.
(minutos)
Consumo
total
KWh/litros
Dura
çã
o
aprox.
(minutos)
TURBO TIMES PLUS

43
Português
Sintético/mistura
8 Delicado frio Frío algodão cores delicadas SIM 3
0,15/50 0,15/55
50 0,10/49 50
sujidade muito leve
Sintético/mistura
9 Delicado 30ºC algodão cores delicadas SIM 3 Lavagem delicada, enxaguamentos,
0,35/50 0,35/55
55 0,20/49 50
sujidade leve absorção automática de
Sintético/mistura
aditivos caso desejar
10 Delicado 40ºC algodão cores delicadas SIM 3
centrifugação final suave
0,55/50 0,60/55
60 0,40/49 55
sujidade normal
Sintético/mistura
11 Delicado 60ºC
algodão branco/cores sólidas
SIM 3
0,95/50 1,00/55
70 0,90/49 70
sujidade normal
Lã/mistura
12 Lã frio LÃ frio lã branco/cor SIM NÃO SIM 1
Lavagem de LÃ, enxaguamentos,
0,05/60 0,05/60
30 0,05/52 35
sujidade muito leve
absorção automática de
Lã/mistura
aditivos caso desejar e
13 Lã 35ºC LÃ 35 lã branco/cor SIM NÃO SIM 1
centrifugação final suave
0,45/60 0,50/60
40 0,40/52 45
sujidade leve
Algodão/mistura algodão
Enxaguamentos, absorção automática
14 Enxaguamentos — Sintético/delicado SIM NÃO SIM 5/6* de aditivos caso desejar e
0,05/25 0,05/30
25 0,05/30 20
Lã/mistura de lã centrifugação final longa
Algodão/mistura algodão
15 Centrifugação — Sintético/delicado NÃO SIM NÃO 5/6* — Hidroextracção e centrifugação
0,05/0 0,05/0
10 0,05/0 10
Lã/mistura de lã final longa
Algodão/mistura algodão Hidroextracção e fim do programa.
16
Hidroextração/fim
— Sintético/delicado NÃO 5/6* — Leva o programa à
0,00/0 0,00/0
2 0,00/0 2
Lã/mistura de lã posição final
* Verifique se a sua máquina de lavar roupa é de 5 ou 6 kg de carga máxima no certificado de garantia que aparece na capa deste manual. Comprove se a máquina de lavar é Turbo Time ou Turbo Time Plus no porta-comandos
da sua própria máquina de lavar. Programa para valorização da lavagem e consumo de energia de acordo com a norma EN60456, accionando a tecla de lavagem intensiva.
NOTA: Os consumos de kWh e litros, assim como a duração dos programas, são para o caso de carga máxima, podendo variar em função do tipo e quantidade de roupa, pressão da rede de água, etc.
PROGRAMA
TEMPERATURA
ACONSELHADA
TIPO DE TEGIDO
Enxaguamento
extra
Lavagem
intensiva
Fácil
engomagem
Selecção
centrifuga
ção
Elimina
centrifugação
Anti-rrugas
CARGA
DE
ROUPA
MAX.
(KG)
COMPARTI-
MENTO
PRODUTOS
DE LAVAGEM
DESCRIÇÃO
DO PROGRAMA
TECLAS DE OPÇÕES POSSÍVEIS
60
40
40
30
30
TURBO TIME
6 Kg
5 Kg
Consumo
total KWh/litros
Dura
çã
o
aprox.
(minutos)
Consumo
total
KWh/litros
Dura
çã
o
aprox.
(minutos)
TURBO TIMES PLUS


The Guarantee is a separate, additional guarantee which does not affect the consumer’s legal rights and is specifically
issued for the customer and appliance referred to in this document.
The Guarantee is valid for two years from the date of receipt of the appliance, and covers all repairs which may be
carried out by Official Technical Assistance Service.
EXCLUSIONS FROM THIS GUARANTEE.
The following are excluded from this Guarantee. In these cases the total repair cost will correspond to the user:
a) Breakdown caused by negligence or improper use of the appliance by the consumer.
b) Breakdown caused by unforeseeable circumstances, force majeure (atmospheric or geological conditions) or
natural disaster.
c) Breakdown or damage arising from improper or illegal installation, or from the use of unsuitable energy or fuel.
d) Periodical maintenance operations carried out on the product.
e) Appliances used in commercial or industrial establishments.
f) Damages caused to the user as a result of the appliance’s failure to function due to breakdown.
CANCELLATION OF THIS GUARANTEE
This Guarantee shall be null and void and without effect if the appliance has been interfered with, modified or repaired
by any unauthorised person or technical service other than the brand’s official technical assistance service.
VERY IMPORTANT: TO BENEFIT FROM THIS GUARANTEE, IT IS ABSOLUTELY ESSENTIAL FOR THE USER TO
PROVIDE THE AUTHORISED TECHNICAL SERVICE WITH AN OFFICIAL RECEIPT GIVING EVIDENCE OF THE DATE
OF PURCHASE OF THE APPLIANCE. IN THE CASE OF APPLIANCES DELIVERED TO NEWLY CONSTRUCTED
PREMISES, EVIDENCE MUST BE PROVIDED OF THE DISPOSAL DATE FOR USE OF THE APPLIANCE.
This Guarantee shall only be valid within the E.U. and shall refer exclusively to the appliance referred to and supplied
by Fagor UK Lancastrian Office Center Ground Floor. Duck Worth House Talbot Road, Old Trafford M32 OEU
Manchester.For other countries, please consult your distributor.
GENERAL GUARANTEE CONDITIONS
2-YEAR GUARANTEE

WASHING MACHINE
INSTALLATION AND ASSEMBLY
1
UNPACKING AND UNLOCKING THE WASHING MACHINE
UNPACKING
UNLOCKING
IMPORTANT
a Loosen the
screws that hold
the plastic boards
at the back of the
machine.
b Loosen and remove
the blocking
screws.
c Cover the holes
with the previously
removed plastic
boards.
Keep the blocking screws safely for future use IÓN A LA WATER MAINS
a/c
b

59
English
2
CONNECTION TO THE WATER MAINSLEVELATION
3
LEVELLING
You will find the water-
input pipe inside the
drum:
a Connect the bent
end of the pipe at
the screw entrance
of the electrically
operated valve situa-
ted at the back of
the machine.
b Connect the other
end of the tube to
the water supply.
Tighten the connec-
tion nut well.
We recommend you
have a fixed drainage
exit at a distance of bet-
ween 50 and 70 cm
from the floor.
Ensure that the drainage
pipe is not too tight and
that there are no folds or
bottlenecks.
Level the washing
machine by using the
adjustable feet. This will
reduce the noise level
and ensure that the
machine will not move
when in operation.
max.
70 cm
min.
50 cm
IMPORTANT
It is important that the elbow of the pipe is properly fixed at the exit so that it doesn’t fall,
with the consequent risk of flooding.
If your washing machine has an input for hot water, connect the tube with the red threa-
ding to the hot water tap and to the electrically operated valve with the red filter.
a
b

Do not remove the
characteristics panel.
It contains important
information.
4
ELECTRICAL CONNECTION
5
PANELLING
Consult the characteris-
tics panel situated on
the porthole door of the
washing machine before
making the electrical
connections. Ensure that
the voltage available at
the base of the socket is
the same as the voltage
indicated on the panel.
It is easy
to change the coating
of the washing
machine panels
to match your kitchen
furniture. These coa-
ting panels may
not be thicker than 5
mm.
a Loosen the
screws of the hin-
ges and dismantle
the door of
the washing
machine.
b Remove the lower
protection frame,
loosening the
screws.
Extract the panel
that was supplied
with the washing
machine.
IMPORTANT
It is very important to earth the washing machine pro-
perly.
The electrical fittings, socket, plug, fuses or automatic
switch and meter must be scaled for the maximum
power indicated on the characteristics panel.
If the power cord is damaged, it must be replaced by one
with the same reference number, only available from an
authorised service centre.
b
c
a
c If the new panel is 3
mm. thick or more,
you will not need to
leave the original
panel. If it is less than
3 mm. thick, place it
over the panel origi-
nally supplied with the
washing machine.
In order to assemble the
door with the new decora-
tive panel, repeat the steps
given in points a, b, c.

61
English
It is also possible to
adjust the height of
the decorative
door in order to align
it with the rest of the
kitchen furniture and
fittings.
a Loosen the screws
of the hinges and
dismantle the door
of the washing
machine.
b Remove the lower
protection frame,
loosening the
screws and extract
the panel that was
supplied with the
washing machine.
c The lower part of
the door and the
lower protection
frame are divided
into 7x10 mm.
Sections. depen-
ding on your needs,
divide and adapt
the decorative
panel to the new
dimensions.
d Replace the deco-
rative panel and the
lower protection
frame and assem-
ble the door again.
a
c
c
c
b

Fagor washing machi-
nes also allow you to
change the direction in
which the door opens.
a Loosen the screws
of the hinges and
dismantle the door
of the washing
machine.
b Remove the lower
protection frame,
loosening the
screws. .
c Extract the panel
that was supplied
with the washing
machine and the
internal panel, loo-
sening the screws
that hold it together.
d Extract the hinges
and insert them on
the other side of the
door.
e Loosen the protecti-
ve cover on the
door and place it
on the opposite
side where the hin-
ges were.
f Replace the plate
again, the door
panel and the lower
protection frame.
Then hang the door
again.
g Extract the fastener
situated at the front
of the washing
machine unit, by loo-
sening the corres-
ponding screw. Now
place the fastener in
the spot where the
upper hinge used to
be
h Remove the protec-
tive buffer and
place it in the spot
where the lower
hinge used to be.
a
b
h i
c d
e
f g
e
i Hang the door by
lightly pushing and
inserting the hinges
in their new location.
Adjust the screws.

63
English
7
6
INSTALATION OF THE WASHING MACHINE UNDER THE
KITCHEN WORKTOP
Now that you have satis-
factorily installed your
washing machine, we
recommend that you run
programme 5 at 60ºC,
without inserting any
laundry or detergent.
This is in order to
check the installation,
the connections and
the drainage system,
as well as to fully clean
the inside before run-
ning a wash program-
me in the washing
machine.
It is possible to place
the washing machine
under the kitchen
worktop.
If you need to change
the worktop of the was-
hing machine, please
ask the Technical
Support Service, for the
guard plate and follow
these steps:
a Dismantle the work-
top of your washing
machine by loose-
ning the side screws
and lightly knocking
the worktop back-
ward in order to
extract it.
b Remove the fasteners
that hold the worktop
in place by loosening
the screws.
c Place and screw in
the guard plate on
the washing machine
in order that you may
introduce it in the
intended spot.
Select
programme 5 at 60ºC
Press the
On/ Off button
a b
c
PRIOR CLEANING
/