Page is loading ...

1
Party Cart Guide
For Model C08PC1
Preassembly Information
1. Read through the entire Assembly Instructions before
you begin.
2. Choose an area large enough to comfortably lay out all
parts and hardware with enough room to easily
maneuver.
3. Remove all components from the carton and use the
Part and Hardware Diagrams to ensure all items are
included and free of damage. If necessary, contact
Customer Service at the number above to order any
missing or replacement part before assembly.
Stop!
Missing a part? No need to go back to SAM'S CLUB!
SAM'S CLUB does not stock parts for this item at the Club, but our team is here to
help you. If you need parts, whether they are missing or damaged,
please call our Toll Free Help Line 1-800-933-0527.
Call us 8:30 AM to 5:00 PM Central Time, Monday through Friday.
! WARNING
This product contains one or more chemicals known to the State of California to cause cancer and birth
defects or other reproductive harm.

2
Limited Warranty
The manufacturer warrants to the original
consumer-purchaser that this product shall be
free from defects in workmanship and materials
under normal and reasonable use when
assembled and operated according to this
Instruction Manual from date of purchase as
follows:
One Year from Date of Purchase
The manufacturer will, at its option, refinish or
replace any product or part found to be defective
during the limited warranty period. There may be
a shipping charge. The manufacturer may require
you to return the part(s) claimed to be defective
for its inspection, freight or postage prepaid.
Contact our Customer Support Center as shown
below before returning any part(s).
The manufacturer will require reasonable proof
of purchase. We strongly recommend you
keep your sales receipt and register your Party
Cart. You can attach your receipt to this manual.
This limited warranty does not cover the cost of
any inconvenience or property damage due to
failure of the product and does not cover damage
due to misuse, abuse, alteration, improper or
failure to perform normal and routine
maintenance, discoloration, scratches, rust,
accident, damage arising out of transportation of
the product, or normal wear and tear. This
limited warranty will not apply to any Party Cart
used for commercial use.
This limited warranty is the sole warranty given
by the manufacturer and is in lieu of all other
warranties; express or implied, including implied
warranty of merchantability or fitness for a
particular purpose. Neither manufacturer dealers
nor the retail establishment selling this product
have any authority to make any warranties or to
promise remedies in addition to or inconsistent
with those stated above.
This limited warranty applies only to products
sold at retail, and is not transferable.
The manufacturer's maximum liability, in any
event, shall not exceed the purchase price of the
product paid by the original consumer-purchaser.
Some states do not allow the exclusion or
limitation of incidental or consequential
damages. Therefore, the above limitations or
exclusions may not apply to you. This warranty
gives you specific legal rights and may also have
other rights, which vary from state to state.
Customer Support Center
Thanks for purchasing our Member’s Mark ® Party Cart. We’re here to help you maximize your enjoyment
and appreciation of your new Party Cart. Please don’t hesitate to contact us should you have any questions
regarding assembly, performance, warranty, or accessories. We have a full line of replacement parts available.
Please have your model number ready before you contact us. We’re here to serve You!
• If you need assistance or to order parts: Call 1-800-933-0527, send a FAX to 1-847-252-1001, or email us
.
• Business hours: Monday through Friday; 8:30AM-5:00PM Central Time.
• Visit us on the web at: www.omahagrills.com
TO THE INSTALLER OR PERSON ASSEMBLYING THIS CART:
Leave this Guide with the consumer.
TO THE CONSUMER:
Retain this Guide for future reference.

3

4
WARNING
Always wear protective gloves when assembling your cart.
!

5
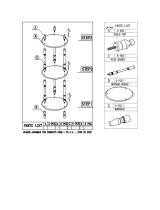
STEP 2
Turn the Cabinet Bottom Panel over and use 3pcs M4*10 (B) bolts to attach Cabinet Left Side
Panel (9) to the Cabinet Bottom Panel.
STEP 1
Place the Cabinet Bottom Panel (12) upside down and use 16pcs M6*16 (A) bolts to attach two
Locking Swivel Casters (16) and two Swivel Casters (17) to the cabinet bottom panel as shown.
Note that the Locking Casters go on the back of the panel.

6
STEP 3
Attach Cabinet Back Panel (8) and Cabinet Left Side Panel using 3pcs M4*10 (B) bolts as shown.
STEP 4
Attach Cabinet Back Panel and Cabinet Right Side Panel (10) using 3pcs M4*10 (B) bolts as
shown.

7
STEP 5
Attach Cabinet Back Panel and Cabinet Right Side Panel to the Cabinet Bottom Panel from inside
of the cabinet using 6pcs M4*10 (B) bolts as shown.
STEP 6
Attach Crossbar (11) to the lower holes of Cabinet Left Side Panel and Cabinet Right Side Panel
using 2pcs M4*10 (B) bolts as shown. Remove the washer and nut from the Brass Male Fitting (G).
Insert through the back of the cart and attach using the nut and washer as shown.

8
STEP 7
Attach Cabinet Door Right and Left Supports (D) to the Cabinet Left Side Panel and Cabinet Right
Side Panel using 4pcs M4*10 (B) bolts as shown.
STEP 8
Remove sinks from the Sink Frame Assembly (1).

9
STEP 9
Place Sink Frame Assembly onto the cabinet and use 9pcs M4*10 (B) bolts to attach Sink Frame
Assembly to the cabinet.
Note: Do not tighten all the bolts until you line up the holes of the Sink Frame with the
holes of the Cabinet.
STEP 10
Remove the large plastic nut from the stem of the Faucet Assembly (4). Insert the faucet through
the top of the cart and attach using the nut as shown.
! WARNING
We do not recommend usin
g
this faucet for drinkin
g
water.

10
STEP 11
Attach the Faucet Hose (13) to the bottom of the Faucet Assembly and to the end of the Brass
Male Fitting as shown.
STEP 12
Unscrew the tops from the bottoms of the two Drain Hose Connecters (32). Attach the connectors
to the sink as shown. Ensure the tops and bottoms of drain hose connecters are tight. Then insert
the two sinks into the Sink Frame Assembly.
Note: Tighten this bolt to prevent
any water leak.

11
STEP 13
Connect an end of each hose to the drain of each sink. Then hang the lower portion of the Drain
Hose (7) through the hose guide on the back panel of the cabinet as shown. Run the drain hose
out of the cabinet through the lower hole in the back of the cabinet.
STEP 14
Insert the Organizer Basket Support (14) into the Cabinet Bottom Panel as shown.

12
STEP 15
Slide the two Organizer Baskets (15) into the Organizer Basket Support as shown.
STEP 16
Attach Top Shelf Supports(R/L) (21) to the sink rear-top panel using 6pcs M4*10 (B) bolts as
shown.

13
STEP 17
Attach Top Shelf (23) to the Top Shelf Supports using 6pcs M4*10 bolts (B). Place the Top Shelf
Railing (22) on the Top Self ensuring its ends go into the appropriate holes in the Top Shelf.
STEP 18
Place Cutting Board (3) and Sink Cover Assembly (2) onto each sink as shown.

14
STEP 19
Screw Door Handles (18) to the Right and Left Doors (19 & 20) using 4pcs M4*6 (C) bolts as shown.
STEP 20
Place the bottom door pins into the door bottom supports on the Cabinet Bottom Panel and push
down on top pins to insert the doors into the cabinet as shown.

15
STEP 21
Place the three Batteries (F) into the battery box. Ensure all of them face the correct direction.
Then place the LED Spotlight (24) onto the bottom of the Top Shelf. You can move it to your
preferred position.
STEP 22
Hang the Bottle Rack (5) and Bottle Cap Catcher (6) on the four bolts screwed into the sink front
panel. Then secure them by tightening the bolts as shown.

16
STEP 23
Attach the Side Shelf Handle (26) to the Side Shelf (27) using 2pcs M6*16 (A) bolts.
STEP 24
Attach Side Shelf Front and Back Supports (25) to the Side Shelf using 4pcs M4*10 (B) bolts.

17
STEP 25
Loosen the two bolts shown on the right side of the Sink Frame Assembly leaving 1/4” extending
out to hang the Side Shelf Front and Back Supports over. Use 6pcs M6*16 (A) bolts to attach it to
the sink right side panel and tighten the original two top bolts.
STEP 26
Insert the 3 Condiment Pans (28) into the Side Shelf.

18
STEP 27
Attach Towel Bar Handle (30) to its Front and Back Supports (29) using 2 M4*10 (B) bolts.
STEP 28
Loosen the two bolts shown on the left side of the Sink Frame Assembly leaving 1/4” extending out
to hang the Towel Bar Handle Front and Back Supports over. Use 6pcs M6*16 (A) bolts to attach it
to the sink left side panel and tighten the original two top bolts.

19
STEP 29
Place the Serving Tray (31) onto the Towel Bar Handle as shown.
STEP 30
Remove any additional labels or packing material from the Party Cart.
Congratulations! Your Party Cart is now assembled and ready for use

20
Party Cart Use and Care Information
Feature Information
• Dual Sinks – may be used as traditional sinks or can be filled with ice to keep beverages or
foods chilled
• PVC Cutting Board – allows for food preparation without worry of scratching the cart surface.
Doubles as a cover for one sink to provide additional countertop space.
• Removable LED Spotlight with Adjustable Gooseneck – may be positioned on any magnetic
surface and aimed to provide light when and where you need it
• Removable Serving Tray – use as a means to help carry food and drinks to serve your guests
or move things from one place to another
• 3 Condiment Trays with Lids – keeps your condiments fresh. Clean with mild dish soap.
• Front Bottle Rack – holds bottles or other containers
• Bottle Cap Remover and Catcher – opens those “non-twist” bottles and conveniently catches
the caps as they come off
• Cabinet Storage with 2 Removable Organizer Baskets – helps to organize and transfer
necessities for outdoor entertaining while providing a hiding place for a wastebasket
Water Information
We recommend using a marine and/or camping hose to run water to the sink. These hoses are
drinking water safe and use nickel plated brass couplings for additional safety.
Stainless Steel Care
• Wash with a mild dish soap and warm water. Clean and polish with a stainless steel cleaner.
Always polish in the direction of the grain.
• Do not allow dirt and grease to accumulate.
• Never use steel wool as it will scratch the surface. Do not use abrasive cleaners and
scrubbers.
• Keep away from these substances which can damage stainless steel surfaces: pool
chemicals, lawn fertilizer, ice melting salt, sea or salt water, urine, bird droppings, and tree
sap. Immediately wash and dry should one or more come in contact with your Party Cart.
Caster Use
Ensure your Party Cart is located on a level surface.
Lock the locking casters by pressing or turning the locking lever on the casters counter
clockwise before use. Unlock by turning or pressing the locking lever on the casters
clockwise.
/